Whirlpool UXT5236BD Support and Manuals
Get Help and Manuals for this Whirlpool item

View All Support Options Below
Free Whirlpool UXT5236BD manuals!
Problems with Whirlpool UXT5236BD?
Ask a Question
Free Whirlpool UXT5236BD manuals!
Problems with Whirlpool UXT5236BD?
Ask a Question
Popular Whirlpool UXT5236BD Manual Pages
Installation Instructions - Page 1

...
Installation Instructions and Use & Care Guide
For questions about features, operation/performance, parts, accessories or service, call: 1-800-253-1301 or visit our website at www.whirlpool.com
In Canada, for assistance, installation and service, call 1-800-807-6777 or visit our website at www.whirlpool.ca
HOTTE D'ASPIRATION DE 30" (76,2 CM) ET 36" (91,4 CM)
Instructions d'installation et Guide...
Installation Instructions - Page 2
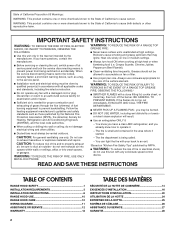
... accordance with all applicable codes and standards, including fire-rated construction.
■ Do not operate any fan with any solid-state speed control device.
READ AND SAVE THESE INSTRUCTIONS
TABLE OF CONTENTS
RANGE HOOD SAFETY 1 INSTALLATION REQUIREMENTS 3 INSTALLATION INSTRUCTIONS 6 RANGE HOOD USE 10 RANGE HOOD CARE 10 WIRING DIAGRAM 11 ASSISTANCE OR SERVICE 12 WARRANTY 12...
Installation Instructions - Page 3
... and follow the instructions provided with installation
clearances specified on ordering, see the "Assistance or Service" section. Check that all governing codes and ordinances. ... system with local codes.
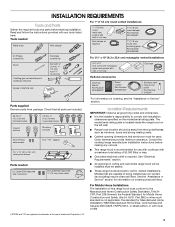
3 Models that are factory set for information on ordering charcoal filters. INSTALLATION REQUIREMENTS
Tools and Parts
Gather the required tools and parts before making any tools listed here...
Installation Instructions - Page 4
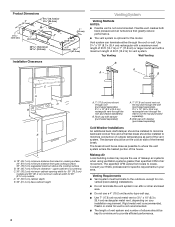
... Air Local building codes may require the use...Installation Clearances
Venting System
Venting Methods NOTES:
■ Flexible vent is optional for this model. B. The break should be as close as part...models. C. 30" (76.2 cm) minimum cabinet opening width for 30" (76.2 cm)
models and 36" (91.4 cm) minimum cabinet width for non- Roof cap with a maximum length of 50 ft (15.2 m) for specific...
Installation Instructions - Page 5

...to seal all governing codes and ordinances.
Follow the electrical connector manufacturer's recommended procedure. If codes permit and a separate ground wire is used .
■ Do not install 2 elbows together.
&#...Code, ANSI/NFPA 70 (latest edition), or CSA Standards C22.1-94, Canadian Electrical Code, Part 1 and C22.2 No. 0-M91 (latest edition) and all local codes and ordinances.
5
The model...
Installation Instructions - Page 6
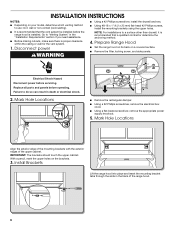
...; Before making cutouts, make sure there is proper clearance within the ceiling or wall for the vent system.
1.
Replace all parts and panels before the range hood is recommended that the vent system be installed before operating. Mark Hole Locations
■ Remove the rectangular damper.
■ Using a #2 Phillips screwdriver, remove the electrical box...
Installation Instructions - Page 7

...bit, drill a hole in each mounting tab at the power supply knockout (B). For a rear vented installation: Mark the 4 vent hole locations (D) on the top of the vent mounting plate must be positioned ... place with the widest distance (A) between the dots marked previously.
Remove the range hood and set it aside.
6.
Position the side edges of the mounting plate between the hole and edge ...
Installation Instructions - Page 8

...8 For information on ordering, see the "Assistance or Service" section.
■ If installing the optional round damper, position it interferes with the rectangular... Vent Installations
For top vent installations, remove the top, rectangular vent knockout (C).
NOTE: An optional 7" (17.8 cm) round damper (A), Part Number W10355451, and a 7" (17.8 cm) round vent mounting plate (B), Part Number ...
Installation Instructions - Page 9
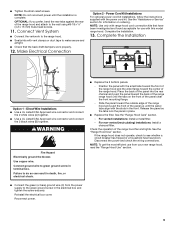
...front. See the "Assistance or Service" section for use from your ... Cord Kit Installations
For optional power cord kit installations, follow the instructions supplied with the...Replace the filter. Disconnect the power and check the wiring connections. NOTE: Use only with this model range hood. Complete the Installation
A B
C
Option 1 - For non-vented (recirculating) installations: Install...
Installation Instructions - Page 10
... stainless steel, do not use Stainless Steel Cleaner
and Polish Part Number 31462A (not included): See
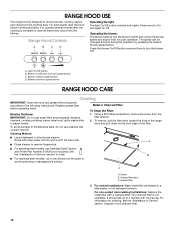
the "Assistance or Service" section to 6 months with a charcoal filter. Metal or Charcoal Filter
To Clean the Filter: 1. Grease filter
3. To avoid damage to the following instructions.
RANGE HOOD USE
The range hood is complete to clear...
Installation Instructions - Page 11
...Reconnect power.
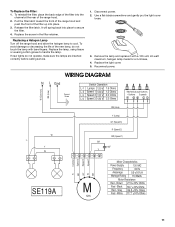
Replace the screw...channel at the rear of the filter up into place to secure the filter.
4. Replace the light cover. 5. Gray 86.8 ±10% Ohms Red -
WIRING DIAGRAM
... power. 2.
Remove the lamp and replace it with bare fingers. Replacing a Halogen Lamp Turn off the range...Brown 27.5 ±10% Ohms
Red - To Replace the Filter: 1. To avoid damage or decreasing ...
Installation Instructions - Page 12

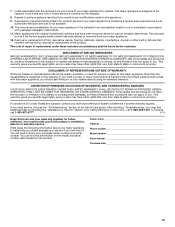
... with any questions or concerns at its sole discretion replace the product. Whirlpool designated service technicians are made with : ■ Features and specifications on our full line of appliances.
■ Installation information.
■ Use and maintenance procedures.
■ Accessory and repair parts sales.
■ Specialized customer assistance (Spanish speaking, hearing impaired...
Installation Instructions - Page 13
... United States and Canada, contact your major appliance.
12. If you need for service or repair of purchase or installation date for repairs. After checking "Troubleshooting," you should ask Whirlpool or your major appliance is located in -home service is covered by an authorized Whirlpool servicer is void if the factory applied serial number has been altered or removed...
Dimension Guide - Page 1
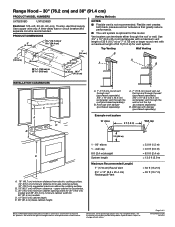
... roof or wall.
B. For complete details, see Installation Instructions packed with damper (purchased separately)
Example vent system
90˚ elbow
6 ft (1.8 m)
Wall cap
2 ft (0.6 m)
1 - 90° elbow 1 - B. Wall cap with product.
Flexible vent creates . C. 30" (76.2 cm) minimum cabinet opening width for 30" (76.2 cm)
models and 36" (91.4 cm) minimum cabinet width...
Dimension Guide - Page 2

...cm x
5.0 ft
25.4 cm) to 7" (17.8 cm) (1.5 m)
90° elbow
Because Whirlpool Corporation policy includes a continuous commitment to improve our products, we reserve the right to change materials and specifications without notice. Calculating Vent System Length
To calculate the length of 2
W10646405-D-UN 04/2015
For complete details, see Installation Instructions packed with product.
Whirlpool UXT5236BD Reviews
We have not received any reviews for Whirlpool yet.