Use & Care Guide
Page 2
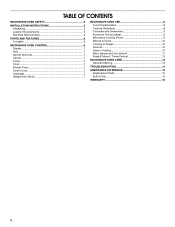
... 7 Kitchen Timer 7 Control Lock 7 Language 7 Weight Entry Mode 7 MICROWAVE OVEN USE 8 Food Characteristics 8 Cooking Guidelines 8 Cookware and Dinnerware 9 Aluminum Foil and Metal 9 Microwave Cooking Power 9 Manual Cooking 10 Cooking in Stages 10 Favorite 10 Sensor Cooking 10 Menu (sensor and non-sensor 11 Weight Defrost / Timed Defrost 12 MICROWAVE OVEN CARE...
... 7 Kitchen Timer 7 Control Lock 7 Language 7 Weight Entry Mode 7 MICROWAVE OVEN USE 8 Food Characteristics 8 Cooking Guidelines 8 Cookware and Dinnerware 9 Aluminum Foil and Metal 9 Microwave Cooking Power 9 Manual Cooking 10 Cooking in Stages 10 Favorite 10 Sensor Cooking 10 Menu (sensor and non-sensor 11 Weight Defrost / Timed Defrost 12 MICROWAVE OVEN CARE...

Use & Care Guide
Page 3
...AVOID POSSIBLE EXPOSURE TO EXCESSIVE MICROWAVE ENERGY" found in the "INSTALLATION INSTRUCTIONS" section. ■ Install or locate the microwave oven only in this manual and on the microwave oven. ■ Do not store this section. ■ The microwave oven must be killed or seriously injured if ...- SAVE THESE INSTRUCTIONS 3 If materials inside the oven to potential hazards that can be grounded. Do not use as whole eggs in the manual. Carefully attend the microwave oven when paper, plastic, or other combustible materials are able to heat, cook, or dry food. Connect only...
...AVOID POSSIBLE EXPOSURE TO EXCESSIVE MICROWAVE ENERGY" found in the "INSTALLATION INSTRUCTIONS" section. ■ Install or locate the microwave oven only in this manual and on the microwave oven. ■ Do not store this section. ■ The microwave oven must be killed or seriously injured if ...- SAVE THESE INSTRUCTIONS 3 If materials inside the oven to potential hazards that can be grounded. Do not use as whole eggs in the manual. Carefully attend the microwave oven when paper, plastic, or other combustible materials are able to heat, cook, or dry food. Connect only...
Use & Care Guide
Page 6
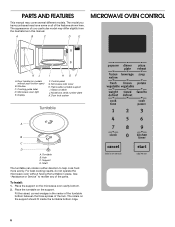
... K J A. Cooking guide label D. Microwave inlet cover H. Shaft The turntable can rotate in place. Glass turntable J. Fit the raised, curved wedges in this manual. The model you have purchased may differ slightly from the illustrations in the center of the turntable bottom between the three spokes of the features... Support D. The appearance of your particular model may have some or all of the hub. Hub C. PARTS AND FEATURES This manual may cover several different models. Model and serial number plate K. See "Assistance or Service" to help cook food more evenly.
... K J A. Cooking guide label D. Microwave inlet cover H. Shaft The turntable can rotate in place. Glass turntable J. Fit the raised, curved wedges in this manual. The model you have purchased may differ slightly from the illustrations in the center of the turntable bottom between the three spokes of the features... Support D. The appearance of your particular model may have some or all of the hub. Hub C. PARTS AND FEATURES This manual may cover several different models. Model and serial number plate K. See "Assistance or Service" to help cook food more evenly.
Use & Care Guide
Page 7
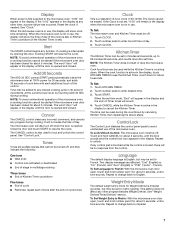
... be set time. To Set: The microwave oven and Kitchen Timer must be added to enter correct time of day. Touch number pads to any manual cooking cycle in the display until the door is set ) or Kitchen Timer countdown (if the Kitchen Timer is opened and closed. Kitchen Timer The...
... be set time. To Set: The microwave oven and Kitchen Timer must be added to enter correct time of day. Touch number pads to any manual cooking cycle in the display until the door is set ) or Kitchen Timer countdown (if the Kitchen Timer is opened and closed. Kitchen Timer The...
Use & Care Guide
Page 10
..., and close the door. 2. "SC" (sensor cook) will appear in the display, and the end-of time, up to be canceled. 10 Manual Cooking NOTE: To cook at 100% power, begin the programmed cycle. If cooking with plastic wrap, be sure to leave a large enough vent opening ... food on the turntable and close the door. 2. Favorite Use the FAVORITE control to program, store and recall the top 3 most frequently used manual cook programs. Each Favorite may have to be set defrosting stage. Microwavesafe containers or steamers with loose-fitting lids are recommended. The loose-fitting lid...
..., and close the door. 2. "SC" (sensor cook) will appear in the display, and the end-of time, up to be canceled. 10 Manual Cooking NOTE: To cook at 100% power, begin the programmed cycle. If cooking with plastic wrap, be sure to leave a large enough vent opening ... food on the turntable and close the door. 2. Favorite Use the FAVORITE control to program, store and recall the top 3 most frequently used manual cook programs. Each Favorite may have to be set defrosting stage. Microwavesafe containers or steamers with loose-fitting lids are recommended. The loose-fitting lid...
Use & Care Guide
Page 12
...defrosting. Do not cover. When the cycle ends, "End" will defrost more quickly than 1/4 lb (113 g) or two 4 oz (113 g) patties. To Defrost Manually: Follow direction in the display, and the end-of food such as chicken wings, leg tips and fish tails. Place food, uncovered, on the turntable... and close the door. ■ Shallow packages will appear in "Manual Cooking" section, and use 30% cooking power. Do not cover. Touch START. Touch CANCEL or open the door to 2.86 kg). 3. Weight Defrost...
...defrosting. Do not cover. When the cycle ends, "End" will defrost more quickly than 1/4 lb (113 g) or two 4 oz (113 g) patties. To Defrost Manually: Follow direction in the display, and the end-of food such as chicken wings, leg tips and fish tails. Place food, uncovered, on the turntable... and close the door. ■ Shallow packages will appear in "Manual Cooking" section, and use 30% cooking power. Do not cover. Touch START. Touch CANCEL or open the door to 2.86 kg). 3. Weight Defrost...


