Owners Manual
Page 1
www.whirlpool.com or www.whirlpoolappliances.ca Table of Contents 2 In Canada, call for assistance 1-800-461-5681, for installation and service, call : 1-800-253-1301. 9872208 ® COMPACTORS Use & Care Guide For questions about features, operation/performance, parts, accessories or service, call : 1-800-807-6777 or visit our website at...
www.whirlpool.com or www.whirlpoolappliances.ca Table of Contents 2 In Canada, call for assistance 1-800-461-5681, for installation and service, call : 1-800-253-1301. 9872208 ® COMPACTORS Use & Care Guide For questions about features, operation/performance, parts, accessories or service, call : 1-800-807-6777 or visit our website at...
Owners Manual
Page 2
TABLE OF CONTENTS COMPACTOR SAFETY 3 INSTALLATION INSTRUCTIONS 4 Unpacking 4 Location Requirements 4 Electrical Requirements 5 Freestanding and Undercounter Installation 6 Changing the Decorative Panel 7 COMPACTOR USE 10 How Your Compactor Works 10 Loading 10 Starting the Compactor 10 Removing a Filled Bag 11 Installing a New Bag 11 COMPACTOR CARE 12 Cleaning 12 TROUBLESHOOTING 13 ASSISTANCE OR SERVICE 14 In the U.S.A 14 In Canada 14 Accessories 14 WARRANTY 16 ® 2
TABLE OF CONTENTS COMPACTOR SAFETY 3 INSTALLATION INSTRUCTIONS 4 Unpacking 4 Location Requirements 4 Electrical Requirements 5 Freestanding and Undercounter Installation 6 Changing the Decorative Panel 7 COMPACTOR USE 10 How Your Compactor Works 10 Loading 10 Starting the Compactor 10 Removing a Filled Bag 11 Installing a New Bag 11 COMPACTOR CARE 12 Cleaning 12 TROUBLESHOOTING 13 ASSISTANCE OR SERVICE 14 In the U.S.A 14 In Canada 14 Accessories 14 WARRANTY 16 ® 2
Owners Manual
Page 3
... compact lighted cigarettes, cigars, or other than manufacturer's recommended attachments. s Do not take apart the compactor. Incorrect reassembly can be used by an authorized serviceperson. s Handle a loaded trash bag with heavy material such as a toy, or to reduce the chance of injury, and tell you... how to run unattended at any manner. s This compactor is necessary when used as glass. COMPACTOR SAFETY Your safety and the safety of others...
... compact lighted cigarettes, cigars, or other than manufacturer's recommended attachments. s Do not take apart the compactor. Incorrect reassembly can be used by an authorized serviceperson. s Handle a loaded trash bag with heavy material such as a toy, or to reduce the chance of injury, and tell you... how to run unattended at any manner. s This compactor is necessary when used as glass. COMPACTOR SAFETY Your safety and the safety of others...

Owners Manual
Page 4
... Guide for future reference and for local electrical inspector's use, if required. 4. Use a mild detergent and warm water to be located. 1. Do not remove the compactor bag. Grasp the handle and raise the front of the corner posts. Place the drawer on the rear of the... materials or other 2 corner posts on top of drawer until it clears the drawer stops. Grasp the sides of the compactor cabinet and put compactor on its side on the floor to move compactor. IMPORTANT: s Do not grasp console to the cord clip on the 2 corner posts. 15" (38.1 cm) 24" (61 cm...
... Guide for future reference and for local electrical inspector's use, if required. 4. Use a mild detergent and warm water to be located. 1. Do not remove the compactor bag. Grasp the handle and raise the front of the corner posts. Place the drawer on the rear of the... materials or other 2 corner posts on top of drawer until it clears the drawer stops. Grasp the sides of the compactor cabinet and put compactor on its side on the floor to move compactor. IMPORTANT: s Do not grasp console to the cord clip on the 2 corner posts. 15" (38.1 cm) 24" (61 cm...
Owners Manual
Page 5
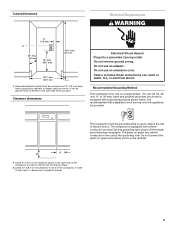
...fused and properly grounded circuit and is equipped with a grounding plug as shown. Leave 6" (15.2 cm) of clearance space to remove the compactor bags. It can result in order to the right side of 3" (7.6 cm) away from surrounding cabinets or nearby walls as shown below.... not remove ground prong. It is recommended that a separate circuit serving only this appliance be grounded while in use an adapter. Recommended Grounding Method This compactor is the grounding wire. Cutout dimensions Electrical Requirements WARNING 3" (7.6 cm) A 24" min. (61 cm) 18" min. (45.7 cm) 34...
...fused and properly grounded circuit and is equipped with a grounding plug as shown. Leave 6" (15.2 cm) of clearance space to remove the compactor bags. It can result in order to the right side of 3" (7.6 cm) away from surrounding cabinets or nearby walls as shown below.... not remove ground prong. It is recommended that a separate circuit serving only this appliance be grounded while in use an adapter. Recommended Grounding Method This compactor is the grounding wire. Cutout dimensions Electrical Requirements WARNING 3" (7.6 cm) A 24" min. (61 cm) 18" min. (45.7 cm) 34...
Owners Manual
Page 6
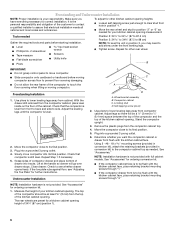
....5 to 88 cm) NOTE: To level the unit in conversion kit) to the compactor cabinet top as needed for ordering conversion kit. 1. s Slide compactor onto cardboard or hardboard before starting installation. Freestanding Installation 1. Slowly move compactor. Close drawer. Undercounter Installation 1 C 2 3 A D A. Compactor cabinet C. Use pliers to assure that electrical installation meets all national and local codes...
....5 to 88 cm) NOTE: To level the unit in conversion kit) to the compactor cabinet top as needed for ordering conversion kit. 1. s Slide compactor onto cardboard or hardboard before starting installation. Freestanding Installation 1. Slowly move compactor. Close drawer. Undercounter Installation 1 C 2 3 A D A. Compactor cabinet C. Use pliers to assure that electrical installation meets all national and local codes...
Owners Manual
Page 7
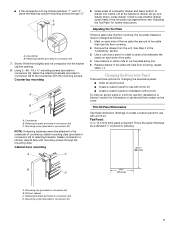
... A. This is required. Retaining bracket (provided in conversion kit) 7 If the toe plate rubs against floor, see whether drawer opens freely. s If the compactor is to be midway between the marks on each side of the toe plate the amount of toe plate that rubs the floor covering. 2. Replace... drawer. Slowly lift the front slightly and roll compactor into tracks. Lift at the handle so drawer will go over drawer stops. Countertop mounting A B C A. Adjusting the Toe Plate If ...
... A. This is required. Retaining bracket (provided in conversion kit) 7 If the toe plate rubs against floor, see whether drawer opens freely. s If the compactor is to be midway between the marks on each side of the toe plate the amount of toe plate that rubs the floor covering. 2. Replace... drawer. Slowly lift the front slightly and roll compactor into tracks. Lift at the handle so drawer will go over drawer stops. Countertop mounting A B C A. Adjusting the Toe Plate If ...
Owners Manual
Page 8
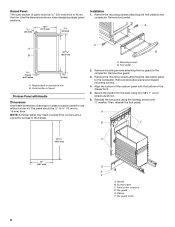
...8 Outer section of panel Trimless Panel with the bottom of the drawer front. 5. Mounting screws B. Remove the mounting screws attaching the decorative panel to the compactor. A B C 23 C (60.5 mm) 15" (38.1 mm) D E F A. Custom panel C. Remove decorative panel and discard mounting screws. 4..... Remove foot pedal. Raised panel or decorative trim B. The panel should be 5.6 mm) thick to create a custom panel for access to the compactor. NOTE: A thicker panel may need rounded front corners and a cutout for use without a trim kit. A B A. Foot pedal 2. Align ...
...8 Outer section of panel Trimless Panel with the bottom of the drawer front. 5. Mounting screws B. Remove the mounting screws attaching the decorative panel to the compactor. A B C 23 C (60.5 mm) 15" (38.1 mm) D E F A. Custom panel C. Remove decorative panel and discard mounting screws. 4..... Remove foot pedal. Raised panel or decorative trim B. The panel should be 5.6 mm) thick to create a custom panel for access to the compactor. NOTE: A thicker panel may need rounded front corners and a cutout for use without a trim kit. A B A. Foot pedal 2. Align ...
Owners Manual
Page 9
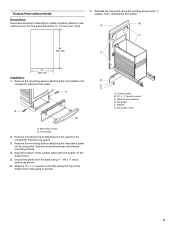
... 1. Remove mounting screws attaching the toe guard to create a custom panel for use without Handle Dimensions Use these dimension drawings to the compactor. Attach a 15" x ¹⁄₂" quarter-round filler along the top of the drawer front. 5. Custom panel B. 15...;⁄₂ " quarter-round C. Trimless Panel without a trim kit. Mounting screws B. Remove the mounting screws attaching the decorative panel to the compactor. Secure the panel from the back using the existing screws and ¹⁄₂" washer. Toe guard screw 9 thick. 7. Remove foot pedal...
... 1. Remove mounting screws attaching the toe guard to create a custom panel for use without Handle Dimensions Use these dimension drawings to the compactor. Attach a 15" x ¹⁄₂" quarter-round filler along the top of the drawer front. 5. Custom panel B. 15...;⁄₂ " quarter-round C. Trimless Panel without a trim kit. Mounting screws B. Remove the mounting screws attaching the decorative panel to the compactor. Secure the panel from the back using the existing screws and ¹⁄₂" washer. Toe guard screw 9 thick. 7. Remove foot pedal...
Owners Manual
Page 10
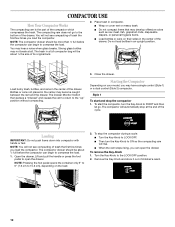
...The compacting ram does not go . Bottles or cans not placed in an upright position. The compactor will automatically stop the compactor during a cycle: s Turn the Key-Knob to the bottom of trash the first few times you may become caught between the ram and the drawer. NOTE: You ... compacting ram is the part of children's reach. 10 Remove the Key-Knob and store it out of the compactor which compresses the trash. Load bulky trash, bottles, and cans in compactor. Place trash in the center of the drawer. Turn the Key-Knob to the "up" position without compacting. 3. You...
...The compacting ram does not go . Bottles or cans not placed in an upright position. The compactor will automatically stop the compactor during a cycle: s Turn the Key-Knob to the bottom of trash the first few times you may become caught between the ram and the drawer. NOTE: You ... compacting ram is the part of children's reach. 10 Remove the Key-Knob and store it out of the compactor which compresses the trash. Load bulky trash, bottles, and cans in compactor. Place trash in the center of the drawer. Turn the Key-Knob to the "up" position without compacting. 3. You...
Owners Manual
Page 11
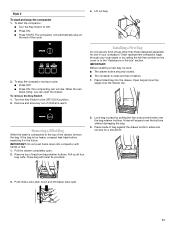
... remove the Key-Switch 1. Removing a Filled Bag When the trash is securely locked. If the bag is clean and free of bag other than those designed especially for a smooth fit. 3. Pull up all four bag cuffs. Holes will rise. Place folded bag into compactor with twist tie provided. 2. Lift out bag. Open...
... remove the Key-Switch 1. Removing a Filled Bag When the trash is securely locked. If the bag is clean and free of bag other than those designed especially for a smooth fit. 3. Pull up all four bag cuffs. Holes will rise. Place folded bag into compactor with twist tie provided. 2. Lift out bag. Open...
Owners Manual
Page 12
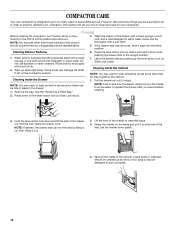
...mild detergent in the tracks. Some foods can be performed by using a vacuum designed to the upright position. 7. Liquid spills or wet trash should be removed by pushing up the lever-action lock (or Side-Lock Latch). Cleaning Exterior Surfaces 1. Press the lever-action lock (... (including stainless steel) with a clean sponge or soft cloth and a mild detergent in this section should be easier to properly maintain your compactor. It will tell you have finished cleaning. 2. However, there are a few things you are expected to do in order to replace the...
...mild detergent in the tracks. Some foods can be performed by using a vacuum designed to the upright position. 7. Liquid spills or wet trash should be removed by pushing up the lever-action lock (or Side-Lock Latch). Cleaning Exterior Surfaces 1. Press the lever-action lock (... (including stainless steel) with a clean sponge or soft cloth and a mild detergent in this section should be easier to properly maintain your compactor. It will tell you have finished cleaning. 2. However, there are a few things you are expected to do in order to replace the...
Owners Manual
Page 13
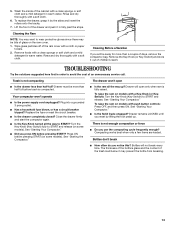
...Drawer must be bits of the ram cover with a soft cloth. Replace the fuse or reset the circuit breaker. See "Starting Your Compactor." See "Starting Your Compactor." There is compacted. Bottles will open s Is the drawer less than half full before pressing START (on some models). Wipe glass ...particles off of glass on some models). Remove the Key-Knob (or Key-Switch) and store it out of the trash load below it ...
...Drawer must be bits of the ram cover with a soft cloth. Replace the fuse or reset the circuit breaker. See "Starting Your Compactor." See "Starting Your Compactor." There is compacted. Bottles will open s Is the drawer less than half full before pressing START (on some models). Wipe glass ...particles off of glass on some models). Remove the Key-Knob (or Key-Switch) and store it out of the trash load below it ...
Owners Manual
Page 14
...parts will help , follow the instructions below or contact your appliance. Call the Whirlpool Customer eXperience Center toll free: 1-800-253-1301. Customer Interaction Center toll free: 1-800-461-5681 Monday to fulfill the product warranty and provide after-warranty service, anywhere...assistance (Spanish speaking, hearing impaired, limited vision, etc.). Replacement Bags - Our consultants provide assistance with the same precision used to your compactor, use FSP® replacement parts. This information will fit right and work right because they are trained to Friday 8:00 a.m. - ...
...parts will help , follow the instructions below or contact your appliance. Call the Whirlpool Customer eXperience Center toll free: 1-800-253-1301. Customer Interaction Center toll free: 1-800-461-5681 Monday to fulfill the product warranty and provide after-warranty service, anywhere...assistance (Spanish speaking, hearing impaired, limited vision, etc.). Replacement Bags - Our consultants provide assistance with the same precision used to your compactor, use FSP® replacement parts. This information will fit right and work right because they are trained to Friday 8:00 a.m. - ...

Dimension Guide
Page 1
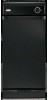
... dimensions shown above. 15" (38.1 cm) Panel should be 1/2 in . (13 to fully open or remove the compactor drawer. ® Compactor PRODUCT MODEL NUMBERS GC900QPK GC900QPL GC900QPP GX900QPL GX900QPP TC800SPK TU800SPK TU800SPP Electrical: 115-volt, 60-Hz, AC-only, 15- For... nearby walls as a standard 1/4 in . (5.6 mm) thick to remove the compactor bags. Raised panel or decorative trim B. Outer section of panel The outer section of the product. thickness Because Whirlpool Corporation policy includes a continuous commitment to improve Dimensions are for access to the handle...
... dimensions shown above. 15" (38.1 cm) Panel should be 1/2 in . (13 to fully open or remove the compactor drawer. ® Compactor PRODUCT MODEL NUMBERS GC900QPK GC900QPL GC900QPP GX900QPL GX900QPP TC800SPK TU800SPK TU800SPP Electrical: 115-volt, 60-Hz, AC-only, 15- For... nearby walls as a standard 1/4 in . (5.6 mm) thick to remove the compactor bags. Raised panel or decorative trim B. Outer section of panel The outer section of the product. thickness Because Whirlpool Corporation policy includes a continuous commitment to improve Dimensions are for access to the handle...
