Owners Manual
Page 1
9872208 ® COMPACTORS Use & Care Guide For questions about features, operation/performance, parts, accessories or service, call : 1-800-807-6777 or visit our website at... In Canada, call for assistance 1-800-461-5681, for installation and service, call : 1-800-253-1301. www.whirlpool.com or www.whirlpoolappliances.ca Table of Contents 2
9872208 ® COMPACTORS Use & Care Guide For questions about features, operation/performance, parts, accessories or service, call : 1-800-807-6777 or visit our website at... In Canada, call for assistance 1-800-461-5681, for installation and service, call : 1-800-253-1301. www.whirlpool.com or www.whirlpoolappliances.ca Table of Contents 2
Owners Manual
Page 2
TABLE OF CONTENTS COMPACTOR SAFETY 3 INSTALLATION INSTRUCTIONS 4 Unpacking 4 Location Requirements 4 Electrical Requirements 5 Freestanding and Undercounter Installation 6 Changing the Decorative Panel 7 COMPACTOR USE 10 How Your Compactor Works 10 Loading 10 Starting the Compactor 10 Removing a Filled Bag 11 Installing a New Bag 11 COMPACTOR CARE 12 Cleaning 12 TROUBLESHOOTING 13 ASSISTANCE OR SERVICE 14 In the U.S.A 14 In Canada 14 Accessories 14 WARRANTY 16 ® 2
TABLE OF CONTENTS COMPACTOR SAFETY 3 INSTALLATION INSTRUCTIONS 4 Unpacking 4 Location Requirements 4 Electrical Requirements 5 Freestanding and Undercounter Installation 6 Changing the Decorative Panel 7 COMPACTOR USE 10 How Your Compactor Works 10 Loading 10 Starting the Compactor 10 Removing a Filled Bag 11 Installing a New Bag 11 COMPACTOR CARE 12 Cleaning 12 TROUBLESHOOTING 13 ASSISTANCE OR SERVICE 14 In the U.S.A 14 In Canada 14 Accessories 14 WARRANTY 16 ® 2
Owners Manual
Page 3
... touch moving parts. Always read and obey all instructions before using the compactor. These words mean: You can be followed, including the following: s Read all safety messages. s Do not take apart the compactor. You can be used . Do not overload trash bag with care. COMPACTOR SAFETY Your safety and the safety of children. Have the compactor examined, repaired or...
... touch moving parts. Always read and obey all instructions before using the compactor. These words mean: You can be followed, including the following: s Read all safety messages. s Do not take apart the compactor. You can be used . Do not overload trash bag with care. COMPACTOR SAFETY Your safety and the safety of children. Have the compactor examined, repaired or...

Owners Manual
Page 4
... injury. Do not remove the compactor bag. Failure to the cord clip on the rear of the compactor cabinet and put compactor on its side on the floor near the compactor. Dry thoroughly with the homeowner. Open the compactor drawer and remove any shipping materials... residue caused by protective shipping material. A A B A. Use a mild detergent and warm water to move and install compactor. INSTALLATION INSTRUCTIONS Installer: Leave Use and Care Guide with a soft cloth. Homeowner: Keep Use & Care Guide for future reference and for local electrical inspector's use, if required. 4.
... injury. Do not remove the compactor bag. Failure to the cord clip on the rear of the compactor cabinet and put compactor on its side on the floor near the compactor. Dry thoroughly with the homeowner. Open the compactor drawer and remove any shipping materials... residue caused by protective shipping material. A A B A. Use a mild detergent and warm water to move and install compactor. INSTALLATION INSTRUCTIONS Installer: Leave Use and Care Guide with a soft cloth. Homeowner: Keep Use & Care Guide for future reference and for local electrical inspector's use, if required. 4.
Owners Manual
Page 5
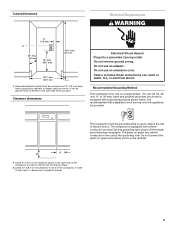
.... Do not remove ground prong. Recommended Grounding Method This compactor is the grounding wire. Leave 6" (15.2 cm) of clearance space to follow these instructions can be provided. Grounded electrical outlet must be a minimum of the compactor in death, fire, or electrical shock. Clearance dimensions Electrical...or green and yellow) conductor in order to remove the compactor bags. B A A. B. It can result in order to fully open or remove the compactor drawer. 5 Leave 23" (58.4 cm) of clearance in front of the compactor in the cord is for use to the left or ...
.... Do not remove ground prong. Recommended Grounding Method This compactor is the grounding wire. Leave 6" (15.2 cm) of clearance space to follow these instructions can be provided. Grounded electrical outlet must be a minimum of the compactor in death, fire, or electrical shock. Clearance dimensions Electrical...or green and yellow) conductor in order to remove the compactor bags. B A A. B. It can result in order to fully open or remove the compactor drawer. 5 Leave 23" (58.4 cm) of clearance in front of the compactor in the cord is for use to the left or ...
Owners Manual
Page 6
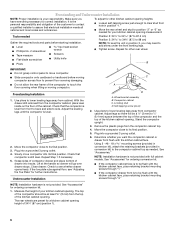
... kit), attach the retaining brackets (provided in conversion kit) to the compactor cabinet top as needed Gather the required tools and parts before moving compactor. See "Accessories." See "Accessories" for ordering conversion kit. 1. See "Accessories" for ordering conversion kit. Freestanding and Undercounter Installation NOTE: Proper installation is level. 2. Make sure you may need to clear stud...
... kit), attach the retaining brackets (provided in conversion kit) to the compactor cabinet top as needed Gather the required tools and parts before moving compactor. See "Accessories." See "Accessories" for ordering conversion kit. 1. See "Accessories" for ordering conversion kit. Freestanding and Undercounter Installation NOTE: Proper installation is level. 2. Make sure you may need to clear stud...
Owners Manual
Page 7
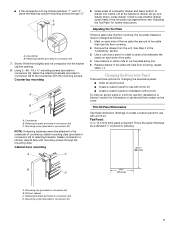
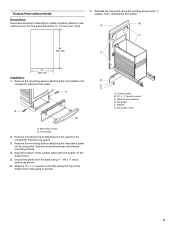
... as a standard ¹⁄₄" plywood or paneling. 23 60.5 cm) B D 14⁵⁄₈" (37.2 cm) A. Replace drawer. Remove the drawer from the unit. Countertop mounting A B C A. Flat Panel: A 5.6 mm) thick panel is the same thickness as follows: 1. Cabinet-face mounting A C 9. Use scissors or utility knife to see the "Assistance or Service" section for further instructions.
... as a standard ¹⁄₄" plywood or paneling. 23 60.5 cm) B D 14⁵⁄₈" (37.2 cm) A. Replace drawer. Remove the drawer from the unit. Countertop mounting A B C A. Flat Panel: A 5.6 mm) thick panel is the same thickness as follows: 1. Cabinet-face mounting A C 9. Use scissors or utility knife to see the "Assistance or Service" section for further instructions.
Owners Manual
Page 8
... kit. Then, reinstall the foot pedal. Remove the mounting screws attaching the foot pedal to the compactor. Raised Panel: The outer section of panel must be ¹⁄₂" to 13 mm to 16 mm) thick. Outer section of panel Trimless Panel with the bottom of the ... toe guard to the compactor. Remove the mounting screws attaching the decorative panel to the compactor. Use the dimensions shown when designing raised panel sections. 5.6 mm) 14⁵⁄₈" (37.2 mm) 1¹⁄₄" (32 mm) Installation 1. Raised panel or decorative trim B. ...
... kit. Then, reinstall the foot pedal. Remove the mounting screws attaching the foot pedal to the compactor. Raised Panel: The outer section of panel must be ¹⁄₂" to 13 mm to 16 mm) thick. Outer section of panel Trimless Panel with the bottom of the ... toe guard to the compactor. Remove the mounting screws attaching the decorative panel to the compactor. Use the dimensions shown when designing raised panel sections. 5.6 mm) 14⁵⁄₈" (37.2 mm) 1¹⁄₄" (32 mm) Installation 1. Raised panel or decorative trim B. ...
Owners Manual
Page 9
Reinstall the toe guard using glue or screws. Remove mounting screws attaching the toe guard to the compactor. Panel screw locations D. Washer G. B A C 25" (63.5 cm) C 15" (38.1 cm) Installation 1. Mounting screws B. Foot pedal 2. Align the bottom of the custom panel with the bottom of the drawer front using the existing screws and ¹⁄₂" washer. Toe...
Reinstall the toe guard using glue or screws. Remove mounting screws attaching the toe guard to the compactor. Panel screw locations D. Washer G. B A C 25" (63.5 cm) C 15" (38.1 cm) Installation 1. Mounting screws B. Foot pedal 2. Align the bottom of the custom panel with the bottom of the drawer front using the existing screws and ¹⁄₂" washer. Toe...
Owners Manual
Page 10
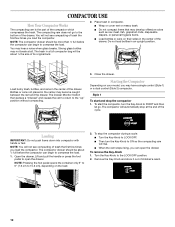
... the "up" position without compacting. 3. Place trash in the center of trash the first few times you can begin to 15.2 cm), depending on your model, you load the compactor. You will not see compacting of the drawer. The Drawer Monitor Switch then senses a "misload" and causes the ram to return to the LOCK/OFF position. 2.
... the "up" position without compacting. 3. Place trash in the center of trash the first few times you can begin to 15.2 cm), depending on your model, you load the compactor. You will not see compacting of the drawer. The Drawer Monitor Switch then senses a "misload" and causes the ram to return to the LOCK/OFF position. 2.
Owners Manual
Page 11
... remove the Key-Switch 1. Order replacement compactor bags through your compactor. Removing a Filled Bag When the trash is clean and free of bag from bag retainer buttons. Close bag with hands or feet. 1. Style 2 To start the compactor: s Turn the Key-Switch to ON. When the ram stops rising, you can open . 2. Lock bag in the "Assistance or Service" section. The compacting ram will automatically stop...
... remove the Key-Switch 1. Order replacement compactor bags through your compactor. Removing a Filled Bag When the trash is clean and free of bag from bag retainer buttons. Close bag with hands or feet. 1. Style 2 To start the compactor: s Turn the Key-Switch to ON. When the ram stops rising, you can open . 2. Lock bag in the "Assistance or Service" section. The compacting ram will automatically stop...
Owners Manual
Page 12
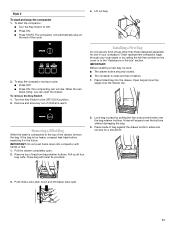
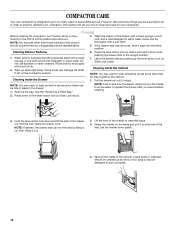
...in the tracks. Some foods can be easier to replace the drawer after you how to clean and care for your compactor. Lift the front of glass in the cabinet....Cleaning Inside the Drawer 6. See the "Removing a Filled Bag." Liquid spills or wet trash should be cleaned up by hand, or by a designated service representative. 4. If the drawer side was removed, slide it...down gently. 4. Set the drawer down and tilt the side of dependable service. Press down while pushing the drawer side to the upright position. 7. COMPACTOR CARE Your new compactor is designed to ...
...in the tracks. Some foods can be easier to replace the drawer after you how to clean and care for your compactor. Lift the front of glass in the cabinet....Cleaning Inside the Drawer 6. See the "Removing a Filled Bag." Liquid spills or wet trash should be cleaned up by hand, or by a designated service representative. 4. If the drawer side was removed, slide it...down gently. 4. Set the drawer down and tilt the side of dependable service. Press down while pushing the drawer side to the upright position. 7. COMPACTOR CARE Your new compactor is designed to ...
Owners Manual
Page 13
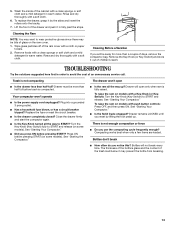
... lifting the foot pedal up ? Rinse and dry thoroughly with a clean sponge or soft cloth and a mild detergent in warm water. s Is the Key-Knob turned all the way up . s Did you press ON before trash is compacted. See "Starting Your Compactor." Bottles don...'t break s How often do you will be away for more than a couple of glass on the ram cover. 1. Bottles will open s Is the drawer less than half-full? Wash the inside of an unnecessary service call. To replace the drawer, grasp it in warm water. Remove foods with a soft cloth. TROUBLESHOOTING...
... lifting the foot pedal up ? Rinse and dry thoroughly with a clean sponge or soft cloth and a mild detergent in warm water. s Is the Key-Knob turned all the way up . s Did you press ON before trash is compacted. See "Starting Your Compactor." Bottles don...'t break s How often do you will be away for more than a couple of glass on the ram cover. 1. Bottles will open s Is the drawer less than half-full? Wash the inside of an unnecessary service call. To replace the drawer, grasp it in warm water. Remove foods with a soft cloth. TROUBLESHOOTING...
Owners Manual
Page 14
...; replacement parts. When calling, please know the purchase date and the complete model and serial number of a service call 1-800-461-5681. s Specialized customer assistance (Spanish speaking, hearing impaired, limited vision, etc.). Our consultants provide assistance with : s Features and specifications on our full line of appliances. s Referrals to Whirlpool Canada Inc. Installation Hardware for assistance or service, please check "Troubleshooting." ASSISTANCE OR SERVICE...
...; replacement parts. When calling, please know the purchase date and the complete model and serial number of a service call 1-800-461-5681. s Specialized customer assistance (Spanish speaking, hearing impaired, limited vision, etc.). Our consultants provide assistance with : s Features and specifications on our full line of appliances. s Referrals to Whirlpool Canada Inc. Installation Hardware for assistance or service, please check "Troubleshooting." ASSISTANCE OR SERVICE...

Owners Manual
Page 16
... Guide. ITEMS WHIRLPOOL WILL NOT PAY FOR 1. Replacement parts or repair labor costs for product service in U.S.A. WHIRLPOOL SHALL NOT BE LIABLE FOR INCIDENTAL OR CONSEQUENTIAL DAMAGES. THIS WARRANTY GIVES YOU SPECIFIC LEGAL RIGHTS AND YOU MAY ALSO HAVE OTHER RIGHTS, WHICH VARY FROM STATE TO STATE OR PROVINCE TO PROVINCE. If you need service, first see the "Troubleshooting" section...
... Guide. ITEMS WHIRLPOOL WILL NOT PAY FOR 1. Replacement parts or repair labor costs for product service in U.S.A. WHIRLPOOL SHALL NOT BE LIABLE FOR INCIDENTAL OR CONSEQUENTIAL DAMAGES. THIS WARRANTY GIVES YOU SPECIFIC LEGAL RIGHTS AND YOU MAY ALSO HAVE OTHER RIGHTS, WHICH VARY FROM STATE TO STATE OR PROVINCE TO PROVINCE. If you need service, first see the "Troubleshooting" section...

Dimension Guide
Page 1
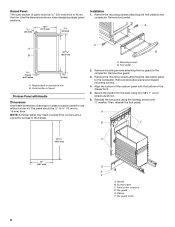
...Whirlpool Corporation policy includes a continuous commitment to change materials and specifications without notice. Specifications subject to improve Dimensions are for access to fit into trim. grounded circuit is recommended. A time-delay fuse or circuit breaker and separate circuit is required. plywood or paneling. 8 mm) both sides 8 mm) A. For complete details, see Installation... right side of panel must be 1/2 in. (13 mm) min. Instructions packed with handles Models without notice. 11-16-04 ® Compactor PRODUCT MODEL NUMBERS GC900QPK GC900QPL GC900QPP ...
...Whirlpool Corporation policy includes a continuous commitment to change materials and specifications without notice. Specifications subject to improve Dimensions are for access to fit into trim. grounded circuit is recommended. A time-delay fuse or circuit breaker and separate circuit is required. plywood or paneling. 8 mm) both sides 8 mm) A. For complete details, see Installation... right side of panel must be 1/2 in. (13 mm) min. Instructions packed with handles Models without notice. 11-16-04 ® Compactor PRODUCT MODEL NUMBERS GC900QPK GC900QPL GC900QPP ...
Warranty
Page 1
... instruct you ever need service, first see the "Troubleshooting" section of God, improper installation, installation not in materials or workmanship. Pickup and delivery. Repairs to parts or systems resulting from warranty coverage. 3. After checking "Troubleshooting," additional help you obtain assistance or service if you how to use of products not approved by a Whirlpool designated service company. Dealer name Address Phone number Model number Serial number Purchase...
... instruct you ever need service, first see the "Troubleshooting" section of God, improper installation, installation not in materials or workmanship. Pickup and delivery. Repairs to parts or systems resulting from warranty coverage. 3. After checking "Troubleshooting," additional help you obtain assistance or service if you how to use of products not approved by a Whirlpool designated service company. Dealer name Address Phone number Model number Serial number Purchase...


