

Installation Instructions
Page 2
... à leur emplacement définitif 18 Installation de la grille de la base 19 Entretien et nettoyage 19 SKT60* TRIM KIT SAFETY Your safety and the safety of California to cause cancer. TABLE OF CONTENTS SKT60* TRIM KIT SAFETY 2 INSTALLATION REQUIREMENTS 3 Plan the Installation 3 Opening Requirements 3 Tools Needed 3 Parts Supplied 3 Electrical Requirements 4 ASSEMBLY INSTRUCTIONS...
... à leur emplacement définitif 18 Installation de la grille de la base 19 Entretien et nettoyage 19 SKT60* TRIM KIT SAFETY Your safety and the safety of California to cause cancer. TABLE OF CONTENTS SKT60* TRIM KIT SAFETY 2 INSTALLATION REQUIREMENTS 3 Plan the Installation 3 Opening Requirements 3 Tools Needed 3 Parts Supplied 3 Electrical Requirements 4 ASSEMBLY INSTRUCTIONS...

Installation Instructions
Page 3
...the refrigerator and freezer. For each grille extrusion that are less than 74¹⁄₂" (189.2 cm) high. Extrusion, Side Trim - The inner opening is your installation using these instructions in height. Each grille extrusion is enough area, approximately 7 ft (2.1 m) by... Plan your responsibility. Plastic Foam Spacer (1) F. Bracket, Front (1) H. INSTALLATION REQUIREMENTS The SKT60* Trim Kit provides an integrated appearance when installing an all parts are included. The trim kit can be reduced in any of both the left hand and right hand side extrusions...
...the refrigerator and freezer. For each grille extrusion that are less than 74¹⁄₂" (189.2 cm) high. Extrusion, Side Trim - The inner opening is your installation using these instructions in height. Each grille extrusion is enough area, approximately 7 ft (2.1 m) by... Plan your responsibility. Plastic Foam Spacer (1) F. Bracket, Front (1) H. INSTALLATION REQUIREMENTS The SKT60* Trim Kit provides an integrated appearance when installing an all parts are included. The trim kit can be reduced in any of both the left hand and right hand side extrusions...

Installation Instructions
Page 4
...refrigerator and a separate circuit serving only your refrigerator and freezer into their final location, it into a grounded 3 prong outlet. Attach the Side Trim Extrusions 1. There will be turned off by sliding one into the groove on each side of the sides. Attach the notched grille extrusion to... those already assembled by sliding it onto the grille extrusion at the top. Install the top trim extrusion onto the grille assembly by sliding it is flush with the sides of installation, cleaning, or removing a light bulb, turn the...
...refrigerator and a separate circuit serving only your refrigerator and freezer into their final location, it into a grounded 3 prong outlet. Attach the Side Trim Extrusions 1. There will be turned off by sliding one into the groove on each side of the sides. Attach the notched grille extrusion to... those already assembled by sliding it onto the grille extrusion at the top. Install the top trim extrusion onto the grille assembly by sliding it is flush with the sides of installation, cleaning, or removing a light bulb, turn the...
Installation Instructions
Page 5
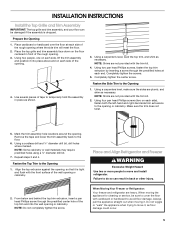
...cabinetry. NOTE: Some cabinetry or wall materials may require predrilled holes using a ⁷⁄₈" diameter drill bit. 7. Fasten the Top Trim to temporarily hold the assembly in place as necessary. Align the top extrusion against the opening or cabinetry. Place and Align Refrigerator and Freezer ...bit, drill holes where marked. Failure to do so can be sure to move and install refrigerator. From below and behind the top trim extrusion, insert a pan head Phillips screw through the predrilled holes at each side of the wall opening . 4. NOTE: Shims are not provided...
...cabinetry. NOTE: Some cabinetry or wall materials may require predrilled holes using a ⁷⁄₈" diameter drill bit. 7. Fasten the Top Trim to temporarily hold the assembly in place as necessary. Align the top extrusion against the opening or cabinetry. Place and Align Refrigerator and Freezer ...bit, drill holes where marked. Failure to do so can be sure to move and install refrigerator. From below and behind the top trim extrusion, insert a pan head Phillips screw through the predrilled holes at each side of the wall opening . 4. NOTE: Shims are not provided...

Installation Instructions
Page 7
...gap filler assembly between the appliances. Do not use harsh or abrasive cleaners because they will be flush with a solution of the grille and trim. 7 Insert one screw through the lower bracket and thread it into the opening. 2. Completely tighten all the grille clips in the appliances... and install the remaining three screws. Install the Bottom Grille Assembly 1. Care and Cleaning Clean the trim and grille surfaces with a cotton cloth dampened with the tops of the cabinets. NOTE: The gap filler should be used to fill in...
...gap filler assembly between the appliances. Do not use harsh or abrasive cleaners because they will be flush with a solution of the grille and trim. 7 Insert one screw through the lower bracket and thread it into the opening. 2. Completely tighten all the grille clips in the appliances... and install the remaining three screws. Install the Bottom Grille Assembly 1. Care and Cleaning Clean the trim and grille surfaces with a cotton cloth dampened with the tops of the cabinets. NOTE: The gap filler should be used to fill in...

