Use and Care Guide
Page 3
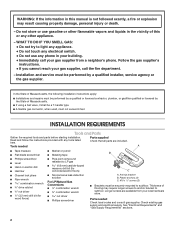
.... Do not store or use any other flammable vapors and liquids in the vicinity of this manual and on your appliance. We have provided many important safety messages in this or any phone in this manual is the safety alert symbol. WHAT TO DO IF YOU SMELL GAS: • Do not try...
.... Do not store or use any other flammable vapors and liquids in the vicinity of this manual and on your appliance. We have provided many important safety messages in this or any phone in this manual is the safety alert symbol. WHAT TO DO IF YOU SMELL GAS: • Do not try...
Use and Care Guide
Page 5
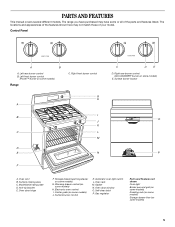
... liner (on some models) H. The locations and appearances of the features shown here may have some models) 5 Right front burner control G H A I . PARTS AND FEATURES This manual covers several different models. Left front burner control (Power™ burner on some or all of your model. Control Panel A B A. Oven door window O. The range...
... liner (on some models) H. The locations and appearances of the features shown here may have some models) 5 Right front burner control G H A I . PARTS AND FEATURES This manual covers several different models. Left front burner control (Power™ burner on some or all of your model. Control Panel A B A. Oven door window O. The range...
Use and Care Guide
Page 6
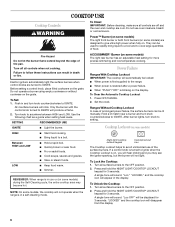
...) HIGH Between HIGH and LOW LOW s Start food cooking. Press OFF/CANCEL 2. Set the clock. "Loc," "LOCKED," and the cooktop icon will automatically be lit manually. SETTING RECOMMENDED USE IGNITE s Light the burner. Ranges Without Cooktop Lockout In case of food. A single tone will sound. Turn knob to setting. Use the...
...) HIGH Between HIGH and LOW LOW s Start food cooking. Press OFF/CANCEL 2. Set the clock. "Loc," "LOCKED," and the cooktop icon will automatically be lit manually. SETTING RECOMMENDED USE IGNITE s Light the burner. Ranges Without Cooktop Lockout In case of food. A single tone will sound. Turn knob to setting. Use the...

Installation Instructions
Page 1
... safety and the safety of injury, and tell you and others are not followed. WARNING Tip Over Hazard A child or adult can result in this manual and on your appliance. Save installation instructions for future reference. This is moved. All safety messages will tell you what can be killed. WARNING You...
... safety and the safety of injury, and tell you and others are not followed. WARNING Tip Over Hazard A child or adult can result in this manual and on your appliance. Save installation instructions for future reference. This is moved. All safety messages will tell you what can be killed. WARNING You...
Installation Instructions
Page 2
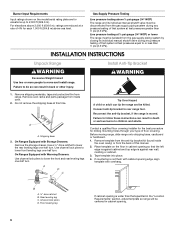
... SMELL GAS: • Do not try to subfloor. Tools needed Check local codes and consult gas supplier. Thickness of Massachusetts. In the State of this manual is not followed exactly, a fire or explosion may require longer screws to anchor bracket to LP gas s 4.8 mm) carbide-tipped masonry drill bit (for wood...
... SMELL GAS: • Do not try to subfloor. Tools needed Check local codes and consult gas supplier. Thickness of Massachusetts. In the State of this manual is not followed exactly, a fire or explosion may require longer screws to anchor bracket to LP gas s 4.8 mm) carbide-tipped masonry drill bit (for wood...

Installation Instructions
Page 5
... a qualified person make sure gas pressure does not exceed 14" (36 cm) water column. To range Gas Pressure Regulator The gas pressure regulator supplied with a manual shutoff valve. The inlet pressure to the regulator should be used. In the absence of E.I .D., flexible metal appliance connector may result in -line connection to...
... a qualified person make sure gas pressure does not exceed 14" (36 cm) water column. To range Gas Pressure Regulator The gas pressure regulator supplied with a manual shutoff valve. The inlet pressure to the regulator should be used. In the absence of E.I .D., flexible metal appliance connector may result in -line connection to...
Installation Instructions
Page 6
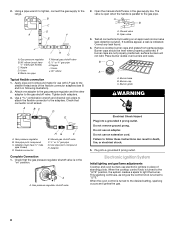
...installer for the best procedure for each 1,000 ft (304.8 m) above ½ psi gauge (14" WCP) The range and its individual manual shutoff valve during any pressure testing of that system at test pressures equal to rear range foot. Remove shipping materials, tape and protective film from... the gas supply piping system by closing its individual manual shutoff valve must be disconnected from the back of floor covering. On Ranges Equipped with overhang. On Ranges Equipped with Warming Drawers:...
...installer for the best procedure for each 1,000 ft (304.8 m) above ½ psi gauge (14" WCP) The range and its individual manual shutoff valve during any pressure testing of that system at test pressures equal to rear range foot. Remove shipping materials, tape and protective film from... the gas supply piping system by closing its individual manual shutoff valve must be disconnected from the back of floor covering. On Ranges Equipped with overhang. On Ranges Equipped with Warming Drawers:...
Installation Instructions
Page 8
... Black iron pipe I . Union J. 90° elbow Typical flexible connection 1. A BC D E A. Adapter Complete Connection 1. Open the manual shutoff valve in place of the flexible connector adapters (see B and G in the "on an approved noncorrosive leak-detection solution. If bubbles ...appear, a leak is not kinked. Place burner grates over burners and caps. Nipple I H G F. Manual gas shutoff valve F. ½" or ¾" gas pipe G. A A. Plug into a grounded 3 prong outlet. This sparking continues, as long ...
... Black iron pipe I . Union J. 90° elbow Typical flexible connection 1. A BC D E A. Adapter Complete Connection 1. Open the manual shutoff valve in place of the flexible connector adapters (see B and G in the "on an approved noncorrosive leak-detection solution. If bubbles ...appear, a leak is not kinked. Place burner grates over burners and caps. Nipple I H G F. Manual gas shutoff valve F. ½" or ¾" gas pipe G. A A. Plug into a grounded 3 prong outlet. This sparking continues, as long ...
Installation Instructions
Page 11
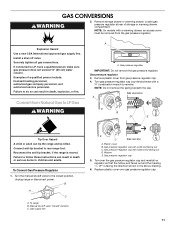
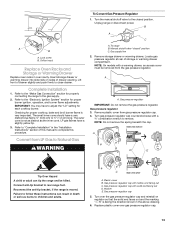
...E LP LP Tip Over Hazard A child or adult can result in death, explosion, or fire. Unplug range or disconnect power. Manual shutoff valve "closed position. Gas pressure regulator cap with solid end facing out C. Turn over the gas pressure regulator cap and reinstall ... C A. Failure to follow these instructions can tip the range and be removed from gas pressure regulator cap. 4. Plastic cover B. Turn the manual shutoff valve to the closed " position C. Gas pressure regulator cap 5. GAS CONVERSIONS WARNING 2. Securely tighten all gas connections. To range B. ...
...E LP LP Tip Over Hazard A child or adult can result in death, explosion, or fire. Unplug range or disconnect power. Manual shutoff valve "closed position. Gas pressure regulator cap with solid end facing out C. Turn over the gas pressure regulator cap and reinstall ... C A. Failure to follow these instructions can tip the range and be removed from gas pressure regulator cap. 4. Plastic cover B. Turn the manual shutoff valve to the closed " position C. Gas pressure regulator cap 5. GAS CONVERSIONS WARNING 2. Securely tighten all gas connections. To range B. ...
Installation Instructions
Page 13
... cap 5. Insert storage drawer or warming drawer into slide rails on regulator so that the solid end faces out and the marking " Turn the manual shutoff valve to the gas supply. 2. NOTE: On models with a ⁵⁄₈" combination wrench to rear range foot. Gas pressure regulator... B A. LP gas flames have a slightly yellow tip. 3. Plastic cover B. Lift front of drawer opening. Locate gas pressure regulator at rear of this manual to the "Make Gas Connection" section for each cooktop burner. Reconnect the anti-tip bracket, if the range is not as distinct as the inner...
... cap 5. Insert storage drawer or warming drawer into slide rails on regulator so that the solid end faces out and the marking " Turn the manual shutoff valve to the gas supply. 2. NOTE: On models with a ⁵⁄₈" combination wrench to rear range foot. Gas pressure regulator... B A. LP gas flames have a slightly yellow tip. 3. Plastic cover B. Lift front of drawer opening. Locate gas pressure regulator at rear of this manual to the "Make Gas Connection" section for each cooktop burner. Reconnect the anti-tip bracket, if the range is not as distinct as the inner...

Installation Instructions
Page 14
... have to the Model Number and Serial Number Plate located behind the left side of the storage or warming drawer for proper sizing of this manual to 2½ turns). increase flame size (preset at factory for the remaining burners. 14 A B A. See "Adjust Oven Broil Burner Flame" section. Repeat steps 1-7 for Natural...
... have to the Model Number and Serial Number Plate located behind the left side of the storage or warming drawer for proper sizing of this manual to 2½ turns). increase flame size (preset at factory for the remaining burners. 14 A B A. See "Adjust Oven Broil Burner Flame" section. Repeat steps 1-7 for Natural...


