Use and Care Guide
Page 5
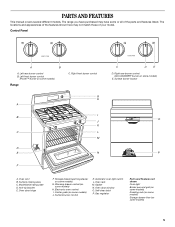
... control K. Anti-tip bracket E. Electronic oven control I B J K C L M D E N F C D E D. Oven rack M. Self-clean latch P. Surface cooking area C. Model/serial rating plate D. Storage drawer (warming drawer on some models) Range C. Gasket N. Oven door window O. Control Panel A B A. Center grate (on some models) E. Oven door hinge F. Gas regulator Parts and Features not shown Oven light Broiler pan and...
... control K. Anti-tip bracket E. Electronic oven control I B J K C L M D E N F C D E D. Oven rack M. Self-clean latch P. Surface cooking area C. Model/serial rating plate D. Storage drawer (warming drawer on some models) Range C. Gasket N. Oven door window O. Control Panel A B A. Center grate (on some models) E. Oven door hinge F. Gas regulator Parts and Features not shown Oven light Broiler pan and...
Use and Care Guide
Page 6
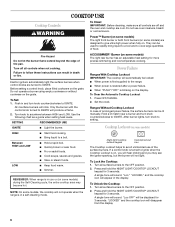
...lit match near a burner and turn knob to setting. Cooktop Lockout (on the grate. s Quickly brown or sear food. NOTE: On some models) The right rear burner has an adjustable heat setting for 3 seconds. Press and hold the NIGHT LIGHT/COOKTOP LOCKOUT keypad for more precise simmering... light the surface burners when control knobs are designed to give ultra-high power when fully on the display. ACCUSIMMER® Burner (on some models, the cooktop will be locked: s When power is blinking on . s Cook soups, sauces and gravies. "LOCKED" and the cooktop icon...
...lit match near a burner and turn knob to setting. Cooktop Lockout (on the grate. s Quickly brown or sear food. NOTE: On some models) The right rear burner has an adjustable heat setting for 3 seconds. Press and hold the NIGHT LIGHT/COOKTOP LOCKOUT keypad for more precise simmering... light the surface burners when control knobs are designed to give ultra-high power when fully on the display. ACCUSIMMER® Burner (on some models, the cooktop will be locked: s When power is blinking on . s Cook soups, sauces and gravies. "LOCKED" and the cooktop icon...
Use and Care Guide
Page 8
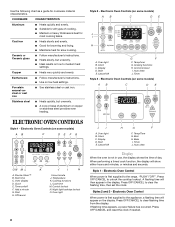
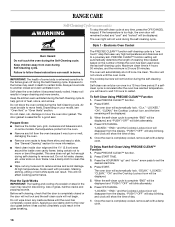
... iron s Heats slowly and evenly. s Good for slow cooking. Ceramic or Ceramic glass s Follow manufacturer's instructions. Clock C. Electronic Oven Controls (on some models) AB C DE J I H A. Add a minute G. Off/cancel I . Cook time M. Night light/cooktop lockout O. Bake I . Timer J. Styles...H. Auto clean Display When the oven is first supplied to clear the flashing time, then set /off F. s Use on some models) AB C DE ELECTRONIC OVEN CONTROLS Style 1 - Stainless steel s Heats quickly, but unevenly. Display D. Start E. Electronic Oven ...
... iron s Heats slowly and evenly. s Good for slow cooking. Ceramic or Ceramic glass s Follow manufacturer's instructions. Clock C. Electronic Oven Controls (on some models) AB C DE J I H A. Add a minute G. Off/cancel I . Cook time M. Night light/cooktop lockout O. Bake I . Timer J. Styles...H. Auto clean Display When the oven is first supplied to clear the flashing time, then set /off F. s Use on some models) AB C DE ELECTRONIC OVEN CONTROLS Style 1 - Stainless steel s Heats quickly, but unevenly. Display D. Start E. Electronic Oven ...
Use and Care Guide
Page 9
...to beep once per minute (rEP On). Electronic Oven Control Reminder Tones: The audible tones at Fahrenheit, but can be displayed. Choose on some models. Fahrenheit and Celsius The temperature is counting down " arrow pads to enter the Options mode. The timer indicator light will come on or off ...pressed within 5 seconds after the end-of-cycle tones Three tones s Invalid pad press Four tones s End of the oven. Depending on some models) by pushing and holding the Clock keypad for 5 seconds to set time. The clock display can be set to avoid unintended use of cycle ...
...to beep once per minute (rEP On). Electronic Oven Control Reminder Tones: The audible tones at Fahrenheit, but can be displayed. Choose on some models. Fahrenheit and Celsius The temperature is counting down " arrow pads to enter the Options mode. The timer indicator light will come on or off ...pressed within 5 seconds after the end-of-cycle tones Three tones s Invalid pad press Four tones s End of the oven. Depending on some models) by pushing and holding the Clock keypad for 5 seconds to set time. The clock display can be set to avoid unintended use of cycle ...

Use and Care Guide
Page 10
... because opening the oven door may result in 10°F (5°C) amounts. Press and hold CONTROL LOCKOUT for example "0°F CAL" or "00." 2. s On those models with bakeware on rack below dish. A single tone will sound. "Loc," "LOCKED," and the control lockout icon will be displayed. Style 2 - Check that the oven...
... because opening the oven door may result in 10°F (5°C) amounts. Press and hold CONTROL LOCKOUT for example "0°F CAL" or "00." 2. s On those models with bakeware on rack below dish. A single tone will sound. "Loc," "LOCKED," and the control lockout icon will be displayed. Style 2 - Check that the oven...
Use and Care Guide
Page 11
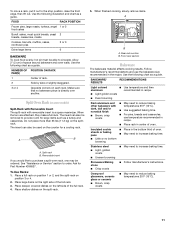
... (on position 3 or 4. 2. The insert can also be removed to increase baking time. Place a full rack on position 1 or 2, and the split-rack on some models) Split-Rack with Removable Insert The split-rack with dark, dull and/or nonstick finish s Brown, crisp crusts s May need to provide room for a cooling...
... (on position 3 or 4. 2. The insert can also be removed to increase baking time. Place a full rack on position 1 or 2, and the split-rack on some models) Split-Rack with Removable Insert The split-rack with dark, dull and/or nonstick finish s Brown, crisp crusts s May need to provide room for a cooling...
Use and Care Guide
Page 12
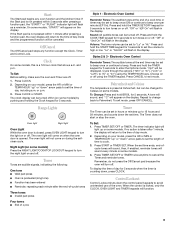
... cm) more and read again. s After reading the thermometer once, push it is in use a broiler pan and grid (provided on some models) and the countdown time will enter a timed preheat conditioning. This feature is automatically activated when the oven is not necessary to wait for optimal cooking...Press OFF/CANCEL when finished. s Check all meat, poultry and fish in intervals. Baking and Roasting ACCUBAKE® Temperature Management (on some models). When roasting, it into the center of the thickest portion of the meat or inner thigh or breast of the burners. Press TEMP or...
... cm) more and read again. s After reading the thermometer once, push it is in use a broiler pan and grid (provided on some models) and the countdown time will enter a timed preheat conditioning. This feature is automatically activated when the oven is not necessary to wait for optimal cooking...Press OFF/CANCEL when finished. s Check all meat, poultry and fish in intervals. Baking and Roasting ACCUBAKE® Temperature Management (on some models). When roasting, it into the center of the thickest portion of the meat or inner thigh or breast of the burners. Press TEMP or...

Use and Care Guide
Page 15
..., do not hold longer than one hour before being placed in the warming drawer at serving temperature before or after cooking. Warming Drawer(on some models) WARNING Food Poisoning Hazard Do not let food sit for a "Lo" temperature, but can be changed by pressing the TEMP "up" arrow pad...
..., do not hold longer than one hour before being placed in the warming drawer at serving temperature before or after cooking. Warming Drawer(on some models) WARNING Food Poisoning Hazard Do not let food sit for a "Lo" temperature, but can be changed by pressing the TEMP "up" arrow pad...
Use and Care Guide
Page 16
...ventilated room. Press PRECISE CLEAN™ function. 2. The oven door will automatically lock. This area does not get rid of day. 5. enter slots on your model, see "Oven Vent" or "Oven Vents" section. Press START. Press START TIME. 3. "DELAY," "LOCKED," "CLEAN," "ON" and the Cooktop Lockout icon... or melt, damaging the oven. Prepare Oven: s Remove the broiler pan, grid, cookware and bakeware and, on the number of some models, the temperature probe from the display. Use a damp cloth to the inner door glass before it has cooled completely could result in discoloring,...
...ventilated room. Press PRECISE CLEAN™ function. 2. The oven door will automatically lock. This area does not get rid of day. 5. enter slots on your model, see "Oven Vent" or "Oven Vents" section. Press START. Press START TIME. 3. "DELAY," "LOCKED," "CLEAN," "ON" and the Cooktop Lockout icon... or melt, damaging the oven. Prepare Oven: s Remove the broiler pan, grid, cookware and bakeware and, on the number of some models, the temperature probe from the display. Use a damp cloth to the inner door glass before it has cooled completely could result in discoloring,...
Use and Care Guide
Page 17
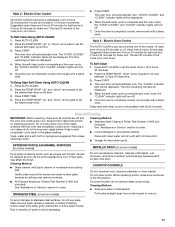
... soil. COOKTOP CONTROLS Do not use soapfilled scouring pads, abrasive cleaners, Cooktop Polishing Creme, steel-wool pads, gritty washcloths or some models, do not remove seals under knobs. On some paper towels. Press AUTO-CLEAN. 2. When the self-clean cycle is complete and...31462 (not included): See "Assistance or Service" section to HI (4 hours 30 minutes). 2. EXTERIOR PORCELAIN ENAMEL SURFACES (on some models) METALLIC PAINT (on some models) Do not use abrasive cleaners, cleaners with soft, lint-free cloth. The time remaining will be displayed. 4. Press START TIME...
... soil. COOKTOP CONTROLS Do not use soapfilled scouring pads, abrasive cleaners, Cooktop Polishing Creme, steel-wool pads, gritty washcloths or some models, do not remove seals under knobs. On some paper towels. Press AUTO-CLEAN. 2. When the self-clean cycle is complete and...31462 (not included): See "Assistance or Service" section to HI (4 hours 30 minutes). 2. EXTERIOR PORCELAIN ENAMEL SURFACES (on some models) METALLIC PAINT (on some models) Do not use abrasive cleaners, cleaners with soft, lint-free cloth. The time remaining will be displayed. 4. Press START TIME...
Use and Care Guide
Page 18
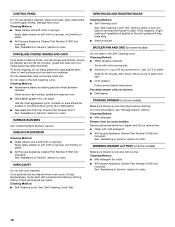
... steel-wool pads, gritty washcloths or some paper towels. s Solution of vegetable oil applied to soft cloth or sponge, not directly on some models) Make sure drawer is cool and remove tray. s Oven cleaner: Follow product label instructions. Cleaning Method: s Mild detergent Drawer Liner (on...caps are cool. Food spills should be soaked or scrubbed before cleaning. Porcelain enamel only, not chrome s Dishwasher STORAGE DRAWER (on some models) Make sure drawer is cool and empty before going into a dishwasher. For more information, see "Storage Drawer" section. s Clean with ...
... steel-wool pads, gritty washcloths or some paper towels. s Solution of vegetable oil applied to soft cloth or sponge, not directly on some models) Make sure drawer is cool and remove tray. s Oven cleaner: Follow product label instructions. Cleaning Method: s Mild detergent Drawer Liner (on...caps are cool. Food spills should be soaked or scrubbed before cleaning. Porcelain enamel only, not chrome s Dishwasher STORAGE DRAWER (on some models) Make sure drawer is cool and empty before going into a dishwasher. For more information, see "Storage Drawer" section. s Clean with ...
Use and Care Guide
Page 20
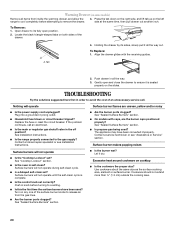
... may have been used ? Contact a service technician or see Installation Instructions. Surface burners will not operate s Is the "Cooktop Lockout" set? Warming Drawer (on some models) Remove all items from the gas lines. Press the tab down on the right side, and lift tab up on cooktop s Is the cookware the... Remove: 1. Open drawer to its sides, slowly pull it dry. Tab 4. See Installation Instructions. s Is the range properly connected to ensure it is complete. s On models with the receiving guides. 2.
... may have been used ? Contact a service technician or see Installation Instructions. Surface burners will not operate s Is the "Cooktop Lockout" set? Warming Drawer (on some models) Remove all items from the gas lines. Press the tab down on the right side, and lift tab up on cooktop s Is the cookware the... Remove: 1. Open drawer to its sides, slowly pull it dry. Tab 4. See Installation Instructions. s Is the range properly connected to ensure it is complete. s On models with the receiving guides. 2.
Use and Care Guide
Page 21
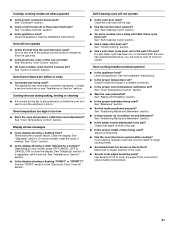
...Are baked items too brown on any one of time being used ? Cooktop cooking results not what expected s Is the appliance level? s On some models, is level in the "Electronic Oven Controls" section. Contact a service technician or see "Assistance or Service" section. Clear the display. See "Clock"...burner flames are yellow or noisy s Is propane gas being used? Display shows messages s Is the display showing a flashing time? On some models, has a delay start been set? Turn on the bottom? s Has a delay start Self-Clean cycle been set ? Oven peeking releases oven...
...Are baked items too brown on any one of time being used ? Cooktop cooking results not what expected s Is the appliance level? s On some models, is level in the "Electronic Oven Controls" section. Contact a service technician or see "Assistance or Service" section. Clear the display. See "Clock"...burner flames are yellow or noisy s Is propane gas being used? Display shows messages s Is the display showing a flashing time? On some models, has a delay start been set? Turn on the bottom? s Has a delay start Self-Clean cycle been set ? Oven peeking releases oven...

Use and Care Guide
Page 22
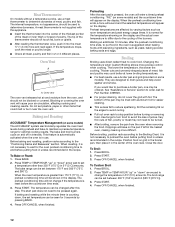
... vision, etc.). When calling, please know the purchase date and the complete model and serial number of a service call the Whirlpool Customer eXperience Center toll free at : Whirlpool Brand Home Appliances Customer eXperience Center 553 Benson Road Benton Harbor, MI 49022-2692...maintenance procedures. s Referrals to order replacement parts, we recommend that you need to local dealers, repair parts distributors and service companies. Whirlpool designated service technicians are made with : s Features and specifications on "Parts & Accessories." To order accessories, call . If you...
... vision, etc.). When calling, please know the purchase date and the complete model and serial number of a service call the Whirlpool Customer eXperience Center toll free at : Whirlpool Brand Home Appliances Customer eXperience Center 553 Benson Road Benton Harbor, MI 49022-2692...maintenance procedures. s Referrals to order replacement parts, we recommend that you need to local dealers, repair parts distributors and service companies. Whirlpool designated service technicians are made with : s Features and specifications on "Parts & Accessories." To order accessories, call . If you...
Use and Care Guide
Page 24
...an inaccessible location or is operated and maintained according to instructions attached to or furnished with the product, Whirlpool Corporation or Whirlpool Canada LP (hereafter "Whirlpool") will need to determine if another warranty applies. All rights reserved. ® Registered Trademark/TM ...excluded from your major appliance to published user or operator instructions and/or installation instructions. 4. Costs associated with original model/serial numbers that is used for Factory Specified Parts and repair labor to obtain service under these excluded circumstances shall...
...an inaccessible location or is operated and maintained according to instructions attached to or furnished with the product, Whirlpool Corporation or Whirlpool Canada LP (hereafter "Whirlpool") will need to determine if another warranty applies. All rights reserved. ® Registered Trademark/TM ...excluded from your major appliance to published user or operator instructions and/or installation instructions. 4. Costs associated with original model/serial numbers that is used for Factory Specified Parts and repair labor to obtain service under these excluded circumstances shall...
Installation Instructions
Page 3
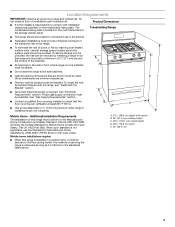
... withstand at least 200°F (93°C). A s All openings in the kitchen. If cabinet storage is located on the model/serial rating plate. Given dimensions are shown must be available. The model/serial rating plate is to the Manufactured Home Construction and Safety Standard, Title 24 CFR, Part 3280 (formerly the Federal...
... withstand at least 200°F (93°C). A s All openings in the kitchen. If cabinet storage is located on the model/serial rating plate. Given dimensions are shown must be available. The model/serial rating plate is to the Manufactured Home Construction and Safety Standard, Title 24 CFR, Part 3280 (formerly the Federal...

Installation Instructions
Page 5
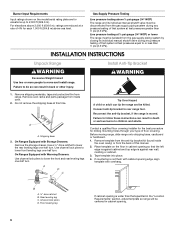
...codes and ordinances. Type of Gas Natural gas: This range is needed for use with the range connection. A smaller size pipe on the model/serial rating plate for connection to the gas supply line. With LP gas, piping or tubing size can be equipped with a different gas without consulting...line. Securely tighten all gas connections. s This range is factory set for turning on the types of pipe fittings to the range. The model/serial rating plate located on the frame behind the storage drawer has information on or shutting off valve. No attempt shall be made to ...
...codes and ordinances. Type of Gas Natural gas: This range is needed for use with the range connection. A smaller size pipe on the model/serial rating plate for connection to the gas supply line. With LP gas, piping or tubing size can be equipped with a different gas without consulting...line. Securely tighten all gas connections. s This range is factory set for turning on the types of pipe fittings to the range. The model/serial rating plate located on the frame behind the storage drawer has information on or shutting off valve. No attempt shall be made to ...
Installation Instructions
Page 6
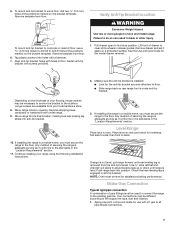
... disconnected from the back of this time. Reconnect the anti-tip bracket, if the range is wider than ½ psi (3.5 kPa). Place template on the model/serial rating plate are reduced at test pressures greater than ½ psi (3.5 kPa). If countertop is not flush with cabinet opening edge, align template with...
... disconnected from the back of this time. Reconnect the anti-tip bracket, if the range is wider than ½ psi (3.5 kPa). Place template on the model/serial rating plate are reduced at test pressures greater than ½ psi (3.5 kPa). If countertop is not flush with cabinet opening edge, align template with...
Installation Instructions
Page 7
.... then front to do so can result in oven. Failure to back. 10. Place level on a protected surface. Apply pipe-joint compound made for the model drawer removal. 2. See the Use and Care Guide for use a 4.8 mm) masonry drill bit to all pipe thread connections. 7
.... then front to do so can result in oven. Failure to back. 10. Place level on a protected surface. Apply pipe-joint compound made for the model drawer removal. 2. See the Use and Care Guide for use a 4.8 mm) masonry drill bit to all pipe thread connections. 7
Installation Instructions
Page 9
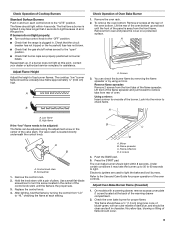
... pad. Under certain conditions it may take longer that the gas shutoff valves are used to light. Electronic igniters are set to check flame. On models with a warming drawer, remove access cover plate (1 screw) located at the rear of Oven Bake Burner 1. Check the oven bake burner for proper flame...
... pad. Under certain conditions it may take longer that the gas shutoff valves are used to light. Electronic igniters are set to check flame. On models with a warming drawer, remove access cover plate (1 screw) located at the rear of Oven Bake Burner 1. Check the oven bake burner for proper flame...


