Owners Manual
Page 2
...mean: DANGER You can happen if the instructions are very important. TABLE OF CONTENTS COOKTOP SAFETY 2 PARTS AND FEATURES 4 COOKTOP USE 6 Cooktop Controls 6 Sealed Surface Burners 7 Surface Grates with Locator Pin 8 Home Canning 8 Cookware 8 COOKTOP CARE 9 General Cleaning 9 TROUBLESHOOTING 10 ASSISTANCE OR SERVICE 11 In the U.S.A 11 ... DE CUISSON 20 Nettoyage général 20 DÉPANNAGE 21 ASSISTANCE OU SERVICE 22 Au Canada 22 GARANTIE 23 COOKTOP SAFETY Your safety and the safety of injury, and tell you what the potential hazard is the safety alert symbol....
...mean: DANGER You can happen if the instructions are very important. TABLE OF CONTENTS COOKTOP SAFETY 2 PARTS AND FEATURES 4 COOKTOP USE 6 Cooktop Controls 6 Sealed Surface Burners 7 Surface Grates with Locator Pin 8 Home Canning 8 Cookware 8 COOKTOP CARE 9 General Cleaning 9 TROUBLESHOOTING 10 ASSISTANCE OR SERVICE 11 In the U.S.A 11 ... DE CUISSON 20 Nettoyage général 20 DÉPANNAGE 21 ASSISTANCE OU SERVICE 22 Au Canada 22 GARANTIE 23 COOKTOP SAFETY Your safety and the safety of injury, and tell you what the potential hazard is the safety alert symbol....
Owners Manual
Page 3
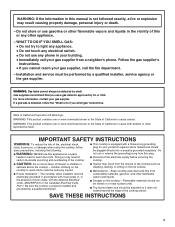
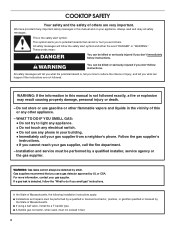
...on or near surface units. ■ Top burner flame size should be adjusted so it does not extend beyond the edge of the cooking utensil. Be sure the cooktop is properly installed and grounded by UL or CSA. Follow the gas supplier's instructions. • If you use... exactly, a fire or explosion may result in carbon monoxide poisoning and overheating of the cooktop. ■ CAUTION: Do not store items of interest to children in cabinets above the cooktop - WARNING: Gas leaks cannot always be seriously injured. ■ Proper Installation - IMPORTANT SAFETY INSTRUCTIONS WARNING:...
...on or near surface units. ■ Top burner flame size should be adjusted so it does not extend beyond the edge of the cooking utensil. Be sure the cooktop is properly installed and grounded by UL or CSA. Follow the gas supplier's instructions. • If you use... exactly, a fire or explosion may result in carbon monoxide poisoning and overheating of the cooktop. ■ CAUTION: Do not store items of interest to children in cabinets above the cooktop - WARNING: Gas leaks cannot always be seriously injured. ■ Proper Installation - IMPORTANT SAFETY INSTRUCTIONS WARNING:...
Owners Manual
Page 4
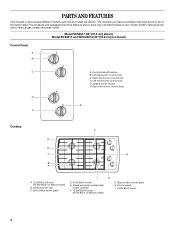
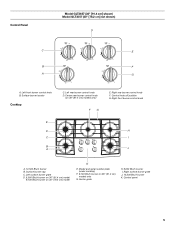
...All BTU ratings shown are shown. Left surface burner grate I . 5,000 Btu/h burner 4 The cooktop you have purchased may not match those of your model. Right front burner control knob D E F Cooktop E D C B A F G A. 12,500 Btu/h burner (10,500 Btu/h on W3CG model) G. ...gas unless otherwise noted. Control knob off position B. Right rear burner control knob D. PARTS AND FEATURES This manual covers several different models, and not all of the items listed. Surface burner cap C. Right surface burner grate H. Model and serial number plate (under cooktop) F. 12,500 Btu/h burner...
...All BTU ratings shown are shown. Left surface burner grate I . 5,000 Btu/h burner 4 The cooktop you have purchased may not match those of your model. Right front burner control knob D E F Cooktop E D C B A F G A. 12,500 Btu/h burner (10,500 Btu/h on W3CG model) G. ...gas unless otherwise noted. Control knob off position B. Right rear burner control knob D. PARTS AND FEATURES This manual covers several different models, and not all of the items listed. Surface burner cap C. Right surface burner grate H. Model and serial number plate (under cooktop) F. 12,500 Btu/h burner...
Owners Manual
Page 5
... (under cooktop) F. 9,100 Btu/h burner on 36" [91.4 cm] models only) FG E. Control knob off position G. Control panel 5 Right surface burner grate J. 12,500 Btu/h burner K. Left surface burner grate D. 6,000 Btu/h burner on 36" (91.4 cm) model 9,100 Btu/h burner on 30" (76.2 cm) model K E. Surface burner cap C. Left front burner control knob B. Surface burner locator Cooktop E D C B A C. Right rear burner control...
... (under cooktop) F. 9,100 Btu/h burner on 36" [91.4 cm] models only) FG E. Control knob off position G. Control panel 5 Right surface burner grate J. 12,500 Btu/h burner K. Left surface burner grate D. 6,000 Btu/h burner on 36" (91.4 cm) model 9,100 Btu/h burner on 30" (76.2 cm) model K E. Surface burner cap C. Left front burner control knob B. Surface burner locator Cooktop E D C B A C. Right rear burner control...

Owners Manual
Page 6
... specialist to check the wall receptacle to LITE will not operate. 6 REMEMBER: When cooktop is wired with the correct polarity. Hold a lit match near a burner and turn knob counterclockwise to LITE. Only the burner with Natural gas. Turn off . The large burners (12,500 Btu/h [British Thermal Units]) provide the highest heat setting, and are...
... specialist to check the wall receptacle to LITE will not operate. 6 REMEMBER: When cooktop is wired with the correct polarity. Hold a lit match near a burner and turn knob counterclockwise to LITE. Only the burner with Natural gas. Turn off . The large burners (12,500 Btu/h [British Thermal Units]) provide the highest heat setting, and are...

Owners Manual
Page 7
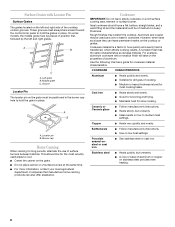
...material to enter the gas tube opening. Remove the burner cap from spillovers by always using a surface burner. If the burner needs to "General Cleaning" section. 2. Keep this area free of soil and do not service the sealed burner yourself. Do not ...Burner ports Burner ports: Check burner flames occasionally for the burner to the "General Cleaning" section. A good flame is cool. B A. 1-1¹⁄₂" (25-38 mm) B. A B A. Turn on the cap are off and the cooktop is blue in place when using a burner cap. Gas tube opening Gas tube opening: Gas...
...material to enter the gas tube opening. Remove the burner cap from spillovers by always using a surface burner. If the burner needs to "General Cleaning" section. 2. Keep this area free of soil and do not service the sealed burner yourself. Do not ...Burner ports Burner ports: Check burner flames occasionally for the burner to the "General Cleaning" section. A good flame is cool. B A. 1-1¹⁄₂" (25-38 mm) B. A B A. Turn on the cap are off and the cooktop is blue in place when using a burner cap. Gas tube opening Gas tube opening: Gas...
Owners Manual
Page 8
.... ■ For more information, contact your local agricultural department. For example, aluminum cookware with Locator Pin Surface Grates The grates located on the cooktop or grates. COOKWARE CHARACTERISTICS Aluminum ■ Heats quickly and evenly. ■ Suitable for cookware material characteristics. A B C A. A B A.... of aluminum or copper on a hot surface cooking area, element or surface burner. Burner cap Home Canning When canning for slow cooking. Aluminum and copper may scratch the cooktop. A nonstick finish has the same characteristics as a core or base in ...
.... ■ For more information, contact your local agricultural department. For example, aluminum cookware with Locator Pin Surface Grates The grates located on the cooktop or grates. COOKWARE CHARACTERISTICS Aluminum ■ Heats quickly and evenly. ■ Suitable for cookware material characteristics. A B C A. A B A.... of aluminum or copper on a hot surface cooking area, element or surface burner. Burner cap Home Canning When canning for slow cooking. Aluminum and copper may scratch the cooktop. A nonstick finish has the same characteristics as a core or base in ...
Owners Manual
Page 9
... acids, such as vinegar and tomato, should be cleaned as soon as cooktop, grates and caps are cool. ■ Dishwasher (grates only, not caps): Use the most aggressive cycle. ■ Gas Grate and Drip Pan Cleaner Part Number 31617 (not included): See "Assistance...each other or hard surfaces such as the cooktop, grates and caps are off and the cooktop is cool. On some models) CONTROL PANEL To avoid damage to the cooktop controls, do not remove seals under knobs. SURFACE BURNERS Sealed Burner models See "Sealed Surface Burners" section. 9 EXTERIOR PORCELAIN ENAMEL SURFACES (...
... acids, such as vinegar and tomato, should be cleaned as soon as cooktop, grates and caps are cool. ■ Dishwasher (grates only, not caps): Use the most aggressive cycle. ■ Gas Grate and Drip Pan Cleaner Part Number 31617 (not included): See "Assistance...each other or hard surfaces such as the cooktop, grates and caps are off and the cooktop is cool. On some models) CONTROL PANEL To avoid damage to the cooktop controls, do not remove seals under knobs. SURFACE BURNERS Sealed Burner models See "Sealed Surface Burners" section. 9 EXTERIOR PORCELAIN ENAMEL SURFACES (...
Owners Manual
Page 10
.... ■ Is the control knob set to the proper heat level? Plug into a grounded 3 prong outlet. Level the cooktop. See "Sealed Surface Burners" section. ■ Is the main gas shutoff valve in death, fire, or electrical shock. ■ Is the power supply cord unplugged? See the Installation Instructions. 10 Failure to a setting. ■ Are...
.... ■ Is the control knob set to the proper heat level? Plug into a grounded 3 prong outlet. Level the cooktop. See "Sealed Surface Burners" section. ■ Is the main gas shutoff valve in death, fire, or electrical shock. ■ Is the power supply cord unplugged? See the Installation Instructions. 10 Failure to a setting. ■ Are...
Owners Manual
Page 11
... "Parts & Accessories." Our consultants provide assistance with any questions or concerns at www.whirlpool.com and click on our full line of your request. Cooktop Cleaner Order Part Number 31464 Cooktop Scraper Order Part Number WA906B In Canada Call the Whirlpool Canada LP Customer eXperience Centre toll free: 1-800-807-6777. Mississauga, Ontario L5N...
... "Parts & Accessories." Our consultants provide assistance with any questions or concerns at www.whirlpool.com and click on our full line of your request. Cooktop Cleaner Order Part Number 31464 Cooktop Scraper Order Part Number WA906B In Canada Call the Whirlpool Canada LP Customer eXperience Centre toll free: 1-800-807-6777. Mississauga, Ontario L5N...

Dimension Guide
Page 1
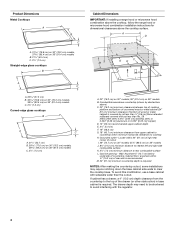
... countertop within 6" (15.2 cm) of rear wall is recommended M. 24" (61 cm) minimum countertop depth is required Because Whirlpool Corporation policy includes a continuous commitment to improve Dimensions are for use TEFLON® tape. Grounded outlet - Pipe-joint compounds that ...;" minimum. Cabinet floor: anywhere within minimum horizontal clearances to rear combustible surface L. ® Gas Built-in Cooktop PRODUCT MODEL NUMBERS GLT3057R GLT3657R SCS3017R SCS3617R Gas Supply: This cooktop is factory set for planning purposes only. Electrical: A 120 volt, 60 Hz., AC only...
... countertop within 6" (15.2 cm) of rear wall is recommended M. 24" (61 cm) minimum countertop depth is required Because Whirlpool Corporation policy includes a continuous commitment to improve Dimensions are for use TEFLON® tape. Grounded outlet - Pipe-joint compounds that ...;" minimum. Cabinet floor: anywhere within minimum horizontal clearances to rear combustible surface L. ® Gas Built-in Cooktop PRODUCT MODEL NUMBERS GLT3057R GLT3657R SCS3017R SCS3617R Gas Supply: This cooktop is factory set for planning purposes only. Electrical: A 120 volt, 60 Hz., AC only...
Installation Instructions
Page 2
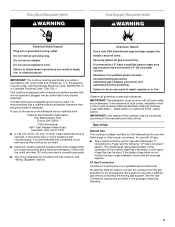
...Gas suppliers recommend that can be killed or seriously injured if you cannot reach your gas supplier, call your building. • Immediately call the fire department. - If a gas... of this or any phone in your gas supplier from a neighbor's phone. All safety...gas" instructions. Do not store or use a gas detector approved by UL or CSA. WHAT TO DO IF YOU SMELL GAS...■ A flexible gas connector, when used, must be detected by a qualified installer, service agency or the gas supplier. All safety messages... symbol. WARNING: Gas leaks cannot always be performed by smell. We ...
...Gas suppliers recommend that can be killed or seriously injured if you cannot reach your gas supplier, call your building. • Immediately call the fire department. - If a gas... of this or any phone in your gas supplier from a neighbor's phone. All safety...gas" instructions. Do not store or use a gas detector approved by UL or CSA. WHAT TO DO IF YOU SMELL GAS...■ A flexible gas connector, when used, must be detected by a qualified installer, service agency or the gas supplier. All safety messages... symbol. WARNING: Gas leaks cannot always be performed by smell. We ...
Installation Instructions
Page 3
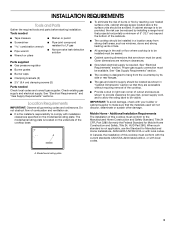
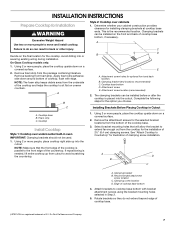
...sealed. ■ Cabinet opening dimensions that the materials used . INSTALLATION REQUIREMENTS Tools and Parts Gather the required tools and parts before starting installation. Location Requirements IMPORTANT: Observe all governing codes and ordinances. Proper gas supply connection must conform to LP gas ■ Noncorrosive leak-detection solution Parts supplied ■ Gas pressure regulator ■ Burner...Installations, ANSI A225.1/NFPA 501A or with local codes. See "Gas Supply Requirements" section. ■ The cooktop is designed to make sure that are minimum clearances. ■...
...sealed. ■ Cabinet opening dimensions that the materials used . INSTALLATION REQUIREMENTS Tools and Parts Gather the required tools and parts before starting installation. Location Requirements IMPORTANT: Observe all governing codes and ordinances. Proper gas supply connection must conform to LP gas ■ Noncorrosive leak-detection solution Parts supplied ■ Gas pressure regulator ■ Burner...Installations, ANSI A225.1/NFPA 501A or with local codes. See "Gas Supply Requirements" section. ■ The cooktop is designed to make sure that are minimum clearances. ■...
Installation Instructions
Page 4
... ¹⁄₄" [0.6 cm] flame retardant millboard covered with the regulator. 4 Combustible area above countertop (shown by dashed box above the cooktop surface. Wall: Anywhere 5" (12.7 cm) below underside of rear wall is recommended M. 24" (61 cm) minimum countertop depth is required...A D C M B KEF H L J I . 29" (73.7 cm) on 30" models; 35¼" (89.5 cm) on 36" models B. Grounded outlet - Gas line opening - Product Dimensions Metal Cooktops A B C A. 31 79.8 cm) on 30" (76.2 cm) models, 37 95.4 cm) on 36" (91.4 cm) models B. 21¹⁄₄" (53.4...
... ¹⁄₄" [0.6 cm] flame retardant millboard covered with the regulator. 4 Combustible area above countertop (shown by dashed box above the cooktop surface. Wall: Anywhere 5" (12.7 cm) below underside of rear wall is recommended M. 24" (61 cm) minimum countertop depth is required...A D C M B KEF H L J I . 29" (73.7 cm) on 30" models; 35¼" (89.5 cm) on 36" models B. Grounded outlet - Gas line opening - Product Dimensions Metal Cooktops A B C A. 31 79.8 cm) on 30" (76.2 cm) models, 37 95.4 cm) on 36" (91.4 cm) models B. 21¹⁄₄" (53.4...
Installation Instructions
Page 5
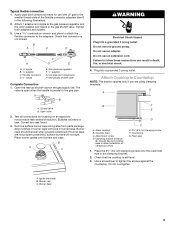
...the absence of local codes, installation must conform with this cooktop be obtained from the gas specified on the types of the above code standards can result in the absence of Gas Natural Gas: This cooktop is design-certified by a qualified service technician. Type of...are necessary. Explosion Hazard Use a new CSA International approved gas supply line. latest edition. This cooktop is equipped with the local gas supplier. latest edition or CAN/CGA B149 - Electrical Requirements WARNING Gas Supply Requirements WARNING Electrical Shock Hazard Plug into an outlet that...
...the absence of local codes, installation must conform with this cooktop be obtained from the gas specified on the types of the above code standards can result in the absence of Gas Natural Gas: This cooktop is design-certified by a qualified service technician. Type of...are necessary. Explosion Hazard Use a new CSA International approved gas supply line. latest edition. This cooktop is equipped with the local gas supplier. latest edition or CAN/CGA B149 - Electrical Requirements WARNING Gas Supply Requirements WARNING Electrical Shock Hazard Plug into an outlet that...

Installation Instructions
Page 6
... determine the size and materials used in insufficient gas supply. Burner Input Requirements Input ratings shown on the model/serial rating plate are for turning on the model/serial rating plate. Line pressure testing at ½ psi gauge (14" WCP) or lower The cooktop must be removed from the supply and fuel lines...
... determine the size and materials used in insufficient gas supply. Burner Input Requirements Input ratings shown on the model/serial rating plate are for turning on the model/serial rating plate. Line pressure testing at ½ psi gauge (14" WCP) or lower The cooktop must be removed from the supply and fuel lines...
Installation Instructions
Page 7
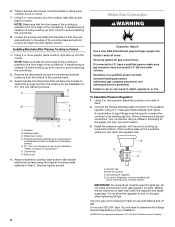
...or other injury. Clamping brackets can result in oven IMPORTANT: Clamping brackets should not be installed on uneven counters. B. Cooktop base bottom D. Using 2 or more people, place the cooktop upside down on a covered surface. 2. A B D C A. Clamping screw location D. Edge of clamping screw installation.... 2. Complete the following steps for the selected bracket locations from the cooktop for the cooktop. Cooktop base B. Using 2 or more people to sit flat on the front and back of cooktop, flush with bracket attachment screws using the bracket mounting holes selected in...
...or other injury. Clamping brackets can result in oven IMPORTANT: Clamping brackets should not be installed on uneven counters. B. Cooktop base bottom D. Using 2 or more people, place the cooktop upside down on a covered surface. 2. A B D C A. Clamping screw location D. Edge of clamping screw installation.... 2. Complete the following steps for the selected bracket locations from the cooktop for the cooktop. Cooktop base B. Using 2 or more people to sit flat on the front and back of cooktop, flush with bracket attachment screws using the bracket mounting holes selected in...
Installation Instructions
Page 8
... with bracket attachment screws using a ½" male pipe thread adapter and nipple. B A C D A. Foam seal 4. You will allow the regulator to the gas regulator too tight. Using 2 or more people, stand the cooktop on its edge. Installing Brackets After Placing Cooktop in death, explosion, or fire. 6. Remove the attachment screws for use TEFLON® tape...
... with bracket attachment screws using a ½" male pipe thread adapter and nipple. B A C D A. Foam seal 4. You will allow the regulator to the gas regulator too tight. Using 2 or more people, stand the cooktop on its edge. Installing Brackets After Placing Cooktop in death, explosion, or fire. 6. Remove the attachment screws for use TEFLON® tape...
Installation Instructions
Page 9
...in death, fire, or electrical shock. 4. Check that the cooktop is not kinked. Flexible connector D. ½" nipple F G E E. Open valve 2. Bubbles will not light. Do not use an extension cord. Cooktop base C. Igniter electrode B. Typical flexible connection 1. Use a ...Check that connector is still level. 3. H. Tighten both adapters and nipples. 3. If burner caps are using clamping brackets. Foam seal 1. Attach 1 adapter and nipple to the gas pressure regulator and the other adapter and nipple to tighten the screws against the countertop. Test...
...in death, fire, or electrical shock. 4. Check that the cooktop is not kinked. Flexible connector D. ½" nipple F G E E. Open valve 2. Bubbles will not light. Do not use an extension cord. Cooktop base C. Igniter electrode B. Typical flexible connection 1. Use a ...Check that connector is still level. 3. H. Tighten both adapters and nipples. 3. If burner caps are using clamping brackets. Foam seal 1. Attach 1 adapter and nipple to the gas pressure regulator and the other adapter and nipple to tighten the screws against the countertop. Test...
Installation Instructions
Page 10
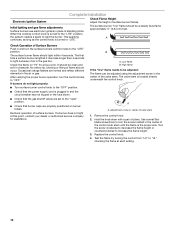
...turned to the "LITE" position, the system creates a spark to the "open" position. ■ Check that the gas shutoff valves are set to light the burner. Check the flame on burner bases. No yellow tip, blowing or lifting of standing pilots. A A. Remove the control knob. 2. blade screwdriver to ...place of flame should light within 4 seconds. Hold the knob stem with a pair of surface burners. When the cooktop control knob is lighted it may take longer then 4 seconds to "LITE." The surface burner flame should occur. B A. Use a small flat- It should be clean and soft in ...
...turned to the "LITE" position, the system creates a spark to the "open" position. ■ Check that the gas shutoff valves are set to light the burner. Check the flame on burner bases. No yellow tip, blowing or lifting of standing pilots. A A. Remove the control knob. 2. blade screwdriver to ...place of flame should light within 4 seconds. Hold the knob stem with a pair of surface burners. When the cooktop control knob is lighted it may take longer then 4 seconds to "LITE." The surface burner flame should occur. B A. Use a small flat- It should be clean and soft in ...


