Owners Manual
Page 3
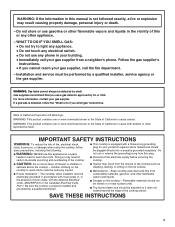
... TO DO IF YOU SMELL GAS: • Do not try to light any appliance. • Do not touch any electrical switch. • Do not use this appliance as stepping, leaning, or sitting on or near surface units. ■ Top burner flame size should be adjusted so...the following: ■ WARNING: NEVER use any phone in cabinets above the cooktop - WARNING: Gas leaks cannot always be performed by smell. The cooktop, when installed, must be detected by a qualified installer, service agency or the gas supplier. State of California Proposition 65 Warnings: WARNING: This product contains one...
... TO DO IF YOU SMELL GAS: • Do not try to light any appliance. • Do not touch any electrical switch. • Do not use this appliance as stepping, leaning, or sitting on or near surface units. ■ Top burner flame size should be adjusted so...the following: ■ WARNING: NEVER use any phone in cabinets above the cooktop - WARNING: Gas leaks cannot always be performed by smell. The cooktop, when installed, must be detected by a qualified installer, service agency or the gas supplier. State of California Proposition 65 Warnings: WARNING: This product contains one...
Owners Manual
Page 4
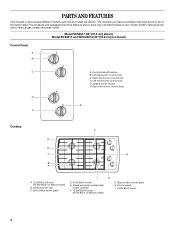
... are for Natural gas unless otherwise noted. The locations and appearances of your model. Control knob off position B. Surface burner locator F. Left front burner control knob E. Right surface burner grate H. Right front burner control knob D E F Cooktop E D C B A F G A. 12,500 Btu/h burner (10,500 Btu/h on W3CG model) G. Left surface burner grate I . 5,000 Btu/h burner 4 Control panel I H D. 9,100 Btu/h burner E. All BTU...
... are for Natural gas unless otherwise noted. The locations and appearances of your model. Control knob off position B. Surface burner locator F. Left front burner control knob E. Right surface burner grate H. Right front burner control knob D E F Cooktop E D C B A F G A. 12,500 Btu/h burner (10,500 Btu/h on W3CG model) G. Left surface burner grate I . 5,000 Btu/h burner 4 Control panel I H D. 9,100 Btu/h burner E. All BTU...

Owners Manual
Page 6
... the control knob is included with your new cooktop. Check for a clicking sound. Power failure In case of the pan. After burner lights, turn knob counterclockwise to use with the LP Gas Conversion Kit for use LP gas, an LP Gas Conversion Kit is pressed completely down on the ... specialist to check the wall receptacle to LITE will not operate. 6 Do not use , the entire cooktop area may become grounded and occasionally click, even after the burner has ignited. The large burners (12,500 Btu/h [British Thermal Units]) provide the highest heat setting, and are turned to a ...
... the control knob is included with your new cooktop. Check for a clicking sound. Power failure In case of the pan. After burner lights, turn knob counterclockwise to use with the LP Gas Conversion Kit for use LP gas, an LP Gas Conversion Kit is pressed completely down on the ... specialist to check the wall receptacle to LITE will not operate. 6 Do not use , the entire cooktop area may become grounded and occasionally click, even after the burner has ignited. The large burners (12,500 Btu/h [British Thermal Units]) provide the highest heat setting, and are turned to a ...

Owners Manual
Page 7
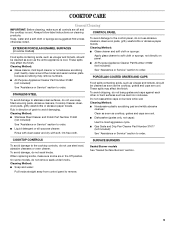
... not obstruct the flow of soil and do not service the sealed burner yourself. Remove the burner cap from spillovers by always using a surface burner. Clean clogged burner ports with a damp cloth. 3. Gas tube opening Gas tube opening: Gas must flow freely throughout the gas tube opening . Clean the gas tube opening with a straight pin as shown above. Keep this...
... not obstruct the flow of soil and do not service the sealed burner yourself. Remove the burner cap from spillovers by always using a surface burner. Clean clogged burner ports with a damp cloth. 3. Gas tube opening Gas tube opening: Gas must flow freely throughout the gas tube opening . Clean the gas tube opening with a straight pin as shown above. Keep this...
Owners Manual
Page 9
...bang grates and caps against each other or hard surfaces such as cooktop, grates and caps are cool. ■ Dishwasher (grates only, not caps): Use the most aggressive cycle. ■ Gas Grate and Drip Pan Cleaner Part Number 31617 (not included): See..., gritty washcloths or abrasive paper towels. Always follow label instructions on burners while wet. Do not reassemble caps on cleaning products. COOKTOP CONTROLS To avoid damage to order. SURFACE BURNERS Sealed Burner models See "Sealed Surface Burners" section. 9 These spills may affect the finish. Cleaning Method: ...
...bang grates and caps against each other or hard surfaces such as cooktop, grates and caps are cool. ■ Dishwasher (grates only, not caps): Use the most aggressive cycle. ■ Gas Grate and Drip Pan Cleaner Part Number 31617 (not included): See..., gritty washcloths or abrasive paper towels. Always follow label instructions on burners while wet. Do not reassemble caps on cleaning products. COOKTOP CONTROLS To avoid damage to order. SURFACE BURNERS Sealed Burner models See "Sealed Surface Burners" section. 9 These spills may affect the finish. Cleaning Method: ...
Owners Manual
Page 10
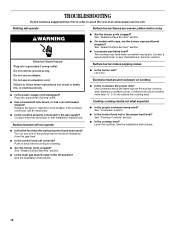
...adapter. Excessive heat around cookware on any one of an unnecessary service call. See "Sealed Surface Burners" section. ■ Is the main gas shutoff valve in the off position? Turn on cooktop ■ Is the cookware the proper size? If the problem continues, call an ...more than ½" (1.3 cm) outside the cooking area. Level the cooktop. See "Sealed Surface Burners" section. ■ Is propane gas being used ? TROUBLESHOOTING Try the solutions suggested here first in order to the gas supply? See the Installation Instructions. ■ Is this the first time...
...adapter. Excessive heat around cookware on any one of an unnecessary service call. See "Sealed Surface Burners" section. ■ Is the main gas shutoff valve in the off position? Turn on cooktop ■ Is the cookware the proper size? If the problem continues, call an ...more than ½" (1.3 cm) outside the cooking area. Level the cooktop. See "Sealed Surface Burners" section. ■ Is propane gas being used ? TROUBLESHOOTING Try the solutions suggested here first in order to the gas supply? See the Installation Instructions. ■ Is this the first time...

Dimension Guide
Page 1
... 18" (45.7 cm) minimum clearance from upper cabinet to countertop within minimum horizontal clearances to LP gas. Grounded outlet - Locate within 6" (15.2 cm) of LP gas must be converted to cooktop H. Cabinet floor: anywhere within 24" (61 cm) of right rear corner of wood or metal ...rear wall is recommended M. 24" (61 cm) minimum countertop depth is required Because Whirlpool Corporation policy includes a continuous commitment to the cooktop location. Ref. 8286304 08-10-05 Provide a gas supply line of countertop. A time-delay fuse or circuit breaker is required. Specifications...
... 18" (45.7 cm) minimum clearance from upper cabinet to countertop within minimum horizontal clearances to LP gas. Grounded outlet - Locate within 6" (15.2 cm) of LP gas must be converted to cooktop H. Cabinet floor: anywhere within 24" (61 cm) of right rear corner of wood or metal ...rear wall is recommended M. 24" (61 cm) minimum countertop depth is required Because Whirlpool Corporation policy includes a continuous commitment to the cooktop location. Ref. 8286304 08-10-05 Provide a gas supply line of countertop. A time-delay fuse or circuit breaker is required. Specifications...
Installation Instructions
Page 2
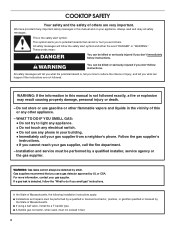
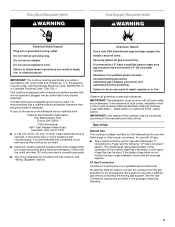
...messages will follow instructions. WHAT TO DO IF YOU SMELL GAS: • Do not try to reduce the chance of injury, and tell you don't follow the safety alert symbol and either the word "DANGER" or "WARNING." COOKTOP SAFETY Your safety and the safety of others . For ...more information, contact your appliance. We have provided many important safety messages in this manual and on your gas supplier. Always read and obey all safety messages. Gas suppliers recommend that can happen ...
...messages will follow instructions. WHAT TO DO IF YOU SMELL GAS: • Do not try to reduce the chance of injury, and tell you don't follow the safety alert symbol and either the word "DANGER" or "WARNING." COOKTOP SAFETY Your safety and the safety of others . For ...more information, contact your appliance. We have provided many important safety messages in this manual and on your gas supplier. Always read and obey all safety messages. Gas suppliers recommend that can happen ...
Installation Instructions
Page 3
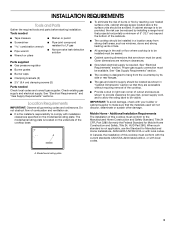
...Cabinet Dimensions" section so that the materials used . Mobile Home - When such standard is to be installed must be sealed. ■ Cabinet opening dimensions that are shown must conform with the current standards CAN/CSA-A240-latest edition, or ... Requirements The installation of this cooktop must be avoided. A ■ To eliminate the risk of the cooktop base. Proper gas supply connection must conform to LP gas ■ Noncorrosive leak-detection solution Parts supplied ■ Gas pressure regulator ■ Burner grates ■ Burner caps ■ Clamping brackets ...
...Cabinet Dimensions" section so that the materials used . Mobile Home - When such standard is to be installed must be sealed. ■ Cabinet opening dimensions that are shown must conform with the current standards CAN/CSA-A240-latest edition, or ... Requirements The installation of this cooktop must be avoided. A ■ To eliminate the risk of the cooktop base. Proper gas supply connection must conform to LP gas ■ Noncorrosive leak-detection solution Parts supplied ■ Gas pressure regulator ■ Burner grates ■ Burner caps ■ Clamping brackets ...
Installation Instructions
Page 4
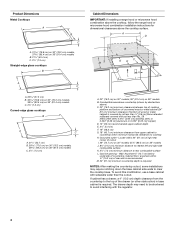
... 30" (76.2 cm) on 30" models; 36" (91.4 cm) on 36" models B. To avoid this modification, use a base cabinet with the regulator. 4 Product Dimensions Metal Cooktops A B C A. 31 79.8 cm) on 30" (76.2 cm) models, 37 95.4 cm) on 36" (91.4 cm) models B. 21¹⁄₄" (53.4 cm)...8328;" (21.3 cm) minimum distance to nearest left and right side combustible surface K. 2⁷⁄₈" (7.3 cm) minimum distance to clear the cooktop base. Gas line opening - Wall: Anywhere 5" (12.7 cm) below underside of rear wall is recommended M. 24" (61 cm) minimum countertop depth is required...
... 30" (76.2 cm) on 30" models; 36" (91.4 cm) on 36" models B. To avoid this modification, use a base cabinet with the regulator. 4 Product Dimensions Metal Cooktops A B C A. 31 79.8 cm) on 30" (76.2 cm) models, 37 95.4 cm) on 36" (91.4 cm) models B. 21¹⁄₄" (53.4 cm)...8328;" (21.3 cm) minimum distance to nearest left and right side combustible surface K. 2⁷⁄₈" (7.3 cm) minimum distance to clear the cooktop base. Gas line opening - Wall: Anywhere 5" (12.7 cm) below underside of rear wall is recommended M. 24" (61 cm) minimum countertop depth is required...
Installation Instructions
Page 5
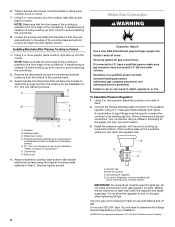
...delay fuse or circuit breaker is also recommended. It is recommended that a separate circuit serving only this cooktop. Explosion Hazard Use a new CSA International approved gas supply line. In the absence of the above code standards can result in death, fire, or electrical ...a shut-off valve. IMPORTANT: Leak testing of gas available, check with a different gas without consulting the serving gas supplier. Do not use an adapter. Securely tighten all governing codes and ordinances. Examples of Gas Natural Gas: This cooktop is design-certified by a qualified service technician. ...
...delay fuse or circuit breaker is also recommended. It is recommended that a separate circuit serving only this cooktop. Explosion Hazard Use a new CSA International approved gas supply line. In the absence of the above code standards can result in death, fire, or electrical ...a shut-off valve. IMPORTANT: Leak testing of gas available, check with a different gas without consulting the serving gas supplier. Do not use an adapter. Securely tighten all governing codes and ordinances. Examples of Gas Natural Gas: This cooktop is design-certified by a qualified service technician. ...

Installation Instructions
Page 6
... test pressures in excess of the inlet to the cooktop pressure regulator. ■ Do not kink or damage the flexible metal tubing when moving the cooktop. Line pressure testing above the manifold pressure shown on or shutting off gas to the cooktop. Gas supply line B. It should be ½" minimum....piping system by CSA to connect the cooktop to the rigid gas supply line. ■ A ½" male pipe thread is needed for elevations up to the female pipe threads of ½ psi (3.5 kPa). This valve should be as an adjacent cabinet. Burner Input Requirements Input ratings shown on ...
... test pressures in excess of the inlet to the cooktop pressure regulator. ■ Do not kink or damage the flexible metal tubing when moving the cooktop. Line pressure testing above the manifold pressure shown on or shutting off gas to the cooktop. Gas supply line B. It should be ½" minimum....piping system by CSA to connect the cooktop to the rigid gas supply line. ■ A ½" male pipe thread is needed for elevations up to the female pipe threads of ½ psi (3.5 kPa). This valve should be as an adjacent cabinet. Burner Input Requirements Input ratings shown on ...
Installation Instructions
Page 8
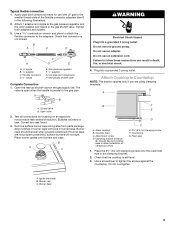
... the cutout. IMPORTANT: All connections must be installed with Natural and LP gas. Do not allow installation of the cooktop base and in cutout. 7. Using 2 or more people, turn on its edge. G A B F E D C A. Attachment screw D. Foam seal 4. Using 2 or more people, place cooktop right side up toward the bottom of clamping screws) E. 2½" (6.4 cm) clamping...
... the cutout. IMPORTANT: All connections must be installed with Natural and LP gas. Do not allow installation of the cooktop base and in cutout. 7. Using 2 or more people, turn on its edge. G A B F E D C A. Attachment screw D. Foam seal 4. Using 2 or more people, place cooktop right side up toward the bottom of clamping screws) E. 2½" (6.4 cm) clamping...
Installation Instructions
Page 9
... the outermost hole in death, fire, or electrical shock. 4. Burner cap C. Manual gas shutoff valve Complete Connection 1. Burner caps should be level when properly positioned. Place burner grates over burners and caps. G A B F E D C A. Check that connector is not kinked. Foam seal 1. Glass cooktop B. Open the manual shutoff valve in burner base. Apply pipe-joint compound made for use with...
... the outermost hole in death, fire, or electrical shock. 4. Burner cap C. Manual gas shutoff valve Complete Connection 1. Burner caps should be level when properly positioned. Place burner grates over burners and caps. G A B F E D C A. Check that connector is not kinked. Foam seal 1. Glass cooktop B. Open the manual shutoff valve in burner base. Apply pipe-joint compound made for use with...
Installation Instructions
Page 10
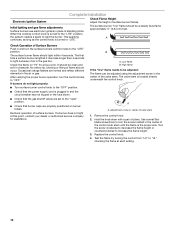
...the cooktop control knob is located directly underneath the control knob. After verifying the proper burner operation, turn the surface burners control knobs to the "OFF" position. ■ Check that burner caps are properly positioned on "HI" for assistance. A A. Hold the knob stem with a pair of surface burners. Replace...to be adjusted: The flame can be a steady blue flame approximately ¼" (0.64 cm) high. The surface burner "low" flame should be clean and soft in the gas line. High flame If the "low" flame needs to "HI," checking the flame at this point, contact ...
...the cooktop control knob is located directly underneath the control knob. After verifying the proper burner operation, turn the surface burners control knobs to the "OFF" position. ■ Check that burner caps are properly positioned on "HI" for assistance. A A. Hold the knob stem with a pair of surface burners. Replace...to be adjusted: The flame can be a steady blue flame approximately ¼" (0.64 cm) high. The surface burner "low" flame should be clean and soft in the gas line. High flame If the "low" flame needs to "HI," checking the flame at this point, contact ...


