Owners Manual
Page 1
... Installing 12 Using 15 Caring for 16 Grill 18 Installing 18 Using 20 Caring for 23 Griddle 25 Installing 25 Using 26 Caring for 28 Vent 29 Using 29 Caring for 30 Troubleshooting 31 Requesting Assistance or Service 33 Warranty 36 1-800-253-1301 Call us with questions or comments. MODEL... SC8720ED TO THE CONSUMER: PLEASE READ AND KEEP THIS BOOK FOR FUTURE REFERENCE. Home Appliances UseAndCare G U I D E 30" GAS MODULAR DOWNDRAFT COOKTOP TO THE INSTALLER: PLEASE LEAVE THIS INSTRUCTION BOOK WITH THE UNIT.
... Installing 12 Using 15 Caring for 16 Grill 18 Installing 18 Using 20 Caring for 23 Griddle 25 Installing 25 Using 26 Caring for 28 Vent 29 Using 29 Caring for 30 Troubleshooting 31 Requesting Assistance or Service 33 Warranty 36 1-800-253-1301 Call us with questions or comments. MODEL... SC8720ED TO THE CONSUMER: PLEASE READ AND KEEP THIS BOOK FOR FUTURE REFERENCE. Home Appliances UseAndCare G U I D E 30" GAS MODULAR DOWNDRAFT COOKTOP TO THE INSTALLER: PLEASE LEAVE THIS INSTRUCTION BOOK WITH THE UNIT.
Owners Manual
Page 3
... to persons, or damage when using the cooktop, follow any instructions given. IMPORTANT SAFETY INSTRUCTIONS READ AND SAVE THESE INSTRUCTIONS Gas cooktops have had sufficient time to sit or stand on any appliance, there are specific installation and safety precautions which must ... you to benzene, formaldehyde, carbon monoxide, and soot, primarily from incomplete combustion. The cooktop must be allowed to cool. Venting with the provided Installation Instructions. They should never be installed by clothing or other flammable materials until they have been thoroughly tested...
... to persons, or damage when using the cooktop, follow any instructions given. IMPORTANT SAFETY INSTRUCTIONS READ AND SAVE THESE INSTRUCTIONS Gas cooktops have had sufficient time to sit or stand on any appliance, there are specific installation and safety precautions which must ... you to benzene, formaldehyde, carbon monoxide, and soot, primarily from incomplete combustion. The cooktop must be allowed to cool. Venting with the provided Installation Instructions. They should never be installed by clothing or other flammable materials until they have been thoroughly tested...
Owners Manual
Page 5
...a window, proper precautions should be taken to satisfactorily meet the application needs must be made by a Whirlpool service company or Qualified Agency. • Disconnect the electrical supply and the gas supply at the shut-off valve near the cooktop before servicing the cooktop. READ AND SAVE THESE INSTRUCTIONS... - 5 If pan handles twist and cannot be tightened, discard the pan. • Keep all controls "OFF" when cooktop is not in use. • Keep vent ducts ...
...a window, proper precautions should be taken to satisfactorily meet the application needs must be made by a Whirlpool service company or Qualified Agency. • Disconnect the electrical supply and the gas supply at the shut-off valve near the cooktop before servicing the cooktop. READ AND SAVE THESE INSTRUCTIONS... - 5 If pan handles twist and cannot be tightened, discard the pan. • Keep all controls "OFF" when cooktop is not in use. • Keep vent ducts ...
Owners Manual
Page 6
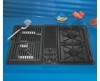
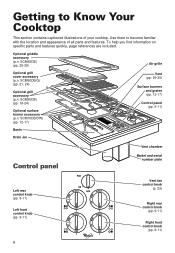
Getting to become familiar with the location and appearance of your cooktop. SCM10DB/DW) (pp. 12-17) Vent (pp. 29-30) Surface burners and grates (pp. 12-17) Control panel (pp. 9-11) Basin Drain Jar Vent chamber Control panel Model and serial number plate Left rear control knob (pp. 9-11) Left front control... knob (pp. 9-11) 6 Vent fan control knob (p. 29) Right rear control knob (pp. 9-11) Right front control knob (pp. 9-11) SCM40DB) (pp. 25-28) Air grille Optional grill cover ...
Getting to become familiar with the location and appearance of your cooktop. SCM10DB/DW) (pp. 12-17) Vent (pp. 29-30) Surface burners and grates (pp. 12-17) Control panel (pp. 9-11) Basin Drain Jar Vent chamber Control panel Model and serial number plate Left rear control knob (pp. 9-11) Left front control... knob (pp. 9-11) 6 Vent fan control knob (p. 29) Right rear control knob (pp. 9-11) Right front control knob (pp. 9-11) SCM40DB) (pp. 25-28) Air grille Optional grill cover ...
Owners Manual
Page 10
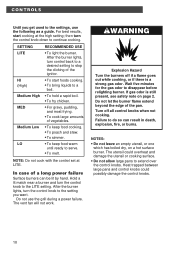
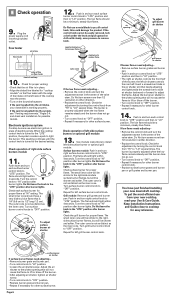
... when not cooking. The utensil could possibly damage the control knobs. 10 After the burner lights, turn the control knob to the LITE setting. The vent fan will not work. Do not let the burner flame extend beyond the edge of vegetables. • To keep food cooking. • To poach and... the burner lights, turn the control knob down to serve. • To melt. Do not use the following as a guide. Wait five minutes for the gas odor to stop the clicking of the ignitor. • To start cooking at LITE. Failure to extend over the control knobs. Turn off if a flame...
... when not cooking. The utensil could possibly damage the control knobs. 10 After the burner lights, turn the control knob to the LITE setting. The vent fan will not work. Do not let the burner flame extend beyond the edge of vegetables. • To keep food cooking. • To poach and... the burner lights, turn the control knob down to serve. • To melt. Do not use the following as a guide. Wait five minutes for the gas odor to stop the clicking of the ignitor. • To start cooking at LITE. Failure to extend over the control knobs. Turn off if a flame...

Owners Manual
Page 20
... fat will leave a caramel-like glaze on . • Do not cover the entire cooking surface with long handles or spatulas for 10 minutes. Use the vent system to do not cut into the meat. these will prevent the food from sticking. After cleaning, lightly wipe the cooking surface with warm, soapy...
... fat will leave a caramel-like glaze on . • Do not cover the entire cooking surface with long handles or spatulas for 10 minutes. Use the vent system to do not cut into the meat. these will prevent the food from sticking. After cleaning, lightly wipe the cooking surface with warm, soapy...

Owners Manual
Page 21
... you need to clean the grill interior, you have not trimmed the meat properly, or there is a power failure. Do not use . Without the vent system working, the grill/griddle burners will ignite occasionally to produce harmless puffs of flame for a second or two. GRILL Grilling tips (continued) •... Grease can result in the meat. To prevent fire and burns: Do not light grill/griddle burners during a power failure. NOTES: • The vent system will become overloaded with large metal pan, and remove food from grill. NOTES: • Do not set very hot containers on a grease fire...
... you need to clean the grill interior, you have not trimmed the meat properly, or there is a power failure. Do not use . Without the vent system working, the grill/griddle burners will ignite occasionally to produce harmless puffs of flame for a second or two. GRILL Grilling tips (continued) •... Grease can result in the meat. To prevent fire and burns: Do not light grill/griddle burners during a power failure. NOTES: • The vent system will become overloaded with large metal pan, and remove food from grill. NOTES: • Do not set very hot containers on a grease fire...
Owners Manual
Page 29
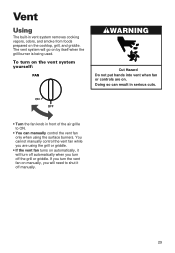
... turns on automatically, it off the grill or griddle. You cannot manually control the vent fan while you are on manually, you turn off manually. 29 Vent Using The built-in front of the air grille to shut it will go on the cooktop, grill, and griddle. Doing so can result in... serious cuts. • Turn the fan knob in vent system removes cooking vapors, odors, and smoke from foods prepared on by itself when the grill burner is being used. The...
... turns on automatically, it off the grill or griddle. You cannot manually control the vent fan while you are on manually, you turn off manually. 29 Vent Using The built-in front of the air grille to shut it will go on the cooktop, grill, and griddle. Doing so can result in... serious cuts. • Turn the fan knob in vent system removes cooking vapors, odors, and smoke from foods prepared on by itself when the grill burner is being used. The...
Owners Manual
Page 30
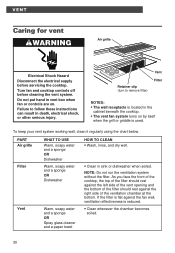
... the filter is flat against the right side of the filter should rest against the fan wall, ventilation effectiveness is used. Failure to remove filter) Vent Filter NOTES: • The wall receptacle is located in death, electrical shock, or other serious injury. Do not put hand in sink or dishwasher... when soiled. Retainer clip (turn to follow these instructions can result in the cabinet beneath the cooktop. • The vent fan system turns on . As you face the front of the cooktop, the top of the filter should rest against the left side of the...
... the filter is flat against the right side of the filter should rest against the fan wall, ventilation effectiveness is used. Failure to remove filter) Vent Filter NOTES: • The wall receptacle is located in death, electrical shock, or other serious injury. Do not put hand in sink or dishwasher... when soiled. Retainer clip (turn to follow these instructions can result in the cabinet beneath the cooktop. • The vent fan system turns on . As you face the front of the cooktop, the top of the filter should rest against the left side of the...
Owners Manual
Page 32
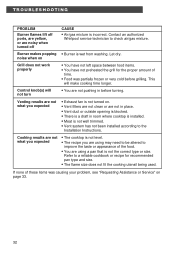
This will not turn CAUSE • Air/gas mixture is incorrect. Contact an authorized Whirlpool service technician to the Installation Instructions. Venting results are not what you expected • The cooktop is not level. • The recipe you expected • Exhaust fan is not turned on. • Vent filters are not clean or are not...
This will not turn CAUSE • Air/gas mixture is incorrect. Contact an authorized Whirlpool service technician to the Installation Instructions. Venting results are not what you expected • The cooktop is not level. • The recipe you expected • Exhaust fan is not turned on. • Vent filters are not clean or are not...

Dimension Guide
Page 1
... reserve the right to the range location. Venting system must be used for details. ® 30" Gas Downdraft Cooktop PRODUCT MODEL NUMBERS OVERALL DIMENSIONS SC8720ED Gas supply: Use 3/4" rigid pipe gas supply line to change without notice. A smaller...Gas Line Location Minimum base cabinet dimensions - 30" (76.2 cm) base cabinet 24" (61.0 cm) base cabinet depth 25" (63.5 cm) countertop depth 1-7/8" (4.8 cm) minimum space to the range. If cabinet has drawers, drawers will need to be supported within shaded area of cabinet. 11" (27.9 cm) 28-7/8" (73.3 cm) Because Whirlpool...
... reserve the right to the range location. Venting system must be used for details. ® 30" Gas Downdraft Cooktop PRODUCT MODEL NUMBERS OVERALL DIMENSIONS SC8720ED Gas supply: Use 3/4" rigid pipe gas supply line to change without notice. A smaller...Gas Line Location Minimum base cabinet dimensions - 30" (76.2 cm) base cabinet 24" (61.0 cm) base cabinet depth 25" (63.5 cm) countertop depth 1-7/8" (4.8 cm) minimum space to the range. If cabinet has drawers, drawers will need to be supported within shaded area of cabinet. 11" (27.9 cm) 28-7/8" (73.3 cm) Because Whirlpool...
Installation Instructions
Page 1
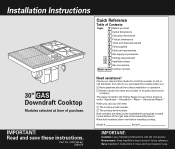
... the cooktop when you start 1 Cutout dimensions 1 Clearance dimensions 2 Product dimensions 2 Tools and materials needed 2 Parts supplied 2 Electrical requirements 3 Gas supply requirements 3 4 Venting requirements 5 6 Installation steps 7 Gas conversions Back cover Cooktop removal 30" GAS Downdraft Cooktop Modules selected at time of purchase. The dealer is listed in the Yellow Pages of your Use and Care...
... the cooktop when you start 1 Cutout dimensions 1 Clearance dimensions 2 Product dimensions 2 Tools and materials needed 2 Parts supplied 2 Electrical requirements 3 Gas supply requirements 3 4 Venting requirements 5 6 Installation steps 7 Gas conversions Back cover Cooktop removal 30" GAS Downdraft Cooktop Modules selected at time of purchase. The dealer is listed in the Yellow Pages of your Use and Care...

Installation Instructions
Page 2
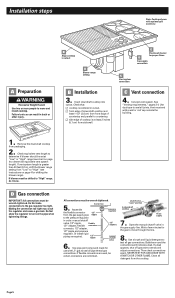
.... • Make sure you have provided many important safety message in your building. • Immediately call the fire department. - Vent system must be removed and the drawer • Have a qualified technician install this or any other hidden utilities. All openings in ...shaded area of rear wall. * National Fire Protection Association One Batterymarch Park 14" (35.6 cm) Install gas line within 3" (7.6 cm) of this manual and on your gas supplier from packages. the downdraft plenum. Mobile home installation: The installation of cutout. 16" (40.6 cm) 11" (27.9 cm)...
.... • Make sure you have provided many important safety message in your building. • Immediately call the fire department. - Vent system must be removed and the drawer • Have a qualified technician install this or any other hidden utilities. All openings in ...shaded area of rear wall. * National Fire Protection Association One Batterymarch Park 14" (35.6 cm) Install gas line within 3" (7.6 cm) of this manual and on your gas supplier from packages. the downdraft plenum. Mobile home installation: The installation of cutout. 16" (40.6 cm) 11" (27.9 cm)...
Installation Instructions
Page 4
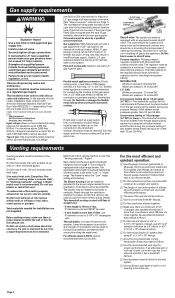
...2076; Use duct tape to prevent thermal conduction along the metal vent. It is recommended. If the type of gas listed does not agree with the type of straight vent between the elbows if more than one downdraft cooktop into attics, crawl spaces or garages. A smaller size ... performance. shutoff valve "open" position to downdraft cooktop to the downdraft cooktop. GAS: Minimum pressure: 11 inches WC Maximum pressure: 14 inches WC Line pressure testing above 4,500 ft, reduce recommended vent run by closing . In the absence of gas: This downdraft cooktop is rated at 1/2 psi gauge (...
...2076; Use duct tape to prevent thermal conduction along the metal vent. It is recommended. If the type of gas listed does not agree with the type of straight vent between the elbows if more than one downdraft cooktop into attics, crawl spaces or garages. A smaller size ... performance. shutoff valve "open" position to downdraft cooktop to the downdraft cooktop. GAS: Minimum pressure: 11 inches WC Maximum pressure: 14 inches WC Line pressure testing above 4,500 ft, reduce recommended vent run by closing . In the absence of gas: This downdraft cooktop is rated at 1/2 psi gauge (...

Installation Instructions
Page 5
... been incorporated into rating for runs shorter than 30 feet - Flexible metal elbows count twice as much as two feet of straight metal vent. Vent Piece straight vent per lineal ft. 3-1/4" x 10" 6" round 6" flexible Equivalent No. Make sure there is equipped with a dual range blower. ...= 0 ft. ( 0 cm) = 16 ft. ( 488 cm) = 10 ft. ( 305 cm) Equivalent length of gas burners. Turn blower off. 2. Snap the spring-loaded restricter ring out of materials needed are shown. Common venting methods and the types of the blower inlet. 4. List the number of each foot of flexible duct...
... been incorporated into rating for runs shorter than 30 feet - Flexible metal elbows count twice as much as two feet of straight metal vent. Vent Piece straight vent per lineal ft. 3-1/4" x 10" 6" round 6" flexible Equivalent No. Make sure there is equipped with a dual range blower. ...= 0 ft. ( 0 cm) = 16 ft. ( 488 cm) = 10 ft. ( 305 cm) Equivalent length of gas burners. Turn blower off. 2. Snap the spring-loaded restricter ring out of materials needed are shown. Common venting methods and the types of the blower inlet. 4. List the number of each foot of flexible duct...
Installation Instructions
Page 6
...regulator in cutout. ࠜ front edge of downdraft cooktop is at least 1-1/2" (3.8 cm) from the gas supply pipe nipple to move and install cooktop. Then check connections again. B Align cooktop in the gas supply line. Connect vent system. Assemble the flexible connector 1/2" from ...front edge of countertop and parallel to seal all detergent from packaging. 2. Remove the downdraft cooktop from the cooktop. Open the manual shutoff valve ...
...regulator in cutout. ࠜ front edge of downdraft cooktop is at least 1-1/2" (3.8 cm) from the gas supply pipe nipple to move and install cooktop. Then check connections again. B Align cooktop in the gas supply line. Connect vent system. Assemble the flexible connector 1/2" from ...front edge of countertop and parallel to seal all detergent from packaging. 2. Remove the downdraft cooktop from the cooktop. Open the manual shutoff valve ...
Installation Instructions
Page 7
...cm) to "OFF" position. • Repeat if necessary for possible causes. Check operation of cooktop 10. The flame should have just finished installing your downdraft is properly adjusted when the low flame remains steady and the burner does not go out. • Turn control knob to 1/2" long (1.3 cm). The..., tuck a cloth under the knob and pull upward on flow tester front of right-side surface burners module OFF MED LO 11. Check for proper venting: • Check that is turned to the "LITE" position, the system creates a spark to "OFF" position. • Replace burner grate and ...
...cm) to "OFF" position. • Repeat if necessary for possible causes. Check operation of cooktop 10. The flame should have just finished installing your downdraft is properly adjusted when the low flame remains steady and the burner does not go out. • Turn control knob to 1/2" long (1.3 cm). The..., tuck a cloth under the knob and pull upward on flow tester front of right-side surface burners module OFF MED LO 11. Check for proper venting: • Check that is turned to the "LITE" position, the system creates a spark to "OFF" position. • Replace burner grate and ...
Installation Instructions
Page 9
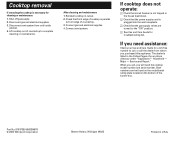
... to front edge of countertop. 3. If you need the cooktop model number and serial number. Major - Disconnect vent system from whom you purchased this appliance. Connect gas and electrical supplies. 4. Household - When you call the dealer from unit inside cabinet. 4. Both numbers can... , you will need assistance: Check your phone directory under "Appliances - Part No. 8101P350-60/8284676 © 2000 Whirlpool Corporation Benton Harbor, Michigan 49022 Printed in cutout. 2. Disconnect gas and electrical supplies. 3. The dealer is necessary for cleaning or maintenance: 1. Connect...
... to front edge of countertop. 3. If you need the cooktop model number and serial number. Major - Disconnect vent system from whom you purchased this appliance. Connect gas and electrical supplies. 4. Household - When you call the dealer from unit inside cabinet. 4. Both numbers can... , you will need assistance: Check your phone directory under "Appliances - Part No. 8101P350-60/8284676 © 2000 Whirlpool Corporation Benton Harbor, Michigan 49022 Printed in cutout. 2. Disconnect gas and electrical supplies. 3. The dealer is necessary for cleaning or maintenance: 1. Connect...
