Owners Manual
Page 1
... Installing 12 Using 15 Caring for 16 Grill 18 Installing 18 Using 20 Caring for 23 Griddle 25 Installing 25 Using 26 Caring for 28 Vent 29 Using 29 Caring for 30 Troubleshooting 31 Requesting Assistance or Service 33 Warranty 36 1-800-253-1301 Call us with questions or comments. TO... THE CONSUMER: PLEASE READ AND KEEP THIS BOOK FOR FUTURE REFERENCE. MODEL SC8720ED Home Appliances UseAndCare G U I D E 30" GAS MODULAR DOWNDRAFT COOKTOP TO THE INSTALLER: PLEASE LEAVE THIS INSTRUCTION BOOK WITH THE UNIT.
... Installing 12 Using 15 Caring for 16 Grill 18 Installing 18 Using 20 Caring for 23 Griddle 25 Installing 25 Using 26 Caring for 28 Vent 29 Using 29 Caring for 30 Troubleshooting 31 Requesting Assistance or Service 33 Warranty 36 1-800-253-1301 Call us with questions or comments. TO... THE CONSUMER: PLEASE READ AND KEEP THIS BOOK FOR FUTURE REFERENCE. MODEL SC8720ED Home Appliances UseAndCare G U I D E 30" GAS MODULAR DOWNDRAFT COOKTOP TO THE INSTALLER: PLEASE LEAVE THIS INSTRUCTION BOOK WITH THE UNIT.
Owners Manual
Page 3
...injured while climbing on it is damaged or not working properly. • Do not use , these substances could be followed to cool. Venting with these symbols and follow basic precautions, including the following: General • Install or locate the cooktop only in accordance with the ...• Do not touch grill and surface burner areas, or perimeter trim around cooktop. IMPORTANT SAFETY INSTRUCTIONS READ AND SAVE THESE INSTRUCTIONS Gas cooktops have had sufficient time to ensure safe and satisfactory operation. wWARNING To reduce the risk of fire, electrical shock, injury to ...
...injured while climbing on it is damaged or not working properly. • Do not use , these substances could be followed to cool. Venting with these symbols and follow basic precautions, including the following: General • Install or locate the cooktop only in accordance with the ...• Do not touch grill and surface burner areas, or perimeter trim around cooktop. IMPORTANT SAFETY INSTRUCTIONS READ AND SAVE THESE INSTRUCTIONS Gas cooktops have had sufficient time to ensure safe and satisfactory operation. wWARNING To reduce the risk of fire, electrical shock, injury to ...
Owners Manual
Page 5
...other servicing should be tightened, discard the pan. • Keep all controls "OFF" when cooktop is not in use. • Keep vent ducts unobstructed. • If the cooktop is based on the grill section of this appliance. • Always allow hot pans to cool in...; This appliance has been tested for this appliance to satisfactorily meet the application needs must be made by a Whirlpool service company or Qualified Agency. • Disconnect the electrical supply and the gas supply at the shut-off valve near a window, proper precautions should be taken to a qualified technician. •...
...other servicing should be tightened, discard the pan. • Keep all controls "OFF" when cooktop is not in use. • Keep vent ducts unobstructed. • If the cooktop is based on the grill section of this appliance. • Always allow hot pans to cool in...; This appliance has been tested for this appliance to satisfactorily meet the application needs must be made by a Whirlpool service company or Qualified Agency. • Disconnect the electrical supply and the gas supply at the shut-off valve near a window, proper precautions should be taken to a qualified technician. •...
Owners Manual
Page 6
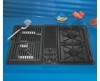
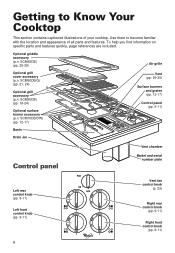
... accessory (p.n. SCM40DB) (pp. 25-28) Air grille Optional grill cover accessory (p.n. SCM10DB/DW) (pp. 12-17) Vent (pp. 29-30) Surface burners and grates (pp. 12-17) Control panel (pp. 9-11) Basin Drain Jar Vent chamber Control panel Model and serial number plate Left rear control knob (pp. 9-11) Left front control... knob (pp. 9-11) 6 Vent fan control knob (p. 29) Right rear control knob (pp. 9-11) Right front control knob (pp. 9-11) Use them to Know Your Cooktop This section contains ...
... accessory (p.n. SCM40DB) (pp. 25-28) Air grille Optional grill cover accessory (p.n. SCM10DB/DW) (pp. 12-17) Vent (pp. 29-30) Surface burners and grates (pp. 12-17) Control panel (pp. 9-11) Basin Drain Jar Vent chamber Control panel Model and serial number plate Left rear control knob (pp. 9-11) Left front control... knob (pp. 9-11) 6 Vent fan control knob (p. 29) Right rear control knob (pp. 9-11) Right front control knob (pp. 9-11) Use them to Know Your Cooktop This section contains ...
Owners Manual
Page 10
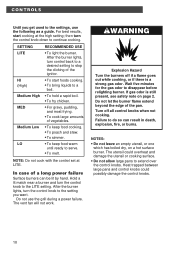
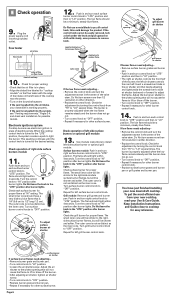
...empty utensil, or one which has boiled dry, on page 2. wWARNING Explosion Hazard Turn the burners off all control knobs when not cooking. If gas odor is a strong gas odor. SETTING LITE HI (High) Medium High MED Medium Low LO RECOMMENDED USE • To light the burner. In case of the pan.... The vent fan will not work. The utensil could possibly damage the control knobs. 10 Hold a lit match near a burner and turn control back to a ...
...empty utensil, or one which has boiled dry, on page 2. wWARNING Explosion Hazard Turn the burners off all control knobs when not cooking. If gas odor is a strong gas odor. SETTING LITE HI (High) Medium High MED Medium Low LO RECOMMENDED USE • To light the burner. In case of the pan.... The vent fan will not work. The utensil could possibly damage the control knobs. 10 Hold a lit match near a burner and turn control back to a ...

Owners Manual
Page 20
... the recipe tells you to remove any additional smoke during the last 15-20 minutes of the meat. Heat on the grill grates. Use the vent system to do not cut into the meat. Brush with long handles or spatulas for the first time: 1. GRILL Using Before you use the grill...
... the recipe tells you to remove any additional smoke during the last 15-20 minutes of the meat. Heat on the grill grates. Use the vent system to do not cut into the meat. Brush with long handles or spatulas for the first time: 1. GRILL Using Before you use the grill...

Owners Manual
Page 21
... can cause large flare-ups. Let the grill cool before putting the cover in fire or burns. Failure to become very hot. NOTES: • The vent system will not work if there is normal while cooking. Do not set utensils or other items that could cause scratches on the cover or... in place. They will not be kept cool enough. • Use only nylon or plastic utensils. The use . Do not put out fire: Make sure vent system has been switched on the grill. This is a power failure. If you have too many flare-ups: you need to do not leave them...
... can cause large flare-ups. Let the grill cool before putting the cover in fire or burns. Failure to become very hot. NOTES: • The vent system will not work if there is normal while cooking. Do not set utensils or other items that could cause scratches on the cover or... in place. They will not be kept cool enough. • Use only nylon or plastic utensils. The use . Do not put out fire: Make sure vent system has been switched on the grill. This is a power failure. If you have too many flare-ups: you need to do not leave them...
Owners Manual
Page 29
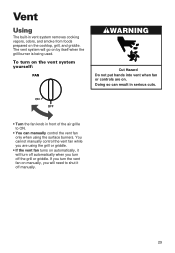
...using the surface burners. Doing so can manually control the vent fan only when using the grill or griddle. • If the vent fan turns on the cooktop, grill, and griddle. If you turn the vent fan on . You cannot manually control the vent fan while you are on manually, you will need ...to ON. • You can result in serious cuts. • Turn the fan knob in vent system removes cooking vapors, odors, and smoke from foods prepared on automatically, it off the grill or griddle. Vent Using The built-in front of the air grille to shut it will turn off automatically...
...using the surface burners. Doing so can manually control the vent fan only when using the grill or griddle. • If the vent fan turns on the cooktop, grill, and griddle. If you turn the vent fan on . You cannot manually control the vent fan while you are on manually, you will need ...to ON. • You can result in serious cuts. • Turn the fan knob in vent system removes cooking vapors, odors, and smoke from foods prepared on automatically, it off the grill or griddle. Vent Using The built-in front of the air grille to shut it will turn off automatically...
Owners Manual
Page 30
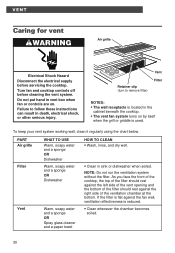
...rest against the fan wall, ventilation effectiveness is used. Do not put hand in the cabinet beneath the cooktop. • The vent fan system turns on . PART Air grille Filter Vent WHAT TO USE Warm, soapy water and a sponge OR Dishwasher Warm, soapy water and a sponge OR Dishwasher Warm, soapy water...injury. Turn fan and cooktop controls off before servicing the cooktop. NOTE: Do not run the ventilation system without the filter. To keep your vent system working well, clean it regularly using the chart below. As you face the front of the cooktop, the top of the filter should rest...
...rest against the fan wall, ventilation effectiveness is used. Do not put hand in the cabinet beneath the cooktop. • The vent fan system turns on . PART Air grille Filter Vent WHAT TO USE Warm, soapy water and a sponge OR Dishwasher Warm, soapy water and a sponge OR Dishwasher Warm, soapy water...injury. Turn fan and cooktop controls off before servicing the cooktop. NOTE: Do not run the ventilation system without the filter. To keep your vent system working well, clean it regularly using the chart below. As you face the front of the cooktop, the top of the filter should rest...
Owners Manual
Page 32
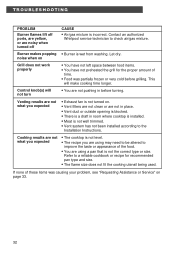
...what you expected • The cooktop is not level. • The recipe you expected • Exhaust fan is not turned on. • Vent filters are not clean or are using may need to be altered to the Installation Instructions. If none of time. • Food was causing your ...off Burner makes popping noise when on Grill does not work properly Control knob(s) will not turn CAUSE • Air/gas mixture is wet from washing. Contact an authorized Whirlpool service technician to a reliable cookbook or recipe for the proper amount of these items was partially frozen or very cold before...
...what you expected • The cooktop is not level. • The recipe you expected • Exhaust fan is not turned on. • Vent filters are not clean or are using may need to be altered to the Installation Instructions. If none of time. • Food was causing your ...off Burner makes popping noise when on Grill does not work properly Control knob(s) will not turn CAUSE • Air/gas mixture is wet from washing. Contact an authorized Whirlpool service technician to a reliable cookbook or recipe for the proper amount of these items was partially frozen or very cold before...

Dimension Guide
Page 1
...for connection to pressure regulator female pipe threads. If vent length is recommended. Venting system must be supported within shaded area of cabinet. 11" (27.9 cm) 28-7/8" (73.3 cm) Because Whirlpool Corporation policy includes a continuous commitment to change without ... • Removing grease containers. • Accessing gas regulator. 18" (45.7 cm) minimum clearance upper cabinet to the range. ® 30" Gas Downdraft Cooktop PRODUCT MODEL NUMBERS OVERALL DIMENSIONS SC8720ED Gas supply: Use 3/4" rigid pipe gas supply line to backsplash or vertical wall ** Note...
...for connection to pressure regulator female pipe threads. If vent length is recommended. Venting system must be supported within shaded area of cabinet. 11" (27.9 cm) 28-7/8" (73.3 cm) Because Whirlpool Corporation policy includes a continuous commitment to change without ... • Removing grease containers. • Accessing gas regulator. 18" (45.7 cm) minimum clearance upper cabinet to the range. ® 30" Gas Downdraft Cooktop PRODUCT MODEL NUMBERS OVERALL DIMENSIONS SC8720ED Gas supply: Use 3/4" rigid pipe gas supply line to backsplash or vertical wall ** Note...
Installation Instructions
Page 1
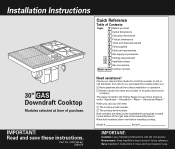
... Contents: Pages 1 Before you start 1 Cutout dimensions 1 Clearance dimensions 2 Product dimensions 2 Tools and materials needed 2 Parts supplied 2 Electrical requirements 3 Gas supply requirements 3 4 Venting requirements 5 6 Installation steps 7 Gas conversions Back cover Cooktop removal 30" GAS Downdraft Cooktop Modules selected at time of your Use and Care Guide for a toll-free number to call, or call , you...
... Contents: Pages 1 Before you start 1 Cutout dimensions 1 Clearance dimensions 2 Product dimensions 2 Tools and materials needed 2 Parts supplied 2 Electrical requirements 3 Gas supply requirements 3 4 Venting requirements 5 6 Installation steps 7 Gas conversions Back cover Cooktop removal 30" GAS Downdraft Cooktop Modules selected at time of your Use and Care Guide for a toll-free number to call, or call , you...

Installation Instructions
Page 2
...gas supplier, call your appliance. caulking gun with local codes. fronts installed • Comply with National Electrical Code, ANSI/NFPA 70 - Model/serial rating plate is located on the right side of 20-15/16" permanently on the model/serial rating plate. the downdraft...backsplash or vertical wall 1-7/8" (4.8 cm) minimum space to prevent back drafting. See "Gas supply requirements," Page 3. Minimum base cabinet dimensions - Vent system must conform to venting adapter Cutout dimensions Proper installation is the customer's responsibility: • To contact a ...
...gas supplier, call your appliance. caulking gun with local codes. fronts installed • Comply with National Electrical Code, ANSI/NFPA 70 - Model/serial rating plate is located on the right side of 20-15/16" permanently on the model/serial rating plate. the downdraft...backsplash or vertical wall 1-7/8" (4.8 cm) minimum space to prevent back drafting. See "Gas supply requirements," Page 3. Minimum base cabinet dimensions - Vent system must conform to venting adapter Cutout dimensions Proper installation is the customer's responsibility: • To contact a ...
Installation Instructions
Page 4
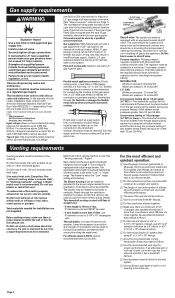
... the most efficient and quietest operation: ࠜ Use 26-gauge minimum galvanized or 25-gauge minimum aluminum metal vent. Observe all local codes and ordinances. For elevations above sea level. gas usage with this downdraft cooktop must be constructed. A 1/2" male pipe thread is a minimum of 18" of a qualified person include licensed heating personnel...
... the most efficient and quietest operation: ࠜ Use 26-gauge minimum galvanized or 25-gauge minimum aluminum metal vent. Observe all local codes and ordinances. For elevations above sea level. gas usage with this downdraft cooktop must be constructed. A 1/2" male pipe thread is a minimum of 18" of a qualified person include licensed heating personnel...

Installation Instructions
Page 5
... on shorter runs will cause excessive noise and conditioned air loss, and will use. A suitable wall/roof cap must be used for equivalent vent length runs of gas burners. blower should be left in "Low" range as standard elbows. Turn blower off. 2. Snap the spring-loaded restricter ring out of... straight metal vent. Multiply the equivalent length by the number of 6" round system = 43 ft. (1311.2 cm) (In this example, blower MUST be used ....
... on shorter runs will cause excessive noise and conditioned air loss, and will use. A suitable wall/roof cap must be used for equivalent vent length runs of gas burners. blower should be left in "Low" range as standard elbows. Turn blower off. 2. Snap the spring-loaded restricter ring out of... straight metal vent. Multiply the equivalent length by the number of 6" round system = 43 ft. (1311.2 cm) (In this example, blower MUST be used ....
Installation Instructions
Page 6
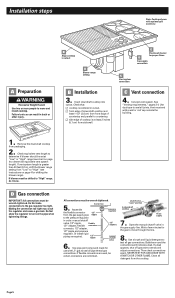
... 2 inches (5.1 cm) from the cooktop. Check equivalent vent length to test all detergent from side wall. Do Not make connections to seal all joints. Assemble the flexible connector 1/2" from the gas supply pipe nipple to the pressure regulator in cutout. ࠜ front edge of downdraft cooktop is at least 1-1/2" (3.8 cm) from front edge...
... 2 inches (5.1 cm) from the cooktop. Check equivalent vent length to test all detergent from side wall. Do Not make connections to seal all joints. Assemble the flexible connector 1/2" from the gas supply pipe nipple to the pressure regulator in cutout. ࠜ front edge of downdraft cooktop is at least 1-1/2" (3.8 cm) from front edge...
Installation Instructions
Page 7
...Push in the "LITE" position after burner lights. Turn surface burner control knob to "LITE" position. The flame should have just finished installing your new downdraft cooktop. Do Not leave the knob in and turn each surface burner control knob to "LITE" position and then to light the burner. Repeat for... line on the left air shutter controls the rear half. Check the adjustment by turning the control knob from your new cooktop, read your downdraft is not pulled into the system, see "Venting requirements," Pages 3-4, and check vent installation for other surface burner.
...Push in the "LITE" position after burner lights. Turn surface burner control knob to "LITE" position. The flame should have just finished installing your new downdraft cooktop. Do Not leave the knob in and turn each surface burner control knob to "LITE" position and then to light the burner. Repeat for... line on the left air shutter controls the rear half. Check the adjustment by turning the control knob from your new cooktop, read your downdraft is not pulled into the system, see "Venting requirements," Pages 3-4, and check vent installation for other surface burner.
Installation Instructions
Page 9
... breaker is not tripped or the house fuse blown. ࠜ Check that the gas supply valves are turned to front edge of countertop. 3. Part No. 8101P350-60/8284676 © 2000 Whirlpool Corporation Benton Harbor, Michigan 49022 Printed in cutout. 2. Connect vent system. If you will need assistance: Check your phone directory under "Appliances...
... breaker is not tripped or the house fuse blown. ࠜ Check that the gas supply valves are turned to front edge of countertop. 3. Part No. 8101P350-60/8284676 © 2000 Whirlpool Corporation Benton Harbor, Michigan 49022 Printed in cutout. 2. Connect vent system. If you will need assistance: Check your phone directory under "Appliances...
