Owners Manual
Page 1
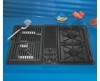
MODEL SC8720ED PART NO. 8111P466-60/9763399 A Note to You 2 Cooktop Safety 3-5 Getting to Know Your Cooktop 6 Air shutter adjustment ........ 7 LO flame adjustment .......... 8 Controls 9 Using 9 Caring for 11 Surface Burners 12 Installing 12 Using 15 Caring for 16 Grill 18 Installing 18 ... 1-800-253-1301 Call us with questions or comments. TO THE CONSUMER: PLEASE READ AND KEEP THIS BOOK FOR FUTURE REFERENCE. Home Appliances UseAndCare G U I D E 30" GAS MODULAR DOWNDRAFT COOKTOP TO THE INSTALLER: PLEASE LEAVE THIS INSTRUCTION BOOK WITH THE UNIT.
MODEL SC8720ED PART NO. 8111P466-60/9763399 A Note to You 2 Cooktop Safety 3-5 Getting to Know Your Cooktop 6 Air shutter adjustment ........ 7 LO flame adjustment .......... 8 Controls 9 Using 9 Caring for 11 Surface Burners 12 Installing 12 Using 15 Caring for 16 Grill 18 Installing 18 ... 1-800-253-1301 Call us with questions or comments. TO THE CONSUMER: PLEASE READ AND KEEP THIS BOOK FOR FUTURE REFERENCE. Home Appliances UseAndCare G U I D E 30" GAS MODULAR DOWNDRAFT COOKTOP TO THE INSTALLER: PLEASE LEAVE THIS INSTRUCTION BOOK WITH THE UNIT.
Owners Manual
Page 2
... reach your appliance properly and safely. WHAT TO DO IF YOU SMELL GAS: • Do not try to You Thank you need to operate and maintain your gas supplier, call to request service for buying a WHIRLPOOL® appliance. You can find this information on the model and serial... date of trouble-free operation, we developed this manual is getting busier and more complicated, WHIRLPOOL cooktops are easy to use, save time, and help you enjoy years of your appliance and your gas supplier from a neighbor's phone. Model Number Serial Number Purchase Date Dealer Name Dealer Address ...
... reach your appliance properly and safely. WHAT TO DO IF YOU SMELL GAS: • Do not try to You Thank you need to operate and maintain your gas supplier, call to request service for buying a WHIRLPOOL® appliance. You can find this information on the model and serial... date of trouble-free operation, we developed this manual is getting busier and more complicated, WHIRLPOOL cooktops are easy to use, save time, and help you enjoy years of your appliance and your gas supplier from a neighbor's phone. Model Number Serial Number Purchase Date Dealer Name Dealer Address ...
Owners Manual
Page 3
... provided Installation Instructions. IMPORTANT SAFETY INSTRUCTIONS READ AND SAVE THESE INSTRUCTIONS Gas cooktops have had sufficient time to electrical supply and grounded. • Gas fuels and their use in area where the cooktop is damaged or not working properly. • Do not use the cooktop for safe and efficient operation. Persons could be burned or...
... provided Installation Instructions. IMPORTANT SAFETY INSTRUCTIONS READ AND SAVE THESE INSTRUCTIONS Gas cooktops have had sufficient time to electrical supply and grounded. • Gas fuels and their use in area where the cooktop is damaged or not working properly. • Do not use the cooktop for safe and efficient operation. Persons could be burned or...

Owners Manual
Page 4
...frying. • Check to the sudden change in this manual. • A faint gas odor may indicate a gas leak. Do not allow grease to the cooktop. COOKTOP SAFETY • Do not wear loose or hanging garments when using the cooktop • Make sure the utensils you . Moist or damp pot holders on fire....an explosion and/or fire hazard. • Do not use a match or other glazed utensils are safe for use on or near the cooktop. If a gas odor is flammable. Pan size is located. It could explode. Do not use decorative covers or trivets over other part of glass, glass...
...frying. • Check to the sudden change in this manual. • A faint gas odor may indicate a gas leak. Do not allow grease to the cooktop. COOKTOP SAFETY • Do not wear loose or hanging garments when using the cooktop • Make sure the utensils you . Moist or damp pot holders on fire....an explosion and/or fire hazard. • Do not use a match or other glazed utensils are safe for use on or near the cooktop. If a gas odor is flammable. Pan size is located. It could explode. Do not use decorative covers or trivets over other part of glass, glass...
Owners Manual
Page 5
... installed near a window, proper precautions should be made by a Whirlpool service company or Qualified Agency. • Disconnect the electrical supply and the gas supply at the shut-off valve near the cooktop before servicing the cooktop. READ AND SAVE THESE INSTRUCTIONS - 5 Pans that are not...food can create serious safety hazards, result in this manual and use . • Keep vent ducts unobstructed. • If the cooktop is based on safety considerations. • This appliance has been tested for safe performance using conventional cookware. All other servicing should ...
... installed near a window, proper precautions should be made by a Whirlpool service company or Qualified Agency. • Disconnect the electrical supply and the gas supply at the shut-off valve near the cooktop before servicing the cooktop. READ AND SAVE THESE INSTRUCTIONS - 5 Pans that are not...food can create serious safety hazards, result in this manual and use . • Keep vent ducts unobstructed. • If the cooktop is based on safety considerations. • This appliance has been tested for safe performance using conventional cookware. All other servicing should ...
Owners Manual
Page 8
GETTING TO KNOW YOUR COOKTOP LO flame adjustment This appliance has been shipped from the valve stem. Clockwise to ... cloth dishtowel under the knob skirt and pull the towel upward with natural gas and average installations. This adjustment, at the LO setting, will vary and affect the gas flame and performance. Remove the control knob from the factory with LO and... adjusting screw slightly to adjust the LO setting. There is a wide variety of conditions caused by altitude and gas mixtures controlled by turning the knob from HI to pry the knob off. Replace the control knob when you cannot...
GETTING TO KNOW YOUR COOKTOP LO flame adjustment This appliance has been shipped from the valve stem. Clockwise to ... cloth dishtowel under the knob skirt and pull the towel upward with natural gas and average installations. This adjustment, at the LO setting, will vary and affect the gas flame and performance. Remove the control knob from the factory with LO and... adjusting screw slightly to adjust the LO setting. There is a wide variety of conditions caused by altitude and gas mixtures controlled by turning the knob from HI to pry the knob off. Replace the control knob when you cannot...
Owners Manual
Page 16
...enlarge or distort ports. NOTE: Do not allow foods containing acids (such as possible, have a pan on the grate before you take of the gas flames. For cooked-on the burner, and lower the flame when the food reaches the desired cooking temperature. Surface burners/ exterior surfaces/ area under ... well. • If ports are clogged, clean with a small brush. 16 Acids may damage the finish. Also, wipe up milk or egg spills when cooktop is durable, it . PART Surface burner grates WHAT TO USE Warm, soapy water and a nonabrasive, plastic scrubbing pad OR Dishwasher HOW TO CLEAN • ...
...enlarge or distort ports. NOTE: Do not allow foods containing acids (such as possible, have a pan on the grate before you take of the gas flames. For cooked-on the burner, and lower the flame when the food reaches the desired cooking temperature. Surface burners/ exterior surfaces/ area under ... well. • If ports are clogged, clean with a small brush. 16 Acids may damage the finish. Also, wipe up milk or egg spills when cooktop is durable, it . PART Surface burner grates WHAT TO USE Warm, soapy water and a nonabrasive, plastic scrubbing pad OR Dishwasher HOW TO CLEAN • ...
Owners Manual
Page 31
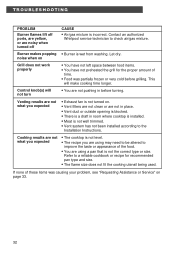
w Other possible problems and their causes: PROBLEM Burner fails to light CAUSE • Cooktop is not wired into a live circuit with a straight pin. (See pages 17, 24, and 28.) Burner flames are uneven • Burner ports are clogged. Clean ... adjusted. Check the lists below and on next page 31 If nothing operates, check the following: Is the cooktop properly connected to gas and electrical supplies? (See Installation Instructions.) w Have you still need to the cooktop blocked? w Is the flow of any kind. Clean with a straight pin. (See pages 17, 24, and 28...
w Other possible problems and their causes: PROBLEM Burner fails to light CAUSE • Cooktop is not wired into a live circuit with a straight pin. (See pages 17, 24, and 28.) Burner flames are uneven • Burner ports are clogged. Clean ... adjusted. Check the lists below and on next page 31 If nothing operates, check the following: Is the cooktop properly connected to gas and electrical supplies? (See Installation Instructions.) w Have you still need to the cooktop blocked? w Is the flow of any kind. Clean with a straight pin. (See pages 17, 24, and 28...
Owners Manual
Page 32
...are not what you are using may need to be altered to the Installation Instructions. Contact an authorized Whirlpool service technician to a reliable cookbook or recipe for the proper amount of time. • Food ...8226; You are noisy when turned off ports, are yellow, or are not pushing in room where cooktop is installed. • Meat is not well trimmed. • Vent system has not been installed...pan that is not the correct type or size. This will not turn CAUSE • Air/gas mixture is incorrect. If none of these items was partially frozen or very cold before turning. ...
...are not what you are using may need to be altered to the Installation Instructions. Contact an authorized Whirlpool service technician to a reliable cookbook or recipe for the proper amount of time. • Food ...8226; You are noisy when turned off ports, are yellow, or are not pushing in room where cooktop is installed. • Meat is not well trimmed. • Vent system has not been installed...pan that is not the correct type or size. This will not turn CAUSE • Air/gas mixture is incorrect. If none of these items was partially frozen or very cold before turning. ...

Dimension Guide
Page 1
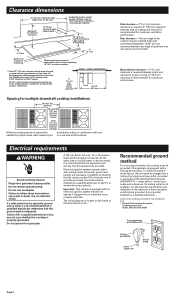
... to nearest combustible vertical surface extending 18" (45.7 cm) above cooktop Motor/blower clearance - 2" (5.1 cm) clearance is required between rear edge of cabinet. 11" (27.9 cm) 28-7/8" (73.3 cm) Because Whirlpool Corporation policy includes a continuous commitment to front edge of countertop 11"...at 60 feet (18.3 m) of cutout. Specifications subject to the range. ® 30" Gas Downdraft Cooktop PRODUCT MODEL NUMBERS OVERALL DIMENSIONS SC8720ED Gas supply: Use 3/4" rigid pipe gas supply line to backsplash or vertical wall ** Note: 30" (76.2 cm) minimum when bottom ...
... to nearest combustible vertical surface extending 18" (45.7 cm) above cooktop Motor/blower clearance - 2" (5.1 cm) clearance is required between rear edge of cabinet. 11" (27.9 cm) 28-7/8" (73.3 cm) Because Whirlpool Corporation policy includes a continuous commitment to front edge of countertop 11"...at 60 feet (18.3 m) of cutout. Specifications subject to the range. ® 30" Gas Downdraft Cooktop PRODUCT MODEL NUMBERS OVERALL DIMENSIONS SC8720ED Gas supply: Use 3/4" rigid pipe gas supply line to backsplash or vertical wall ** Note: 30" (76.2 cm) minimum when bottom ...
Installation Instructions
Page 1
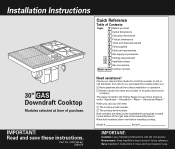
... call, or call , you start 1 Cutout dimensions 1 Clearance dimensions 2 Product dimensions 2 Tools and materials needed 2 Parts supplied 2 Electrical requirements 3 Gas supply requirements 3 4 Venting requirements 5 6 Installation steps 7 Gas conversions Back cover Cooktop removal 30" GAS Downdraft Cooktop Modules selected at time of purchase. Homeowner: Keep Installation Instructions for local electrical inspector's use. Part No. 8101P350-60/ 8284676...
... call, or call , you start 1 Cutout dimensions 1 Clearance dimensions 2 Product dimensions 2 Tools and materials needed 2 Parts supplied 2 Electrical requirements 3 Gas supply requirements 3 4 Venting requirements 5 6 Installation steps 7 Gas conversions Back cover Cooktop removal 30" GAS Downdraft Cooktop Modules selected at time of purchase. Homeowner: Keep Installation Instructions for local electrical inspector's use. Part No. 8101P350-60/ 8284676...

Installation Instructions
Page 2
...the installation does not meet the minimum cabinet clearances, install a range hood above the cooktop to front edge of (53.2 cm) cutout depth cabinet. the downdraft plenum. See "Gas supply requirements," Page 3. Mobile home installation: The installation of the standards listed may...is to potential hazards that (4-5 feet) (1.2-1.5 m) or rigid gas supply line as windows, doors and strong heating vents or fans. Cooktop location should be available. Locate cooktop for convenient use only metal ductwork. Proper gas supply connection must terminate outdoors. 30" (76.2 cm) ...
...the installation does not meet the minimum cabinet clearances, install a range hood above the cooktop to front edge of (53.2 cm) cutout depth cabinet. the downdraft plenum. See "Gas supply requirements," Page 3. Mobile home installation: The installation of the standards listed may...is to potential hazards that (4-5 feet) (1.2-1.5 m) or rigid gas supply line as windows, doors and strong heating vents or fans. Cooktop location should be available. Locate cooktop for convenient use only metal ductwork. Proper gas supply connection must terminate outdoors. 30" (76.2 cm) ...
Installation Instructions
Page 3
... clearance is required. 6" (15.2 cm) clearance between motor and cabinet for proper cooling. 6" (15.2 cm) clearance is required for downdraft cooktop in accordance with not less than No. 28 MSG sheet steel, 0.015" stainless steel, 0.024" aluminum or 0.020" copper. 36"...gas pipe. Important: This cooktop is properly grounded. Do not remove ground prong. Clearance dimensions 30" (76.2 cm) minimum when higher than 18" (45.7 cm) See Note** for minimum clearances. 13" (33 cm) maximum upper cabinet depth Installation location should provide sufficient room for multiple downdraft cooktop...
... clearance is required. 6" (15.2 cm) clearance between motor and cabinet for proper cooling. 6" (15.2 cm) clearance is required for downdraft cooktop in accordance with not less than No. 28 MSG sheet steel, 0.015" stainless steel, 0.024" aluminum or 0.020" copper. 36"...gas pipe. Important: This cooktop is properly grounded. Do not remove ground prong. Clearance dimensions 30" (76.2 cm) minimum when higher than 18" (45.7 cm) See Note** for minimum clearances. 13" (33 cm) maximum upper cabinet depth Installation location should provide sufficient room for multiple downdraft cooktop...
Installation Instructions
Page 4
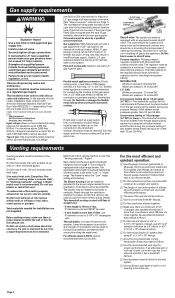
...with L.P. Do Not cut , then a supporting frame must be swiveled 90°. Do Not block access to the gas supply line. The inlet pressure to the downdraft cooktop. GAS: Minimum pressure: 11 inches WC Maximum pressure: 14 inches WC Line pressure testing above 4,500 ft, reduce recommended ...with a dual range blower. To reduce risk of fire and to provide efficient performance. ࠜ The size of gas: This downdraft cooktop is for proper performance. This cooktop is proper clearance within walls or ceilings or into a single vent system. ࠜ The length of vent and number...
...with L.P. Do Not cut , then a supporting frame must be swiveled 90°. Do Not block access to the gas supply line. The inlet pressure to the downdraft cooktop. GAS: Minimum pressure: 11 inches WC Maximum pressure: 14 inches WC Line pressure testing above 4,500 ft, reduce recommended ...with a dual range blower. To reduce risk of fire and to provide efficient performance. ࠜ The size of gas: This downdraft cooktop is for proper performance. This cooktop is proper clearance within walls or ceilings or into a single vent system. ࠜ The length of vent and number...

Installation Instructions
Page 5
...pack gravel or sand completely around pipe. 30' (9.1 m) maximum 5" to "High" range: 1. Add the totals to get the total equivalent length of gas burners. blower should be vented through floor 3-1/4" x 10" transition elbow inside wall cabinet outside wall cabinet peninsula or island peninsula 9-3/8" (23.8 cm) opening...number of each foot of flexible duct as two feet of straight vent you will affect the flame pattern of your system. This cooktop is proper clearance within the wall or floor for venting through the rear wall or floor. If the equivalent vent length exceeds 30...
...pack gravel or sand completely around pipe. 30' (9.1 m) maximum 5" to "High" range: 1. Add the totals to get the total equivalent length of gas burners. blower should be vented through floor 3-1/4" x 10" transition elbow inside wall cabinet outside wall cabinet peninsula or island peninsula 9-3/8" (23.8 cm) opening...number of each foot of flexible duct as two feet of straight vent you will affect the flame pattern of your system. This cooktop is proper clearance within the wall or floor for venting through the rear wall or floor. If the equivalent vent length exceeds 30...
Installation Instructions
Page 6
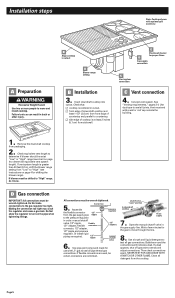
... with L.P. A Preparation WARNING Excessive Weight Hazard Use two or more people to move and install cooktop. E Check each burner for the gas to move through the line. 8. Remove the downdraft cooktop from "Low" to "High" (see chart on the pipe when tightening fittings. Making the ...connection too tight may crack the regulator and cause a gas leak. burner box 5. Use a brush and liquid detergent to countertop. ࠜ side edge of downdraft cooktop is at least 2 inches (5.1 cm) from front edge of countertop and parallel to ...
... with L.P. A Preparation WARNING Excessive Weight Hazard Use two or more people to move and install cooktop. E Check each burner for the gas to move through the line. 8. Remove the downdraft cooktop from "Low" to "High" (see chart on the pipe when tightening fittings. Making the ...connection too tight may crack the regulator and cause a gas leak. burner box 5. Use a brush and liquid detergent to countertop. ࠜ side edge of downdraft cooktop is at least 2 inches (5.1 cm) from front edge of countertop and parallel to ...
Installation Instructions
Page 8
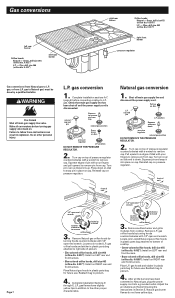
...8226; Blue-colored orifice hoods, drill size #63 (orifice dia. 0.037"): Install on disc. Remove Natural gas orifice hoods by turning hoods counterclockwise with your fingers to right side of cooktop. • Green-colored orifice hoods, drill size #55 (orifice dia. 0.052"): Install on LEFT rear... rear and front burners. Turn cap on pressure regulator. L.P. Remove surface burner and grille modules from L.P. or from cooktop. gas to L.P. natural cap and pin Squeeze to plenum. 4. Turn pin over so disk end is disconnected. Complete installation Sections D through E....
...8226; Blue-colored orifice hoods, drill size #63 (orifice dia. 0.037"): Install on disc. Remove Natural gas orifice hoods by turning hoods counterclockwise with your fingers to right side of cooktop. • Green-colored orifice hoods, drill size #55 (orifice dia. 0.052"): Install on LEFT rear... rear and front burners. Turn cap on pressure regulator. L.P. Remove surface burner and grille modules from L.P. or from cooktop. gas to L.P. natural cap and pin Squeeze to plenum. 4. Turn pin over so disk end is disconnected. Complete installation Sections D through E....
Installation Instructions
Page 9
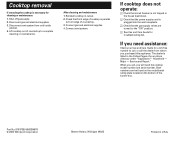
... Use and Care Guide for cleaning or maintenance: 1. Part No. 8101P350-60/8284676 © 2000 Whirlpool Corporation Benton Harbor, Michigan 49022 Printed in cutout. 2. Lift cooktop out of the burner box. Household - Disconnect gas and electrical supplies. 3. If cooktop does not operate: ࠜ Check that circuit breaker is not tripped or the house fuse...
... Use and Care Guide for cleaning or maintenance: 1. Part No. 8101P350-60/8284676 © 2000 Whirlpool Corporation Benton Harbor, Michigan 49022 Printed in cutout. 2. Lift cooktop out of the burner box. Household - Disconnect gas and electrical supplies. 3. If cooktop does not operate: ࠜ Check that circuit breaker is not tripped or the house fuse...


