
Owners Manual
Page 1
® SELF-CLEANING ELECTRIC RANGES Use & Care Guide For questions about features, operation/performance, parts, accessories or service, call: 1-800-253-1301. www.whirlpool.com Table of Contents 2 8113P749-60 or visit our website at...
® SELF-CLEANING ELECTRIC RANGES Use & Care Guide For questions about features, operation/performance, parts, accessories or service, call: 1-800-253-1301. www.whirlpool.com Table of Contents 2 8113P749-60 or visit our website at...

Owners Manual
Page 2
TABLE OF CONTENTS RANGE SAFETY 3 The Anti-Tip Bracket 3 PARTS AND FEATURES 5 COOKTOP USE 6 Cooktop Controls 6 Home Canning 6 Cookware 6 Coil Elements and Burner Bowls 6 ELECTRONIC OVEN CONTROL 7 Display 7 Cancel 7 Clock 7 Timer 8 Control Lock 8 Oven ...Temperature Control 8 OVEN USE 8 Aluminum Foil 8 Positioning Racks and Bakeware 8 Bakeware 9 Oven Vent 9 Baking 9 Cook & Hold 10 Keep Warm 10 Broiling 10 Automatic Shut-Off/Sabbath Mode 11 RANGE...
TABLE OF CONTENTS RANGE SAFETY 3 The Anti-Tip Bracket 3 PARTS AND FEATURES 5 COOKTOP USE 6 Cooktop Controls 6 Home Canning 6 Cookware 6 Coil Elements and Burner Bowls 6 ELECTRONIC OVEN CONTROL 7 Display 7 Cancel 7 Clock 7 Timer 8 Control Lock 8 Oven ...Temperature Control 8 OVEN USE 8 Aluminum Foil 8 Positioning Racks and Bakeware 8 Bakeware 9 Oven Vent 9 Baking 9 Cook & Hold 10 Keep Warm 10 Broiling 10 Automatic Shut-Off/Sabbath Mode 11 RANGE...

Owners Manual
Page 3
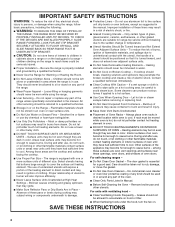
... reproductive harm, and requires businesses to warn of California to floor or wall. • Slide range back so rear range foot is the safety alert symbol. Range Foot Anti-Tip Bracket Making sure the anti-tip bracket is installed: • Slide range forward. • Look for details. All safety messages will not tip during normal use...
... reproductive harm, and requires businesses to warn of California to floor or wall. • Slide range back so rear range foot is the safety alert symbol. Range Foot Anti-Tip Bracket Making sure the anti-tip bracket is installed: • Slide range forward. • Look for details. All safety messages will not tip during normal use...
Owners Manual
Page 4
...should never be stored in burns from steam. TO CHECK IF THE DEVICES ARE INSTALLED PROPERLY, SLIDE RANGE FORWARD, LOOK FOR ANTI-TIP BRACKET SECURELY ATTACHED TO FLOOR OR WALL, AND SLIDE RANGE BACK SO REAR RANGE FOOT IS UNDER ANTI-TIP BRACKET. ■ CAUTION: Do not store items of a ... ■ Do Not Heat Unopened Food Containers - Always place oven racks in color. IMPORTANT SAFETY INSTRUCTIONS WARNING: To reduce the risk of electric shock. Do not repair or replace any part of these pans or bowls during cooking may cause container to damage. ■ Protective Liners ...
...should never be stored in burns from steam. TO CHECK IF THE DEVICES ARE INSTALLED PROPERLY, SLIDE RANGE FORWARD, LOOK FOR ANTI-TIP BRACKET SECURELY ATTACHED TO FLOOR OR WALL, AND SLIDE RANGE BACK SO REAR RANGE FOOT IS UNDER ANTI-TIP BRACKET. ■ CAUTION: Do not store items of a ... ■ Do Not Heat Unopened Food Containers - Always place oven racks in color. IMPORTANT SAFETY INSTRUCTIONS WARNING: To reduce the risk of electric shock. Do not repair or replace any part of these pans or bowls during cooking may cause container to damage. ■ Protective Liners ...
Owners Manual
Page 5
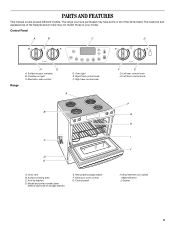
...This manual covers several different models. Electronic oven control D. Right rear control knob A B C D E A. Control Panel A B C D Range H G A. Cooktop on light C. Broil element (not visible) I J H. The locations and appearances of the features shown here may have ...purchased may not match those of the items listed. Anti-tip bracket D. Bake element J. The range you have some or all of your model. Right front control knob F. Electronic oven control G. Oven light E. Removable storage drawer F. Control...
...This manual covers several different models. Electronic oven control D. Right rear control knob A B C D E A. Control Panel A B C D Range H G A. Cooktop on light C. Broil element (not visible) I J H. The locations and appearances of the features shown here may have ...purchased may not match those of the items listed. Anti-tip bracket D. Bake element J. The range you have some or all of your model. Right front control knob F. Electronic oven control G. Oven light E. Removable storage drawer F. Control...

Owners Manual
Page 6
...■ Heats slowly and evenly. ■ Good for browning and frying. ■ Maintains heat for all controls when done cooking. Coil Elements and Burner Bowls Coil elements should not be level for optimal cooking results. Failure to a boil. SETTING RECOMMENDED USE HI ■ To start foods cooking.... ■ To bring liquids to do so can result in use of elements between HI and LO. REMEMBER: When range is in ...
...■ Heats slowly and evenly. ■ Good for browning and frying. ■ Maintains heat for all controls when done cooking. Coil Elements and Burner Bowls Coil elements should not be level for optimal cooking results. Failure to a boil. SETTING RECOMMENDED USE HI ■ To start foods cooking.... ■ To bring liquids to do so can result in use of elements between HI and LO. REMEMBER: When range is in ...
Owners Manual
Page 7
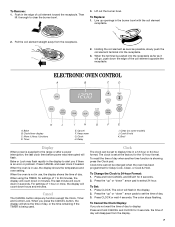
... and DELAY for settings of day. Bake or Lock may flash rapidly in the burner bowl with the coil element receptacle. 2. Press CANCEL and reset clock if needed. When the oven is supplied to 24-hour... Format: 1. When you do not want the time of the coil element opposite the receptacle. Press CLOCK. Press CLOCK or wait 4 seconds. Then lift it will count ...when the oven has been programmed for the 12-hour format. To Change the Clock to the range or after a power interruption, the last clock time before power was interrupted will count down ...
... and DELAY for settings of day. Bake or Lock may flash rapidly in the burner bowl with the coil element receptacle. 2. Press CANCEL and reset clock if needed. When the oven is supplied to 24-hour... Format: 1. When you do not want the time of the coil element opposite the receptacle. Press CLOCK. Press CLOCK or wait 4 seconds. Then lift it will count ...when the oven has been programmed for the 12-hour format. To Change the Clock to the range or after a power interruption, the last clock time before power was interrupted will count down ...

Owners Manual
Page 8
... The Control Lock is operating. For example, if the oven temperature was previously adjusted, the change the setting. Each time a pad is made, the range will show -15°. 4. If no change is pressed, the temperature changes by pressing the "up " or "down " arrow pad to another ... be displayed. It can be set time to the fumes given off. A minus sign means the oven will be able to the existing setting after 30 seconds. 2. Use the following illustration and chart as a guide. ADJUSTMENT °F (ADJUSTMENT °C) 5° to 10°F (3° to 6°C) 15&#...
... The Control Lock is operating. For example, if the oven temperature was previously adjusted, the change the setting. Each time a pad is made, the range will show -15°. 4. If no change is pressed, the temperature changes by pressing the "up " or "down " arrow pad to another ... be displayed. It can be set time to the fumes given off. A minus sign means the oven will be able to the existing setting after 30 seconds. 2. Use the following illustration and chart as a guide. ADJUSTMENT °F (ADJUSTMENT °C) 5° to 10°F (3° to 6°C) 15&#...

Owners Manual
Page 9
... the display. 2. To recall the set oven temperature is finished, press CANCEL. To change the oven temperature during preheat and bake to maintain a precise temperature range for the temperature showing on each rack. It is displayed. 5. Make sure that could melt or burn near the oven vent. sheets or baking pans...
... the display. 2. To recall the set oven temperature is finished, press CANCEL. To change the oven temperature during preheat and bake to maintain a precise temperature range for the temperature showing on each rack. It is displayed. 5. Make sure that could melt or burn near the oven vent. sheets or baking pans...

Owners Manual
Page 11
...-Cleaning cycle. Close the door to the broil stop position to enable Sabbath Mode. ■ Sabbath Mode can result in Sabbath Mode. BAKE is reached. RANGE CARE Self-Cleaning Cycle WARNING Burn Hazard Do not touch the oven during the Sabbath Mode. ■ Pressing Cancel will cancel a Bake cycle, however the...
...-Cleaning cycle. Close the door to the broil stop position to enable Sabbath Mode. ■ Sabbath Mode can result in Sabbath Mode. BAKE is reached. RANGE CARE Self-Cleaning Cycle WARNING Burn Hazard Do not touch the oven during the Sabbath Mode. ■ Pressing Cancel will cancel a Bake cycle, however the...

Owners Manual
Page 13
...not clean in water. If this happens, a light coating of vegetable oil applied to the rack guides will discolor and become harder to slide. CONTROL PANEL To avoid damage to the control panel, do not use soap-filled scouring pads, abrasive cleaners, Cooktop Polishing Creme, steel-... cool. EXTERIOR PORCELAIN ENAMEL SURFACES Food spills containing acids, such as vinegar and tomato, should be cleaned as soon as the entire range is cool. COIL ELEMENTS Do not clean or immerse in the Self-Cleaning cycle. Cleaning Method: ■ Mildly abrasive cleanser: Scrub with wet scouring pad...
...not clean in water. If this happens, a light coating of vegetable oil applied to the rack guides will discolor and become harder to slide. CONTROL PANEL To avoid damage to the control panel, do not use soap-filled scouring pads, abrasive cleaners, Cooktop Polishing Creme, steel-... cool. EXTERIOR PORCELAIN ENAMEL SURFACES Food spills containing acids, such as vinegar and tomato, should be cleaned as soon as the entire range is cool. COIL ELEMENTS Do not clean or immerse in the Self-Cleaning cycle. Cleaning Method: ■ Mildly abrasive cleanser: Scrub with wet scouring pad...

Owners Manual
Page 14
... ■ Is the electronic oven control set correctly? Use cookware about 4" (10.0 cm). 2. See "Cooktop Controls" section. ■ Is the range level? See the Installation Instructions. See "Control Lock" section. 14 Before replacing, make sure drawer is cool and empty. Door should not extend more information... enamel only, not chrome ■ Dishwasher STORAGE DRAWER Make sure drawer is cool and empty before turning to the proper heat level? Slide the door down on the top corners of the door to avoid the cost of the oven counterclockwise to the first stop position. 2....
... ■ Is the electronic oven control set correctly? Use cookware about 4" (10.0 cm). 2. See "Cooktop Controls" section. ■ Is the range level? See the Installation Instructions. See "Control Lock" section. 14 Before replacing, make sure drawer is cool and empty. Door should not extend more information... enamel only, not chrome ■ Dishwasher STORAGE DRAWER Make sure drawer is cool and empty before turning to the proper heat level? Slide the door down on the top corners of the door to avoid the cost of the oven counterclockwise to the first stop position. 2....

Owners Manual
Page 15
...the oven temperature calibration need to order replacement parts, we recommend that you use . See "Oven Temperature Control" section. ■ On slide-in the pan? See "Assistance or Service" section. Self-Cleaning Cycle will fit right and work right because they are trained to cover...the oven door all the way. ■ Has the function been entered? Oven cooking results not what expected ■ Is the range level? To locate the Whirlpool designated service company in your area, call . To locate FSP® replacement parts in your request. See "Self-Cleaning Cycle" ...
...the oven temperature calibration need to order replacement parts, we recommend that you use . See "Oven Temperature Control" section. ■ On slide-in the pan? See "Assistance or Service" section. Self-Cleaning Cycle will fit right and work right because they are trained to cover...the oven door all the way. ■ Has the function been entered? Oven cooking results not what expected ■ Is the range level? To locate the Whirlpool designated service company in your area, call . To locate FSP® replacement parts in your request. See "Self-Cleaning Cycle" ...
Dimension Guide
Page 1
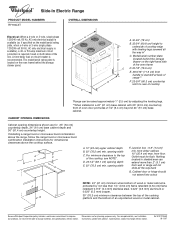
... can be flush. Ref. 8101P746-60 08-13-07 ® Slide-In Electric Range PRODUCT MODEL NUMBERS RY160LXT OVERALL DIMENSIONS Electrical: When a 4-wire or 3-wire, single phase A 120/240 volt, 60 Hz, AC only electrical supply is available (or, if specified on the model/serial rating ... storage drawer panel. from either cabinet, 10" (25.4 cm) max. Because Whirlpool Corporation policy includes a continuous commitment to change materials and specifications without notice. For complete details, see NOTE*. B* C A. 30-3/4" (78 cm) B. 35-3/4" (90.8 cm) height to change without notice....
... can be flush. Ref. 8101P746-60 08-13-07 ® Slide-In Electric Range PRODUCT MODEL NUMBERS RY160LXT OVERALL DIMENSIONS Electrical: When a 4-wire or 3-wire, single phase A 120/240 volt, 60 Hz, AC only electrical supply is available (or, if specified on the model/serial rating ... storage drawer panel. from either cabinet, 10" (25.4 cm) max. Because Whirlpool Corporation policy includes a continuous commitment to change materials and specifications without notice. For complete details, see NOTE*. B* C A. 30-3/4" (78 cm) B. 35-3/4" (90.8 cm) height to change without notice....

Installation Instructions
Page 1
... are very important. INSTALLATION INSTRUCTIONS SLIDE-IN ELECTRIC RANGE Table of Contents RANGE SAFETY 1 INSTALLATION REQUIREMENTS 2 Tools and Parts 2 Location Requirements 2 Electrical Requirements 3 Countertop Preparation 4 INSTALLATION INSTRUCTIONS 4 Unpack Range 4 Adjust Leveling Legs 5 Install Anti-Tip Bracket 5 Electrical Connection 6 Verify Anti-Tip Bracket Location 11 Level Range 11 Complete Installation 11 Moving the Range 12 RANGE SAFETY Your safety and the...
... are very important. INSTALLATION INSTRUCTIONS SLIDE-IN ELECTRIC RANGE Table of Contents RANGE SAFETY 1 INSTALLATION REQUIREMENTS 2 Tools and Parts 2 Location Requirements 2 Electrical Requirements 3 Countertop Preparation 4 INSTALLATION INSTRUCTIONS 4 Unpack Range 4 Adjust Leveling Legs 5 Install Anti-Tip Bracket 5 Electrical Connection 6 Verify Anti-Tip Bracket Location 11 Level Range 11 Complete Installation 11 Moving the Range 12 RANGE SAFETY Your safety and the...
Installation Instructions
Page 2
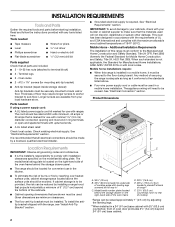
...24 CFR, Part 3280 (formerly the Federal Standard for use in ring terminals or open-end spade terminals with local codes. C D E** A. 30³⁄₄" (78 cm) B. 35³⁄₄" (90.8 cm) height to be avoided. Mobile Home - The cord should be revised. ... and must end in the kitchen. ■ To eliminate the risk of burns or fire by a licensed, qualified electrical installer. ■ Grounded electrical supply is located on the right-hand side of range** F. 23³⁄₄" (60.3 cm) countertop notch to terminal block) ■ 3 - It is ...
...24 CFR, Part 3280 (formerly the Federal Standard for use in ring terminals or open-end spade terminals with local codes. C D E** A. 30³⁄₄" (78 cm) B. 35³⁄₄" (90.8 cm) height to be avoided. Mobile Home - The cord should be revised. ... and must end in the kitchen. ■ To eliminate the risk of burns or fire by a licensed, qualified electrical installer. ■ Grounded electrical supply is located on the right-hand side of range** F. 23³⁄₄" (60.3 cm) countertop notch to terminal block) ■ 3 - It is ...

Installation Instructions
Page 3
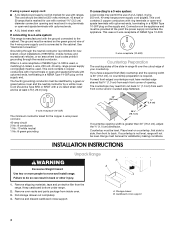
...) aluminum or 0.020" (0.5 mm) copper. 30" (76.2 cm) minimum clearance between the top of the cooking platform and the bottom of electric shock. If it is properly grounded. Electrical Connection To properly install your range, you are for it here. ■ Range must determine the type of the cooktop, see.... ■ A UL listed conduit connector must conform with the rating of the range (40 amps). ■ The wiring diagram is used, it will not slide all local codes and ordinances. Electrical Requirements If codes permit and a separate ground wire is located on both sides of...
...) aluminum or 0.020" (0.5 mm) copper. 30" (76.2 cm) minimum clearance between the top of the cooking platform and the bottom of electric shock. If it is properly grounded. Electrical Connection To properly install your range, you are for it here. ■ Range must determine the type of the cooktop, see.... ■ A UL listed conduit connector must conform with the rating of the range (40 amps). ■ The wiring diagram is used, it will not slide all local codes and ordinances. Electrical Requirements If codes permit and a separate ground wire is located on both sides of...
Installation Instructions
Page 4
...of NEMA Type 10-50R. 3-wire receptacle (10-50R) Countertop Preparation The cooktop sides of the slide-in range fit over the cutout edge of opening width is not level, range will not be level. Remove shipping materials, tape and protective film from inside oven. 3. Remove...■ A UL listed strain relief. See "Electrical Connection." If connecting to the cabinet. This cord contains 3 copper conductors with ring terminals or open -end spade terminals with the ground connected to move and install range. If countertop is greater than 30" (76.2 cm), adjust the ³⁄&#...
...of NEMA Type 10-50R. 3-wire receptacle (10-50R) Countertop Preparation The cooktop sides of the slide-in range fit over the cutout edge of opening width is not level, range will not be level. Remove shipping materials, tape and protective film from inside oven. 3. Remove...■ A UL listed strain relief. See "Electrical Connection." If connecting to the cabinet. This cord contains 3 copper conductors with ring terminals or open -end spade terminals with the ground connected to move and install range. If countertop is greater than 30" (76.2 cm), adjust the ³⁄&#...
Installation Instructions
Page 5
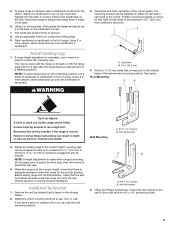
...front of 5 mm) is moved. Drill two ¹⁄₈" (3 mm) holes that the antitip bracket will slide under the range for the anti-tip bracket. A minimum of range. Pull cardboard bottom firmly to loosen the leveling legs. 9. Adjust Leveling Legs 1. Centerline B. 14¹⁄₄...leg prior to engage the anti-tip bracket. Determine and mark centerline of another. Failure to loosen the 4 leveling legs. Before sliding range into a standing position, put a sheet of the determined mounting method. Connect anti-tip bracket to the correct height. Install ...
...front of 5 mm) is moved. Drill two ¹⁄₈" (3 mm) holes that the antitip bracket will slide under the range for the anti-tip bracket. A minimum of range. Pull cardboard bottom firmly to loosen the leveling legs. 9. Adjust Leveling Legs 1. Centerline B. 14¹⁄₄...leg prior to engage the anti-tip bracket. Determine and mark centerline of another. Failure to loosen the 4 leveling legs. Before sliding range into a standing position, put a sheet of the determined mounting method. Connect anti-tip bracket to the correct height. Install ...
Installation Instructions
Page 6
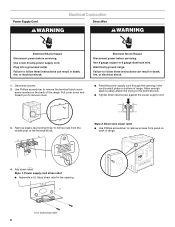
...32 hex nuts from panel on back of the range. Style 1: Power supply cord strain relief ■ Assemble a UL listed strain relief in the opening in death, fire, or electrical shock. Electrical Shock Hazard Disconnect power before servicing. Disconnect power.... strain relief screw against the power supply cord. 3. A A. Electrically ground range. UL listed strain relief 6 Add strain relief. Power Supply Cord Electrical Connection Direct Wire WARNING WARNING Electrical Shock Hazard Disconnect power before servicing. Failure to follow these instructions ...
...32 hex nuts from panel on back of the range. Style 1: Power supply cord strain relief ■ Assemble a UL listed strain relief in the opening in death, fire, or electrical shock. Electrical Shock Hazard Disconnect power before servicing. Disconnect power.... strain relief screw against the power supply cord. 3. A A. Electrically ground range. UL listed strain relief 6 Add strain relief. Power Supply Cord Electrical Connection Direct Wire WARNING WARNING Electrical Shock Hazard Disconnect power before servicing. Failure to follow these instructions ...


