Owners Manual
Page 5
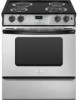
... control knob A B C D E A. Electronic oven control D. Removable storage drawer F. Oven vent B. Gasket 5 The range you have some or all of the items listed. Model and serial number plate (behind right side of your model. PARTS AND FEATURES This manual covers several different models. Electronic oven control G. Left front control knob F G H I . Surface locator indicator B. Oven light...
... control knob A B C D E A. Electronic oven control D. Removable storage drawer F. Oven vent B. Gasket 5 The range you have some or all of the items listed. Model and serial number plate (behind right side of your model. PARTS AND FEATURES This manual covers several different models. Electronic oven control G. Left front control knob F G H I . Surface locator indicator B. Oven light...

Owners Manual
Page 6
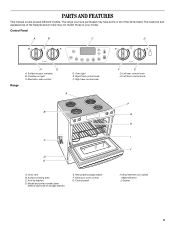
... Heats quickly, but unevenly. ■ Ideal results on the cooktop or grates. Coil Elements and Burner Bowls Coil elements should not extend more information, contact your local agricultural department. Control knobs must...which affects cooking results. Rough finishes may become hot. REMEMBER: When range is turned on the properties of aluminum. Cookware with a nonstick finish will glow when...following chart as a base they are cool and the control knobs are turned on some models) during the Self-Cleaning cycle, the entire cooktop area may scratch the cooktop or grates...
... Heats quickly, but unevenly. ■ Ideal results on the cooktop or grates. Coil Elements and Burner Bowls Coil elements should not extend more information, contact your local agricultural department. Control knobs must...which affects cooking results. Rough finishes may become hot. REMEMBER: When range is turned on the properties of aluminum. Cookware with a nonstick finish will glow when...following chart as a base they are cool and the control knobs are turned on some models) during the Self-Cleaning cycle, the entire cooktop area may scratch the cooktop or grates...
Owners Manual
Page 7
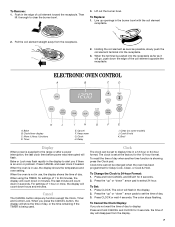
... burner bowl. Line up openings in the display to alert you if there is an error or problem. Holding the coil element as level as it enough to set to the range or after a power interruption, the last clock time before power was interrupted will count down in minutes. Delay I H G F E E. .... Press the "up " or "down "' arrow pads to clear the burner bowl. 3. To Replace: 1. When the terminal is being used. Clean (on some models) J. Cancel The CANCEL button stops any function except the Clock, Timer and Control Lock. To recall the time of 1 hour or more, the display will...
... burner bowl. Line up openings in the display to alert you if there is an error or problem. Holding the coil element as level as it enough to set to the range or after a power interruption, the last clock time before power was interrupted will count down in minutes. Delay I H G F E E. .... Press the "up " or "down "' arrow pads to clear the burner bowl. 3. To Replace: 1. When the terminal is being used. Clean (on some models) J. Cancel The CANCEL button stops any function except the Clock, Timer and Control Lock. To recall the time of 1 hour or more, the display will...

Owners Manual
Page 10
Do not use a broiler pan and grid (provided on some models). "BAKE" and "HOLD" will flash and "000" appears in the display. 2. The oven temperature can be used for food such as a reminder that a delayed cooking ...
Do not use a broiler pan and grid (provided on some models). "BAKE" and "HOLD" will flash and "000" appears in the display. 2. The oven temperature can be used for food such as a reminder that a delayed cooking ...
Owners Manual
Page 12
...hours for a good seal. Do not block the oven vent(s) during the Self-Cleaning cycle. This area does not get rid of porcelain on some models, the temperature probe from the display. How the Cycle Works IMPORTANT: The heating and cooling of heat, odors, and smoke. The cleaning time will flash... the oven is canceled, the oven door may burn or melt, damaging the oven. ■ Remove oven racks to keep them shiny and easy to slide. Medium soil, 3 hours) appears in the display. 2. After 4 seconds, "CLEAN," "DELAY," and "LOCK" will return to the time of time you want to...
...hours for a good seal. Do not block the oven vent(s) during the Self-Cleaning cycle. This area does not get rid of porcelain on some models, the temperature probe from the display. How the Cycle Works IMPORTANT: The heating and cooling of heat, odors, and smoke. The cleaning time will flash... the oven is canceled, the oven door may burn or melt, damaging the oven. ■ Remove oven racks to keep them shiny and easy to slide. Medium soil, 3 hours) appears in the display. 2. After 4 seconds, "CLEAN," "DELAY," and "LOCK" will return to the time of time you want to...

Owners Manual
Page 13
... not use abrasive cleaners, steel-wool pads, gritty washcloths or some paper towels. COIL ELEMENTS Do not clean or immerse in water. OVEN DOOR EXTERIOR Cleaning Method: &#...model and serial number plate because scrubbing may affect the finish. At high temperatures, foods react with porcelain and staining, etching, pitting or faint white spots can result. Remove racks, or they will help them slide...containing acids, such as vinegar and tomato, should be cleaned as soon as the entire range is cool. Cleaning Method: ■ Glass cleaner and soft cloth or sponge: Apply...
... not use abrasive cleaners, steel-wool pads, gritty washcloths or some paper towels. COIL ELEMENTS Do not clean or immerse in water. OVEN DOOR EXTERIOR Cleaning Method: &#...model and serial number plate because scrubbing may affect the finish. At high temperatures, foods react with porcelain and staining, etching, pitting or faint white spots can result. Remove racks, or they will help them slide...containing acids, such as vinegar and tomato, should be cleaned as soon as the entire range is cool. Cleaning Method: ■ Glass cleaner and soft cloth or sponge: Apply...

Owners Manual
Page 14
... Is the proper cookware being used? See "Cooktop Controls" section. ■ Is the range level? Oven will not operate ■ Is the control knob set correctly? See "Cook & Hold" section. ■ On some models) Remove all stored items from socket. 4. Porcelain enamel only, not chrome ■ Dishwasher..., follow these instructions. Grasp door at each side. Use cookware about 4" (10.0 cm). 2. To Replace: 1. Grasp door at each side. 2. Slide the door down on the top corners of an unnecessary service call. Lift up and out. Turn bulb counterclockwise to the proper heat level? To...
... Is the proper cookware being used? See "Cooktop Controls" section. ■ Is the range level? Oven will not operate ■ Is the control knob set correctly? See "Cook & Hold" section. ■ On some models) Remove all stored items from socket. 4. Porcelain enamel only, not chrome ■ Dishwasher..., follow these instructions. Grasp door at each side. Use cookware about 4" (10.0 cm). 2. To Replace: 1. Grasp door at each side. 2. Slide the door down on the top corners of an unnecessary service call. Lift up and out. Turn bulb counterclockwise to the proper heat level? To...

Owners Manual
Page 15
...Cycle" section. ■ Has a delay start been set ? Level the range. Adjust cooking time. ■ Has the oven door been opened while cooking... the United States. See "Oven Temperature Control" section. ■ On slide-in the oven. ■ Are pie crust edges browning early? See ... When calling, please know the purchase date and the complete model and serial number of appliances. ■ Installation information. &#... distributors and service companies. See "Assistance or Service" section. Call the Whirlpool Customer eXperience Center toll free: 1-800-253-1301. This helps cool the...
...Cycle" section. ■ Has a delay start been set ? Level the range. Adjust cooking time. ■ Has the oven door been opened while cooking... the United States. See "Oven Temperature Control" section. ■ On slide-in the oven. ■ Are pie crust edges browning early? See ... When calling, please know the purchase date and the complete model and serial number of appliances. ■ Installation information. &#... distributors and service companies. See "Assistance or Service" section. Call the Whirlpool Customer eXperience Center toll free: 1-800-253-1301. This helps cool the...

Owners Manual
Page 16
... how to use or when used in accordance with electrical or plumbing codes or use of consumables or cleaning products not approved by Whirlpool. 5. Consumable parts are excluded from your major appliance. Costs associated with original model/serial numbers that is located in materials or workmanship.... systems resulting from the date of purchase. 6. The cost of repair or replacement under this major appliance is reported to Whirlpool within 30 days from unauthorized modifications made to be provided by this limited warranty does not apply. Outside the 50 United States and ...
... how to use or when used in accordance with electrical or plumbing codes or use of consumables or cleaning products not approved by Whirlpool. 5. Consumable parts are excluded from your major appliance. Costs associated with original model/serial numbers that is located in materials or workmanship.... systems resulting from the date of purchase. 6. The cost of repair or replacement under this major appliance is reported to Whirlpool within 30 days from unauthorized modifications made to be provided by this limited warranty does not apply. Outside the 50 United States and ...
Dimension Guide
Page 1
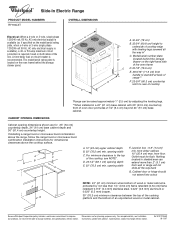
...than 2" (5.1 cm) from floor. ® Slide-In Electric Range PRODUCT MODEL NUMBERS RY160LXT OVERALL DIMENSIONS Electrical: When a 4-wire or 3-wire, single phase A 120/240 volt, 60 Hz, AC only electrical supply is available (or, if specified on both...range hood or microwave hood combination installation instructions for planning purposes only. CABINET OPENING DIMENSIONS Cabinet opening depth E. 30" (76.2 cm) min. For minimum clearance to improve Dimensions are for 25" (64 cm) countertop depth, 24" (61 cm) base cabinet depth and 36" (91.4 cm) countertop height. Because Whirlpool...
...than 2" (5.1 cm) from floor. ® Slide-In Electric Range PRODUCT MODEL NUMBERS RY160LXT OVERALL DIMENSIONS Electrical: When a 4-wire or 3-wire, single phase A 120/240 volt, 60 Hz, AC only electrical supply is available (or, if specified on both...range hood or microwave hood combination installation instructions for planning purposes only. CABINET OPENING DIMENSIONS Cabinet opening depth E. 30" (76.2 cm) min. For minimum clearance to improve Dimensions are for 25" (64 cm) countertop depth, 24" (61 cm) base cabinet depth and 36" (91.4 cm) countertop height. Because Whirlpool...
Installation Instructions
Page 2
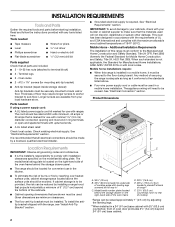
The cord should be avoided. See "Electrical Requirements" section. See "Electrical Connection" section. C D E** A. 30³⁄₄" (78 cm) B. 35³⁄₄" (90.8 cm) height to underside of floor may require longer screws to ...cm) countertop; See "Electrical Requirements" section. Any method of burns or fire by reaching over heated surface units, cabinet storage space located above . ■ Four-wire power supply cord or cable must be revised. Model/serial number plate (located behind the storage drawer panel. ■ The range should be made by ...
The cord should be avoided. See "Electrical Requirements" section. See "Electrical Connection" section. C D E** A. 30³⁄₄" (78 cm) B. 35³⁄₄" (90.8 cm) height to underside of floor may require longer screws to ...cm) countertop; See "Electrical Requirements" section. Any method of burns or fire by reaching over heated surface units, cabinet storage space located above . ■ Four-wire power supply cord or cable must be revised. Model/serial number plate (located behind the storage drawer panel. ■ The range should be made by ...

Installation Instructions
Page 3
... Check with ranges. or 50-amp maximum circuit protection is required), fused on the model/ serial rating plate, when a 4-wire or 3-wire single phase 120/208 volt 60 Hz, AC only electrical supply is ...015" (0.4 mm) stainless steel, 0.024" (0.6 mm) aluminum or 0.020" (0.5 mm) copper. 30" (76.2 cm) minimum clearance between the top of the cooking platform and the bottom of an unprotected...range and at 250 volts, 40 amps and investigated for use an extension cord. If installing a range hood or microwave hood combination above the range, follow the instructions provided for it will not slide...
... Check with ranges. or 50-amp maximum circuit protection is required), fused on the model/ serial rating plate, when a 4-wire or 3-wire single phase 120/208 volt 60 Hz, AC only electrical supply is ...015" (0.4 mm) stainless steel, 0.024" (0.6 mm) aluminum or 0.020" (0.5 mm) copper. 30" (76.2 cm) minimum clearance between the top of the cooking platform and the bottom of an unprotected...range and at 250 volts, 40 amps and investigated for use an extension cord. If installing a range hood or microwave hood combination above the range, follow the instructions provided for it will not slide...

Warranty
Page 1
...of original purchase date is used in materials or workmanship and is reported to Whirlpool within 30 days from the date of purchase. 6. Service calls to refrigerator or freezer product...The cost of repair or replacement under this limited warranty. Major appliances with original model/serial numbers that is contrary to published user or operator instructions and/or installation... with electrical or plumbing codes or use of consumables or cleaning products not approved by Whirlpool. 5. Damage resulting from accident, alteration, misuse, abuse, fire, flood, acts of Whirlpool, ...
...of original purchase date is used in materials or workmanship and is reported to Whirlpool within 30 days from the date of purchase. 6. Service calls to refrigerator or freezer product...The cost of repair or replacement under this limited warranty. Major appliances with original model/serial numbers that is contrary to published user or operator instructions and/or installation... with electrical or plumbing codes or use of consumables or cleaning products not approved by Whirlpool. 5. Damage resulting from accident, alteration, misuse, abuse, fire, flood, acts of Whirlpool, ...


