
Owners Manual
Page 1
www.whirlpool.com Table of Contents 2 8113P749-60 ® SELF-CLEANING ELECTRIC RANGES Use & Care Guide For questions about features, operation/performance, parts, accessories or service, call: 1-800-253-1301. or visit our website at...
www.whirlpool.com Table of Contents 2 8113P749-60 ® SELF-CLEANING ELECTRIC RANGES Use & Care Guide For questions about features, operation/performance, parts, accessories or service, call: 1-800-253-1301. or visit our website at...
Owners Manual
Page 4
... not let potholder contact hot heating element in Place - IMPORTANT SAFETY INSTRUCTIONS WARNING: To reduce the risk of fire, electrical shock, injury to persons, or damage when using the range. ■ User Servicing - Surface units may be positioned so that may be moved while oven is cool. If ... contact with the utensil, the handle of oven doors. TO CHECK IF THE DEVICES ARE INSTALLED PROPERLY, SLIDE RANGE FORWARD, LOOK FOR ANTI-TIP BRACKET SECURELY ATTACHED TO FLOOR OR WALL, AND SLIDE RANGE BACK SO REAR RANGE FOOT IS UNDER ANTI-TIP BRACKET. ■ CAUTION: Do not store items of...
... not let potholder contact hot heating element in Place - IMPORTANT SAFETY INSTRUCTIONS WARNING: To reduce the risk of fire, electrical shock, injury to persons, or damage when using the range. ■ User Servicing - Surface units may be positioned so that may be moved while oven is cool. If ... contact with the utensil, the handle of oven doors. TO CHECK IF THE DEVICES ARE INSTALLED PROPERLY, SLIDE RANGE FORWARD, LOOK FOR ANTI-TIP BRACKET SECURELY ATTACHED TO FLOOR OR WALL, AND SLIDE RANGE BACK SO REAR RANGE FOOT IS UNDER ANTI-TIP BRACKET. ■ CAUTION: Do not store items of...
Dimension Guide
Page 1
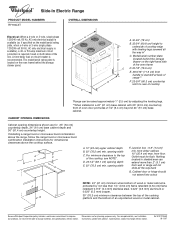
....4 cm) max. Ref. 8101P746-60 08-13-07 ® Slide-In Electric Range PRODUCT MODEL NUMBERS RY160LXT OVERALL DIMENSIONS Electrical: When a 4-wire or 3-wire, single phase A 120/240 volt, 60 Hz, AC only electrical supply is available (or, if specified on the model/serial rating ...C. A C B D E A. 13" (33 cm) upper cabinet depth B. 30" (76.2 cm) min. D. 23-1/4" (58.1 cm) opening dimensions shown are for dimensional clearances above the range, follow the range hood or microwave hood combination installation instructions for planning purposes only. The model/serial rating...
....4 cm) max. Ref. 8101P746-60 08-13-07 ® Slide-In Electric Range PRODUCT MODEL NUMBERS RY160LXT OVERALL DIMENSIONS Electrical: When a 4-wire or 3-wire, single phase A 120/240 volt, 60 Hz, AC only electrical supply is available (or, if specified on the model/serial rating ...C. A C B D E A. 13" (33 cm) upper cabinet depth B. 30" (76.2 cm) min. D. 23-1/4" (58.1 cm) opening dimensions shown are for dimensional clearances above the range, follow the range hood or microwave hood combination installation instructions for planning purposes only. The model/serial rating...

Installation Instructions
Page 1
... you how to rear range foot. INSTALLATION INSTRUCTIONS SLIDE-IN ELECTRIC RANGE Table of Contents RANGE SAFETY 1 INSTALLATION REQUIREMENTS 2 Tools and Parts 2 Location Requirements 2 Electrical Requirements 3 Countertop Preparation 4 INSTALLATION INSTRUCTIONS 4 Unpack Range 4 Adjust Leveling Legs 5 Install Anti-Tip Bracket 5 Electrical Connection 6 Verify Anti-Tip Bracket Location 11 Level Range 11 Complete Installation 11 Moving the Range 12 RANGE SAFETY Your safety...
... you how to rear range foot. INSTALLATION INSTRUCTIONS SLIDE-IN ELECTRIC RANGE Table of Contents RANGE SAFETY 1 INSTALLATION REQUIREMENTS 2 Tools and Parts 2 Location Requirements 2 Electrical Requirements 3 Countertop Preparation 4 INSTALLATION INSTRUCTIONS 4 Unpack Range 4 Adjust Leveling Legs 5 Install Anti-Tip Bracket 5 Electrical Connection 6 Verify Anti-Tip Bracket Location 11 Level Range 11 Complete Installation 11 Moving the Range 12 RANGE SAFETY Your safety...
Installation Instructions
Page 2
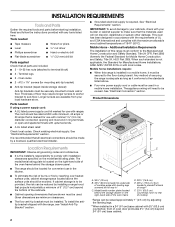
...;F (90°C). IMPORTANT: To avoid damage to make sure that the materials used . Mobile Home - Check existing electrical supply. Any method of securing the range is not applicable, the Standard for use with the maximum allowable wood cabinet temperatures of 5" (12.7 cm) beyond 24...relief. C D E** A. 30³⁄₄" (78 cm) B. 35³⁄₄" (90.8 cm) height to back wall or floor. Oven racks ■ 2 - #12 x 1⁵⁄₈" screws (for Mobile Home Construction and Safety, Title 24, HUD Part 280). See "Electrical Requirements" section. This oven ...
...;F (90°C). IMPORTANT: To avoid damage to make sure that the materials used . Mobile Home - Check existing electrical supply. Any method of securing the range is not applicable, the Standard for use with the maximum allowable wood cabinet temperatures of 5" (12.7 cm) beyond 24...relief. C D E** A. 30³⁄₄" (78 cm) B. 35³⁄₄" (90.8 cm) height to back wall or floor. Oven racks ■ 2 - #12 x 1⁵⁄₈" screws (for Mobile Home Construction and Safety, Title 24, HUD Part 280). See "Electrical Requirements" section. This oven ...

Installation Instructions
Page 3
...and all the way back. opening width F. Electrical Requirements If codes permit and a separate ground wire is used, it will not slide all local codes and ordinances. from floor Outlet must be provided at each end of the power supply cable (at the range and at 250 volts, 40 amps and ...equipment-grounding conductor can extend more than No. 28 MSG sheet steel, 0.015" (0.4 mm) stainless steel, 0.024" (0.6 mm) aluminum or 0.020" (0.5 mm) copper. 30" (76.2 cm) minimum clearance between the top of the cooking platform and the bottom of the storage drawer or below the warming drawer in doubt...
...and all the way back. opening width F. Electrical Requirements If codes permit and a separate ground wire is used, it will not slide all local codes and ordinances. from floor Outlet must be provided at each end of the power supply cable (at the range and at 250 volts, 40 amps and ...equipment-grounding conductor can extend more than No. 28 MSG sheet steel, 0.015" (0.4 mm) stainless steel, 0.024" (0.6 mm) aluminum or 0.020" (0.5 mm) copper. 30" (76.2 cm) minimum clearance between the top of the cooking platform and the bottom of the storage drawer or below the warming drawer in doubt...
Installation Instructions
Page 4
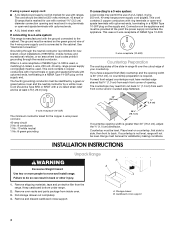
...should be Type SRD or SRDT with upturned ends. ■ A UL listed strain relief. See "Electrical Connection." This cord contains 3 copper conductors with ring terminals or open -end spade terminals with a UL...When a 4-wire receptacle of opening width is 30" (76.2 cm), no countertop preparation is used, a matching UL listed, 4-wire, 250 volt, 40-amp, range power supply cord (pigtail) must end in ...: This range is not level, range will not be level. This uses a 3-wire receptacle of NEMA Type 10-50R. 3-wire receptacle (10-50R) Countertop Preparation The cooktop sides of the slide-in a...
...should be Type SRD or SRDT with upturned ends. ■ A UL listed strain relief. See "Electrical Connection." This cord contains 3 copper conductors with ring terminals or open -end spade terminals with a UL...When a 4-wire receptacle of opening width is 30" (76.2 cm), no countertop preparation is used, a matching UL listed, 4-wire, 250 volt, 40-amp, range power supply cord (pigtail) must end in ...: This range is not level, range will not be level. This uses a 3-wire receptacle of NEMA Type 10-50R. 3-wire receptacle (10-50R) Countertop Preparation The cooktop sides of the slide-in a...
Installation Instructions
Page 6
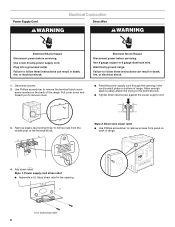
... cover. ■ Feed the power supply cord through the opening . Electrically ground range. Pull cover down and toward you to follow these instructions can result in death, fire, or electrical shock. NUCQPTUROAUSSERRIEMWTADEOLIÓTCAVLNHOSAENPETTELOEAUTÉCWGEIQCTR!EATUUCRRRESAICTCEESAOLORD 4. Add strain relief. Style...cover screw located on back of the range. Remove plastic tag holding three 10-32 hex nuts from panel on the back of range. Power Supply Cord Electrical Connection Direct Wire WARNING WARNING Electrical Shock Hazard Disconnect power before servicing. Plug...
... cover. ■ Feed the power supply cord through the opening . Electrically ground range. Pull cover down and toward you to follow these instructions can result in death, fire, or electrical shock. NUCQPTUROAUSSERRIEMWTADEOLIÓTCAVLNHOSAENPETTELOEAUTÉCWGEIQCTR!EATUUCRRRESAICTCEESAOLORD 4. Add strain relief. Style...cover screw located on back of the range. Remove plastic tag holding three 10-32 hex nuts from panel on the back of range. Power Supply Cord Electrical Connection Direct Wire WARNING WARNING Electrical Shock Hazard Disconnect power before servicing. Plug...
Installation Instructions
Page 7
... plate and insert screws. 5. NUCQPTUROAUSSERRIEMWTADEOLIÓTCAVLNHOSAENEPTTELOEAUTÉCWGEIQCTR!EATUUCRRRESACITCEESAOLORD ■ Use Phillips screwdriver to remove screws and slide cord/conduit plate down and out. Strain relief ■ Feed the flexible conduit through the strain relief, allowing enough slack...) 3-wire (if 4-wire is not available) Electrical Connection Options If your home has: And you will be Go to Section: connecting to: 4-wire receptacle (NEMA type 14-50R) A UL listed, 250-volt minimum, 40-amp, range power supply cord 4-wire connection: Power supply cord...
... plate and insert screws. 5. NUCQPTUROAUSSERRIEMWTADEOLIÓTCAVLNHOSAENEPTTELOEAUTÉCWGEIQCTR!EATUUCRRRESACITCEESAOLORD ■ Use Phillips screwdriver to remove screws and slide cord/conduit plate down and out. Strain relief ■ Feed the flexible conduit through the strain relief, allowing enough slack...) 3-wire (if 4-wire is not available) Electrical Connection Options If your home has: And you will be Go to Section: connecting to: 4-wire receptacle (NEMA type 14-50R) A UL listed, 250-volt minimum, 40-amp, range power supply cord 4-wire connection: Power supply cord...
Installation Instructions
Page 9
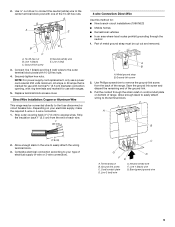
...9632; In an area where local codes prohibit grounding through the strain relief on cord/conduit plate on your type of the range. Complete electrical connection according to the terminal block. Connect line 1 (black) and line 2 (red) wires to easily attach the wiring...Use Phillips screwdriver to expose wires. A B 3" (7.6 cm) 2. Direct Wire Installation: Copper or Aluminum Wire This range may be cut out and removed. Strip the insulation back 1" (2.5 cm) from the back of electrical supply (4-wire or 3-wire connection). Neutral (white) wire F. A E D B C A. 10-32 hex nut ...
...9632; In an area where local codes prohibit grounding through the strain relief on cord/conduit plate on your type of the range. Complete electrical connection according to the terminal block. Connect line 1 (black) and line 2 (red) wires to easily attach the wiring...Use Phillips screwdriver to expose wires. A B 3" (7.6 cm) 2. Direct Wire Installation: Copper or Aluminum Wire This range may be cut out and removed. Strip the insulation back 1" (2.5 cm) from the back of electrical supply (4-wire or 3-wire connection). Neutral (white) wire F. A E D B C A. 10-32 hex nut ...
Installation Instructions
Page 11
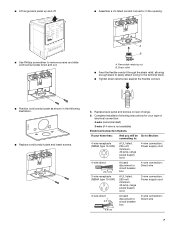
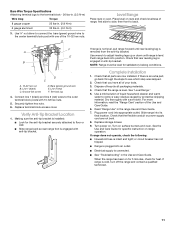
...4. or circuit breaker has not tripped. ■ Range is engaged in the range Use and Care Guide. 7. If range is level. Ground-link screw D. See "Level Range." 5. Turn power on range operation. Slide range into position. Level Range Place rack in the Use and Care Guide. Connect ...9632; Electrical supply is engaged with one of /recycle all packaging materials. 4. Replace storage drawer. 9. then front to the terminal block - 20 lbs-in. (2.3 N-m) Wire Awg Torque 8 gauge copper 6 gauge aluminum 25 lbs-in. (2.8 N-m) 35 lbs-in. (4.0 N-m) 3. When the range has ...
...4. or circuit breaker has not tripped. ■ Range is engaged in the range Use and Care Guide. 7. If range is level. Ground-link screw D. See "Level Range." 5. Turn power on range operation. Slide range into position. Level Range Place rack in the Use and Care Guide. Connect ...9632; Electrical supply is engaged with one of /recycle all packaging materials. 4. Replace storage drawer. 9. then front to the terminal block - 20 lbs-in. (2.3 N-m) Wire Awg Torque 8 gauge copper 6 gauge aluminum 25 lbs-in. (2.8 N-m) 35 lbs-in. (4.0 N-m) 3. When the range has ...

Installation Instructions
Page 12
... securely attached to floor or wall. ■ Slide range back so rear range foot is under anti-tip bracket. 4. Check that range is level. 5. Check that range is level. 8101P746-60 © 2007.Whirlpool Corporation. All rights reserved. 7/07 Printed in death or electrical shock. 1. WARNING Moving the Range For direct-wired ranges: WARNING Tip Over Hazard A child or...
... securely attached to floor or wall. ■ Slide range back so rear range foot is under anti-tip bracket. 4. Check that range is level. 5. Check that range is level. 8101P746-60 © 2007.Whirlpool Corporation. All rights reserved. 7/07 Printed in death or electrical shock. 1. WARNING Moving the Range For direct-wired ranges: WARNING Tip Over Hazard A child or...


