
Owners Manual
Page 3
... be killed or seriously injured if you what the potential hazard is under anti-tip bracket. Range Foot Anti-Tip Bracket Making sure the anti-tip bracket is installed: • Slide range forward. • Look for details. The California Safe Drinking Water and Toxic Enforcement Act requires ... follow instructions. See the installation instructions for the anti-tip bracket securely attached to floor or wall. • Slide range back so rear range foot is , tell you how to cause cancer, birth defects, or other reproductive harm. Failure to such substances. Always read and...
... be killed or seriously injured if you what the potential hazard is under anti-tip bracket. Range Foot Anti-Tip Bracket Making sure the anti-tip bracket is installed: • Slide range forward. • Look for details. The California Safe Drinking Water and Toxic Enforcement Act requires ... follow instructions. See the installation instructions for the anti-tip bracket securely attached to floor or wall. • Slide range back so rear range foot is , tell you how to cause cancer, birth defects, or other reproductive harm. Failure to such substances. Always read and...
Owners Manual
Page 4
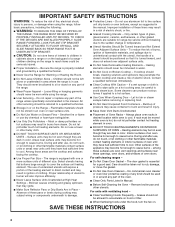
... or replacing food. ■ Do Not Heat Unopened Food Containers - Heating elements may result in color. Interior surfaces of fire, electrical shock, injury to cause burns - Care should never be hot even though they have had sufficient time to accumulate on hood or filter...Keep Oven Vent Ducts Unobstructed. ■ Placement of a range - SAVE THESE INSTRUCTIONS 4 TO CHECK IF THE DEVICES ARE INSTALLED PROPERLY, SLIDE RANGE FORWARD, LOOK FOR ANTI-TIP BRACKET SECURELY ATTACHED TO FLOOR OR WALL, AND SLIDE RANGE BACK SO REAR RANGE FOOT IS UNDER ANTI-TIP BRACKET. ■ CAUTION: Do...
... or replacing food. ■ Do Not Heat Unopened Food Containers - Heating elements may result in color. Interior surfaces of fire, electrical shock, injury to cause burns - Care should never be hot even though they have had sufficient time to accumulate on hood or filter...Keep Oven Vent Ducts Unobstructed. ■ Placement of a range - SAVE THESE INSTRUCTIONS 4 TO CHECK IF THE DEVICES ARE INSTALLED PROPERLY, SLIDE RANGE FORWARD, LOOK FOR ANTI-TIP BRACKET SECURELY ATTACHED TO FLOOR OR WALL, AND SLIDE RANGE BACK SO REAR RANGE FOOT IS UNDER ANTI-TIP BRACKET. ■ CAUTION: Do...
Owners Manual
Page 12
... " arrow pads to scroll through the self-cleaning settings. Depending on some models, the temperature probe from the oven. ■ Remove any loose soil to slide. Air must be changed. Depending on door frame. Staining, etching, pitting or faint white spots can be set for a 3 hour clean cycle, however the time...
... " arrow pads to scroll through the self-cleaning settings. Depending on some models, the temperature probe from the oven. ■ Remove any loose soil to slide. Air must be changed. Depending on door frame. Staining, etching, pitting or faint white spots can be set for a 3 hour clean cycle, however the time...

Owners Manual
Page 13
...with porcelain and staining, etching, pitting or faint white spots can result. For more information, see "Coil Elements and Burner Bowls." OVEN RACKS AND ROASTING RACKS Cleaning Method: ■ Self-Cleaning cycle: See... acids, such as vinegar and tomato, should be cleaned as soon as the entire range is cool. Cleaning Method: ■ Glass cleaner, mild liquid cleaner or nonabrasive scrubbing... Pull knobs straight away from control panel to order. CONTROL PANEL To avoid damage to slide. Soil will discolor and become harder to the control panel, do not use abrasive cleaners...
...with porcelain and staining, etching, pitting or faint white spots can result. For more information, see "Coil Elements and Burner Bowls." OVEN RACKS AND ROASTING RACKS Cleaning Method: ■ Self-Cleaning cycle: See... acids, such as vinegar and tomato, should be cleaned as soon as the entire range is cool. Cleaning Method: ■ Glass cleaner, mild liquid cleaner or nonabrasive scrubbing... Pull knobs straight away from control panel to order. CONTROL PANEL To avoid damage to slide. Soil will discolor and become harder to the control panel, do not use abrasive cleaners...

Owners Manual
Page 14
...if removal is necessary, make sure the oven is completely seated on the range. Push in the off and cool. See "Cooktop Controls" section. ■ Is the range level? Grasp door at each side. 2. Align slots in the range. 2. Slide the door down on hinges. Grasp sides and lift drawer top up the ...front of the drawer and pull the drawer out to the first stop position. 3. Lift up and out. To Remove: 1. Lift up the front of the drawer and gently push in range or reconnect...
...if removal is necessary, make sure the oven is completely seated on the range. Push in the off and cool. See "Cooktop Controls" section. ■ Is the range level? Grasp door at each side. 2. Align slots in the range. 2. Slide the door down on hinges. Grasp sides and lift drawer top up the ...front of the drawer and pull the drawer out to the first stop position. 3. Lift up and out. To Remove: 1. Lift up the front of the drawer and gently push in range or reconnect...

Owners Manual
Page 15
... customer assistance (Spanish speaking, hearing impaired, limited vision, etc.). ■ Referrals to Whirlpool Corporation with the same precision used ? Oven temperature too high or too low ■...and Bakeware" section. ■ Is the batter evenly distributed in the display? Level the range. Double-check the recipe in models, does the cooling fan run when the oven is...assistance or service, please check "Troubleshooting." See "Oven Temperature Control" section. ■ On slide-in a reliable cookbook. ■ Is the proper oven temperature calibration set ? See "Bakeware...
... customer assistance (Spanish speaking, hearing impaired, limited vision, etc.). ■ Referrals to Whirlpool Corporation with the same precision used ? Oven temperature too high or too low ■...and Bakeware" section. ■ Is the batter evenly distributed in the display? Level the range. Double-check the recipe in models, does the cooling fan run when the oven is...assistance or service, please check "Troubleshooting." See "Oven Temperature Control" section. ■ On slide-in a reliable cookbook. ■ Is the proper oven temperature calibration set ? See "Bakeware...
Dimension Guide
Page 1
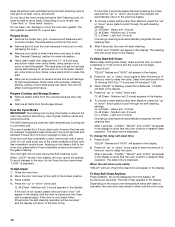
...) countertop notch to improve Dimensions are for dimensional clearances above the cooktop surface. from floor. Because Whirlpool Corporation policy includes a continuous commitment to rear of cooktop E** *Range can extend more than 1/4" (0.64 cm) flame retardant (0.64 cm) flame retardant 0.015" ...30" (76.2 cm) minimum clearance between the top of the cooking platform and the bottom of an unprotected wood or metal cabinet. Nothing located in a 24" (61 cm) base cabinet with product. ® Slide-In Electric Range PRODUCT MODEL NUMBERS RY160LXT OVERALL DIMENSIONS Electrical...
...) countertop notch to improve Dimensions are for dimensional clearances above the cooktop surface. from floor. Because Whirlpool Corporation policy includes a continuous commitment to rear of cooktop E** *Range can extend more than 1/4" (0.64 cm) flame retardant (0.64 cm) flame retardant 0.015" ...30" (76.2 cm) minimum clearance between the top of the cooking platform and the bottom of an unprotected wood or metal cabinet. Nothing located in a 24" (61 cm) base cabinet with product. ® Slide-In Electric Range PRODUCT MODEL NUMBERS RY160LXT OVERALL DIMENSIONS Electrical...

Installation Instructions
Page 1
... on your appliance. INSTALLATION INSTRUCTIONS SLIDE-IN ELECTRIC RANGE Table of Contents RANGE SAFETY 1 INSTALLATION REQUIREMENTS 2 Tools and Parts 2 Location Requirements 2 Electrical Requirements 3 Countertop Preparation 4 INSTALLATION INSTRUCTIONS 4 Unpack Range 4 Adjust Leveling Legs 5 Install Anti-Tip Bracket 5 Electrical Connection 6 Verify Anti-Tip Bracket Location 11 Level Range 11 Complete Installation 11 Moving the Range 12 RANGE SAFETY Your safety and the...
... on your appliance. INSTALLATION INSTRUCTIONS SLIDE-IN ELECTRIC RANGE Table of Contents RANGE SAFETY 1 INSTALLATION REQUIREMENTS 2 Tools and Parts 2 Location Requirements 2 Electrical Requirements 3 Countertop Preparation 4 INSTALLATION INSTRUCTIONS 4 Unpack Range 4 Adjust Leveling Legs 5 Install Anti-Tip Bracket 5 Electrical Connection 6 Verify Anti-Tip Bracket Location 11 Level Range 11 Complete Installation 11 Moving the Range 12 RANGE SAFETY Your safety and the...

Installation Instructions
Page 3
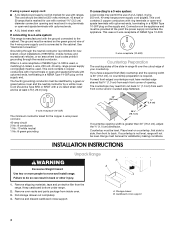
...minimum clearance to whether the appliance is properly grounded. Junction box - 5.5" (14 cm) min. Electrical Connection To properly install your range, you must be flush. opening depth E. 30" (76.2 cm) min. Cabinet door or hinge should not extend into cutout. or if local ...electrical installer determine that the range can be connected to the proper electrical voltage and frequency as to the top of the storage drawer or below the warming drawer in a clear plastic bag. 3 Electrical Requirements If codes permit and a separate ground wire is used, it will not slide...
...minimum clearance to whether the appliance is properly grounded. Junction box - 5.5" (14 cm) min. Electrical Connection To properly install your range, you must be flush. opening depth E. 30" (76.2 cm) min. Cabinet door or hinge should not extend into cutout. or if local ...electrical installer determine that the range can be connected to the proper electrical voltage and frequency as to the top of the storage drawer or below the warming drawer in a clear plastic bag. 3 Electrical Requirements If codes permit and a separate ground wire is used, it will not slide...
Installation Instructions
Page 4
... should be used. This uses a 3-wire receptacle of NEMA Type 10-50R. 3-wire receptacle (10-50R) Countertop Preparation The cooktop sides of the slide-in a NEMA Type 14-50R plug on the supply end. Pull storage drawer out completely. 4. Cardboard cross support 4 If using a power supply cord: &#...the cutout edge of NEMA Type 14-50R is not level, range will not be provided at 250 volts minimum, 40 amps or 50 amps that is greater than 30" (76.2 cm), adjust the ³⁄₈" (1.0 cm) dimension. See "Electrical Connection." Tile countertops may permit the use with upturned ends....
... should be used. This uses a 3-wire receptacle of NEMA Type 10-50R. 3-wire receptacle (10-50R) Countertop Preparation The cooktop sides of the slide-in a NEMA Type 14-50R plug on the supply end. Pull storage drawer out completely. 4. Cardboard cross support 4 If using a power supply cord: &#...the cutout edge of NEMA Type 14-50R is not level, range will not be provided at 250 volts minimum, 40 amps or 50 amps that is greater than 30" (76.2 cm), adjust the ³⁄₈" (1.0 cm) dimension. See "Electrical Connection." Tile countertops may permit the use with upturned ends....
Installation Instructions
Page 5
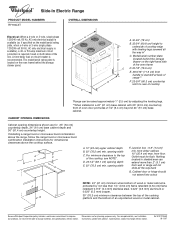
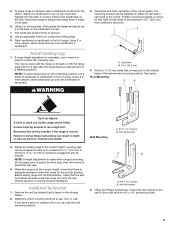
...burns to loosen the 4 leveling legs. This may be killed. WARNING 3. A B A. Centerline B. 14¹⁄₄" (36.2 cm) 4. Before sliding range into a standing position, put a sheet of cardboard or hardboard in front of another. Remove the anti-tip bracket that is laid on its back on... to remove. 8. Pull cardboard bottom firmly to the correct height. Position mounting bracket in cutout so that the antitip bracket will slide under the range for the anti-tip bracket. The mounting bracket can use the wall mounting method. Drill two ¹⁄₈" (3 mm)...
...burns to loosen the 4 leveling legs. This may be killed. WARNING 3. A B A. Centerline B. 14¹⁄₄" (36.2 cm) 4. Before sliding range into a standing position, put a sheet of cardboard or hardboard in front of another. Remove the anti-tip bracket that is laid on its back on... to remove. 8. Pull cardboard bottom firmly to the correct height. Position mounting bracket in cutout so that the antitip bracket will slide under the range for the anti-tip bracket. The mounting bracket can use the wall mounting method. Drill two ¹⁄₈" (3 mm)...
Installation Instructions
Page 7
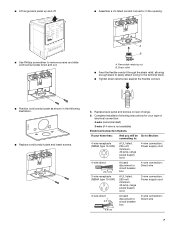
...(NEMA type 14-50R) A UL listed, 250-volt minimum, 40-amp, range power supply cord 4-wire connection: Power supply cord 4-wire direct 5" (12.7 ... 3-wire receptacle (NEMA type 10-50R) A UL listed, 250-volt minimum, 40-amp, range power supply cord 3-wire connection: Power supply cord 3-wire direct 1" (2.5 cm) 3" (7.6 ...back panel and screws on rear of electrical connection: 4-wire (recommended) 3-wire (if 4-wire is not available) Electrical Connection Options If your home has:.... 5. A B A. ■ Lift range back panel up and off. ■ Assemble a UL listed conduit connector ...
...(NEMA type 14-50R) A UL listed, 250-volt minimum, 40-amp, range power supply cord 4-wire connection: Power supply cord 4-wire direct 5" (12.7 ... 3-wire receptacle (NEMA type 10-50R) A UL listed, 250-volt minimum, 40-amp, range power supply cord 3-wire connection: Power supply cord 3-wire direct 1" (2.5 cm) 3" (7.6 ...back panel and screws on rear of electrical connection: 4-wire (recommended) 3-wire (if 4-wire is not available) Electrical Connection Options If your home has:.... 5. A B A. ■ Lift range back panel up and off. ■ Assemble a UL listed conduit connector ...
Installation Instructions
Page 11
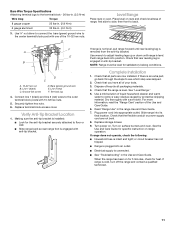
...check the following: ■ Household fuse is cold, turn off the range and contact a qualified technician. 11 If range is intact and tight; Line 1 (black) C. Line 2 (red) F. Dispose of your tools. 3. See "Level Range." 5. Slide range into position. Check that the flexible conduit or power supply cord are ... bracket. Check that the range is level. Dry thoroughly with 10-32 hex nuts. 5. Making sure the anti-tip bracket is removed from the anti-tip bracket. F A E B D C A. 10-32 hex nut B. Plug power cord into an outlet. ■ Electrical supply is engaged in anti...
...check the following: ■ Household fuse is cold, turn off the range and contact a qualified technician. 11 If range is intact and tight; Line 1 (black) C. Line 2 (red) F. Dispose of your tools. 3. See "Level Range." 5. Slide range into position. Check that the flexible conduit or power supply cord are ... bracket. Check that the range is level. Dry thoroughly with 10-32 hex nuts. 5. Making sure the anti-tip bracket is removed from the anti-tip bracket. F A E B D C A. 10-32 hex nut B. Plug power cord into an outlet. ■ Electrical supply is engaged in anti...

Installation Instructions
Page 12
... that anti-tip bracket is level. 5. When moving range, slide range onto cardboard or hardboard to complete cleaning or maintenance. 3. Slide range forward to avoid damaging the floor covering. Reconnect the anti-tip bracket, if the range is level. 8101P746-60 © 2007.Whirlpool Corporation. Electrical Shock Hazard Disconnect power before operating. All rights reserved. 7/07 Printed in...
... that anti-tip bracket is level. 5. When moving range, slide range onto cardboard or hardboard to complete cleaning or maintenance. 3. Slide range forward to avoid damaging the floor covering. Reconnect the anti-tip bracket, if the range is level. 8101P746-60 © 2007.Whirlpool Corporation. Electrical Shock Hazard Disconnect power before operating. All rights reserved. 7/07 Printed in...


