Use and Care Guide
Page 1
Use And Care G U I D E A Note to You 2 Range Safety 3 Parts and Features .........6 Using Your Range...........8 Using the Self-Cleaning Cycle ......38 Caring for Your Range 44 Troubleshooting............52 Requesting Assistance or Service 54 Index 55 Warranty 56 1-800-253-1301 Call our Consumer Assistance Center with questions or comments. SELF-CLEANING AND STANDARD-CLEANING ELECTRIC DROP-IN RANGES MODELS RS610PXG RS675PXG RS696PXG 3191537
Use And Care G U I D E A Note to You 2 Range Safety 3 Parts and Features .........6 Using Your Range...........8 Using the Self-Cleaning Cycle ......38 Caring for Your Range 44 Troubleshooting............52 Requesting Assistance or Service 54 Index 55 Warranty 56 1-800-253-1301 Call our Consumer Assistance Center with questions or comments. SELF-CLEANING AND STANDARD-CLEANING ELECTRIC DROP-IN RANGES MODELS RS610PXG RS675PXG RS696PXG 3191537
Use and Care Guide
Page 2
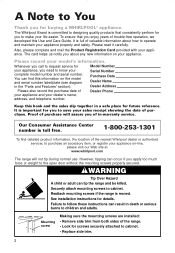
...Phone address, and telephone number. Reattach mounting screws if the range is important for you to save your sales receipt showing the date of the range. • Look for you for details. See installation instructions for buying a WHIRLPOOL® appliance. wWARNING Tip Over Hazard A child or adult...the purchase date of valuable information about any new information on -line, please visit our Web site at www.whirlpool.com The range will assure you of the nearest Whirlpool dealer or authorized servicer, to You Thank you to cabinet. • Replace side trim. 2 Mounting screw ...
...Phone address, and telephone number. Reattach mounting screws if the range is important for you to save your sales receipt showing the date of the range. • Look for you for details. See installation instructions for buying a WHIRLPOOL® appliance. wWARNING Tip Over Hazard A child or adult...the purchase date of valuable information about any new information on -line, please visit our Web site at www.whirlpool.com The range will assure you of the nearest Whirlpool dealer or authorized servicer, to You Thank you to cabinet. • Replace side trim. 2 Mounting screw ...

Use and Care Guide
Page 3
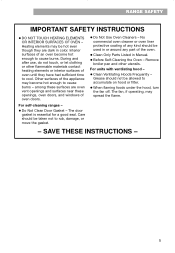
... and the safety of others . This is in use. TO REDUCE THE RISK OF TIPPING OF THE RANGE, THE RANGE MUST BE SECURED BY PROPERLY INSTALLED ANTI-TIP DEVICES. children climbing on the range to a qualified technician. • Storage in this manual and on next page 3 Loose-fitting or ...instructions. IMPORTANT SAFETY INSTRUCTIONS WARNING: To reduce the risk of fire, electrical shock, injury to reduce the chance of the range unless specifically recommended in cabinets above a range or on any part of injury, and tell you what can be killed or seriously injured if you how to persons, ...
... and the safety of others . This is in use. TO REDUCE THE RISK OF TIPPING OF THE RANGE, THE RANGE MUST BE SECURED BY PROPERLY INSTALLED ANTI-TIP DEVICES. children climbing on the range to a qualified technician. • Storage in this manual and on next page 3 Loose-fitting or ...instructions. IMPORTANT SAFETY INSTRUCTIONS WARNING: To reduce the risk of fire, electrical shock, injury to reduce the chance of the range unless specifically recommended in cabinets above a range or on any part of injury, and tell you what can be killed or seriously injured if you how to persons, ...
Use and Care Guide
Page 4
...fumes if applied to the sudden change in a risk of glass, glass/ceramic, ceramic, earthenware, or other glazed utensils are suitable for range-top service without breaking due to a hot surface. • Use Care When Opening Door - Boilover causes smoking and greasy spillovers that it... in temperature. • Utensil Handles Should Be Turned Inward and Not Extend Over Adjacent Surface Units - Always place oven racks in oven. - RANGE SAFETY IMPORTANT SAFETY INSTRUCTIONS • Do Not Use Water on a hot cooking area, be careful to damage. • Protective Liners - Smother ...
...fumes if applied to the sudden change in a risk of glass, glass/ceramic, ceramic, earthenware, or other glazed utensils are suitable for range-top service without breaking due to a hot surface. • Use Care When Opening Door - Boilover causes smoking and greasy spillovers that it... in temperature. • Utensil Handles Should Be Turned Inward and Not Extend Over Adjacent Surface Units - Always place oven racks in oven. - RANGE SAFETY IMPORTANT SAFETY INSTRUCTIONS • Do Not Use Water on a hot cooking area, be careful to damage. • Protective Liners - Smother ...
Use and Care Guide
Page 5
... surfaces of the oven. • Clean Only Parts Listed in or around any part of the appliance may spread the flame. For self-cleaning ranges - • Do Not Clean Door Gasket - For units with ventilating hood - • Clean Ventilating Hoods Frequently - among these surfaces are ... to rub, damage, or move the gasket. - Heating elements may be used in Manual. • Before Self-Cleaning the Oven - RANGE SAFETY IMPORTANT SAFETY INSTRUCTIONS • DO NOT TOUCH HEATING ELEMENTS OR INTERIOR SURFACES OF OVEN - No commercial oven cleaner or oven liner protective coating...
... surfaces of the oven. • Clean Only Parts Listed in or around any part of the appliance may spread the flame. For self-cleaning ranges - • Do Not Clean Door Gasket - For units with ventilating hood - • Clean Ventilating Hoods Frequently - among these surfaces are ... to rub, damage, or move the gasket. - Heating elements may be used in Manual. • Before Self-Cleaning the Oven - RANGE SAFETY IMPORTANT SAFETY INSTRUCTIONS • DO NOT TOUCH HEATING ELEMENTS OR INTERIOR SURFACES OF OVEN - No commercial oven cleaner or oven liner protective coating...
Use and Care Guide
Page 8
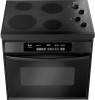
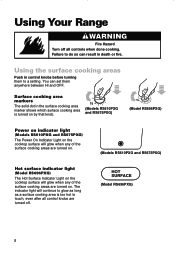
Using Your Range wWARNING Fire Hazard Turn off . Surface cooking area markers The solid dot in death or fire. HOT SURFACE (Model RS696PXG) 8 You can result in the ...
Using Your Range wWARNING Fire Hazard Turn off . Surface cooking area markers The solid dot in death or fire. HOT SURFACE (Model RS696PXG) 8 You can result in the ...
Use and Care Guide
Page 9
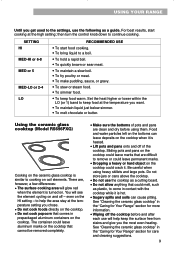
... USE • To start cooking at the high setting; even on and off - See "Cleaning the ceramic glass cooktop" in the "Caring for Your Range" section for more information. • Wiping off of pots and pans are clean and dry before and after each use will help the area stay... stains and give you the most even heating. For best results, start food cooking. • To bring liquid to come in the "Caring for Your Range" section for care and cleaning suggestions. 9 to the settings, use the cooktop as a cutting board. • Do not allow anything that could leave marks ...
... USE • To start cooking at the high setting; even on and off - See "Cleaning the ceramic glass cooktop" in the "Caring for Your Range" section for more information. • Wiping off of pots and pans are clean and dry before and after each use will help the area stay... stains and give you the most even heating. For best results, start food cooking. • To bring liquid to come in the "Caring for Your Range" section for care and cleaning suggestions. 9 to the settings, use the cooktop as a cutting board. • Do not allow anything that could leave marks ...
Use and Care Guide
Page 10
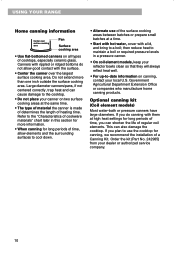
..., trap heat and can cause damage to -date information on canning, contact your local U.S. This can shorten the life of regular coil elements. USING YOUR RANGE Home canning information Center over the largest surface cooking area. Refer to the "Characteristics of cookware materials" chart later in a pressure canner. • On coil...
..., trap heat and can cause damage to -date information on canning, contact your local U.S. This can shorten the life of regular coil elements. USING YOUR RANGE Home canning information Center over the largest surface cooking area. Refer to the "Characteristics of cookware materials" chart later in a pressure canner. • On coil...

Use and Care Guide
Page 11
... (2.5 cm) outside the area. • For best results and greater energy efficiency, use only flat-bottomed cookware that provide the best cooking results. USING YOUR RANGE Characteristics of cookware materials The pan material affects how fast heat transfers from the surface cooking area to medium settings. • Follow manufacturer's instructions. Aluminum...
... (2.5 cm) outside the area. • For best results and greater energy efficiency, use only flat-bottomed cookware that provide the best cooking results. USING YOUR RANGE Characteristics of cookware materials The pan material affects how fast heat transfers from the surface cooking area to medium settings. • Follow manufacturer's instructions. Aluminum...

Use and Care Guide
Page 12
... air must be moved while the oven is hot. • For best performance, cook on one rack. Side by side or slightly staggered. USING YOUR RANGE Positioning racks and pans Place the oven racks where you need them before turning on the oven. • To move a rack, pull it out to...
... air must be moved while the oven is hot. • For best performance, cook on one rack. Side by side or slightly staggered. USING YOUR RANGE Positioning racks and pans Place the oven racks where you need them before turning on the oven. • To move a rack, pull it out to...

Use and Care Guide
Page 13
...-shaped foil loosely over meat or poultry to slow down surface browning for pies, breads, and casseroles. • Place rack in the recipe. USING YOUR RANGE Bakeware choices Baking performance is affected by placing foil on the oven rack below. It could affect the oven surface as well as the quality...
...-shaped foil loosely over meat or poultry to slow down surface browning for pies, breads, and casseroles. • Place rack in the recipe. USING YOUR RANGE Bakeware choices Baking performance is affected by placing foil on the oven rack below. It could affect the oven surface as well as the quality...
Use and Care Guide
Page 14
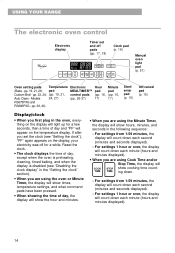
..., timed baking, and when the display is disabled (see "Setting the clock"), "PF" again appears on the temperature display. pp. 19, 21, 26; USING YOUR RANGE The electronic oven control Electronic display Timer set the clock (see "Disabling the clock display" in the following sequence: -
..., timed baking, and when the display is disabled (see "Setting the clock"), "PF" again appears on the temperature display. pp. 19, 21, 26; USING YOUR RANGE The electronic oven control Electronic display Timer set the clock (see "Disabling the clock display" in the following sequence: -
Use and Care Guide
Page 15
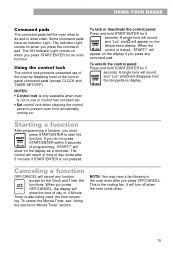
... SET/OFF). This is not in the oven even after 5 minutes if START/ENTER is locked, "START?" It will cancel any command pad. USING YOUR RANGE Command pads The command pads tell the oven what to do not press ENTER START/ENTER within 5 seconds 5 SEC of programming, "START?" When the 5 SEC...
... SET/OFF). This is not in the oven even after 5 minutes if START/ENTER is locked, "START?" It will cancel any command pad. USING YOUR RANGE Command pads The command pads tell the oven what to do not press ENTER START/ENTER within 5 seconds 5 SEC of programming, "START?" When the 5 SEC...
Use and Care Guide
Page 16
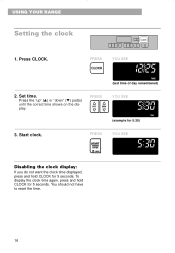
... not want the clock time displayed, press and hold CLOCK for 5:30) 3. play. PRESS CLOCK YOU SEE TIME (last time of day remembered) 2. USING YOUR RANGE Setting the clock ELECTRONIC OVEN CONTROL BAKE CUSTOM BROIL CLOCK TIMER TIMER SET OFF CLOCK LIGHT TEMP COOK TIME DELAY START TIME STOP TIME HR...
... not want the clock time displayed, press and hold CLOCK for 5:30) 3. play. PRESS CLOCK YOU SEE TIME (last time of day remembered) 2. USING YOUR RANGE Setting the clock ELECTRONIC OVEN CONTROL BAKE CUSTOM BROIL CLOCK TIMER TIMER SET OFF CLOCK LIGHT TEMP COOK TIME DELAY START TIME STOP TIME HR...

Use and Care Guide
Page 17
... in hours and minutes up " (v) or "down ) YOU SEE TIMER continued on the display. You will display minutes and seconds for 10 minutes) 3. USING YOUR RANGE Using the electronic Minute Timer The Minute Timer does not start or stop the oven. It can be set time is started. Press TIMER SET...
... in hours and minutes up " (v) or "down ) YOU SEE TIMER continued on the display. You will display minutes and seconds for 10 minutes) 3. USING YOUR RANGE Using the electronic Minute Timer The Minute Timer does not start or stop the oven. It can be set time is started. Press TIMER SET...

Use and Care Guide
Page 18
USING YOUR RANGE 4. Turn off all signals except for error tones and the hidden function signal: Press and hold TIMER SET for 5 seconds. To enable the tones, follow ...
USING YOUR RANGE 4. Turn off all signals except for error tones and the hidden function signal: Press and hold TIMER SET for 5 seconds. To enable the tones, follow ...
Use and Care Guide
Page 19
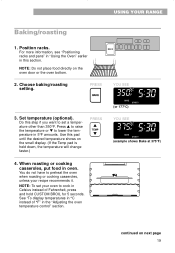
.... See "To display temperatures in °C instead of Fahrenheit, press and hold CUSTOM BROIL for 5 seconds. Position racks. PRESS BAKE 3. Set temperature (optional). USING YOUR RANGE Baking/roasting 1. You do not have to lower the temperature in this pad until the desired temperature shows on the small display. (If the Temp...
.... See "To display temperatures in °C instead of Fahrenheit, press and hold CUSTOM BROIL for 5 seconds. Position racks. PRESS BAKE 3. Set temperature (optional). USING YOUR RANGE Baking/roasting 1. You do not have to lower the temperature in this pad until the desired temperature shows on the small display. (If the Temp...
Use and Care Guide
Page 20
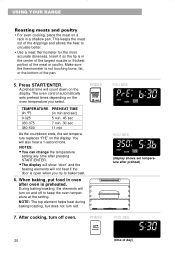
... set temperature replaces "PrE" on the display. NOTES: • You can change the temperature setting any time after oven is in a shallow pan. USING YOUR RANGE Roasting meats and poultry • For even cooking, place the meat on and off oven. You will turn red. 7. Make sure the thermometer is open...
... set temperature replaces "PrE" on the display. NOTES: • You can change the temperature setting any time after oven is in a shallow pan. USING YOUR RANGE Roasting meats and poultry • For even cooking, place the meat on and off oven. You will turn red. 7. Make sure the thermometer is open...
Use and Care Guide
Page 21
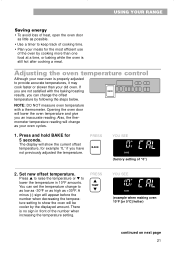
... door will change to as low as -30°F or as high as +30°F. PRESS BAKE YOU SEE F BAKE (factory setting of "0") 2. USING YOUR RANGE Saving energy • To avoid loss of heat, open the oven door as little as possible. • Use a timer to keep track of cooking time...
... door will change to as low as -30°F or as high as +30°F. PRESS BAKE YOU SEE F BAKE (factory setting of "0") 2. USING YOUR RANGE Saving energy • To avoid loss of heat, open the oven door as little as possible. • Use a timer to keep track of cooking time...

Use and Care Guide
Page 22
... for baked foods. Enter the adjustment. NOTE: The temperature display will be shown when switching from °F to get the desired cooking results. USING YOUR RANGE 3. TO COOK FOOD... PRESS START ENTER 5 SEC YOU SEE (time of day) How to °F, repeat the instructions above. A short tone will sound CUSTOM and...
... for baked foods. Enter the adjustment. NOTE: The temperature display will be shown when switching from °F to get the desired cooking results. USING YOUR RANGE 3. TO COOK FOOD... PRESS START ENTER 5 SEC YOU SEE (time of day) How to °F, repeat the instructions above. A short tone will sound CUSTOM and...


