Use and Care Guide
Page 6
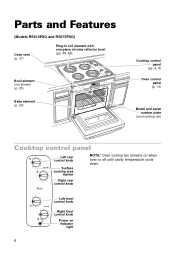
... control knob Right front control knob Power on when oven is off until cavity temperature cools down. Parts and Features (Models RS610PXG and RS675PXG) Oven vent (p. 37) Plug-in coil element with one-piece chrome reflector bowl (pp. 48, 49) Broil element (not shown) (p. 23) Bake element...TIMER SET TIMER OFF MIN HR CLOCK LIGHT START ENTER 5 SEC OFF CANCEL Cooktop control panel (pp. 6, 8) Oven control panel (p. 14) Model and serial number plate (on mounting rail) Cooktop control panel Left rear control knob Surface cooking area marker NOTE: Oven cooling fan remains on ...
... control knob Right front control knob Power on when oven is off until cavity temperature cools down. Parts and Features (Models RS610PXG and RS675PXG) Oven vent (p. 37) Plug-in coil element with one-piece chrome reflector bowl (pp. 48, 49) Broil element (not shown) (p. 23) Bake element...TIMER SET TIMER OFF MIN HR CLOCK LIGHT START ENTER 5 SEC OFF CANCEL Cooktop control panel (pp. 6, 8) Oven control panel (p. 14) Model and serial number plate (on mounting rail) Cooktop control panel Left rear control knob Surface cooking area marker NOTE: Oven cooling fan remains on ...
Use and Care Guide
Page 9
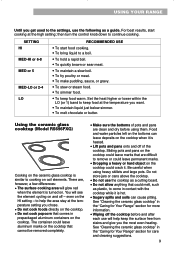
... or lower within the LO (or 1) band to keep food at the high setting; Be careful when using them. Using the ceramic glass cooktop (Model RS696PXG) Cooking on the ceramic glass cooktop is turned on. There are, however, a few differences: • The surface cooking area will glow red... when the element is similar to cooking on coil elements. even on the cooktop. See "Cleaning the ceramic glass cooktop" in contact with the cooktop while it is heated. • Lift pots and...
... or lower within the LO (or 1) band to keep food at the high setting; Be careful when using them. Using the ceramic glass cooktop (Model RS696PXG) Cooking on the ceramic glass cooktop is turned on. There are, however, a few differences: • The surface cooking area will glow red... when the element is similar to cooking on coil elements. even on the cooktop. See "Cleaning the ceramic glass cooktop" in contact with the cooktop while it is heated. • Lift pots and...
Use and Care Guide
Page 10
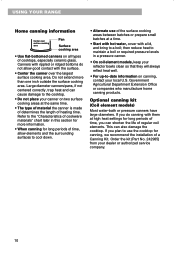
... on all types of heating time. then reduce heat to maintain a boil or required pressure levels in a pressure canner. • On coil element models, keep your reflector bowls clean so that they will always reflect heat well. • For up-to the "Characteristics of cookware materials" ...chart later in this section for more than one inch outside the surface cooking area. Optional canning kit (Coil element models) Most water-bath or pressure canners have large diameters. Order the kit (Part No. 242905) from your local U.S. This can shorten...
... on all types of heating time. then reduce heat to maintain a boil or required pressure levels in a pressure canner. • On coil element models, keep your reflector bowls clean so that they will always reflect heat well. • For up-to the "Characteristics of cookware materials" ...chart later in this section for more than one inch outside the surface cooking area. Optional canning kit (Coil element models) Most water-bath or pressure canners have large diameters. Order the kit (Part No. 242905) from your local U.S. This can shorten...
Use and Care Guide
Page 44
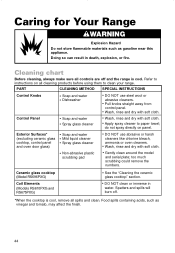
...glass cleaner • Wash, rinse and dry with soft cloth. • Non-abrasive plastic scrubbing pad • Gently clean around the model and serial plate; Exterior Surfaces* (excluding ceramic glass cooktop, control panel and oven door glass) • Soap and water • Mild...8226; Apply spray cleaner to clean your range. Food spills containing acids, such as gasoline near this appliance. Ceramic glass cooktop (Model RS696PXG) Coil Elements (Models RS610PXG and RS675PXG) • See the "Cleaning the ceramic glass cooktop" section. • DO NOT clean or immerse in ...
...glass cleaner • Wash, rinse and dry with soft cloth. • Non-abrasive plastic scrubbing pad • Gently clean around the model and serial plate; Exterior Surfaces* (excluding ceramic glass cooktop, control panel and oven door glass) • Soap and water • Mild...8226; Apply spray cleaner to clean your range. Food spills containing acids, such as gasoline near this appliance. Ceramic glass cooktop (Model RS696PXG) Coil Elements (Models RS610PXG and RS675PXG) • See the "Cleaning the ceramic glass cooktop" section. • DO NOT clean or immerse in ...
Use and Care Guide
Page 47
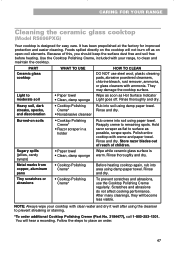
...Polishing Creme regularly. Rinse thoroughly and dry. Reapply creme to moderate soil Heavy soil, dark streaks, specks, and discoloration Burned-on open-coil elements. Polish entire cooktop with clean water and dry it well after using damp paper towel. Rinse and dry. NOTE: Always wipe ...Cooktop Polishing Creme* Before heating cooktop again, rub into soil using damp paper towel. CARING FOR YOUR RANGE Cleaning the ceramic glass cooktop (Model RS696PXG) Your cooktop is warm. It has been prepolished at the factory for easy care. Use the Cooktop Polishing Creme, included with your...
...Polishing Creme regularly. Rinse thoroughly and dry. Reapply creme to moderate soil Heavy soil, dark streaks, specks, and discoloration Burned-on open-coil elements. Polish entire cooktop with clean water and dry it well after using damp paper towel. Rinse and dry. NOTE: Always wipe ...Cooktop Polishing Creme* Before heating cooktop again, rub into soil using damp paper towel. CARING FOR YOUR RANGE Cleaning the ceramic glass cooktop (Model RS696PXG) Your cooktop is warm. It has been prepolished at the factory for easy care. Use the Cooktop Polishing Creme, included with your...

Use and Care Guide
Page 48
BAKE OFF CARING FOR YOUR RANGE Coil elements and reflector bowls (Models RS610PXG and RS675PXG) Removing 1. Push in this section for cleaning instructions. 48 Pull the coil element straight away from the receptacle. 4. Then lift it just enough to clear the reflector bowl. 3. Lift out the reflector bowl. See the "Cleaning chart" earlier in the edge of the coil element, opposite the receptacle. Make sure all coil elements are off and cool before removing coil elements and reflector bowls. 2.
BAKE OFF CARING FOR YOUR RANGE Coil elements and reflector bowls (Models RS610PXG and RS675PXG) Removing 1. Push in this section for cleaning instructions. 48 Pull the coil element straight away from the receptacle. 4. Then lift it just enough to clear the reflector bowl. 3. Lift out the reflector bowl. See the "Cleaning chart" earlier in the edge of the coil element, opposite the receptacle. Make sure all coil elements are off and cool before removing coil elements and reflector bowls. 2.

Use and Care Guide
Page 49
... coil element opposite the receptacle. This extra heat can cause it will go into the receptacle as far as possible with the coil element... receptacle. Line up openings in the reflector bowl with the terminal just started into the receptacle. 4. BAKE OFF 3. Push the coil ...element terminal into the receptacle. In either case, some may not be too large for the coil element. When the ... to the cookware on the coil elements. They also help catch spills. When they are off and cool before replacing coil elements and reflector bowls. 2....
... coil element opposite the receptacle. This extra heat can cause it will go into the receptacle as far as possible with the coil element... receptacle. Line up openings in the reflector bowl with the terminal just started into the receptacle. 4. BAKE OFF 3. Push the coil ...element terminal into the receptacle. In either case, some may not be too large for the coil element. When the ... to the cookware on the coil elements. They also help catch spills. When they are off and cool before replacing coil elements and reflector bowls. 2....
Use and Care Guide
Page 52
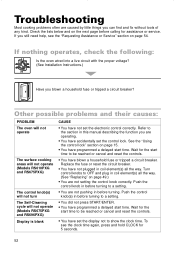
... and RS675PXG) The control knob(s) will not turn The Self-Cleaning cycle will not operate (Models RS675PXG and RS696PXG) Display is blank CAUSE • You have not set the display not to OFF and plug in coil element(s) all the way. Replace the fuse or reset the circuit breaker. • You... to a setting. • You did not press START/ENTER. • You have programmed a delayed start time to a setting. • You are not pushing in coil element(s) all the way. (See "Replacing" on page 54. Push the control knob(s) in this manual describing the function you can find and fix without...
... and RS675PXG) The control knob(s) will not turn The Self-Cleaning cycle will not operate (Models RS675PXG and RS696PXG) Display is blank CAUSE • You have not set the display not to OFF and plug in coil element(s) all the way. Replace the fuse or reset the circuit breaker. • You... to a setting. • You did not press START/ENTER. • You have programmed a delayed start time to a setting. • You are not pushing in coil element(s) all the way. (See "Replacing" on page 54. Push the control knob(s) in this manual describing the function you can find and fix without...
Use and Care Guide
Page 55
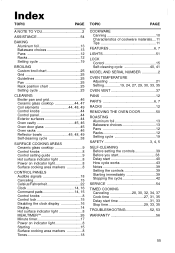
...25 Grid 25 Guidelines 25 Pan 25 Rack position chart 25 Setting cycle 23 CLEANING Broiler pan and grid 46 Ceramic glass cooktop 44, 47 Coil elements 44, 48, 49 Control knobs 44 Control panel 44 Exterior surfaces 44 Oven cavity 45, 46 Oven door glass 45 Oven racks 46... area markers 8 Tones 18 COOKWARE Canning 10 Characteristics of cookware materials....11 Tips 11 FEATURES 6, 7 LIGHTS 51 LOCK Control 15 Self-cleaning cycle 40, 41 MODEL AND SERIAL NUMBER 2 OVEN TEMPERATURE Adjusting 21 Setting 19, 24, 27, 29, 30, 33, 35 OVEN VENT 37 PANS 12 PARTS 6, 7 RACKS 12 REMOVING...
...25 Grid 25 Guidelines 25 Pan 25 Rack position chart 25 Setting cycle 23 CLEANING Broiler pan and grid 46 Ceramic glass cooktop 44, 47 Coil elements 44, 48, 49 Control knobs 44 Control panel 44 Exterior surfaces 44 Oven cavity 45, 46 Oven door glass 45 Oven racks 46... area markers 8 Tones 18 COOKWARE Canning 10 Characteristics of cookware materials....11 Tips 11 FEATURES 6, 7 LIGHTS 51 LOCK Control 15 Self-cleaning cycle 40, 41 MODEL AND SERIAL NUMBER 2 OVEN TEMPERATURE Adjusting 21 Setting 19, 24, 27, 29, 30, 33, 35 OVEN VENT 37 PANS 12 PARTS 6, 7 RACKS 12 REMOVING...


