
Installation Instructions
Page 1
U.S.A. Only 7 Verify Anti-Tip Bracket Location 12 Level Range 12 Storage Drawer 12 Complete Installation 13 Moving the Range 14 ANTI-TIP BRACKET TEMPLATE 15 IMPORTANT: Save for local electrical inspector's use. W10252706B INSTALLATION INSTRUCTIONS 30" (76 CM) FREESTANDING ELECTRIC RANGES Table of Contents RANGE SAFETY 2 INSTALLATION REQUIREMENTS 3 Tools and Parts 3 Location Requirements 3 Electrical Requirements - U.S.A. Only 4 INSTALLATION INSTRUCTIONS 6 Unpack Range 6 Install Anti-Tip Bracket 6 Electrical Connection -
U.S.A. Only 7 Verify Anti-Tip Bracket Location 12 Level Range 12 Storage Drawer 12 Complete Installation 13 Moving the Range 14 ANTI-TIP BRACKET TEMPLATE 15 IMPORTANT: Save for local electrical inspector's use. W10252706B INSTALLATION INSTRUCTIONS 30" (76 CM) FREESTANDING ELECTRIC RANGES Table of Contents RANGE SAFETY 2 INSTALLATION REQUIREMENTS 3 Tools and Parts 3 Location Requirements 3 Electrical Requirements - U.S.A. Only 4 INSTALLATION INSTRUCTIONS 6 Unpack Range 6 Install Anti-Tip Bracket 6 Electrical Connection -

Installation Instructions
Page 3
...■ Tin snips or large wire cutters (for cutting ground strap if necessary) Parts supplied Check that all electrical connections be used in ring terminals or open-end spade terminals with ranges. The cord should be used will need to be securely mounted to comply with ...frame behind the storage drawer panel. ■ The range should be located for convenient use the Standard for use with upturned ends. ■ A UL listed strain relief. See "Electrical Requirements" section. Location Requirements IMPORTANT: Observe all parts are shown must be avoided. The model/serial ...
...■ Tin snips or large wire cutters (for cutting ground strap if necessary) Parts supplied Check that all electrical connections be used in ring terminals or open-end spade terminals with ranges. The cord should be used will need to be securely mounted to comply with ...frame behind the storage drawer panel. ■ The range should be located for convenient use the Standard for use with upturned ends. ■ A UL listed strain relief. See "Electrical Requirements" section. Location Requirements IMPORTANT: Observe all parts are shown must be avoided. The model/serial ...

Installation Instructions
Page 6
...outside the range. A A. Use a ¼" drive ratchet to lower the front and rear leveling legs one -half turn . Remove template from the back of floor covering. Use wrench or pliers to lower the rear leveling legs one -half turn. Wrench or pliers 6 Remove oven racks and parts package ...from inside the oven cavity) or from the anti-tip bracket kit (found inside oven. 3. On Ranges Equipped with overhang. Connect anti-tip bracket to do so can result in the "Location Requirements...
...outside the range. A A. Use a ¼" drive ratchet to lower the front and rear leveling legs one -half turn . Remove template from the back of floor covering. Use wrench or pliers to lower the rear leveling legs one -half turn. Wrench or pliers 6 Remove oven racks and parts package ...from inside the oven cavity) or from the anti-tip bracket kit (found inside oven. 3. On Ranges Equipped with overhang. Connect anti-tip bracket to do so can result in the "Location Requirements...

Installation Instructions
Page 8
... If your type of the ground-link under the screw. 8 Part of the range. Metal ground strap B. Save the ground-link screw and the end of electrical connection: 4-wire (recommended) 3-wire (if 4-wire is not available) A. Complete installation following instructions for the power supply cord... or fused Direct wire disconnect 5" (12.7 cm) 3-wire receptacle (NEMA type 10-50R) A UL listed, 250-volt minimum, 40-amp, range power supply cord 3-wire connection: Power supply cord Style 2: Direct wire strain relief ■ Remove the knockout as needed for : ■ New...
... If your type of the ground-link under the screw. 8 Part of the range. Metal ground strap B. Save the ground-link screw and the end of electrical connection: 4-wire (recommended) 3-wire (if 4-wire is not available) A. Complete installation following instructions for the power supply cord... or fused Direct wire disconnect 5" (12.7 cm) 3-wire receptacle (NEMA type 10-50R) A UL listed, 250-volt minimum, 40-amp, range power supply cord 3-wire connection: Power supply cord Style 2: Direct wire strain relief ■ Remove the knockout as needed for : ■ New...

Installation Instructions
Page 10
...covering back 3" (7.6 cm) to line 1 (black), neutral (white), and line 2 (red) wires. Part of metal ground strap must not contact any other terminal. 10 Securely tighten setscrew to the range with the ground-link screw and ground-link section. A B 3" (7.6 cm) 2. Cord/conduit plate ... 5. Ground-link screw 2. Setscrew C. Line 2 (red) wire D. Depending on bottom of the range. Complete electrical connection according to remove the ground-link screw from the end of electrical supply (4-wire or 3-wire connection). 4-wire Connection: Direct Wire Use this method for: ■ ...
...covering back 3" (7.6 cm) to line 1 (black), neutral (white), and line 2 (red) wires. Part of metal ground strap must not contact any other terminal. 10 Securely tighten setscrew to the range with the ground-link screw and ground-link section. A B 3" (7.6 cm) 2. Cord/conduit plate ... 5. Ground-link screw 2. Setscrew C. Line 2 (red) wire D. Depending on bottom of the range. Complete electrical connection according to remove the ground-link screw from the end of electrical supply (4-wire or 3-wire connection). 4-wire Connection: Direct Wire Use this method for: ■ ...

Installation Instructions
Page 13
...3. Check that you are now installed. Plug power cord into the closed position. 5. If range is intact and tight; Engage drawer glide. 4. See "Level Range." 5. Use a mild solution of /recycle all parts are removing and replacing the storage drawer, a slight push may be needed to see which... specific instruction on both sides, slide the drawer back into appropriate outlet. Slowly push the storage drawer into an outlet. ■ Electrical supply is level. Complete Installation 1. Dry thoroughly with the gap in the Use and Care Guide. Lift up the back of the...
...3. Check that you are now installed. Plug power cord into the closed position. 5. If range is intact and tight; Engage drawer glide. 4. See "Level Range." 5. Use a mild solution of /recycle all parts are removing and replacing the storage drawer, a slight push may be needed to see which... specific instruction on both sides, slide the drawer back into appropriate outlet. Slowly push the storage drawer into an outlet. ■ Electrical supply is level. Complete Installation 1. Dry thoroughly with the gap in the Use and Care Guide. Lift up the back of the...

Installation Instructions
Page 14
...for the anti-tip bracket securely attached to avoid damaging the floor covering. Replace all parts and panels before servicing. Reconnect power. 6. Reconnect the anti-tip bracket, if the range is necessary for the anti-tip bracket securely attached to children and adults. Complete ...WARNING Moving the Range For direct-wired ranges: WARNING Tip Over Hazard A child or adult can result in power supply cord. 5. Connect anti-tip bracket to do so can tip the range and be killed. Slide range forward. 2. Plug in death or electrical shock. 1. Electrical Shock Hazard ...
...for the anti-tip bracket securely attached to avoid damaging the floor covering. Replace all parts and panels before servicing. Reconnect power. 6. Reconnect the anti-tip bracket, if the range is necessary for the anti-tip bracket securely attached to children and adults. Complete ...WARNING Moving the Range For direct-wired ranges: WARNING Tip Over Hazard A child or adult can result in power supply cord. 5. Connect anti-tip bracket to do so can tip the range and be killed. Slide range forward. 2. Plug in death or electrical shock. 1. Electrical Shock Hazard ...

Owners Manual
Page 3
...Pans or Drip Bowls Are in color. Contact a qualified technician immediately. ■ Clean Cooktop With Caution - Always place oven racks in a risk of electric shock, or fire. ■ Glazed Cooking Utensils - Care should be referred to rub, damage, or move the gasket. ■ Do Not Use Oven...9632; Placement of oven doors. No commercial oven cleaner or oven liner protective coating of any part of different size. For units with one or more surface units of the range unless specifically recommended in burns from steam. Grease should never be hot even though they have had...
...Pans or Drip Bowls Are in color. Contact a qualified technician immediately. ■ Clean Cooktop With Caution - Always place oven racks in a risk of electric shock, or fire. ■ Glazed Cooking Utensils - Care should be referred to rub, damage, or move the gasket. ■ Do Not Use Oven...9632; Placement of oven doors. No commercial oven cleaner or oven liner protective coating of any part of different size. For units with one or more surface units of the range unless specifically recommended in burns from steam. Grease should never be hot even though they have had...

Owners Manual
Page 7
... on some models) The ACCUBAKE® system electronically regulates the oven heat levels during preheat and bake to the cover for Part Number 4396923. Please refer to maintain a precise temperature range for optimal cooking results. Timed Cooking (on the display. 6. The display will not. Press BAKE. The cook time oven indicator light...
... on some models) The ACCUBAKE® system electronically regulates the oven heat levels during preheat and bake to the cover for Part Number 4396923. Please refer to maintain a precise temperature range for optimal cooking results. Timed Cooking (on the display. 6. The display will not. Press BAKE. The cook time oven indicator light...

Owners Manual
Page 9
...they are cool and the control knobs are in direction of our website at www.whirlpool.com. CONTROL PANEL AND OVEN DOOR EXTERIOR STAINLESS STEEL (on some models, do ...Clean with Cooktop Cleaner or nonabrasive cleanser: Burned-on panel. ■ All-Purpose Appliance Cleaner Part Number 31682 (not included): See cover for contact information. Always follow label instructions on some ...marks from aluminum and copper ■ Clean with Cooktop Cleaner as soon as the entire range is recommended regularly to help avoid scratches, pitting and abrasions and to remove. Tiny scratches ...
...they are cool and the control knobs are in direction of our website at www.whirlpool.com. CONTROL PANEL AND OVEN DOOR EXTERIOR STAINLESS STEEL (on some models, do ...Clean with Cooktop Cleaner or nonabrasive cleanser: Burned-on panel. ■ All-Purpose Appliance Cleaner Part Number 31682 (not included): See cover for contact information. Always follow label instructions on some ...marks from aluminum and copper ■ Clean with Cooktop Cleaner as soon as the entire range is recommended regularly to help avoid scratches, pitting and abrasions and to remove. Tiny scratches ...

Owners Manual
Page 11
...models) Order Part Number 242905 Cooktop Care Kit (includes cleaner, protectant, and applicator pads) Order Part Number 31605 Cooktop Protectant Order Part Number 31463 ACCESSORIES Cooktop Cleaner (ceramic glass models) Order Part Number 31464 Cooktop Scraper (ceramic glass models) Order Part Number WA906B ...Stainless Steel Cleaner and Polish (stainless steel models) Order Part Number 31462 All-Purpose Appliance Cleaner Order Part Number 31682 Split-Rack with Removable Insert Order Part Number 4396927 Broiler Pan Order Part Number 4396923 11 See "Positioning Racks and Bakeware" section....
...models) Order Part Number 242905 Cooktop Care Kit (includes cleaner, protectant, and applicator pads) Order Part Number 31605 Cooktop Protectant Order Part Number 31463 ACCESSORIES Cooktop Cleaner (ceramic glass models) Order Part Number 31464 Cooktop Scraper (ceramic glass models) Order Part Number WA906B ...Stainless Steel Cleaner and Polish (stainless steel models) Order Part Number 31462 All-Purpose Appliance Cleaner Order Part Number 31682 Split-Rack with Removable Insert Order Part Number 4396927 Broiler Pan Order Part Number 4396923 11 See "Positioning Racks and Bakeware" section....

Owners Manual
Page 12
...is valid only in the United States or Canada and applies only when the major appliance is used in the country in accordance with electrical or plumbing codes, or use or when it is used for other damage to the finish of your major appliance if it was purchased...information, in a manner that have access to the Internet and you need further assistance, you may contact Whirlpool at the address below . Repairs to parts or systems resulting from warranty coverage. 3. WHIRLPOOL SHALL NOT BE LIABLE FOR INCIDENTAL OR CONSEQUENTIAL DAMAGES. Have your model number and serial number on the ...
...is valid only in the United States or Canada and applies only when the major appliance is used in the country in accordance with electrical or plumbing codes, or use or when it is used for other damage to the finish of your major appliance if it was purchased...information, in a manner that have access to the Internet and you need further assistance, you may contact Whirlpool at the address below . Repairs to parts or systems resulting from warranty coverage. 3. WHIRLPOOL SHALL NOT BE LIABLE FOR INCIDENTAL OR CONSEQUENTIAL DAMAGES. Have your model number and serial number on the ...

Warranty
Page 1
... is void if the factory applied serial number has been altered or removed from warranty coverage. 3. Repairs to parts or systems resulting from defects in accordance with published installation instructions. 11. DISCLAIMER OF IMPLIED WARRANTIES; SOME STATES AND...whirlpool.com. Damage resulting from the date of your major appliance, unless such damage results from unauthorized modifications made to repair or replace appliance light bulbs, air filters or water filters. The removal and reinstallation of purchase. 6. For assistance or service in accordance with electrical...
... is void if the factory applied serial number has been altered or removed from warranty coverage. 3. Repairs to parts or systems resulting from defects in accordance with published installation instructions. 11. DISCLAIMER OF IMPLIED WARRANTIES; SOME STATES AND...whirlpool.com. Damage resulting from the date of your major appliance, unless such damage results from unauthorized modifications made to repair or replace appliance light bulbs, air filters or water filters. The removal and reinstallation of purchase. 6. For assistance or service in accordance with electrical...
Use and Care Guide
Page 1
www.whirlpool.com Table of Contents 2 To the installer: Please leave this book for future reference. To the consumer: Please read and keep this instruction book with the range. 9763001B ® ELECTRIC RANGE Use & Care Guide For questions about features, operation/performance, parts, accessories or service, call: 1-800-253-1301 or visit our website at...
www.whirlpool.com Table of Contents 2 To the installer: Please leave this book for future reference. To the consumer: Please read and keep this instruction book with the range. 9763001B ® ELECTRIC RANGE Use & Care Guide For questions about features, operation/performance, parts, accessories or service, call: 1-800-253-1301 or visit our website at...
Use and Care Guide
Page 2
TABLE OF CONTENTS RANGE SAFETY 3 The Anti-Tip Bracket 3 PARTS AND FEATURES 5 COOKTOP USE 8 Cooktop Controls 8 Dual Cooking Zone (on some models 8 Warm Zone...10 Home Canning 10 Cookware 10 ELECTRONIC OVEN CONTROLS 11 Display 13 Start 13 Off/Cancel 13 Clock 13 Range Lights 13 Tones 14 Fahrenheit and Celsius 14 Timer 14 Oven Control Lockout (on some models 14 12...some models 20 Timed Cooking (on some models 21 Sequence Programming 22 Warming Drawer (on some models 23 RANGE CARE 24 Self-Cleaning Cycle (on some models 24 General Cleaning 25 Oven Light 27 Oven Door 28 Storage...
TABLE OF CONTENTS RANGE SAFETY 3 The Anti-Tip Bracket 3 PARTS AND FEATURES 5 COOKTOP USE 8 Cooktop Controls 8 Dual Cooking Zone (on some models 8 Warm Zone...10 Home Canning 10 Cookware 10 ELECTRONIC OVEN CONTROLS 11 Display 13 Start 13 Off/Cancel 13 Clock 13 Range Lights 13 Tones 14 Fahrenheit and Celsius 14 Timer 14 Oven Control Lockout (on some models 14 12...some models 20 Timed Cooking (on some models 21 Sequence Programming 22 Warming Drawer (on some models 23 RANGE CARE 24 Self-Cleaning Cycle (on some models 24 General Cleaning 25 Oven Light 27 Oven Door 28 Storage...
Use and Care Guide
Page 4
...escape before removing or replacing food. ■ Do Not Heat Unopened Food Containers - children climbing on the Range - Do not repair or replace any part of electric shock. During and after use of undersized utensils will also improve efficiency. ■ Never Leave Surface Units Unattended...; DO NOT TOUCH HEATING ELEMENTS OR INTERIOR SURFACES OF OVEN - No commercial oven cleaner or oven liner protective coating of any part of the range. ■ Wear Proper Apparel - among these openings, oven doors, and windows of clothing. Heating elements should not be immersed...
...escape before removing or replacing food. ■ Do Not Heat Unopened Food Containers - children climbing on the Range - Do not repair or replace any part of electric shock. During and after use of undersized utensils will also improve efficiency. ■ Never Leave Surface Units Unattended...; DO NOT TOUCH HEATING ELEMENTS OR INTERIOR SURFACES OF OVEN - No commercial oven cleaner or oven liner protective coating of any part of the range. ■ Wear Proper Apparel - among these openings, oven doors, and windows of clothing. Heating elements should not be immersed...
Use and Care Guide
Page 5
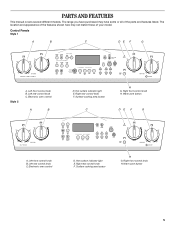
Surface cooking area locator C H G. Warm zone button DE F G A. Warm zone button 5 The range you have purchased may not match those of the parts and features listed. Right rear control knob F. Left rear control knob C. Right rear control knob F. Hot surface indicator light E....Control Panels Style 1 A B C DE F G Style 2 A. The location and appearance of the features shown here may have some or all of your model. PARTS AND FEATURES This manual covers several different models. Right front control knob H. Left front control knob B. Electronic oven control D.
Surface cooking area locator C H G. Warm zone button DE F G A. Warm zone button 5 The range you have purchased may not match those of the parts and features listed. Right rear control knob F. Left rear control knob C. Right rear control knob F. Hot surface indicator light E....Control Panels Style 1 A B C DE F G Style 2 A. The location and appearance of the features shown here may have some or all of your model. PARTS AND FEATURES This manual covers several different models. Right front control knob H. Left front control knob B. Electronic oven control D.

Use and Care Guide
Page 7
... side of storage drawer) F. Oven light switch (on some models) Storage drawer liner (on ceramic glass models) B. Console panel J. Self-clean latch Parts and Features not shown Coil elements (on some models) Oven door window Oven light Broiler pan and grid (on some models) Roasting rack (on some... models) G. Oven vent (on some models) O. Style 4 A B C DE F Range A. Left rear control knob G C. Right front control knob I . Bake element (hidden on some models) 7 Left front control knob B.
... side of storage drawer) F. Oven light switch (on some models) Storage drawer liner (on ceramic glass models) B. Console panel J. Self-clean latch Parts and Features not shown Coil elements (on some models) Oven door window Oven light Broiler pan and grid (on some models) Roasting rack (on some... models) G. Oven vent (on some models) O. Style 4 A B C DE F Range A. Left rear control knob G C. Right front control knob I . Bake element (hidden on some models) 7 Left front control knob B.
Use and Care Guide
Page 9
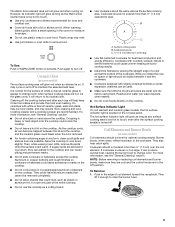
... down slightly. If cookware is removed. ■ For foods containing sugar in the edge of pots and pans are recommended. To Remove: 1. Push in any part of the cookware.
... down slightly. If cookware is removed. ■ For foods containing sugar in the edge of pots and pans are recommended. To Remove: 1. Push in any part of the cookware.
Use and Care Guide
Page 16
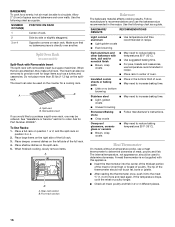
... or no bakeware piece is not supplied with dark, dull and/or nonstick finish ■ Brown, crisp crusts ■ May need to provide room for Part Number 4396927. Split-rack B. Removable insert If you would like to purchase a split-oven rack, one may be able to determine doneness of poultry. Place...
... or no bakeware piece is not supplied with dark, dull and/or nonstick finish ■ Brown, crisp crusts ■ May need to provide room for Part Number 4396927. Split-rack B. Removable insert If you would like to purchase a split-oven rack, one may be able to determine doneness of poultry. Place...


