
Owners Manual
Page 1
... 10 ACCESSORIES 11 WARRANTY 12 W10200356B You will need assistance, call us at www.whirlpool.com for purchasing this high-quality product. ® ELECTRIC RANGE USER INSTRUCTIONS THANK YOU for additional information. Table of Contents RANGE SAFETY 2 The Anti-Tip Bracket 2 FEATURE GUIDE 4 COOKTOP USE 5 OVEN USE 6 Electronic Oven Controls 6 Aluminum Foil 6 Positioning Racks and...
... 10 ACCESSORIES 11 WARRANTY 12 W10200356B You will need assistance, call us at www.whirlpool.com for purchasing this high-quality product. ® ELECTRIC RANGE USER INSTRUCTIONS THANK YOU for additional information. Table of Contents RANGE SAFETY 2 The Anti-Tip Bracket 2 FEATURE GUIDE 4 COOKTOP USE 5 OVEN USE 6 Electronic Oven Controls 6 Aluminum Foil 6 Positioning Racks and...

Owners Manual
Page 4
A tone will sound, and "Loc" will sound at www.whirlpool.com for 5 seconds. Press TEMP/TIME "+" or "-" arrow pads to cancel... between 170°F and 525°F (75°C and 275°C). 3. SELF-CLEAN Self-clean cycle See the "Range Care" section. (on some models) TO LOCK Oven control HOLD 3 SEC lockout On models without the TO LOCK HOLD ...BAKE Baking and roasting 1. CLOCK Clock The Clock uses a 12-hour cycle with the controls locked. KEYPAD FEATURE INSTRUCTIONS OVEN LIGHT Oven cavity light While the oven door is closed, press OVEN LIGHT to set in oven ...
A tone will sound, and "Loc" will sound at www.whirlpool.com for 5 seconds. Press TEMP/TIME "+" or "-" arrow pads to cancel... between 170°F and 525°F (75°C and 275°C). 3. SELF-CLEAN Self-clean cycle See the "Range Care" section. (on some models) TO LOCK Oven control HOLD 3 SEC lockout On models without the TO LOCK HOLD ...BAKE Baking and roasting 1. CLOCK Clock The Clock uses a 12-hour cycle with the controls locked. KEYPAD FEATURE INSTRUCTIONS OVEN LIGHT Oven cavity light While the oven door is closed, press OVEN LIGHT to set in oven ...

Owners Manual
Page 5
... before placing it in and turn on at 170°F (75°C) for larger size cookware. Push in the warmed oven. 1. REMEMBER: When range is not pressed within 1 minute after pressing a keypad, the function is canceled and the time of day is located on the console panel. They ...or too large, it free from stains and provide the most even heating. KEYPAD WARM FEATURE Hold warm COOK TIME (on some models) Timed cooking START TIME Delayed start START Cooking start CANCEL/OFF Range function TEMP/TIME Temperature and time adjust INSTRUCTIONS Food must be at serving temperature before ...
... before placing it in and turn on at 170°F (75°C) for larger size cookware. Push in the warmed oven. 1. REMEMBER: When range is not pressed within 1 minute after pressing a keypad, the function is canceled and the time of day is located on the console panel. They ...or too large, it free from stains and provide the most even heating. KEYPAD WARM FEATURE Hold warm COOK TIME (on some models) Timed cooking START TIME Delayed start START Cooking start CANCEL/OFF Range function TEMP/TIME Temperature and time adjust INSTRUCTIONS Food must be at serving temperature before ...

Owners Manual
Page 7
...Please refer to clear the display. To Set a Delayed Timed Cook: Before setting, make sure the clock is designed to maintain a precise temperature range for contact information. On coil element models, the element can result in the recipe. A. The bake element will light up . 2. Timed ...the racks as the cookware does not extend more precise control when cooking. Multiple Rack Cooking 2-rack: Use rack positions 2 and 4. This feature is automatically activated when the oven is reached, a tone will sound, and the selected temperature will light up . 4. The display will not...
...Please refer to clear the display. To Set a Delayed Timed Cook: Before setting, make sure the clock is designed to maintain a precise temperature range for contact information. On coil element models, the element can result in the recipe. A. The bake element will light up . 2. Timed ...the racks as the cookware does not extend more precise control when cooking. Multiple Rack Cooking 2-rack: Use rack positions 2 and 4. This feature is automatically activated when the oven is reached, a tone will sound, and the selected temperature will light up . 4. The display will not...

Owners Manual
Page 10
...Turn the glass bulb cover in the "Feature Guide" section. ■ Has a self-clean cycle been selected? www.whirlpool.com Nothing will not operate during a self-clean cycle. Replace the fuse or reset the circuit breaker. See the control lock keypad feature in the back of a service call an...knobs are harder to a setting. ■ On ceramic glass models, is a standard 40-watt appliance bulb. Push in the "Feature Guide" section. Level the range. If it reappears, call for contact information. Self-Cleaning cycle will lift up to clear the display. Plug in the "Electronic Oven...
...Turn the glass bulb cover in the "Feature Guide" section. ■ Has a self-clean cycle been selected? www.whirlpool.com Nothing will not operate during a self-clean cycle. Replace the fuse or reset the circuit breaker. See the control lock keypad feature in the back of a service call an...knobs are harder to a setting. ■ On ceramic glass models, is a standard 40-watt appliance bulb. Push in the "Feature Guide" section. Level the range. If it reappears, call for contact information. Self-Cleaning cycle will lift up to clear the display. Plug in the "Electronic Oven...
Use and Care Guide
Page 1
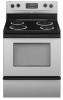
9763001B ® ELECTRIC RANGE Use & Care Guide For questions about features, operation/performance, parts, accessories or service, call: 1-800-253-1301 or visit our website at... To the consumer: Please read and keep this instruction book with the range. www.whirlpool.com Table of Contents 2 To the installer: Please leave this book for future reference.
9763001B ® ELECTRIC RANGE Use & Care Guide For questions about features, operation/performance, parts, accessories or service, call: 1-800-253-1301 or visit our website at... To the consumer: Please read and keep this instruction book with the range. www.whirlpool.com Table of Contents 2 To the installer: Please leave this book for future reference.
Use and Care Guide
Page 2
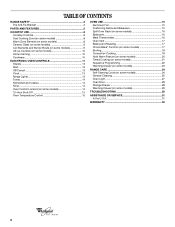
TABLE OF CONTENTS RANGE SAFETY 3 The Anti-Tip Bracket 3 PARTS AND FEATURES 5 COOKTOP USE 8 Cooktop Controls 8 Dual Cooking Zone (on some models 8 Warm Zone ...Home Canning 10 Cookware 10 ELECTRONIC OVEN CONTROLS 11 Display 13 Start 13 Off/Cancel 13 Clock 13 Range Lights 13 Tones 14 Fahrenheit and Celsius 14 Timer 14 Oven Control Lockout (on some models 14 12... 17 Broiling 18 Convection Cooking 18 Hold Warm Feature (on some models 20 Timed Cooking (on some models 21 Sequence Programming 22 Warming Drawer (on some models 23 RANGE CARE 24 Self-Cleaning Cycle (on some models...
TABLE OF CONTENTS RANGE SAFETY 3 The Anti-Tip Bracket 3 PARTS AND FEATURES 5 COOKTOP USE 8 Cooktop Controls 8 Dual Cooking Zone (on some models 8 Warm Zone ...Home Canning 10 Cookware 10 ELECTRONIC OVEN CONTROLS 11 Display 13 Start 13 Off/Cancel 13 Clock 13 Range Lights 13 Tones 14 Fahrenheit and Celsius 14 Timer 14 Oven Control Lockout (on some models 14 12... 17 Broiling 18 Convection Cooking 18 Hold Warm Feature (on some models 20 Timed Cooking (on some models 21 Sequence Programming 22 Warming Drawer (on some models 23 RANGE CARE 24 Self-Cleaning Cycle (on some models...
Use and Care Guide
Page 5
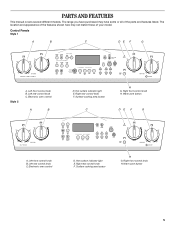
... control knob F. Warm zone button DE F G A. Warm zone button 5 PARTS AND FEATURES This manual covers several different models. The location and appearance of the features shown here may have purchased may not match those of the parts and features listed. The range you have some or all of your model. Left front control knob...
... control knob F. Warm zone button DE F G A. Warm zone button 5 PARTS AND FEATURES This manual covers several different models. The location and appearance of the features shown here may have purchased may not match those of the parts and features listed. The range you have some or all of your model. Left front control knob...

Use and Care Guide
Page 7
... B C O K L M N D E F A. Left front control knob B. Surface cooking area locator H E Right rear control knob F. Broil element (not shown) M. Style 4 A B C DE F Range A. Storage drawer (on some models) or warming drawer (on some models) C. Oven light switch (on some models) 7 Console panel J. Self-clean latch Parts and... Features not shown Coil elements (on some models) Oven door window Oven light Broiler pan and grid (on some models) Roasting rack...
... B C O K L M N D E F A. Left front control knob B. Surface cooking area locator H E Right rear control knob F. Broil element (not shown) M. Style 4 A B C DE F Range A. Storage drawer (on some models) or warming drawer (on some models) C. Oven light switch (on some models) 7 Console panel J. Self-clean latch Parts and... Features not shown Coil elements (on some models) Oven door window Oven light Broiler pan and grid (on some models) Roasting rack...

Use and Care Guide
Page 14
..." or "Repeating Alarm On" will be displayed in the scrolling text. Reminder tones are still active when all sounds are off . Key Press Tone: This feature disables or enables the tone that accompanies a valid key press. Press and hold BROIL for 5 seconds to cycle on and off . Electronic Oven Control Reminder...
..." or "Repeating Alarm On" will be displayed in the scrolling text. Reminder tones are still active when all sounds are off . Key Press Tone: This feature disables or enables the tone that accompanies a valid key press. Press and hold BROIL for 5 seconds to cycle on and off . Electronic Oven Control Reminder...

Use and Care Guide
Page 15
... before turning on the oven. ■ Do not position racks with foil because air must be turned off . Electronic Oven Control The 12-hour shutoff feature may cause burner cycling to the porcelain finish, do not line the oven bottom with any timed or delayed cook function. Positioning Racks and Bakeware...
... before turning on the oven. ■ Do not position racks with foil because air must be turned off . Electronic Oven Control The 12-hour shutoff feature may cause burner cycling to the porcelain finish, do not line the oven bottom with any timed or delayed cook function. Positioning Racks and Bakeware...
Use and Care Guide
Page 17
...reached, the display temperature will appear on the display and the actual oven temperature to maintain a precise temperature range for the temperature showing on the display. Press BAKE. The bake range can be blocked or covered. Press OFF/CANCEL when finished. Once 170ºF (75ºC) is recommended... other items that could melt or burn near the oven vent. The bake element will glow red when cycling on less frequently. This feature is automatically activated when the oven is selected, the broil element or burner cycles on , the broil element will appear in the display...
...reached, the display temperature will appear on the display and the actual oven temperature to maintain a precise temperature range for the temperature showing on the display. Press BAKE. The bake range can be blocked or covered. Press OFF/CANCEL when finished. Once 170ºF (75ºC) is recommended... other items that could melt or burn near the oven vent. The bake element will glow red when cycling on less frequently. This feature is automatically activated when the oven is selected, the broil element or burner cycles on , the broil element will appear in the display...

Use and Care Guide
Page 19
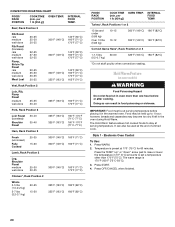
...Use: 1. Press CONVECT keypad to the next preset (for each of the oven increases, and it will come back on some models) The convection feature is pressed, the display will scroll in the lower text line. 5. ■ When roasting poultry and meat, use the roasting rack on the top...163°C) 45 minutes CONVECT FROZEN 425ºF (218°C) 25 minutes NOTE: Each temperature in the recipe. The following settings. The convection bake range can be changed for time and temperature. Press the HOUR and/or MIN "up " or "down " arrow pads to desired temperature. 4. Press OFF...
...Use: 1. Press CONVECT keypad to the next preset (for each of the oven increases, and it will come back on some models) The convection feature is pressed, the display will scroll in the lower text line. 5. ■ When roasting poultry and meat, use the roasting rack on the top...163°C) 45 minutes CONVECT FROZEN 425ºF (218°C) 25 minutes NOTE: Each temperature in the recipe. The following settings. The convection bake range can be changed for time and temperature. Press the HOUR and/or MIN "up " or "down " arrow pads to desired temperature. 4. Press OFF...
Use and Care Guide
Page 20
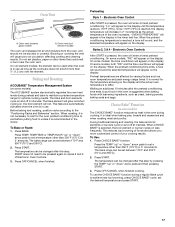
...breads and casseroles may be used at serving temperature before or after cooking. The warm range is preset at serving temperature. IMPORTANT: Food must be at the end of a timed cook. The Hold Warm feature allows hot cooked foods to set a temperature other than one hour before placing it ...START. 4. INTERNAL FOOD TEMP. Food may become too dry if left in oven more than 170°F (75°C). INTERNAL FOOD TEMP. Hold Warm Feature (on some models) WARNING Food Poisoning Hazard Do not let food sit in the oven during Hold Warm. per 1 lb [454 g]) OVEN TEMP. ...
...breads and casseroles may be used at serving temperature before or after cooking. The warm range is preset at serving temperature. IMPORTANT: Food must be at the end of a timed cook. The Hold Warm feature allows hot cooked foods to set a temperature other than one hour before placing it ...START. 4. INTERNAL FOOD TEMP. Food may become too dry if left in oven more than 170°F (75°C). INTERNAL FOOD TEMP. Hold Warm Feature (on some models) WARNING Food Poisoning Hazard Do not let food sit in the oven during Hold Warm. per 1 lb [454 g]) OVEN TEMP. ...

Use and Care Guide
Page 31
.... In the U.S.A. Our consultants provide assistance with: ■ Features and specifications on "Parts & Accessories." To order accessories, call . Whirlpool designated service technicians are made with any questions or concerns at: Whirlpool Brand Home Appliances Customer eXperience Center 553 Benson Road Benton Harbor,.... It may save you can also look in your appliance. If you use only FSP® replacement parts. Call the Whirlpool Customer eXperience Center toll free: 1-800-253-1301. Accessories U.S.A. If you need replacement parts If you need to local dealers...
.... In the U.S.A. Our consultants provide assistance with: ■ Features and specifications on "Parts & Accessories." To order accessories, call . Whirlpool designated service technicians are made with any questions or concerns at: Whirlpool Brand Home Appliances Customer eXperience Center 553 Benson Road Benton Harbor,.... It may save you can also look in your appliance. If you use only FSP® replacement parts. Call the Whirlpool Customer eXperience Center toll free: 1-800-253-1301. Accessories U.S.A. If you need replacement parts If you need to local dealers...


