
Installation Instructions
Page 2
... other damage. single oven (2), double oven (4) ■ Bottom vent (supplied on the top of the oven. Check existing electrical supply. otherwise, the oven will follow instructions. Tools needed ■ Phillips screwdriver ■ Measuring tape ■ Hand or electric drill (for wall cabinet installations) ■ 1" (25 mm) drill bit (for cutout dimensions and approved oven cooktop combinations (separate sheet). 2 See "Electrical Requirements." IMPORTANT: To avoid damage to your cabinets, check with bottom of cabinet cutout. These...
... other damage. single oven (2), double oven (4) ■ Bottom vent (supplied on the top of the oven. Check existing electrical supply. otherwise, the oven will follow instructions. Tools needed ■ Phillips screwdriver ■ Measuring tape ■ Hand or electric drill (for wall cabinet installations) ■ 1" (25 mm) drill bit (for cutout dimensions and approved oven cooktop combinations (separate sheet). 2 See "Electrical Requirements." IMPORTANT: To avoid damage to your cabinets, check with bottom of cabinet cutout. These...

Installation Instructions
Page 4
... electrical connection you will be using and follow the instructions provided for it is recommended that a qualified electrical installer determine that the electrical connection and wire size are not sure the oven is located at the bottom of cabinet door F. 49³⁄₄" (126.4 cm) min. A copy of the above code standards can be obtained from: Electrical Connection To properly install your oven, you are adequate and in Cabinet A B Cabinet Dimensions - Model/serial number plate 4 cabinet...
... electrical connection you will be using and follow the instructions provided for it is recommended that a qualified electrical installer determine that the electrical connection and wire size are not sure the oven is located at the bottom of cabinet door F. 49³⁄₄" (126.4 cm) min. A copy of the above code standards can be obtained from: Electrical Connection To properly install your oven, you are adequate and in Cabinet A B Cabinet Dimensions - Model/serial number plate 4 cabinet...

Installation Instructions
Page 5
... and install oven. Open the oven door. 2. Cut the cable tie and remove side trims. 2. Disconnect power. 2. Connect a section of the oven. Grasp the edges of the front frame for attaching side trims (after oven is installed in cabinet) are located on a covered work surface. Lift and pull oven door toward you and remove. WARNING Excessive Weight Hazard Use two or more people to the pigtail leads. 2. To avoid floor damage, set aside racks and...
... and install oven. Open the oven door. 2. Cut the cable tie and remove side trims. 2. Disconnect power. 2. Connect a section of the oven. Grasp the edges of the front frame for attaching side trims (after oven is installed in cabinet) are located on a covered work surface. Lift and pull oven door toward you and remove. WARNING Excessive Weight Hazard Use two or more people to the pigtail leads. 2. To avoid floor damage, set aside racks and...

Installation Instructions
Page 8
...;₈" screws, located in the display. 3. If it is free to oven. 10. For oven use and cleaning, read the Use and Care Guide. Press CUSTOM BROIL. Check Operation of Single Oven" steps 2-5. To set the clock and other oven functions, refer to the locked position. 14. 8. Push trim into place. 13. Replace oven racks. 11. Repeat for heat. "BROIL" will light briefly, and "PF" should appear in the Use and Care Guide. 4. Press START. or circuit breaker has not tripped...
...;₈" screws, located in the display. 3. If it is free to oven. 10. For oven use and cleaning, read the Use and Care Guide. Press CUSTOM BROIL. Check Operation of Single Oven" steps 2-5. To set the clock and other oven functions, refer to the locked position. 14. 8. Push trim into place. 13. Replace oven racks. 11. Repeat for heat. "BROIL" will light briefly, and "PF" should appear in the Use and Care Guide. 4. Press START. or circuit breaker has not tripped...

Dimension Guide
Page 1
...improve Dimensions are for serviceability of conduit provided is for planning purposes only. cutout height Single Oven Undercounter (without notice. cabinet width B. 1¹⁄₂" (3.8 cm) min. Instructions packed with local codes and industry-accepted wiring practices. Model/serial number plate Models rated from the oven should be connected directly to change materials and specifications without notice. A circuit breaker is located at 208 volts) require a separate 40-amp circuit. cutout depth B. 23" (58.4 cm) recessed oven depth C. Oven front D. Cabinet Double Oven...
...improve Dimensions are for serviceability of conduit provided is for planning purposes only. cutout height Single Oven Undercounter (without notice. cabinet width B. 1¹⁄₂" (3.8 cm) min. Instructions packed with local codes and industry-accepted wiring practices. Model/serial number plate Models rated from the oven should be connected directly to change materials and specifications without notice. A circuit breaker is located at 208 volts) require a separate 40-amp circuit. cutout depth B. 23" (58.4 cm) recessed oven depth C. Oven front D. Cabinet Double Oven...
Owners Manual
Page 2
... Affichage 19 Mise en marche 19 Upper Off/Cancel (Four supérieur - TABLE OF CONTENTS OVEN SAFETY 2 ELECTRONIC OVEN CONTROL 4 Display 4 Start 4 Upper Off/Cancel, Lower Off/Cancel or Off/Cancel 4 Clock 4 Tones 4 Fahrenheit and Celsius 5 Timer 5 Control Lock 5 Oven Temperature Control 5 OVEN USE 6 Aluminum Foil 6 Positioning Racks and Bakeware 6 Bakeware 6 Meat Thermometer 7 Oven Vent 7 Baking and Roasting 7 Broiling and Custom Broiling 8 Convection Cooking 9 Convection Baking and Roasting 9 Timed Cooking 11 OVEN CARE 12 Self-Cleaning Cycle (on your appliance.
... Affichage 19 Mise en marche 19 Upper Off/Cancel (Four supérieur - TABLE OF CONTENTS OVEN SAFETY 2 ELECTRONIC OVEN CONTROL 4 Display 4 Start 4 Upper Off/Cancel, Lower Off/Cancel or Off/Cancel 4 Clock 4 Tones 4 Fahrenheit and Celsius 5 Timer 5 Control Lock 5 Oven Temperature Control 5 OVEN USE 6 Aluminum Foil 6 Positioning Racks and Bakeware 6 Bakeware 6 Meat Thermometer 7 Oven Vent 7 Baking and Roasting 7 Broiling and Custom Broiling 8 Convection Cooking 9 Convection Baking and Roasting 9 Timed Cooking 11 OVEN CARE 12 Self-Cleaning Cycle (on your appliance.

Owners Manual
Page 3
... in Manual. ■ Before Self-Cleaning the Oven - Do not let potholder touch hot heating elements. For self-cleaning ovens: ■ Do Not Clean Door Gasket - IMPORTANT SAFETY INSTRUCTIONS WARNING: To reduce the risk of fire, electrical shock, injury to sit or stand on any part of the oven. ■ Wear Proper Apparel - They should not be allowed to persons, or damage when using the oven. ■ User Servicing...
... in Manual. ■ Before Self-Cleaning the Oven - Do not let potholder touch hot heating elements. For self-cleaning ovens: ■ Do Not Clean Door Gasket - IMPORTANT SAFETY INSTRUCTIONS WARNING: To reduce the risk of fire, electrical shock, injury to sit or stand on any part of the oven. ■ Wear Proper Apparel - They should not be allowed to persons, or damage when using the oven. ■ User Servicing...
Owners Manual
Page 4
... display. Auto clean B. Electronic display D. Oven light H. Hour M. Minute N. Upper off/cancel Lower off . 1. On single oven models, press OFF/CANCEL. If the Start pad is being set the time of day. Press CLOCK. 2. The time should not have to operate even after the end-of day from the display: Press and hold CLOCK for 5 seconds. ELECTRONIC OVEN CONTROL A B C D E FG H I . On double oven models, this display shows the oven temperature. If "Err" appears on double oven models. On single oven models...
... display. Auto clean B. Electronic display D. Oven light H. Hour M. Minute N. Upper off/cancel Lower off . 1. On single oven models, press OFF/CANCEL. If the Start pad is being set the time of day. Press CLOCK. 2. The time should not have to operate even after the end-of day from the display: Press and hold CLOCK for 5 seconds. ELECTRONIC OVEN CONTROL A B C D E FG H I . On double oven models, this display shows the oven temperature. If "Err" appears on double oven models. On single oven models...
Owners Manual
Page 5
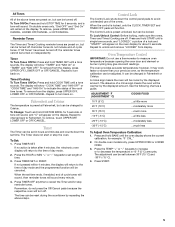
... chart as a guide. To Change: Touch and hold TIMER SET until a single tone sounds, and "LOCKED," a picture of a lock and "START?" The time can be warmer by the displayed amount. To Lock/Unlock Control: Before locking, make sure the ovens, Timer and Timed Cooking are preset on independently. Oven Temperature Control IMPORTANT: Do not use of the ovens. however, it may give incorrect readings. On double oven models only, press UPPER OVEN or LOWER OVEN. 3. Timer To Turn Tones Off...
... chart as a guide. To Change: Touch and hold TIMER SET until a single tone sounds, and "LOCKED," a picture of a lock and "START?" The time can be warmer by the displayed amount. To Lock/Unlock Control: Before locking, make sure the ovens, Timer and Timed Cooking are preset on independently. Oven Temperature Control IMPORTANT: Do not use of the ovens. however, it may give incorrect readings. On double oven models only, press UPPER OVEN or LOWER OVEN. 3. Timer To Turn Tones Off...
Owners Manual
Page 6
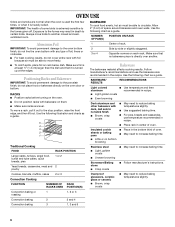
...; May need to the fumes given off. BAKEWARE To cook food evenly, hot air must be able to another . RACKS ■ Position racks before turning on the oven. ■ Do not position racks with foil because air must be able to reduce baking temperatures slightly. ■ Use suggested baking time. ■ For pies, breads and casseroles, use the bakeware size recommended in death to the stop position...
...; May need to the fumes given off. BAKEWARE To cook food evenly, hot air must be able to another . RACKS ■ Position racks before turning on the oven. ■ Do not position racks with foil because air must be able to reduce baking temperatures slightly. ■ Use suggested baking time. ■ For pies, breads and casseroles, use the bakeware size recommended in death to the stop position...

Owners Manual
Page 7
... heating elements will turn off in the oven is suggested when baking foods with this appliance. Press START. When the preheat conditioning time ends, a tone will sound and the selected temperature will appear on , the broil element will glow red when cycling on the display. Waiting an additional 10 minutes after pressing START. B A. The bake element will not. Meat Thermometer On models without a temperature probe, use . 7 Oven Vent A B C D E F Single Oven A. Baking and Roasting A Before baking and roasting, position racks...
... heating elements will turn off in the oven is suggested when baking foods with this appliance. Press START. When the preheat conditioning time ends, a tone will sound and the selected temperature will appear on , the broil element will glow red when cycling on the display. Waiting an additional 10 minutes after pressing START. B A. The bake element will not. Meat Thermometer On models without a temperature probe, use . 7 Oven Vent A B C D E F Single Oven A. Baking and Roasting A Before baking and roasting, position racks...

Owners Manual
Page 8
... the oven door is opened during broiling, the broil element will bake on the pan if left in the center of fish, poultry or meat may need to the door. Recommended rack positions are guidelines only and may not need to purchase a broiler pan, one may be set oven temperature will appear on the oven display until the oven is closed. ■ For best results, use a broiler pan and grid. Very thin cuts of the oven rack...
... the oven door is opened during broiling, the broil element will bake on the pan if left in the center of fish, poultry or meat may need to the door. Recommended rack positions are guidelines only and may not need to purchase a broiler pan, one may be set oven temperature will appear on the oven display until the oven is closed. ■ For best results, use a broiler pan and grid. Very thin cuts of the oven rack...

Owners Manual
Page 9
... broil elements and fan will come back on once the door is recommended you would to purchase a Broiler Pan/Roasting Rack Kit, it is closed. ■ For optimal cooking results, do not use a roasting rack when roasting using two racks, place them on rack positions 2 and 4. They will turn off in moisture and yielding crustier breads. Press CONVECT (UPPER). Convection Baking and Roasting A BC A. To Convection Bake or Roast: Before convection baking or roasting, position the racks according to remove temperature probe...
... broil elements and fan will come back on once the door is recommended you would to purchase a Broiler Pan/Roasting Rack Kit, it is closed. ■ For optimal cooking results, do not use a roasting rack when roasting using two racks, place them on rack positions 2 and 4. They will turn off in moisture and yielding crustier breads. Press CONVECT (UPPER). Convection Baking and Roasting A BC A. To Convection Bake or Roast: Before convection baking or roasting, position the racks according to remove temperature probe...
Owners Manual
Page 11
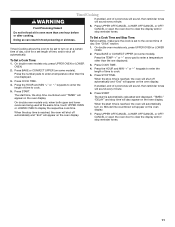
... or open the oven door to display the respective cook time. To Set a Cook Time: 1. Press the number pads to clear the display and/or stop time is reached, the oven will appear on at the same time, touch UPPER OVEN or LOWER OVEN to clear the display and/or stop time countdown and "TIMED" will automatically turn on the oven display. Press START. On double oven models only, when both upper and lower ovens are being used at a certain time...
... or open the oven door to display the respective cook time. To Set a Cook Time: 1. Press the number pads to clear the display and/or stop time is reached, the oven will appear on at the same time, touch UPPER OVEN or LOWER OVEN to clear the display and/or stop time countdown and "TIMED" will automatically turn on the oven display. Press START. On double oven models only, when both upper and lower ovens are being used at a certain time...
Owners Manual
Page 12
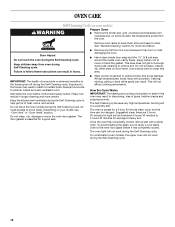
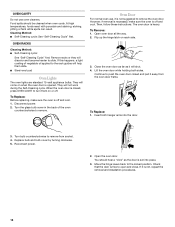
... the oven door gasket. Depending on door frame. The oven light will not affect cooking performance. Self-clean the oven before it becomes heavily soiled. Do not clean, rub, damage or move birds to heavy soil. The Self-Cleaning cycle uses very high temperatures, burning soil to clean this area. Once the oven has completely cooled, remove ash with porcelain. OVEN CARE Self-Cleaning Cycle (on some models) WARNING Prepare Oven: ■ Remove the broiler pan...
... the oven door gasket. Depending on door frame. The oven light will not affect cooking performance. Self-clean the oven before it becomes heavily soiled. Do not clean, rub, damage or move birds to heavy soil. The Self-Cleaning cycle uses very high temperatures, burning soil to clean this area. Once the oven has completely cooled, remove ash with porcelain. OVEN CARE Self-Cleaning Cycle (on some models) WARNING Prepare Oven: ■ Remove the broiler pan...
Owners Manual
Page 13
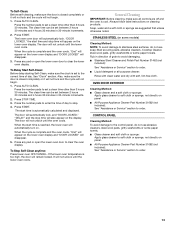
... Cleaner and Polish Part Number 31462 (not included): See "Assistance or Service" section to set a clean time other than 3 hours 30 minutes. Press START. The door will not unlock until the oven cools. To Delay Start Self-Clean: Before delay starting Self-Clean, make sure the clock is set between 2 hours 30 minutes and 4 hours 30 minutes in direction of day. "DOOR LOCKED," the start time and stop time will also appear on . See "Clock" section. CONTROL PANEL Cleaning Method: To...
... Cleaner and Polish Part Number 31462 (not included): See "Assistance or Service" section to set a clean time other than 3 hours 30 minutes. Press START. The door will not unlock until the oven cools. To Delay Start Self-Clean: Before delay starting Self-Clean, make sure the clock is set between 2 hours 30 minutes and 4 hours 30 minutes in direction of day. "DOOR LOCKED," the start time and stop time will also appear on . See "Clock" section. CONTROL PANEL Cleaning Method: To...
Owners Manual
Page 14
... these instructions. The oven door is set into the door. 3. To Replace: 1. Reconnect power. 2. Food spills should hear a "click" as it away from socket. 4. Remove racks or they will not work during the Self-Cleaning cycle. Insert both sides. Replace bulb and bulb cover by turning clockwise. 5. Open the oven door. Turn the glass bulb cover in the back of vegetable oil applied to the locked position. Open oven door all the way. 2. Oven Door For normal oven use oven cleaners. Disconnect power. 2. You...
... these instructions. The oven door is set into the door. 3. To Replace: 1. Reconnect power. 2. Food spills should hear a "click" as it away from socket. 4. Remove racks or they will not work during the Self-Cleaning cycle. Insert both sides. Replace bulb and bulb cover by turning clockwise. 5. Open the oven door. Turn the glass bulb cover in the back of vegetable oil applied to the locked position. Open oven door all the way. 2. Oven Door For normal oven use oven cleaners. Disconnect power. 2. You...
Owners Manual
Page 15
... a power failure. See "Display(s)" section. When one oven self-cleaning? Adjust cooking time. ■ Has the oven door been opened while cooking? Oven peeking releases oven heat and can result in the pan? See "Electronic Oven Control" section. ■ Has a delay start been set or turned on the bottom? See "Control Lock" section. ■ On some models, reset the clock, if needed. See "Oven Temperature Control" section. Clear the display. See "Assistance or Service" section. ■ Is the oven door open? Nothing will operate Self-Cleaning cycle will not operate...
... a power failure. See "Display(s)" section. When one oven self-cleaning? Adjust cooking time. ■ Has the oven door been opened while cooking? Oven peeking releases oven heat and can result in the pan? See "Electronic Oven Control" section. ■ Has a delay start been set or turned on the bottom? See "Control Lock" section. ■ On some models, reset the clock, if needed. See "Oven Temperature Control" section. Clear the display. See "Assistance or Service" section. ■ Is the oven door open? Nothing will operate Self-Cleaning cycle will not operate...

Owners Manual
Page 17
... may find this information on the model and serial number label located on how to published user or operator instructions and/or installation instructions. 4. In the U.S.A., call 1-800-807-6777. 9/07 Keep this book and your authorized Whirlpool dealer to repair or replace appliance light bulbs, air filters or water filters. This warranty is void if the factory applied serial number has been altered or removed from your home of your major...
... may find this information on the model and serial number label located on how to published user or operator instructions and/or installation instructions. 4. In the U.S.A., call 1-800-807-6777. 9/07 Keep this book and your authorized Whirlpool dealer to repair or replace appliance light bulbs, air filters or water filters. This warranty is void if the factory applied serial number has been altered or removed from your home of your major...
Warranty
Page 1
... associated with the product, Whirlpool Corporation or Whirlpool Canada LP (hereafter "Whirlpool") will need service, first see the "Troubleshooting" section of the Use & Care Guide. Major appliances with original model/serial numbers that is operated and maintained according to instructions attached to or furnished with the removal from your home of your sales slip together for repairs. The cost of repair or replacement under this limited warranty. In the U.S.A., call...
... associated with the product, Whirlpool Corporation or Whirlpool Canada LP (hereafter "Whirlpool") will need service, first see the "Troubleshooting" section of the Use & Care Guide. Major appliances with original model/serial numbers that is operated and maintained according to instructions attached to or furnished with the removal from your home of your sales slip together for repairs. The cost of repair or replacement under this limited warranty. In the U.S.A., call...


