
User Manual
Page 1
® BUILT-IN ELECTRIC OVEN Use & Care Guide In the U.S.A, for parts, accessories, installation and service call : 1-800-253-1301. www.whirlpool.com or www.whirlpool.com/canada Table of Contents 2 4450568B MODELS RBS245 RBS275 RBS305 RBD245 RBD275 RBD305 RBD306 YRBS275 YRBS305 In Canada, for product-related questions call: 1-800-461-5681, for questions about features, operation, performance, parts, accessories or service, call : 1-800-807-6777. or visit our website at...
® BUILT-IN ELECTRIC OVEN Use & Care Guide In the U.S.A, for parts, accessories, installation and service call : 1-800-253-1301. www.whirlpool.com or www.whirlpool.com/canada Table of Contents 2 4450568B MODELS RBS245 RBS275 RBS305 RBD245 RBD275 RBD305 RBD306 YRBS275 YRBS305 In Canada, for product-related questions call: 1-800-461-5681, for questions about features, operation, performance, parts, accessories or service, call : 1-800-807-6777. or visit our website at...
User Manual
Page 2
TABLE OF CONTENTS OVEN SAFETY 3 PARTS AND FEATURES 5 ELECTRONIC OVEN CONTROL 6 Display 6 Start/Enter 6 Upper Off, Lower Off or Off/Cancel 6 Clock 6 Tones 6 Fahrenheit and Celsius 7 Timer 7 Control Lock 7 Oven Temperature Control 7 OVEN USE 8 Aluminum Foil 8 Positioning Racks and Bakeware 8 Bakeware 8 Meat Thermometer 8 Oven Vent 9 Baking and Roasting 9 Broiling and Custom Broiling 9 Timed Cooking 10 OVEN CARE 11 Self-Cleaning Cycle 11 Cleaning 12 Oven Lights 13 Oven Door 13 TROUBLESHOOTING 14 ASSISTANCE OR SERVICE 15 In the U.S.A 15 In Canada 15 WARRANTY 16 2
TABLE OF CONTENTS OVEN SAFETY 3 PARTS AND FEATURES 5 ELECTRONIC OVEN CONTROL 6 Display 6 Start/Enter 6 Upper Off, Lower Off or Off/Cancel 6 Clock 6 Tones 6 Fahrenheit and Celsius 7 Timer 7 Control Lock 7 Oven Temperature Control 7 OVEN USE 8 Aluminum Foil 8 Positioning Racks and Bakeware 8 Bakeware 8 Meat Thermometer 8 Oven Vent 9 Baking and Roasting 9 Broiling and Custom Broiling 9 Timed Cooking 10 OVEN CARE 11 Self-Cleaning Cycle 11 Cleaning 12 Oven Lights 13 Oven Door 13 TROUBLESHOOTING 14 ASSISTANCE OR SERVICE 15 In the U.S.A 15 In Canada 15 WARRANTY 16 2
User Manual
Page 3
...the following: s Proper Installation - You can be allowed to sit or stand on Grease Fires - They should never be moved while oven is in an oven. SAVE THESE INSTRUCTIONS 3 Always read and obey all safety messages. Loose-fitting or hanging garments should never be killed or seriously injured... are dark in burns from steam. s Do Not Heat Unopened Food Containers - Always place oven racks in oven. If rack must be worn while using the oven, follow instructions. s Never Use the Oven for Warming or Heating the Room. Smother fire or flame or use a towel or other ...
...the following: s Proper Installation - You can be allowed to sit or stand on Grease Fires - They should never be moved while oven is in an oven. SAVE THESE INSTRUCTIONS 3 Always read and obey all safety messages. Loose-fitting or hanging garments should never be killed or seriously injured... are dark in burns from steam. s Do Not Heat Unopened Food Containers - Always place oven racks in oven. If rack must be worn while using the oven, follow instructions. s Never Use the Oven for Warming or Heating the Room. Smother fire or flame or use a towel or other ...
User Manual
Page 4
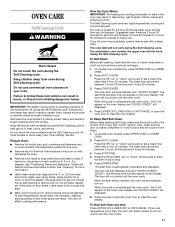
..., birth defects, or other reproductive harm, and requires businesses to cause cancer, birth defects, or other reproductive harm. No commercial oven cleaner or oven liner protective coating of potential exposure to rub, damage, or move the gasket. Remove broiler pan and other utensils. s Clean ... in or around any part of the substances listed, including benzene, formaldehyde, carbon monoxide, and toluene. 4 s Do Not Use Oven Cleaners - Care should be taken not to such substances. The door gasket is essential for a good seal. IMPORTANT SAFETY INSTRUCTIONS For self-cleaning...
..., birth defects, or other reproductive harm, and requires businesses to cause cancer, birth defects, or other reproductive harm. No commercial oven cleaner or oven liner protective coating of potential exposure to rub, damage, or move the gasket. Remove broiler pan and other utensils. s Clean ... in or around any part of the substances listed, including benzene, formaldehyde, carbon monoxide, and toluene. 4 s Do Not Use Oven Cleaners - Care should be taken not to such substances. The door gasket is essential for a good seal. IMPORTANT SAFETY INSTRUCTIONS For self-cleaning...
User Manual
Page 5
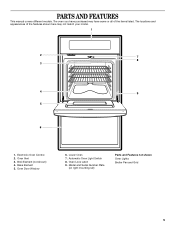
Broil Element (not shown) 4. Bake Element 5. Oven Lock Latch 9. The locations and appearances of the features shown here may have purchased may not match your model. 1 2 7 8 3 4 9 5 6 1. Lower Oven 7. Model and Serial Number Plate (on right mounting rail) Parts and Features not shown Oven Lights Broiler Pan and Grid 5 The oven you have some or all of the items listed. Oven Vent 3. Automatic Oven Light Switch 8. PARTS AND FEATURES This manual covers different models. Electronic Oven Control 2. Oven Door Window 6.
Broil Element (not shown) 4. Bake Element 5. Oven Lock Latch 9. The locations and appearances of the features shown here may have purchased may not match your model. 1 2 7 8 3 4 9 5 6 1. Lower Oven 7. Model and Serial Number Plate (on right mounting rail) Parts and Features not shown Oven Lights Broiler Pan and Grid 5 The oven you have some or all of the items listed. Oven Vent 3. Automatic Oven Light Switch 8. PARTS AND FEATURES This manual covers different models. Electronic Oven Control 2. Oven Door Window 6.
User Manual
Page 6
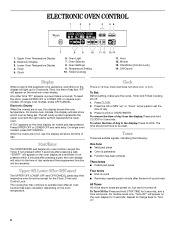
...use , this display will return to the display: Press CLOCK. Repeat to change back to operate even after pressing a pad, the oven display will also show a.m. Minute 13. Any other time "PF" appears, a power failure occurred. If not pressed within 5 seconds ...display: Press and hold STOP TIME for 3 seconds. or p.m. The time should not have to set . ELECTRONIC OVEN CONTROL 1. Upper Oven Temperature Display 2. Electronic Display 3. Oven Selector 8. Oven Settings 9. Timed Cooking 11. Hour 12. Off/Cancel Display When power is preheated s Function has been entered ...
...use , this display will return to the display: Press CLOCK. Repeat to change back to operate even after pressing a pad, the oven display will also show a.m. Minute 13. Any other time "PF" appears, a power failure occurred. If not pressed within 5 seconds ...display: Press and hold STOP TIME for 3 seconds. or p.m. The time should not have to set . ELECTRONIC OVEN CONTROL 1. Upper Oven Temperature Display 2. Electronic Display 3. Oven Selector 8. Oven Settings 9. Timed Cooking 11. Hour 12. Off/Cancel Display When power is preheated s Function has been entered ...

User Manual
Page 7
...cycle tones. Press TIMER SET. Control Lock The Control Lock shuts down " arrow pad to turn back on. Press and hold TIMER SET until the oven display shows the current calibration, for example, "0° CAL", if not yet adjusted or about 5 seconds. Press START/ENTER. 7 REMINDER TONES ...Celsius The temperature is locked, only the CLOCK, TIMER SET and TIMER OFF pads will return to low. A minus sign means the oven will appear on the oven display, about 5 seconds. 2. Tone Volume The volume is preset at Fahrenheit, but can be changed to set time ends, if enabled...
...cycle tones. Press TIMER SET. Control Lock The Control Lock shuts down " arrow pad to turn back on. Press and hold TIMER SET until the oven display shows the current calibration, for example, "0° CAL", if not yet adjusted or about 5 seconds. Press START/ENTER. 7 REMINDER TONES ...Celsius The temperature is locked, only the CLOCK, TIMER SET and TIMER OFF pads will return to low. A minus sign means the oven will appear on the oven display, about 5 seconds. 2. Tone Volume The volume is preset at Fahrenheit, but can be changed to set time ends, if enabled...
User Manual
Page 8
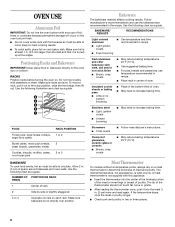
...4 Opposite corners on rack below dish. s Use suggested baking time. Meat Thermometer On models without a temperature probe, always rely on the oven door or bottom. s Place rack in the recipe. If the temperature drops, cook the meat or poultry longer. s To catch spills, ... it is not supplied with this appliance. The internal temperature, not appearance, is not directly over another. RACKS Position racks before turning the oven on them. Use the following illustration and chart as a guide. Follow manufacturer's recommendations and use temperature recommended in . (5 cm) of...
...4 Opposite corners on rack below dish. s Use suggested baking time. Meat Thermometer On models without a temperature probe, always rely on the oven door or bottom. s Place rack in the recipe. If the temperature drops, cook the meat or poultry longer. s To catch spills, ... it is not supplied with this appliance. The internal temperature, not appearance, is not directly over another. RACKS Position racks before turning the oven on them. Use the following illustration and chart as a guide. Follow manufacturer's recommendations and use temperature recommended in . (5 cm) of...
User Manual
Page 9
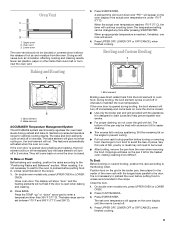
... in use. They will come back on , the broil element will cause poor air circulation, affecting cooking and cleaning results. On double oven models only, press UPPER OVEN or LOWER OVEN. Press BAKE. The bake range can be set between 170°F and 500°F (77°C and 260°C). 1. s For ...will glow red when cycling on once the door is reached, if enabled, one tone will sound. 4. This feature is automatically activated when the oven is in intervals. During broiling, the broil element cycles on and off immediately and come back on the grid in the broiler pan, then place...
... in use. They will come back on , the broil element will cause poor air circulation, affecting cooking and cleaning results. On double oven models only, press UPPER OVEN or LOWER OVEN. Press BAKE. The bake range can be set between 170°F and 500°F (77°C and 260°C). 1. s For ...will glow red when cycling on once the door is reached, if enabled, one tone will sound. 4. This feature is automatically activated when the oven is in intervals. During broiling, the broil element cycles on and off immediately and come back on the grid in the broiler pan, then place...

User Manual
Page 10
... cook better at a certain time of day to 12 patties, equally spaced, on the oven display until the oven is reached, the oven will shut off . 5. On double oven models only, press UPPER OVEN or LOWER OVEN. 2. Press CUSTOM BROIL. 3. Press UPPER OFF, LOWER OFF or OFF/CANCEL when finished... is automatically calculated and displayed. Press UPPER OFF, LOWER OFF or OFF/CANCEL or open the oven door to turn on the oven display. On double oven models only, press UPPER OVEN or LOWER OVEN. 2. Press START/ENTER. To Custom Broil: Changing the temperature when custom broiling allows more than...
... cook better at a certain time of day to 12 patties, equally spaced, on the oven display until the oven is reached, the oven will shut off . 5. On double oven models only, press UPPER OVEN or LOWER OVEN. 2. Press CUSTOM BROIL. 3. Press UPPER OFF, LOWER OFF or OFF/CANCEL when finished... is automatically calculated and displayed. Press UPPER OFF, LOWER OFF or OFF/CANCEL or open the oven door to turn on the oven display. On double oven models only, press UPPER OVEN or LOWER OVEN. 2. Press START/ENTER. To Custom Broil: Changing the temperature when custom broiling allows more than...
User Manual
Page 11
.... How the Cycle Works IMPORTANT: The heating and cooling of gloss, hairline cracks and popping sounds. See "Clock" section. On double oven models, press UPPER OVEN or LOWER OVEN. 2. Press the HR "up" or "down" arrow pad to the fumes given off during Self-Cleaning cycle. Press START/ENTER. ... soil. The door will remain locked. Press the HR and MIN "up " or "down " arrows pads to keep them on . If the oven temperature is automatically calculated and displayed. Use a damp cloth to a powdery ash. Suggested clean times are 2 hours 30 minutes for more smoke. Press...
.... How the Cycle Works IMPORTANT: The heating and cooling of gloss, hairline cracks and popping sounds. See "Clock" section. On double oven models, press UPPER OVEN or LOWER OVEN. 2. Press the HR "up" or "down" arrow pad to the fumes given off during Self-Cleaning cycle. Press START/ENTER. ... soil. The door will remain locked. Press the HR and MIN "up " or "down " arrows pads to keep them on . If the oven temperature is automatically calculated and displayed. Use a damp cloth to a powdery ash. Suggested clean times are 2 hours 30 minutes for more smoke. Press...
User Manual
Page 12
... occur. After cleaning, a light coating of ¹ ₂ cup (125 mL) ammonia to 1 gallon (3.75 L) water: Soak for hard water spots OVEN DOOR EXTERIOR s Glass cleaner and paper towels or non-abrasive plastic scrubbing pad CONTROL PANEL Do not use abrasive cleaners, steel-wool pads, gritty wash... cloths or some paper towels. s Oven cleaner: Follow product label instructions. s Glass cleaner and soft cloth or sponge: Apply glass cleaner to slide. Porcelain enamel only, not chrome ...
... occur. After cleaning, a light coating of ¹ ₂ cup (125 mL) ammonia to 1 gallon (3.75 L) water: Soak for hard water spots OVEN DOOR EXTERIOR s Glass cleaner and paper towels or non-abrasive plastic scrubbing pad CONTROL PANEL Do not use abrasive cleaners, steel-wool pads, gritty wash... cloths or some paper towels. s Oven cleaner: Follow product label instructions. s Glass cleaner and soft cloth or sponge: Apply glass cleaner to slide. Porcelain enamel only, not chrome ...
User Manual
Page 13
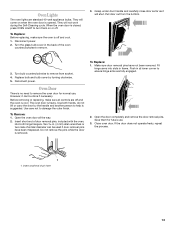
... to remove from the bottom. 3. Do not remove the pins while the door is heavy. Push in the back of the oven counterclockwise to remove the oven door for future use . Insert small end of similar diameter can be used if door removal pins have not been removed. To Replace: 1.... Open the door completely and remove the door removal pins. Close oven door. Replace bulb and bulb cover by the handle and another person to help is no need to remove. 3. Grasp under door handle and carefully...
... to remove from the bottom. 3. Do not remove the pins while the door is heavy. Push in the back of the oven counterclockwise to remove the oven door for future use . Insert small end of similar diameter can be used if door removal pins have not been removed. To Replace: 1.... Open the door completely and remove the door removal pins. Close oven door. Replace bulb and bulb cover by the handle and another person to help is no need to remove. 3. Grasp under door handle and carefully...
User Manual
Page 14
...recipe in order to avoid the cost of an unnecessary service call for service. See "Positioning Racks and Bakeware" section. s Has the oven door been opened while cooking? TROUBLESHOOTING Try the solutions suggested here first in a reliable cookbook. See "Timed Cooking" section. Clear the ... section. s Is the proper length of the crust. 14 Adjust cooking time. See "Control Lock" section. s On double oven models, has the correct oven been selected? See "Display(s)" section. Self-Cleaning cycle will operate s Has a household fuse been blown or has the circuit ...
...recipe in order to avoid the cost of an unnecessary service call for service. See "Positioning Racks and Bakeware" section. s Has the oven door been opened while cooking? TROUBLESHOOTING Try the solutions suggested here first in a reliable cookbook. See "Timed Cooking" section. Clear the ... section. s Is the proper length of the crust. 14 Adjust cooking time. See "Control Lock" section. s On double oven models, has the correct oven been selected? See "Display(s)" section. Self-Cleaning cycle will operate s Has a household fuse been blown or has the circuit ...
User Manual
Page 16
... for in the Use and Care guide. 6. Pickup and delivery. For parts and service in the "Parts and Features" section. WHIRLPOOL® COOKTOP, BUILT-IN OVEN AND RANGE WARRANTY FULL ONE-YEAR WARRANTY For one year from the date of purchase, when this appliance is operated and maintained according... to instructions attached to or furnished with the product, Whirlpool Corporation will pay for FSP® replacement parts and repair labor ...
... for in the Use and Care guide. 6. Pickup and delivery. For parts and service in the "Parts and Features" section. WHIRLPOOL® COOKTOP, BUILT-IN OVEN AND RANGE WARRANTY FULL ONE-YEAR WARRANTY For one year from the date of purchase, when this appliance is operated and maintained according... to instructions attached to or furnished with the product, Whirlpool Corporation will pay for FSP® replacement parts and repair labor ...


