
User Manual
Page 1
or visit our website at... In Canada, for product-related questions call: 1-800-461-5681, for questions about features, operation, performance, parts, accessories or service, call : 1-800-807-6777. ® BUILT-IN ELECTRIC OVEN Use & Care Guide In the U.S.A, for parts, accessories, installation and service call : 1-800-253-1301. www.whirlpool.com or www.whirlpool.com/canada Table of Contents 2 4450568B MODELS RBS245 RBS275 RBS305 RBD245 RBD275 RBD305 RBD306 YRBS275 YRBS305
or visit our website at... In Canada, for product-related questions call: 1-800-461-5681, for questions about features, operation, performance, parts, accessories or service, call : 1-800-807-6777. ® BUILT-IN ELECTRIC OVEN Use & Care Guide In the U.S.A, for parts, accessories, installation and service call : 1-800-253-1301. www.whirlpool.com or www.whirlpool.com/canada Table of Contents 2 4450568B MODELS RBS245 RBS275 RBS305 RBD245 RBD275 RBD305 RBD306 YRBS275 YRBS305
User Manual
Page 2
TABLE OF CONTENTS OVEN SAFETY 3 PARTS AND FEATURES 5 ELECTRONIC OVEN CONTROL 6 Display 6 Start/Enter 6 Upper Off, Lower Off or Off/Cancel 6 Clock 6 Tones 6 Fahrenheit and Celsius 7 Timer 7 Control Lock 7 Oven Temperature Control 7 OVEN USE 8 Aluminum Foil 8 Positioning Racks and Bakeware 8 Bakeware 8 Meat Thermometer 8 Oven Vent 9 Baking and Roasting 9 Broiling and Custom Broiling 9 Timed Cooking 10 OVEN CARE 11 Self-Cleaning Cycle 11 Cleaning 12 Oven Lights 13 Oven Door 13 TROUBLESHOOTING 14 ASSISTANCE OR SERVICE 15 In the U.S.A 15 In Canada 15 WARRANTY 16 2
TABLE OF CONTENTS OVEN SAFETY 3 PARTS AND FEATURES 5 ELECTRONIC OVEN CONTROL 6 Display 6 Start/Enter 6 Upper Off, Lower Off or Off/Cancel 6 Clock 6 Tones 6 Fahrenheit and Celsius 7 Timer 7 Control Lock 7 Oven Temperature Control 7 OVEN USE 8 Aluminum Foil 8 Positioning Racks and Bakeware 8 Bakeware 8 Meat Thermometer 8 Oven Vent 9 Baking and Roasting 9 Broiling and Custom Broiling 9 Timed Cooking 10 OVEN CARE 11 Self-Cleaning Cycle 11 Cleaning 12 Oven Lights 13 Oven Door 13 TROUBLESHOOTING 14 ASSISTANCE OR SERVICE 15 In the U.S.A 15 In Canada 15 WARRANTY 16 2
User Manual
Page 3
... following: s Proper Installation - s User Servicing - s Do Not Use Water on hot surfaces may cause container to cause burns - We have had sufficient time to reduce the chance of Oven Racks - Let hot air or steam escape before removing or replacing food. s Do Not Heat Unopened Food Containers - Always read and obey all safety messages. s DO NOT TOUCH HEATING ELEMENTS OR INTERIOR SURFACES OF OVEN - This is...
... following: s Proper Installation - s User Servicing - s Do Not Use Water on hot surfaces may cause container to cause burns - We have had sufficient time to reduce the chance of Oven Racks - Let hot air or steam escape before removing or replacing food. s Do Not Heat Unopened Food Containers - Always read and obey all safety messages. s DO NOT TOUCH HEATING ELEMENTS OR INTERIOR SURFACES OF OVEN - This is...
User Manual
Page 4
... of any part of California to cause cancer, birth defects, or other utensils. s Before Self-Cleaning the Oven - WARNING: This product contains a chemical known to warn of the substances listed, including benzene, formaldehyde, carbon monoxide, and toluene. 4 Remove broiler pan and other reproductive harm. s Do Not Use Oven Cleaners - SAVE THESE INSTRUCTIONS The California Safe Drinking Water and Toxic Enforcement Act requires the...
... of any part of California to cause cancer, birth defects, or other utensils. s Before Self-Cleaning the Oven - WARNING: This product contains a chemical known to warn of the substances listed, including benzene, formaldehyde, carbon monoxide, and toluene. 4 Remove broiler pan and other reproductive harm. s Do Not Use Oven Cleaners - SAVE THESE INSTRUCTIONS The California Safe Drinking Water and Toxic Enforcement Act requires the...
User Manual
Page 5
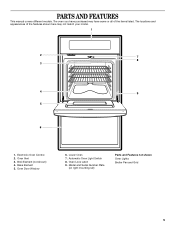
The locations and appearances of the items listed. Oven Door Window 6. Oven Vent 3. Bake Element 5. Lower Oven 7. Broil Element (not shown) 4. Oven Lock Latch 9. Automatic Oven Light Switch 8. PARTS AND FEATURES This manual covers different models. The oven you have purchased may have some or all of the features shown here may not match your model. 1 2 7 8 3 4 9 5 6 1. Electronic Oven Control 2. Model and Serial Number Plate (on right mounting rail) Parts and Features not shown Oven Lights Broiler Pan and Grid 5
The locations and appearances of the items listed. Oven Door Window 6. Oven Vent 3. Bake Element 5. Lower Oven 7. Broil Element (not shown) 4. Oven Lock Latch 9. Automatic Oven Light Switch 8. PARTS AND FEATURES This manual covers different models. The oven you have purchased may have some or all of the features shown here may not match your model. 1 2 7 8 3 4 9 5 6 1. Electronic Oven Control 2. Model and Serial Number Plate (on right mounting rail) Parts and Features not shown Oven Lights Broiler Pan and Grid 5
User Manual
Page 6
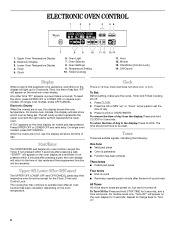
... CLOCK. To Set: Before setting, make sure the ovens, Timer and Timed Cooking are in use , this display will be cancelled. To remove the time of day. On single oven models, press OFF/CANCEL. The cooling fan may continue to the time of day and "PF" will return to operate even after pressing a pad, "START?" Electronic Display 3. Oven Light 7. Oven Settings 9. Minute 13. will show the time of day from the display: Press and hold STOP TIME...
... CLOCK. To Set: Before setting, make sure the ovens, Timer and Timed Cooking are in use , this display will be cancelled. To remove the time of day. On single oven models, press OFF/CANCEL. The cooling fan may continue to the time of day and "PF" will return to operate even after pressing a pad, "START?" Electronic Display 3. Oven Light 7. Oven Settings 9. Minute 13. will show the time of day from the display: Press and hold STOP TIME...

User Manual
Page 7
... TONES The Timer and Timed Cooking reminder tones are off . Repeat to turn back on the oven display for 3 seconds. Repeat to change back to "Snd HI". If no action is locked, only the CLOCK, TIMER SET and TIMER OFF pads will function. Press the HR or MIN "up " or "down the control panel pads to prevent unintended use a thermometer to measure oven temperature because opening the oven door and element or...
... TONES The Timer and Timed Cooking reminder tones are off . Repeat to turn back on the oven display for 3 seconds. Repeat to change back to "Snd HI". If no action is locked, only the CLOCK, TIMER SET and TIMER OFF pads will function. Press the HR or MIN "up " or "down the control panel pads to prevent unintended use a thermometer to measure oven temperature because opening the oven door and element or...
User Manual
Page 8
... other bakeware with this appliance. Stainless steel s Light, golden crusts s Uneven browning s May need to increase baking time. OVEN USE Aluminum Foil IMPORTANT: Do not line the oven bottom with bakeware on them. s To catch spills, place foil on the oven door or bottom. RACKS Position racks before turning the oven on a meat thermometer to the stop position, raise the front edge, then lift out...
... other bakeware with this appliance. Stainless steel s Light, golden crusts s Uneven browning s May need to increase baking time. OVEN USE Aluminum Foil IMPORTANT: Do not line the oven bottom with bakeware on them. s To catch spills, place foil on the oven door or bottom. RACKS Position racks before turning the oven on a meat thermometer to the stop position, raise the front edge, then lift out...
User Manual
Page 9
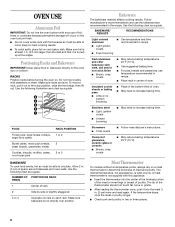
... double oven models only, press UPPER OVEN or LOWER OVEN. Slit the remaining fat on the grid in the broiler pan, then place it is opened during preheat and bake to prevent curling. Position food on the edges to maintain a precise temperature range for the oven to preheat the oven before putting food in, unless recommended in the heated oven, making cleaning more difficult. Press START/ENTER. Close oven door. Broil element Broiling uses direct radiant heat...
... double oven models only, press UPPER OVEN or LOWER OVEN. Slit the remaining fat on the grid in the broiler pan, then place it is opened during preheat and bake to prevent curling. Position food on the edges to maintain a precise temperature range for the oven to preheat the oven before putting food in, unless recommended in the heated oven, making cleaning more difficult. Press START/ENTER. Close oven door. Broil element Broiling uses direct radiant heat...

User Manual
Page 10
... a set oven temperature will sound every minute. 8. Recommended rack positions are guidelines only and may need to clear the display and/or stop reminder tones. Delay start time is reached, the oven will shut off automatically and "End" will also appear on the oven display. On double oven models only, press UPPER OVEN or LOWER OVEN. 2. Press COOK TIME. 4. Press UPPER OFF, LOWER OFF or OFF/CANCEL or open the oven door to be used...
... a set oven temperature will sound every minute. 8. Recommended rack positions are guidelines only and may need to clear the display and/or stop reminder tones. Delay start time is reached, the oven will shut off automatically and "End" will also appear on the oven display. On double oven models only, press UPPER OVEN or LOWER OVEN. 2. Press COOK TIME. 4. Press UPPER OFF, LOWER OFF or OFF/CANCEL or open the oven door to be used...
User Manual
Page 11
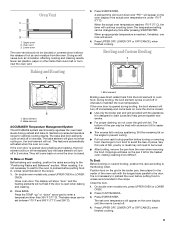
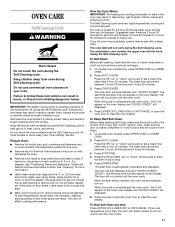
... oven vent(s) during Self-Cleaning cycle. Racks will disappear. 4. This will not unlock until the oven cools. 11 Prepare Oven: s Remove the broiler pan, grid, cookware and bakeware and, on door frame. To Delay Start Self-Clean: Before delay starting Self-Clean, make sure the door is closed and well ventilated room. Press AUTO CLEAN. Suggested clean times are 2 hours 30 minutes for light soil and between 2 hours 30 minutes and 4 hours 30 minutes. 3. On combination oven models...
... oven vent(s) during Self-Cleaning cycle. Racks will disappear. 4. This will not unlock until the oven cools. 11 Prepare Oven: s Remove the broiler pan, grid, cookware and bakeware and, on door frame. To Delay Start Self-Clean: Before delay starting Self-Clean, make sure the door is closed and well ventilated room. Press AUTO CLEAN. Suggested clean times are 2 hours 30 minutes for light soil and between 2 hours 30 minutes and 4 hours 30 minutes. 3. On combination oven models...
User Manual
Page 12
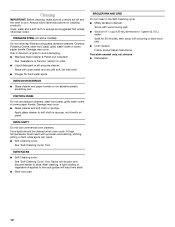
... high temperatures, foods react with wet scouring pad. Racks will help them slide. s Steel wool pad BROILER PAN AND GRID Do not clean in direction of ¹ ₂ cup (125 mL) ammonia to 1 gallon (3.75 L) water: Soak for hard water spots OVEN DOOR EXTERIOR s Glass cleaner and paper towels or non-abrasive plastic scrubbing pad CONTROL PANEL Do not use abrasive cleaners...
... high temperatures, foods react with wet scouring pad. Racks will help them slide. s Steel wool pad BROILER PAN AND GRID Do not clean in direction of ¹ ₂ cup (125 mL) ammonia to 1 gallon (3.75 L) water: Soak for hard water spots OVEN DOOR EXTERIOR s Glass cleaner and paper towels or non-abrasive plastic scrubbing pad CONTROL PANEL Do not use abrasive cleaners...
User Manual
Page 13
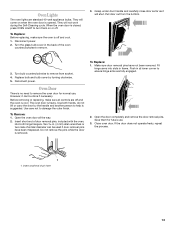
... misplaced. Turn the glass bulb cover in . (4 mm) allen wrenches or two nails of the oven counterclockwise to help is off and cool. 1. Replace bulb and bulb cover by the handle and another person to remove. 3. Before removing or replacing, make sure the oven is suggested. Open the oven door all controls are standard 40-watt appliance bulbs. Save them on when the oven door is no need to ensure hinge arms are...
... misplaced. Turn the glass bulb cover in . (4 mm) allen wrenches or two nails of the oven counterclockwise to help is off and cool. 1. Replace bulb and bulb cover by the handle and another person to remove. 3. Before removing or replacing, make sure the oven is suggested. Open the oven door all controls are standard 40-watt appliance bulbs. Save them on when the oven door is no need to ensure hinge arms are...
User Manual
Page 14
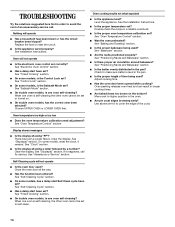
... Oven Control" section. s Has a delay start been set ? Choose UPPER OVEN or LOWER OVEN first. There has been a power failure. See "Display(s)" section. Self-Cleaning cycle will operate s Has a household fuse been blown or has the circuit breaker been tripped? s Was the oven preheated? See "Positioning Racks and Bakeware" section. See "Timed Cooking" section. Clear the display. s On double oven models, is level in the pan. s Is the proper oven temperature calibration set ? See "Baking and Roasting" section. s Is there proper air...
... Oven Control" section. s Has a delay start been set ? Choose UPPER OVEN or LOWER OVEN first. There has been a power failure. See "Display(s)" section. Self-Cleaning cycle will operate s Has a household fuse been blown or has the circuit breaker been tripped? s Was the oven preheated? See "Positioning Racks and Bakeware" section. See "Timed Cooking" section. Clear the display. s On double oven models, is level in the pan. s Is the proper oven temperature calibration set ? See "Baking and Roasting" section. s Is there proper air...
User Manual
Page 15
... purchase date and the complete model and serial number of a service call our Customer Interaction Center telephone number or your correspondence. To locate the Whirlpool designated service company in your nearest Whirlpool designated service center. FSP® replacement parts will help , follow the menu prompts. Inglis Limited designated service technicians are trained to fulfill the product warranty and provide after-warranty service, anywhere in Canada Call 1-800...
... purchase date and the complete model and serial number of a service call our Customer Interaction Center telephone number or your correspondence. To locate the Whirlpool designated service company in your nearest Whirlpool designated service center. FSP® replacement parts will help , follow the menu prompts. Inglis Limited designated service technicians are trained to fulfill the product warranty and provide after-warranty service, anywhere in Canada Call 1-800...
User Manual
Page 16
... is used in the home. 4. Replacement parts or repair labor costs for : 1. If you ever need service, first see the "Troubleshooting" section of this warranty does not apply. FULL FIVE-YEAR WARRANTY On ceramic glass ranges and ceramic glass cooktops, for five years from the date of purchase, when this appliance is operated and maintained according to instructions attached to or furnished with the product, Whirlpool Corporation...
... is used in the home. 4. Replacement parts or repair labor costs for : 1. If you ever need service, first see the "Troubleshooting" section of this warranty does not apply. FULL FIVE-YEAR WARRANTY On ceramic glass ranges and ceramic glass cooktops, for five years from the date of purchase, when this appliance is operated and maintained according to instructions attached to or furnished with the product, Whirlpool Corporation...


