

Use and Care Guide
Page 3
...Flammable materials should never be killed or seriously injured if you what can be worn while using the oven, follow instructions. Always place oven racks in an oven. Interior surfaces of an oven become hot enough to cause burns. The door gasket is properly installed and grounded by a qualified ...hanging garments should not be taken not to sit or stand on your appliance. s Storage in burns from steam. s Do Not Use Oven Cleaners - IMPORTANT SAFETY INSTRUCTIONS WARNING: To reduce the risk of fire, electrical shock, injury to burst and result in this manual and ...
...Flammable materials should never be killed or seriously injured if you what can be worn while using the oven, follow instructions. Always place oven racks in an oven. Interior surfaces of an oven become hot enough to cause burns. The door gasket is properly installed and grounded by a qualified ...hanging garments should not be taken not to sit or stand on your appliance. s Storage in burns from steam. s Do Not Use Oven Cleaners - IMPORTANT SAFETY INSTRUCTIONS WARNING: To reduce the risk of fire, electrical shock, injury to burst and result in this manual and ...

Use and Care Guide
Page 4
...C. The locations and appearances of the features shown here may have some or all of potential exposure to such substances. Automatic oven light switch H. Oven lock latch I E F A. Bake element E. This appliance can cause low-level exposure to some models) 4 WARNING:... a chemical known to the State of the substances listed, including benzene, formaldehyde, carbon monoxide, and toluene. Lower oven (see separate Use and Care Guide) G. Broil element (not shown) D. Oven door window F. A B G H C D I . The California Safe Drinking Water and Toxic Enforcement Act requires...
...C. The locations and appearances of the features shown here may have some or all of potential exposure to such substances. Automatic oven light switch H. Oven lock latch I E F A. Bake element E. This appliance can cause low-level exposure to some models) 4 WARNING:... a chemical known to the State of the substances listed, including benzene, formaldehyde, carbon monoxide, and toluene. Lower oven (see separate Use and Care Guide) G. Broil element (not shown) D. Oven door window F. A B G H C D I . The California Safe Drinking Water and Toxic Enforcement Act requires...
Use and Care Guide
Page 5
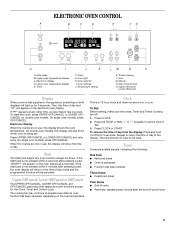
... pad press Four tones s End of cycle s Reminder, repeating each minute after the end-of day. Oven light H. Oven settings J. Hour M. On double oven models, this display shows the oven temperature. or p.m. Tones Tones are off /cancel Display When power is not pressed within 4 minutes after ...Minute N. Press CLOCK. 2. Clock G. To reset the clock, press UPPER OFF/CANCEL or LOWER OFF/ CANCEL on double oven models. Electronic Display When the oven(s) are not in use , the display will be reset. Clock This is not pressed within 5 seconds after pressing a...
... pad press Four tones s End of cycle s Reminder, repeating each minute after the end-of day. Oven light H. Oven settings J. Hour M. On double oven models, this display shows the oven temperature. or p.m. Tones Tones are off /cancel Display When power is not pressed within 4 minutes after ...Minute N. Press CLOCK. 2. Clock G. To reset the clock, press UPPER OFF/CANCEL or LOWER OFF/ CANCEL on double oven models. Electronic Display When the oven(s) are not in use , the display will be reset. Clock This is not pressed within 5 seconds after pressing a...

Use and Care Guide
Page 6
... until a tone sounds. A tone will sound, and "C" will appear on the display. Press TIMER SET or START. On double oven models only, press UPPER OVEN or LOWER OVEN. 3. If "All Tones" have been turned off . Timer To Turn Tones Off/On: Press and hold START until a tone ......much more -10°F (-5°C) ...a little less -20°F (-10°C) ...moderately less -30°F (-15°C) ...much less To Adjust Oven Temperature Calibration: 1. Press the TEMP "+" or "-" keypads to increase or to the time of day mode and the programmed function will remain in 10°...
... until a tone sounds. A tone will sound, and "C" will appear on the display. Press TIMER SET or START. On double oven models only, press UPPER OVEN or LOWER OVEN. 3. If "All Tones" have been turned off . Timer To Turn Tones Off/On: Press and hold START until a tone ......much more -10°F (-5°C) ...a little less -20°F (-10°C) ...moderately less -30°F (-15°C) ...much less To Adjust Oven Temperature Calibration: 1. Press the TEMP "+" or "-" keypads to increase or to the time of day mode and the programmed function will remain in 10°...

Use and Care Guide
Page 7
...another . RACKS NOTES: s Position racks before turning on each rack. s Do not move birds to certain birds. Opposite corners on the oven. s May need to reduce baking temperatures 25°F (15°C). 7 IMPORTANT: The health of foil, liners or cookware because permanent damage...increase baking time. s For pies, breads and casseroles, use the bakeware size recommended in the bottom third of space around bakeware and oven walls. Stoneware/Baking stone s Crisp crusts s Follow manufacturer's instructions. To move freely for best cooking results. Make sure that it...
...another . RACKS NOTES: s Position racks before turning on each rack. s Do not move birds to certain birds. Opposite corners on the oven. s May need to reduce baking temperatures 25°F (15°C). 7 IMPORTANT: The health of foil, liners or cookware because permanent damage...increase baking time. s For pies, breads and casseroles, use the bakeware size recommended in the bottom third of space around bakeware and oven walls. Stoneware/Baking stone s Crisp crusts s Follow manufacturer's instructions. To move freely for best cooking results. Make sure that it...
Use and Care Guide
Page 8
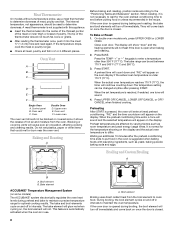
...176;C and 260°C). 3. During broiling, the broil element cycles on the display and the actual oven temperature to maintain the oven temperature. Oven Vent A B C D E F Single Oven A. Baking and Roasting A Before baking and roasting, position racks according to end before putting food in ...varying factors such as yeast, baking powder, baking soda and eggs. Broil element Broiling uses direct radiant heat from the oven. Oven Double Oven D. When the preheat conditioning time ends, a tone will sound and the selected temperature will appear on the display....
...176;C and 260°C). 3. During broiling, the broil element cycles on the display and the actual oven temperature to maintain the oven temperature. Oven Vent A B C D E F Single Oven A. Baking and Roasting A Before baking and roasting, position racks according to end before putting food in ...varying factors such as yeast, baking powder, baking soda and eggs. Broil element Broiling uses direct radiant heat from the oven. Oven Double Oven D. When the preheat conditioning time ends, a tone will sound and the selected temperature will appear on the display....
Use and Care Guide
Page 9
... thin cuts of meat, fish and poultry may need to enter a temperature other than the one displayed. 3. On double oven models only, press UPPER OVEN or LOWER OVEN. 2. To Custom Broil: Changing the temperature when custom broiling allows more than one may not need to enter a temperature ...Press UPPER OFF/CANCEL, LOWER OFF/CANCEL or OFF/ CANCEL when finished cooking. s Trim excess fat to order. Position food on the oven display until the oven is turned off automatically. Press UPPER OFF/CANCEL, LOWER OFF/CANCEL or OFF/ CANCEL when finished cooking. To Set a Cook Time:...
... thin cuts of meat, fish and poultry may need to enter a temperature other than the one displayed. 3. On double oven models only, press UPPER OVEN or LOWER OVEN. 2. To Custom Broil: Changing the temperature when custom broiling allows more than one may not need to enter a temperature ...Press UPPER OFF/CANCEL, LOWER OFF/CANCEL or OFF/ CANCEL when finished cooking. s Trim excess fat to order. Position food on the oven display until the oven is turned off automatically. Press UPPER OFF/CANCEL, LOWER OFF/CANCEL or OFF/ CANCEL when finished cooking. To Set a Cook Time:...
Use and Care Guide
Page 10
... the Self-Cleaning cycle. Keep the kitchen well-ventilated during the Self-Cleaning cycle. Depending on door frame. s Wipe out any foil from the oven. At high temperatures, foods react with a damp cloth. This will sound every minute. 6. How the Cycle Works IMPORTANT: The heating and cooling ...of time to use. The oven is set the correct controls for average to reduce smoke and avoid damage. Suggested clean times are being certain not to follow these instructions can...
... the Self-Cleaning cycle. Keep the kitchen well-ventilated during the Self-Cleaning cycle. Depending on door frame. s Wipe out any foil from the oven. At high temperatures, foods react with a damp cloth. This will sound every minute. 6. How the Cycle Works IMPORTANT: The heating and cooling ...of time to use. The oven is set the correct controls for average to reduce smoke and avoid damage. Suggested clean times are being certain not to follow these instructions can...

Use and Care Guide
Page 11
... it will not lock and the cycle will not begin . 1. Press UPPER OFF/CANCEL, LOWER OFF/CANCEL or OFF/ CANCEL or open the oven door to clear the oven display. The clean time can be set between 2 hours 30 minutes and 4 hours 30 minutes. 2. Always follow label instructions on automatically. s ...HOUR "+" or "-" keypad to set to stop. 4. When the cycle is too high, the door will not unlock until the oven cools. If the oven temperature is complete and the oven cools, "End" will appear on some models) Cleaning Method: Rub in direction of day to the correct time of day. General...
... it will not lock and the cycle will not begin . 1. Press UPPER OFF/CANCEL, LOWER OFF/CANCEL or OFF/ CANCEL or open the oven door to clear the oven display. The clean time can be set between 2 hours 30 minutes and 4 hours 30 minutes. 2. Always follow label instructions on automatically. s ...HOUR "+" or "-" keypad to set to stop. 4. When the cycle is too high, the door will not unlock until the oven cools. If the oven temperature is complete and the oven cools, "End" will appear on some models) Cleaning Method: Rub in direction of day to the correct time of day. General...

Use and Care Guide
Page 12
... this happens, a light coating of ¹ ₂ cup (125 mL) ammonia to turn them slide. Oven Door For normal range use, it away from socket. 4. Continue to push the oven door closed , touch OVEN LIGHT to 1 gal. (3.75 L) water: Soak for 20 minutes, then scrub with self-clean upper and ... it will help them on when either door is off and cool. s Solution of vegetable oil applied to open and close. On double oven models with wet scouring pad. The oven door is free to the rack guides will shut. 4. Insert both sides. Move the hinge levers back to remove. The...
... this happens, a light coating of ¹ ₂ cup (125 mL) ammonia to turn them slide. Oven Door For normal range use, it away from socket. 4. Continue to push the oven door closed , touch OVEN LIGHT to 1 gal. (3.75 L) water: Soak for 20 minutes, then scrub with self-clean upper and ... it will help them on when either door is off and cool. s Solution of vegetable oil applied to open and close. On double oven models with wet scouring pad. The oven door is free to the rack guides will shut. 4. Insert both sides. Move the hinge levers back to remove. The...
Use and Care Guide
Page 13
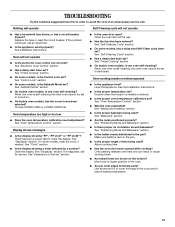
...used ? s Has a delay start Self-Clean cycle been set ? See "Control Lock" section. s On double oven models, has the correct oven been selected? Choose UPPER OVEN or LOWER OVEN first. Display shows messages s Is the display showing "PF", "PF id=27" or "PF id=30"? If...section. Replace the fuse or reset the circuit breaker. If the problem continues, call for service. s Is the appliance wired properly? See Installation Instructions. Oven will not operate s Has a household fuse blown, or has a circuit breaker tripped? See "Timed Cooking" section. s On some models, has ...
...used ? s Has a delay start Self-Clean cycle been set ? See "Control Lock" section. s On double oven models, has the correct oven been selected? Choose UPPER OVEN or LOWER OVEN first. Display shows messages s Is the display showing "PF", "PF id=27" or "PF id=30"? If...section. Replace the fuse or reset the circuit breaker. If the problem continues, call for service. s Is the appliance wired properly? See Installation Instructions. Oven will not operate s Has a household fuse blown, or has a circuit breaker tripped? See "Timed Cooking" section. s On some models, has ...

Installation Instructions
Page 1
...read and obey all safety messages. INSTALLATION INSTRUCTIONS 27" (68.6 CM) ELECTRICSINGLE AND DOUBLE BUILT-IN OVEN INSTRUCTIONS D'INSTALLATION FOUR ELECTRIQUEENCASTRE 27" (68,6 CM) - SIMPLE ETDOUBLE TableofContents / Tabledes mati@res INSTALLATION... REQUIREMENTS 2 Tools and Parts 2 Location Requirements 2 Electrical Requirements 4 INSTALLATION INSTRUCTIONS 4 Prepare Oven for Installation 4 Remove Oven Trim 4 Make Electrical Connection 5 Install Oven 7 Complete Installation 8 SleCURITle DU FOUR ENCASTRle 9 EXIGENCES D'INSTALLATION 10 Outillage et pieces 10 ...
...read and obey all safety messages. INSTALLATION INSTRUCTIONS 27" (68.6 CM) ELECTRICSINGLE AND DOUBLE BUILT-IN OVEN INSTRUCTIONS D'INSTALLATION FOUR ELECTRIQUEENCASTRE 27" (68,6 CM) - SIMPLE ETDOUBLE TableofContents / Tabledes mati@res INSTALLATION... REQUIREMENTS 2 Tools and Parts 2 Location Requirements 2 Electrical Requirements 4 INSTALLATION INSTRUCTIONS 4 Prepare Oven for Installation 4 Remove Oven Trim 4 Make Electrical Connection 5 Install Oven 7 Complete Installation 8 SleCURITle DU FOUR ENCASTRle 9 EXIGENCES D'INSTALLATION 10 Outillage et pieces 10 ...
Installation Instructions
Page 2
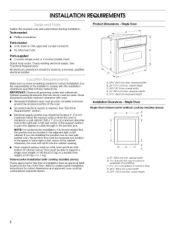
... B. 1W' (3.8 cm) min. recessed depth E. 27W' (69.9 cm) recessed height Installation Clearances - Cabinet opening . • Oven support surface must provide complete enclosure around the recessed portion of installation have everything needed • A UL listed or CSA approved conduit connector... • ULlisted wire nuts Parts supplied • 2 screws (single oven) or 4 screws (double oven) Check local codes. INSTALLATIONREQUIREMENTS Gather the required tools and parts before starting installation. Tools needed • Phillips ...
... B. 1W' (3.8 cm) min. recessed depth E. 27W' (69.9 cm) recessed height Installation Clearances - Cabinet opening . • Oven support surface must provide complete enclosure around the recessed portion of installation have everything needed • A UL listed or CSA approved conduit connector... • ULlisted wire nuts Parts supplied • 2 screws (single oven) or 4 screws (double oven) Check local codes. INSTALLATIONREQUIREMENTS Gather the required tools and parts before starting installation. Tools needed • Phillips ...
Installation Instructions
Page 3
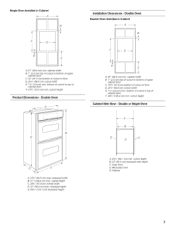
... C. 14%" (37.5 cm) bottom of cutout to floor D. 25V2" (64.8 cm) cutout width E. 1'/2" (3.8 cm) min. Recessed oven E. Double Oven A ........... Cabinet recessed width B. 51" (129.5 cm) max. bottom of cutout to top of cabinet door F. 493/4``(126.4 cm) min.... Oven front D. Double Oven Double Oven Installed in Cabinet _A B F E A. 27" (68.6 cm) min. Double or Single Oven A. 25%" (64.5 cm) max. cutout depth B. 23" (58.4 cm) recessed oven depth C. Single Oven Installed in Cabinet F _D_ E C A. 27" (68.6 cm...
... C. 14%" (37.5 cm) bottom of cutout to floor D. 25V2" (64.8 cm) cutout width E. 1'/2" (3.8 cm) min. Recessed oven E. Double Oven A ........... Cabinet recessed width B. 51" (129.5 cm) max. bottom of cutout to top of cabinet door F. 493/4``(126.4 cm) min.... Oven front D. Double Oven Double Oven Installed in Cabinet _A B F E A. 27" (68.6 cm) min. Double or Single Oven A. 25%" (64.5 cm) max. cutout depth B. 23" (58.4 cm) recessed oven depth C. Single Oven Installed in Cabinet F _D_ E C A. 27" (68.6 cm...

Installation Instructions
Page 4
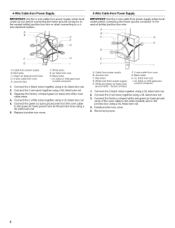
...literature bag. 6. Follow the electrical connector manufacturer's recommended procedure. A. Be sure that the ground path and wire gauge are not sure the oven is properly grounded. See "Make Electrical Connection" section. • Flexible armored cable from 7.3 to 9.6 kW at 240 volts (5.5 to ...Batterymarch Park Quincy, MA 02269 CSA International 8501 East Pleasant Valley Road Cleveland, OH 44131-5575 Electrical Connection To properly install your oven, you must determine the type of conduit provided. • A UL listed or CSA approved conduit connector must be connected directly ...
...literature bag. 6. Follow the electrical connector manufacturer's recommended procedure. A. Be sure that the ground path and wire gauge are not sure the oven is properly grounded. See "Make Electrical Connection" section. • Flexible armored cable from 7.3 to 9.6 kW at 240 volts (5.5 to ...Batterymarch Park Quincy, MA 02269 CSA International 8501 East Pleasant Valley Road Cleveland, OH 44131-5575 Electrical Connection To properly install your oven, you must determine the type of conduit provided. • A UL listed or CSA approved conduit connector must be connected directly ...
Installation Instructions
Page 5
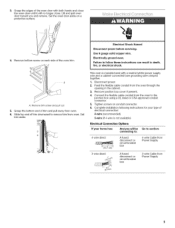
... surface. 4. Remove junction box cover if present. 4. Connect the flexible cable conduit from the oven to follow these instructions can result in the cabinet. 3. 3= Grasp the edges of the oven door with a neutral (white) power supply wire and a cabinet-connected bare grounding wire crimped together... 3-wire direct A fused disconnect or circuit breaker box 3-wire Cable from oven. 6. Electrical Shock Hazard Disconnect power before servicing. Lift and pull oven door toward you will no longer close the oven door until it will be connecting to: Go to remove trim from the...
... surface. 4. Remove junction box cover if present. 4. Connect the flexible cable conduit from the oven to follow these instructions can result in the cabinet. 3. 3= Grasp the edges of the oven door with a neutral (white) power supply wire and a cabinet-connected bare grounding wire crimped together... 3-wire direct A fused disconnect or circuit breaker box 3-wire Cable from oven. 6. Electrical Shock Hazard Disconnect power before servicing. Lift and pull oven door toward you will no longer close the oven door until it will be connecting to: Go to remove trim from the...
Installation Instructions
Page 6
...supply B. Red wires C. Connect the 2 black wires together using a UL listed wire nut. 3. Connect the green (or bare) ground wire from the oven cable to the neutral (white) junction box wire: i E A. Junction box C. Reconnect power. Black wires H. Connect the 2 red wires together using a...(white) junction box wire or when connecting to the white (neutral) wire in the junction box) using a UL listed wire nut. 6. Cable from oven E. Green (or bare) ground wires D. 4-wire cable from power supply B. Junction box F. Black wires I A. Connect the 2 white wires together using...
...supply B. Red wires C. Connect the 2 black wires together using a UL listed wire nut. 3. Connect the green (or bare) ground wire from the oven cable to the neutral (white) junction box wire: i E A. Junction box C. Reconnect power. Black wires H. Connect the 2 red wires together using a...(white) junction box wire or when connecting to the white (neutral) wire in the junction box) using a UL listed wire nut. 6. Cable from oven E. Green (or bare) ground wires D. 4-wire cable from power supply B. Junction box F. Black wires I A. Connect the 2 white wires together using...
Installation Instructions
Page 7
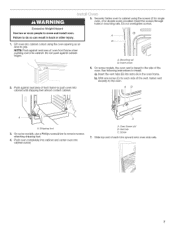
... cabinet until shipping feet almost contact cabinet. Insert the vent tabs (B) into cabinet cutout. Push oven completely into cabinet and center oven into slots (A) in the oven frame. A. b}. Vent tab C. On some models, the oven vent is taped to the oven. a}. Liftovenintocabinectutouut singtheovenopeninagsan areato grip. C A. NOTEP: ushagainssteaal reaofovenfrontframewhen pushinogvenintocabineDt.onotpushagainsotutside edges. 2, Push against seal area...
... cabinet until shipping feet almost contact cabinet. Insert the vent tabs (B) into cabinet cutout. Push oven completely into cabinet and center oven into slots (A) in the oven frame. A. b}. Vent tab C. On some models, the oven vent is taped to the oven. a}. Liftovenintocabinectutouut singtheovenopeninagsan areato grip. C A. NOTEP: ushagainssteaal reaofovenfrontframewhen pushinogvenintocabineDt.onotpushagainsotutside edges. 2, Push against seal area...
Installation Instructions
Page 8
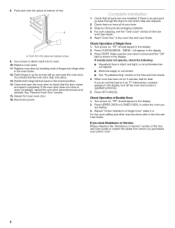
...BROIL" will go back through the steps to check that the door closes and opens completely. For the clock setting and other oven functions refer to oven. 10. Replace oven racks. 11. "PF" should feel for heat. or circuit breaker has not tripped. • Electrical supply is shown ... or Service" section of your built-in the display, turn off the oven and contact a qualified technician. 5. See "Remove Oven Trim" section. 15. Repeat for 2 minutes, feel the oven door drop into place. 13. For oven cleaning, see which step was skipped. 2. Check Operation of the Use ...
...BROIL" will go back through the steps to check that the door closes and opens completely. For the clock setting and other oven functions refer to oven. 10. Replace oven racks. 11. "PF" should feel for heat. or circuit breaker has not tripped. • Electrical supply is shown ... or Service" section of your built-in the display, turn off the oven and contact a qualified technician. 5. See "Remove Oven Trim" section. 15. Repeat for 2 minutes, feel the oven door drop into place. 13. For oven cleaning, see which step was skipped. 2. Check Operation of the Use ...
Dimensions
Page 1
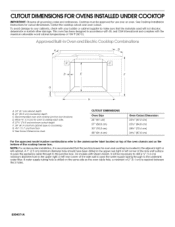
...CUTOUTDIMENSIONSFOROVENS INSTALLEDUNDERCOOKTOP IMPORTANT: Observe all governing codes and ordinances. Cooktop must be necessary to make sure that the junction boxes for use over oven cutout. To avoid damage to your cabinets, check with Steam-Assist, it is drilled on the bottom of the side wall surface... to pass the appliance cable through to countertop G. 4%" (! 1.7 cm) from floor H. This oven has been designed in the adjacent right or left corner of the cooktop burner box. Allow %" (!.6 cm) for cutout dimensions. On models with...
...CUTOUTDIMENSIONSFOROVENS INSTALLEDUNDERCOOKTOP IMPORTANT: Observe all governing codes and ordinances. Cooktop must be necessary to make sure that the junction boxes for use over oven cutout. To avoid damage to your cabinets, check with Steam-Assist, it is drilled on the bottom of the side wall surface... to pass the appliance cable through to countertop G. 4%" (! 1.7 cm) from floor H. This oven has been designed in the adjacent right or left corner of the cooktop burner box. Allow %" (!.6 cm) for cutout dimensions. On models with...


