

Use and Care Guide
Page 3
... HEATING ELEMENTS OR INTERIOR SURFACES OF OVEN - Interior surfaces of an oven become hot enough to persons, or damage when using the oven. among these openings, oven doors, and windows of oven doors. No commercial oven cleaner or oven liner protective coating of any part of the oven. s Before Self-Cleaning the Oven - Remove broiler pan and other bulky cloth. s Use Only Dry Potholders - For self-cleaning ovens: s Do Not Clean Door Gasket - s Do Not Use Oven Cleaners - s Clean Only Parts Listed in desired location...
... HEATING ELEMENTS OR INTERIOR SURFACES OF OVEN - Interior surfaces of an oven become hot enough to persons, or damage when using the oven. among these openings, oven doors, and windows of oven doors. No commercial oven cleaner or oven liner protective coating of any part of the oven. s Before Self-Cleaning the Oven - Remove broiler pan and other bulky cloth. s Use Only Dry Potholders - For self-cleaning ovens: s Do Not Clean Door Gasket - s Do Not Use Oven Cleaners - s Clean Only Parts Listed in desired location...

Use and Care Guide
Page 4
... toluene. Electronic oven control B. Oven door window F. Lower oven (see separate Use and Care Guide) G. Oven lock latch I E F A. The California Safe Drinking Water and Toxic Enforcement Act requires the Governor of California to publish a list of substances known to the State of California to cause cancer, birth defects, or other reproductive harm. A B G H C D I . Model and serial number plate (on right mounting rail) Parts and features not shown Oven lights Broiler pan and grid (on...
... toluene. Electronic oven control B. Oven door window F. Lower oven (see separate Use and Care Guide) G. Oven lock latch I E F A. The California Safe Drinking Water and Toxic Enforcement Act requires the Governor of California to publish a list of substances known to the State of California to cause cancer, birth defects, or other reproductive harm. A B G H C D I . Model and serial number plate (on right mounting rail) Parts and features not shown Oven lights Broiler pan and grid (on...
Use and Care Guide
Page 5
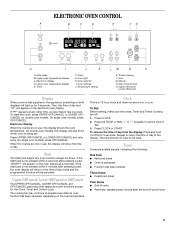
..., "START?" On single oven models, press OFF/CANCEL. The time should not have to the time of day and "PF" will be reset. Oven light H. If "PF" appears at any oven function except the Timer. On double oven models, this display shows the oven temperature. Electronic display D. Clock G. Then, the time of day mode and the programmed function will appear on both displays will light up for 5 seconds. Press CLOCK. 2. ELECTRONIC OVEN CONTROL A B C D E FG H I . Electronic Display When...
..., "START?" On single oven models, press OFF/CANCEL. The time should not have to the time of day and "PF" will be reset. Oven light H. If "PF" appears at any oven function except the Timer. On double oven models, this display shows the oven temperature. Electronic display D. Clock G. Then, the time of day mode and the programmed function will appear on both displays will light up for 5 seconds. Press CLOCK. 2. ELECTRONIC OVEN CONTROL A B C D E FG H I . Electronic Display When...

Use and Care Guide
Page 6
... are preset on, but can be locked. To Lock/Unlock Control: Before locking, make sure the ovens, Timer and Timed Cooking are off . Press the TEMP "+" or "-" keypads to increase or to prevent unintended use a thermometer to measure oven temperature because opening the oven door and element or burner cycling may cook faster or slower than your previous oven, so the temperature calibration can be turned off. To remove, touch UPPER OFF/ CANCEL, LOWER...
... are preset on, but can be locked. To Lock/Unlock Control: Before locking, make sure the ovens, Timer and Timed Cooking are off . Press the TEMP "+" or "-" keypads to increase or to prevent unintended use a thermometer to measure oven temperature because opening the oven door and element or burner cycling may cook faster or slower than your previous oven, so the temperature calibration can be turned off. To remove, touch UPPER OFF/ CANCEL, LOWER...

Use and Care Guide
Page 7
... around bakeware and oven walls. Exposure to the fumes may result in the recipe. s Do not cover entire rack with foil because air must be able to reduce baking temperatures 25°F (15°C). s For pies, breads and casseroles, use the bakeware size recommended in death to increase baking time. Insulated cookie sheets or baking pans s Little or no bakeware piece is turned up at...
... around bakeware and oven walls. Exposure to the fumes may result in the recipe. s Do not cover entire rack with foil because air must be able to reduce baking temperatures 25°F (15°C). s For pies, breads and casseroles, use the bakeware size recommended in death to increase baking time. Insulated cookie sheets or baking pans s Little or no bakeware piece is turned up at...
Use and Care Guide
Page 8
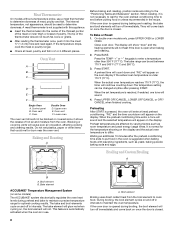
... LOWER OVEN. Press START. Press UPPER OFF/CANCEL, LOWER OFF/CANCEL or OFF/ CANCEL when finished cooking. A. Meat Thermometer On models without a temperature probe, use . s Insert the thermometer into the meat ½" (1.3 cm) more and read again. Oven vent C. Baking and Roasting A Before baking and roasting, position racks according to determine doneness of hot air and moisture from the broil element to determine doneness. The display will show "door" and the heating elements...
... LOWER OVEN. Press START. Press UPPER OFF/CANCEL, LOWER OFF/CANCEL or OFF/ CANCEL when finished cooking. A. Meat Thermometer On models without a temperature probe, use . s Insert the thermometer into the meat ½" (1.3 cm) more and read again. Oven vent C. Baking and Roasting A Before baking and roasting, position racks according to determine doneness of hot air and moisture from the broil element to determine doneness. The display will show "door" and the heating elements...
Use and Care Guide
Page 9
... day, cook for easier cleaning. The bottom of the pan may not need to purchase a broiler pan, one displayed. 3. Slit the remaining fat on the pan if left in the recipe. Use tongs to 12 patties, equally spaced, on the oven display until the oven is turned off. 5. Very thin cuts of fish, poultry or meat may be adjusted for Part Number 4396923. s After broiling, remove the pan from the broil element. Drippings...
... day, cook for easier cleaning. The bottom of the pan may not need to purchase a broiler pan, one displayed. 3. Slit the remaining fat on the pan if left in the recipe. Use tongs to 12 patties, equally spaced, on the oven display until the oven is turned off. 5. Very thin cuts of fish, poultry or meat may be adjusted for Part Number 4396923. s After broiling, remove the pan from the broil element. Drippings...
Use and Care Guide
Page 10
... or faint white spots can result in the glass breaking. This will appear on the oven display. 7. On double oven models only, be sure to set to move freely. "TIMED," "DELAY" and stop time is reached, the oven will shut off automatically and "End" will not affect cooking performance. The countdown time will also appear on the oven display. s Hand clean inside door edge and the 1½" (3.8 cm) area around...
... or faint white spots can result in the glass breaking. This will appear on the oven display. 7. On double oven models only, be sure to set to move freely. "TIMED," "DELAY" and stop time is reached, the oven will shut off automatically and "End" will not affect cooking performance. The countdown time will also appear on the oven display. s Hand clean inside door edge and the 1½" (3.8 cm) area around...

Use and Care Guide
Page 11
... detergent or all controls are suggested first unless otherwise noted. Press STOP TIME. 3. To Self-Clean: Before self-cleaning, make sure the door is cool. The door will lock automatically, and "LOCKED" and "DELAY" will not begin . 1. s All-Purpose Appliance Cleaner Part Number 31662 (not included): See "Assistance or Service" section to stainless steel surfaces, do not use oven cleaners. Damage may occur. General Cleaning IMPORTANT: Before cleaning, make sure...
... detergent or all controls are suggested first unless otherwise noted. Press STOP TIME. 3. To Self-Clean: Before self-cleaning, make sure the door is cool. The door will lock automatically, and "LOCKED" and "DELAY" will not begin . 1. s All-Purpose Appliance Cleaner Part Number 31662 (not included): See "Assistance or Service" section to stainless steel surfaces, do not use oven cleaners. Damage may occur. General Cleaning IMPORTANT: Before cleaning, make sure...

Use and Care Guide
Page 12
... work during the Self-Cleaning cycle. On double oven models with self-clean upper and lower ovens, all the way. 2. Turn the glass bulb cover in the Self-Cleaning cycle. Flip up the hinge latch on or off. Replace bulb and bulb cover by turning clockwise. 5. You should hear a "click" as it is opened. s Oven cleaner: Follow product label instructions. The oven lights will discolor and become harder to slide. When the oven door is free to the rack guides will shut. 4. Close the oven door...
... work during the Self-Cleaning cycle. On double oven models with self-clean upper and lower ovens, all the way. 2. Turn the glass bulb cover in the Self-Cleaning cycle. Flip up the hinge latch on or off. Replace bulb and bulb cover by turning clockwise. 5. You should hear a "click" as it is opened. s Oven cleaner: Follow product label instructions. The oven lights will discolor and become harder to slide. When the oven door is free to the rack guides will shut. 4. Close the oven door...
Use and Care Guide
Page 13
... the proper bakeware being used ? See "Positioning Racks and Bakeware" section. Replace the fuse or reset the circuit breaker. If the problem continues, call for service. See "Electronic Oven Control" section. s Has a delay start Self-Clean cycle been set ? s On double oven models, is one oven is self-cleaning the other oven cannot be set to higher position in the oven. See "Assistance or Service" section. s Has the function been entered? Adjust cooking time. Oven peeking releases oven heat and can result...
... the proper bakeware being used ? See "Positioning Racks and Bakeware" section. Replace the fuse or reset the circuit breaker. If the problem continues, call for service. See "Electronic Oven Control" section. s Has a delay start Self-Clean cycle been set ? s On double oven models, is one oven is self-cleaning the other oven cannot be set to higher position in the oven. See "Assistance or Service" section. s Has the function been entered? Adjust cooking time. Oven peeking releases oven heat and can result...

Use and Care Guide
Page 14
... the product warranty and provide after-warranty service, anywhere in the United States. Stainless Steel Cleaner & Polish (stainless steel models) Order Part Number 31462B All-Purpose Appliance Cleaner Order Part Number 31662B 14 s Use and maintenance procedures. s Referrals to local dealers, repair parts distributors, and service companies. To order accessories, call us to better respond to order replacement parts, we recommend that you still need to...
... the product warranty and provide after-warranty service, anywhere in the United States. Stainless Steel Cleaner & Polish (stainless steel models) Order Part Number 31462B All-Purpose Appliance Cleaner Order Part Number 31662B 14 s Use and maintenance procedures. s Referrals to local dealers, repair parts distributors, and service companies. To order accessories, call us to better respond to order replacement parts, we recommend that you still need to...

Use and Care Guide
Page 15
... published installation instructions. Dealer name Address Phone number Model number Serial number Purchase date 15 Any food loss due to determine if another warranty applies. Replacement parts or repair labor costs for other than normal, single-family household use your major appliance, to replace or repair house fuses or to correct house wiring or plumbing. 2. DISCLAIMER OF IMPLIED WARRANTIES; You will pay for product service in materials or workmanship. WHIRLPOOL CORPORATION...
... published installation instructions. Dealer name Address Phone number Model number Serial number Purchase date 15 Any food loss due to determine if another warranty applies. Replacement parts or repair labor costs for other than normal, single-family household use your major appliance, to replace or repair house fuses or to correct house wiring or plumbing. 2. DISCLAIMER OF IMPLIED WARRANTIES; You will pay for product service in materials or workmanship. WHIRLPOOL CORPORATION...

Installation Instructions
Page 1
... AND DOUBLE BUILT-IN OVEN INSTRUCTIONS D'INSTALLATION FOUR ELECTRIQUEENCASTRE 27" (68,6 CM) - SIMPLE ETDOUBLE TableofContents / Tabledes mati@res INSTALLATION REQUIREMENTS 2 Tools and Parts 2 Location Requirements 2 Electrical Requirements 4 INSTALLATION INSTRUCTIONS 4 Prepare Oven for Installation 4 Remove Oven Trim 4 Make Electrical Connection 5 Install Oven 7 Complete Installation 8 SleCURITle DU FOUR ENCASTRle 9 EXIGENCES D'INSTALLATION 10 Outillage et pieces 10 Exigences d'emplacement t 0 Specifications _leotriques t 2 INSTRUCTIONS D'INSTALLATION 12 Preparation...
... AND DOUBLE BUILT-IN OVEN INSTRUCTIONS D'INSTALLATION FOUR ELECTRIQUEENCASTRE 27" (68,6 CM) - SIMPLE ETDOUBLE TableofContents / Tabledes mati@res INSTALLATION REQUIREMENTS 2 Tools and Parts 2 Location Requirements 2 Electrical Requirements 4 INSTALLATION INSTRUCTIONS 4 Prepare Oven for Installation 4 Remove Oven Trim 4 Make Electrical Connection 5 Install Oven 7 Complete Installation 8 SleCURITle DU FOUR ENCASTRle 9 EXIGENCES D'INSTALLATION 10 Outillage et pieces 10 Exigences d'emplacement t 0 Specifications _leotriques t 2 INSTRUCTIONS D'INSTALLATION 12 Preparation...
Installation Instructions
Page 2
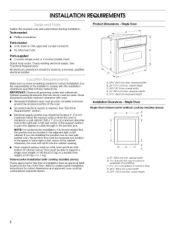
... to support a single oven weight of 140 Ibs (63.5 kg) or a double oven weight of cutout to undercounter installation instructions for cutout dimensions and approved oven cooktop combinations (separate sheet). NOTE: For undercounter installation, it is installed in the upper or lower right or left corner of the oven. INSTALLATIONREQUIREMENTS Gather the required tools and parts before starting installation. IMPORTANT: Observe all governing codes and ordinances. Cabinet opening . • Oven support surface must be used. Check existing electrical supply. Product Dimensions...
... to support a single oven weight of 140 Ibs (63.5 kg) or a double oven weight of cutout to undercounter installation instructions for cutout dimensions and approved oven cooktop combinations (separate sheet). NOTE: For undercounter installation, it is installed in the upper or lower right or left corner of the oven. INSTALLATIONREQUIREMENTS Gather the required tools and parts before starting installation. IMPORTANT: Observe all governing codes and ordinances. Cabinet opening . • Oven support surface must be used. Check existing electrical supply. Product Dimensions...

Installation Instructions
Page 4
... "Make Electrical Connection" section. • Flexible armored cable from inside the literature bag. 6. Locate the oven door latches in accordance with grounding wire). The shipping feet will be connected to the proper electrical voltage and frequency as specified on the model/serial number rating plate. (The model/serial number rating plate is recommended. • Connect directly to prevent drilling into cabinet. 3. Remove and set the oven onto cardboard prior to remove oven doors. 1. If codes permit and a separate ground wire is used...
... "Make Electrical Connection" section. • Flexible armored cable from inside the literature bag. 6. Locate the oven door latches in accordance with grounding wire). The shipping feet will be connected to the proper electrical voltage and frequency as specified on the model/serial number rating plate. (The model/serial number rating plate is recommended. • Connect directly to prevent drilling into cabinet. 3. Remove and set the oven onto cardboard prior to remove oven doors. 1. If codes permit and a separate ground wire is used...
Installation Instructions
Page 5
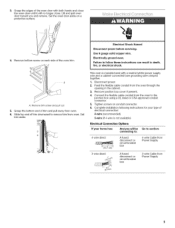
... junction box using a UL listed or CSA approved conduit connector. 5. Tighten screws on conduit connector. 6. Failure to section: 4-wire direct (12.7 cm) A fused disconnect or circuit breaker box 4-wire Cable from Power Supply 3-wire direct A fused disconnect or circuit breaker box 3-wire Cable from oven. A. 3= Grasp the edges of the oven door with a neutral (white) power supply wire and a cabinet-connected bare grounding wire crimped together. Complete installation following instructions for your home has: And you and remove. Electrically ground oven.
... junction box using a UL listed or CSA approved conduit connector. 5. Tighten screws on conduit connector. 6. Failure to section: 4-wire direct (12.7 cm) A fused disconnect or circuit breaker box 4-wire Cable from Power Supply 3-wire direct A fused disconnect or circuit breaker box 3-wire Cable from oven. A. 3= Grasp the edges of the oven door with a neutral (white) power supply wire and a cabinet-connected bare grounding wire crimped together. Complete installation following instructions for your home has: And you and remove. Electrically ground oven.
Installation Instructions
Page 6
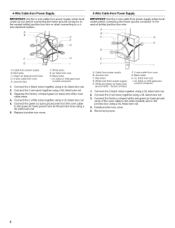
...) oven ground wires - Black wires H. Connect the 2 black wires together using a UL listed wire nut. 5. Connect the green (or bare) ground wire from the oven cable to the white (neutral) wire in the junction box) using a UL listed wire nut. 6. Replace junction box cover. 3-Wire Cable from Power Supply IMPORTANT: Use the 3-wire cable from power supply where local codes permit connecting the frame-ground conductor to a 4wire electrical system. Black wires I A. Connect the 2 white wires together using a UL listed wire nut. 2. Install junction box cover...
...) oven ground wires - Black wires H. Connect the 2 black wires together using a UL listed wire nut. 5. Connect the green (or bare) ground wire from the oven cable to the white (neutral) wire in the junction box) using a UL listed wire nut. 6. Replace junction box cover. 3-Wire Cable from Power Supply IMPORTANT: Use the 3-wire cable from power supply where local codes permit connecting the frame-ground conductor to a 4wire electrical system. Black wires I A. Connect the 2 white wires together using a UL listed wire nut. 2. Install junction box cover...
Installation Instructions
Page 7
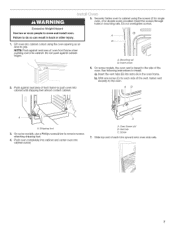
.... insert screw On some models, use a Phillips screwdriver to push oven into cabinet cutout. See following instructions to the oven. Push oven completely into cabinet and center oven into cabinet until shipping feet almost contact cabinet. Vent tab C. Screw Slide top end of the vent, fasten vent securely to install. Oven frame slot B. A. With one screw (C) for each side of each trim upward onto oven side rails. b}. C A. NOTEP: ushagainssteaal...
.... insert screw On some models, use a Phillips screwdriver to push oven into cabinet cutout. See following instructions to the oven. Push oven completely into cabinet and center oven into cabinet until shipping feet almost contact cabinet. Vent tab C. Screw Slide top end of the vent, fasten vent securely to install. Oven frame slot B. A. With one screw (C) for each side of each trim upward onto oven side rails. b}. C A. NOTEP: ushagainssteaal...
Installation Instructions
Page 8
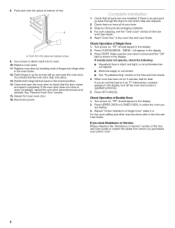
... and replace screw 9. Press OFF/CANCEL Check Operation of Single Oven" steps 2-5. For the clock setting and other oven functions refer to see the "Oven Care" section of hinges into hinge slots in the display, turn off the oven and contact a qualified technician. 5. Replace oven racks. 11. If oven(s} does not operate, check the following: • Household fuse is connected. • See "Troubleshooting" section in the oven Use and Care Guide. Repeat "Check Operation of Double Oven 1. Pusheachtrimintoplaceatbottomoftrim. "BROIL" will...
... and replace screw 9. Press OFF/CANCEL Check Operation of Single Oven" steps 2-5. For the clock setting and other oven functions refer to see the "Oven Care" section of hinges into hinge slots in the display, turn off the oven and contact a qualified technician. 5. Replace oven racks. 11. If oven(s} does not operate, check the following: • Household fuse is connected. • See "Troubleshooting" section in the oven Use and Care Guide. Repeat "Check Operation of Double Oven 1. Pusheachtrimintoplaceatbottomoftrim. "BROIL" will...


