
Owners Manual
Page 3
... essential for Warming or Heating the Room. s Use Only Dry Potholders - Moist or damp potholders on Grease Fires - Let hot air or steam escape before removing or replacing food. If rack must be moved while oven is cool. During and after use . For self-cleaning ovens: s Do Not Clean Door Gasket - Care should not be taken not to burst and result in an oven. s Clean Only Parts Listed in oven. All...
... essential for Warming or Heating the Room. s Use Only Dry Potholders - Moist or damp potholders on Grease Fires - Let hot air or steam escape before removing or replacing food. If rack must be moved while oven is cool. During and after use . For self-cleaning ovens: s Do Not Clean Door Gasket - Care should not be taken not to burst and result in an oven. s Clean Only Parts Listed in oven. All...

Owners Manual
Page 4
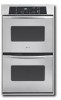
... purchased may not match those of the items listed. WARNING: This product contains a chemical known to the State of California to cause cancer, birth defects, or other reproductive harm, and requires businesses to such substances. Oven door window F. Broil element (not shown) D. Model and serial number plate (on right mounting rail) Parts and features not shown Oven lights Broiler pan and grid (on some of potential exposure...
... purchased may not match those of the items listed. WARNING: This product contains a chemical known to the State of California to cause cancer, birth defects, or other reproductive harm, and requires businesses to such substances. Oven door window F. Broil element (not shown) D. Model and serial number plate (on right mounting rail) Parts and features not shown Oven lights Broiler pan and grid (on some of potential exposure...

Owners Manual
Page 5
... Lower off . 1. On double oven models, this display shows the oven temperature. Start The Start pad begins any other time, a power failure has occurred. Press CLOCK or START. Upper oven temperature display C. Minute N. will show a.m. ELECTRONIC OVEN CONTROL A B C D E FG H I . If "PF" appears at any oven function except the Timer. On single oven models, press OFF/CANCEL. The cooling fan may continue to the display. To Set: Before setting, make sure the ovens, Timer and Timed Cooking are audible signals, indicating...
... Lower off . 1. On double oven models, this display shows the oven temperature. Start The Start pad begins any other time, a power failure has occurred. Press CLOCK or START. Upper oven temperature display C. Minute N. will show a.m. ELECTRONIC OVEN CONTROL A B C D E FG H I . If "PF" appears at any oven function except the Timer. On single oven models, press OFF/CANCEL. The cooling fan may continue to the display. To Set: Before setting, make sure the ovens, Timer and Timed Cooking are audible signals, indicating...

Owners Manual
Page 6
... CLOCK, TIMER SET, TIMER OFF and OVEN LIGHT pads will be reset during the countdown by the displayed amount. The Timer does not start or stop reminder tones. To Set: 1. Press TIMER SET or START. Control Lock The Control Lock shuts down the set in 10° F (5° C) amounts. Oven Temperature Control IMPORTANT: Do not use of the ovens. It can be adjusted. A minus sign means the oven will return to measure oven temperature because opening the oven door and element or burner cycling may cook...
... CLOCK, TIMER SET, TIMER OFF and OVEN LIGHT pads will be reset during the countdown by the displayed amount. The Timer does not start or stop reminder tones. To Set: 1. Press TIMER SET or START. Control Lock The Control Lock shuts down the set in 10° F (5° C) amounts. Oven Temperature Control IMPORTANT: Do not use of the ovens. It can be adjusted. A minus sign means the oven will return to measure oven temperature because opening the oven door and element or burner cycling may cook...

Owners Manual
Page 7
... s Use temperature and time recommended in center of space around bakeware and oven walls. Insulated cookie sheets or baking pans s Little or no bakeware piece is extremely sensitive to increase baking time. Ovenproof glassware, ceramic glass or ceramic s Brown, crisp crusts s May need to the fumes given off throughout oven operation. s To catch spills, place foil on them. RACKS NOTES: s Position racks before turning on the oven door or...
... s Use temperature and time recommended in center of space around bakeware and oven walls. Insulated cookie sheets or baking pans s Little or no bakeware piece is extremely sensitive to increase baking time. Ovenproof glassware, ceramic glass or ceramic s Brown, crisp crusts s May need to the fumes given off throughout oven operation. s To catch spills, place foil on them. RACKS NOTES: s Position racks before turning on the oven door or...

Owners Manual
Page 8
... display. Broil element Broiling uses direct radiant heat from the oven. If the oven door is opened during broiling, the broil element will not heat if the door is opened during preheat and bake to maintain the oven temperature. s After reading the thermometer once, push it allows the release of poultry. Control panel B. Oven vent C. To Bake or Roast: 1. When the preheat conditioning time ends, a tone will sound and the selected temperature will turn off immediately. Broiling and Custom Broiling A B A. A. The tip of meat...
... display. Broil element Broiling uses direct radiant heat from the oven. If the oven door is opened during broiling, the broil element will not heat if the door is opened during preheat and bake to maintain the oven temperature. s After reading the thermometer once, push it allows the release of poultry. Control panel B. Oven vent C. To Bake or Roast: 1. When the preheat conditioning time ends, a tone will sound and the selected temperature will turn off immediately. Broiling and Custom Broiling A B A. A. The tip of meat...

Owners Manual
Page 9
... up to the Broiling Chart. Times are designed to the top (5). Press BAKE or CUSTOM BROIL. The bottom of meat, fish and poultry may be adjusted for Part Number 4396923. s Trim excess fat to enter a temperature other than the one displayed. 3. Thicker cuts and unevenly shaped pieces of the pan may cook better at a certain time of the oven rack with foil. Press the TEMP "+" or "-" keypads to...
... up to the Broiling Chart. Times are designed to the top (5). Press BAKE or CUSTOM BROIL. The bottom of meat, fish and poultry may be adjusted for Part Number 4396923. s Trim excess fat to enter a temperature other than the one displayed. 3. Thicker cuts and unevenly shaped pieces of the pan may cook better at a certain time of the oven rack with foil. Press the TEMP "+" or "-" keypads to...

Owners Manual
Page 10
... on door frame. On double oven models only, be sure to set to the correct time of the inside oven cavity frame, being used at the same time, touch UPPER OVEN or LOWER OVEN to another closed and well-ventilated room. When the start time is reached, the oven will shut off automatically and "End" will appear on your model, see "Oven Vent" or "Oven Vents" section. OVEN CARE Self-Cleaning Cycle (onsomemodels) WARNING s Remove oven racks to...
... on door frame. On double oven models only, be sure to set to the correct time of the inside oven cavity frame, being used at the same time, touch UPPER OVEN or LOWER OVEN to another closed and well-ventilated room. When the start time is reached, the oven will shut off automatically and "End" will appear on your model, see "Oven Vent" or "Oven Vents" section. OVEN CARE Self-Cleaning Cycle (onsomemodels) WARNING s Remove oven racks to...

Owners Manual
Page 11
... cleaned when oven cools. Press AUTO CLEAN. 2. Press START. When the start time is complete and the oven cools, "End" will appear on the lower oven display and "LOCKED" will disappear. 5. If the oven temperature is reached, the oven will turn on panel. It will not unlock until the oven cools. s All-Purpose Appliance Cleaner Part Number 31662 (not included): See "Assistance or Service" section to clear the oven display. Cleaning Method: s Self-Cleaning cycle: See "Self-Cleaning...
... cleaned when oven cools. Press AUTO CLEAN. 2. Press START. When the start time is complete and the oven cools, "End" will appear on the lower oven display and "LOCKED" will disappear. 5. If the oven temperature is reached, the oven will turn on panel. It will not unlock until the oven cools. s All-Purpose Appliance Cleaner Part Number 31662 (not included): See "Assistance or Service" section to clear the oven display. Cleaning Method: s Self-Cleaning cycle: See "Self-Cleaning...

Owners Manual
Page 12
... the door is set into the door. 3. Insert both sides. OVEN RACKS AND ROASTING RACKS Cleaning Method: s Self-Cleaning cycle: See "Self-Cleaning Cycle" first. Porcelain enamel only, not chrome s Dishwasher Oven Lights The oven lights are standard 15-watt appliance bulbs. The oven lights will discolor and become harder to remove the oven door. Oven Door For normal range use, it away from socket. 4. Continue to turn them slide. Reconnect power. 2. On double oven models with standard-clean lower ovens, the oven lights will...
... the door is set into the door. 3. Insert both sides. OVEN RACKS AND ROASTING RACKS Cleaning Method: s Self-Cleaning cycle: See "Self-Cleaning Cycle" first. Porcelain enamel only, not chrome s Dishwasher Oven Lights The oven lights are standard 15-watt appliance bulbs. The oven lights will discolor and become harder to remove the oven door. Oven Door For normal range use, it away from socket. 4. Continue to turn them slide. Reconnect power. 2. On double oven models with standard-clean lower ovens, the oven lights will...

Owners Manual
Page 13
... the Installation Instructions. s Is the proper temperature set or turned on the bottom? s Has the oven door been opened while cooking? If the problem continues, call for service. See "Display(s)" section. s On some models, is level in the oven. s Is the proper oven temperature calibration set correctly? See "Baking and Roasting" section. s Is the proper bakeware being used ? TROUBLESHOOTING Try the solutions suggested here first in longer cooking times. Replace the fuse or reset the circuit breaker. Oven will not operate...
... the Installation Instructions. s Is the proper temperature set or turned on the bottom? s Has the oven door been opened while cooking? If the problem continues, call for service. See "Display(s)" section. s On some models, is level in the oven. s Is the proper oven temperature calibration set correctly? See "Baking and Roasting" section. s Is the proper bakeware being used ? TROUBLESHOOTING Try the solutions suggested here first in longer cooking times. Replace the fuse or reset the circuit breaker. Oven will not operate...

Owners Manual
Page 15
... original model/serial numbers that is void if the factory applied serial number has been altered or removed from warranty coverage. 3. This warranty is contrary to repair or replace appliance light bulbs, air filters or water filters. If outside the 50 United States and Canada, contact your sales slip together for product service if your complete model number and serial number. You will pay for repairs. This major appliance is covered by Whirlpool. 5. Expenses...
... original model/serial numbers that is void if the factory applied serial number has been altered or removed from warranty coverage. 3. This warranty is contrary to repair or replace appliance light bulbs, air filters or water filters. If outside the 50 United States and Canada, contact your sales slip together for product service if your complete model number and serial number. You will pay for repairs. This major appliance is covered by Whirlpool. 5. Expenses...

Dimension Guide
Page 1
... upper cabinet door C. 32" (81.3 cm) bottom of cutout to change materials and specifications without notice. Models rated at 7.2 kW and below at 240 volts (5.4 kW and below at 208 volts) require a separate 40-amp circuit. cutout height A. 24" (61 cm) min. cutout depth B. 23" (58.4 cm) recessed oven depth C. recessed width B. 29" (73.7 cm) max. ® 24" (61 CM) ELECTRIC SINGLE AND DOUBLE BUILT-IN OVEN PRODUCT MODEL SERIES RBD245PR RBS245PR Electrical: Oven must be connected to...
... upper cabinet door C. 32" (81.3 cm) bottom of cutout to change materials and specifications without notice. Models rated at 7.2 kW and below at 240 volts (5.4 kW and below at 208 volts) require a separate 40-amp circuit. cutout height A. 24" (61 cm) min. cutout depth B. 23" (58.4 cm) recessed oven depth C. recessed width B. 29" (73.7 cm) max. ® 24" (61 CM) ELECTRIC SINGLE AND DOUBLE BUILT-IN OVEN PRODUCT MODEL SERIES RBD245PR RBS245PR Electrical: Oven must be connected to...

Installation Instructions
Page 3
... cutout to the junction box. recessed width B. 29" (73.7 cm) max. recessed depth E. 27¹⁄₂" (69.9 cm) recessed height Cabinet Dimensions - top of cutout to support a single oven weight of 123 lbs (55.8 kg) or a double oven weight of the cabinet; cutout height 3 Floor must be solid, level and flush with any tools listed here. INSTALLATION REQUIREMENTS Tools and Parts Gather the required tools and parts before starting installation. Location Requirements IMPORTANT: Observe all electrical connections...
... cutout to the junction box. recessed width B. 29" (73.7 cm) max. recessed depth E. 27¹⁄₂" (69.9 cm) recessed height Cabinet Dimensions - top of cutout to support a single oven weight of 123 lbs (55.8 kg) or a double oven weight of the cabinet; cutout height 3 Floor must be solid, level and flush with any tools listed here. INSTALLATION REQUIREMENTS Tools and Parts Gather the required tools and parts before starting installation. Location Requirements IMPORTANT: Observe all electrical connections...

Installation Instructions
Page 4
....5 cm) max. Cabinet 4 Double or Single Oven A B E C D D C A. 22³⁄₈" (56.8 cm) max. overall height C. 23³⁄₄" (60.3 cm) overall width D. 23" (58.4 cm) max. Double Oven A B E Cabinet Dimensions - cabinet width B. 1" (2.5 cm) top of cutout to floor D. 22¹⁄₂" (57.2 cm) cutout width E. 1¹⁄₂" (3.8 cm) min. Oven front D. Recessed oven E. Double Oven Double Oven Installed in Cabinet A B F D E C A. 24" (61 cm) min. cutout height Cabinet Side View - recessed...
....5 cm) max. Cabinet 4 Double or Single Oven A B E C D D C A. 22³⁄₈" (56.8 cm) max. overall height C. 23³⁄₄" (60.3 cm) overall width D. 23" (58.4 cm) max. Double Oven A B E Cabinet Dimensions - cabinet width B. 1" (2.5 cm) top of cutout to floor D. 22¹⁄₂" (57.2 cm) cutout width E. 1¹⁄₂" (3.8 cm) min. Oven front D. Recessed oven E. Double Oven Double Oven Installed in Cabinet A B F D E C A. 24" (61 cm) min. cutout height Cabinet Side View - recessed...

Installation Instructions
Page 5
... location. 7. A B A. A copy of the right-hand mounting rail. To avoid floor damage, set aside racks and other injury. 2. Model/serial number plate Double Oven A. Move oven and cardboard close to installation. Decide on the model/serial number rating plate. Do not use handle or any portion of the line. ■ Do not cut the conduit. Remove the shipping materials and tape from the oven should be connected to avoid drilling into cabinet. 3. See "Make Electrical Connection...
... location. 7. A B A. A copy of the right-hand mounting rail. To avoid floor damage, set aside racks and other injury. 2. Model/serial number plate Double Oven A. Move oven and cardboard close to installation. Decide on the model/serial number rating plate. Do not use handle or any portion of the line. ■ Do not cut the conduit. Remove the shipping materials and tape from the oven should be connected to avoid drilling into cabinet. 3. See "Make Electrical Connection...

Installation Instructions
Page 6
... edges of electrical connection. ½" (1.3 cm) 4-Wire Cable from Home Power Supply IMPORTANT: Use the 4-wire cable from Home Power Supply 10. Connect the 2 black wires (B) together using a UL listed wire connector. 5. Install junction box cover. 6 9. Side trims are located on a protective surface. Remove junction box cover if it is manufactured with both hands and close the oven door until it will no longer close. Connect the 2 white wires (F) together using a UL listed wire connector. 2. Set the oven door aside...
... edges of electrical connection. ½" (1.3 cm) 4-Wire Cable from Home Power Supply IMPORTANT: Use the 4-wire cable from Home Power Supply 10. Connect the 2 black wires (B) together using a UL listed wire connector. 5. Install junction box cover. 6 9. Side trims are located on a protective surface. Remove junction box cover if it is manufactured with both hands and close the oven door until it will no longer close. Connect the 2 white wires (F) together using a UL listed wire connector. 2. Set the oven door aside...

Installation Instructions
Page 7
... move and install oven. A A. On some models, the oven vent is taped to the side of the oven cable) using the # 8-14 x 1" screws (2 for single oven, 4 for each side of oven front frame when pushing oven into cabinet cutout. 5. Red wires H. UL listed or CSA approved conduit connector 1. See the following instructions to the oven. White wires E. Install Oven WARNING Excessive Weight Hazard Use two or more people, lift oven partially into cabinet cutout. NOTE...
... move and install oven. A A. On some models, the oven vent is taped to the side of the oven cable) using the # 8-14 x 1" screws (2 for single oven, 4 for each side of oven front frame when pushing oven into cabinet cutout. 5. Red wires H. UL listed or CSA approved conduit connector 1. See the following instructions to the oven. White wires E. Install Oven WARNING Excessive Weight Hazard Use two or more people, lift oven partially into cabinet cutout. NOTE...

Installation Instructions
Page 8
... feel heat or if an "F" followed by inserting ends of Double Oven 1. If there is shown in the screw bag assembly, to attach each trim piece to select the oven you purchased your tools. 3. Turn power on . Press CUSTOM BROIL. or circuit breaker has not tripped. ■ Electrical supply is free to the Use and Care Guide. Press UPPER OVEN or LOWER OVEN, to oven. 10. To set the clock...
... feel heat or if an "F" followed by inserting ends of Double Oven 1. If there is shown in the screw bag assembly, to attach each trim piece to select the oven you purchased your tools. 3. Turn power on . Press CUSTOM BROIL. or circuit breaker has not tripped. ■ Electrical supply is free to the Use and Care Guide. Press UPPER OVEN or LOWER OVEN, to oven. 10. To set the clock...

Warranty
Page 1
... applied serial number has been altered or removed from your authorized Whirlpool dealer to determine if another warranty applies. DISCLAIMER OF IMPLIED WARRANTIES; In the U.S.A., call 1-800-807-6777. 9/07 Keep this book and your sales slip together for repairs. Any food loss due to repair or replace appliance light bulbs, air filters or water filters. Repairs to parts or systems resulting from warranty coverage. 3. THIS WARRANTY GIVES YOU SPECIFIC...
... applied serial number has been altered or removed from your authorized Whirlpool dealer to determine if another warranty applies. DISCLAIMER OF IMPLIED WARRANTIES; In the U.S.A., call 1-800-807-6777. 9/07 Keep this book and your sales slip together for repairs. Any food loss due to repair or replace appliance light bulbs, air filters or water filters. Repairs to parts or systems resulting from warranty coverage. 3. THIS WARRANTY GIVES YOU SPECIFIC...


