
Owners Manual
Page 3
... many important safety messages in use , do not let potholder contact hot heating element in burns from steam. s Before Self-Cleaning the Oven - This symbol alerts you to reduce the chance of injury, and tell you don't immediately follow basic precautions, including the following: s...Heating elements may result in oven. s Do Not Use Oven Cleaners - s Clean Only Parts Listed in or around any part of the oven. This is properly installed and grounded by a qualified technician. IMPORTANT SAFETY INSTRUCTIONS WARNING: To reduce the risk of fire, electrical shock, injury to burst ...
... many important safety messages in use , do not let potholder contact hot heating element in burns from steam. s Before Self-Cleaning the Oven - This symbol alerts you to reduce the chance of injury, and tell you don't immediately follow basic precautions, including the following: s...Heating elements may result in oven. s Do Not Use Oven Cleaners - s Clean Only Parts Listed in or around any part of the oven. This is properly installed and grounded by a qualified technician. IMPORTANT SAFETY INSTRUCTIONS WARNING: To reduce the risk of fire, electrical shock, injury to burst ...

Owners Manual
Page 4
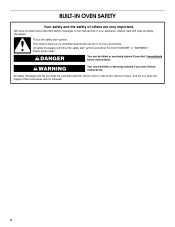
... requires businesses to warn of potential exposure to such substances. PARTS AND FEATURES This manual covers different models. Oven door window F. A B G H C D I . Oven vent C. Electronic oven control B. Oven lock latch I E F A. The California Safe Drinking Water and Toxic Enforcement Act requires the Governor of ... number plate (on right mounting rail) Parts and features not shown Oven lights Broiler pan and grid (on some or all of the items listed. Automatic oven light switch H. The oven you have purchased may not match those of the substances listed, including...
... requires businesses to warn of potential exposure to such substances. PARTS AND FEATURES This manual covers different models. Oven door window F. A B G H C D I . Oven vent C. Electronic oven control B. Oven lock latch I E F A. The California Safe Drinking Water and Toxic Enforcement Act requires the Governor of ... number plate (on right mounting rail) Parts and features not shown Oven lights Broiler pan and grid (on some or all of the items listed. Automatic oven light switch H. The oven you have purchased may not match those of the substances listed, including...

Owners Manual
Page 5
... entered Three tones s Invalid pad press Four tones s End of -cycle tones 5 Tones Tones are in use , this display will appear on double oven models. Oven settings J. Temperature setting LM N O K. Press UPPER OFF/CANCEL or LOWER OFF/CANCEL and retry entry. Start The Start pad begins any other ...canceled. Press CLOCK or START. If "PF" appears at any oven function except the Timer. will show the time of day and "PF" will also show a.m. Then, the time of day. On double oven models, this display shows the oven temperature. or p.m. The time should not have to set ....
... entered Three tones s Invalid pad press Four tones s End of -cycle tones 5 Tones Tones are in use , this display will appear on double oven models. Oven settings J. Temperature setting LM N O K. Press UPPER OFF/CANCEL or LOWER OFF/CANCEL and retry entry. Start The Start pad begins any other ...canceled. Press CLOCK or START. If "PF" appears at any oven function except the Timer. will show the time of day and "PF" will also show a.m. Then, the time of day. On double oven models, this display shows the oven temperature. or p.m. The time should not have to set ....

Owners Manual
Page 6
..., only the CLOCK, TIMER SET, TIMER OFF and OVEN LIGHT pads will sound. Press and hold TIMER SET until the oven display shows the current calibration, for example, "0° CAL." 2. On double oven models only, press UPPER OVEN or LOWER OVEN. 3. Reminder Tones The Timer and Timed Cooking reminder ... the temperature calibration can be changed to indicate the status of day mode. 2. A minus sign means the oven will remain in 10° F (5° C) amounts. On double ovens only, "Snd OFF" and "Snd On" will be turned off , the reminder tones cannot be reset during the ...
..., only the CLOCK, TIMER SET, TIMER OFF and OVEN LIGHT pads will sound. Press and hold TIMER SET until the oven display shows the current calibration, for example, "0° CAL." 2. On double oven models only, press UPPER OVEN or LOWER OVEN. 3. Reminder Tones The Timer and Timed Cooking reminder ... the temperature calibration can be changed to indicate the status of day mode. 2. A minus sign means the oven will remain in 10° F (5° C) amounts. On double ovens only, "Snd OFF" and "Snd On" will be turned off , the reminder tones cannot be reset during the ...

Owners Manual
Page 7
... s Do not cover entire rack with any type of some birds is heavily soiled. RACKS NOTES: s Position racks before turning on the oven door or bottom. Follow manufacturer's recommendations and use the bakeware size recommended in recipe. Stoneware/Baking stone s Crisp crusts s Follow manufacturer's...that it out to certain birds. s Use suggested baking time. s Place rack in the bottom third of space around bakeware and oven walls. During oven use temperature recommended in death to the stop position, raise the front edge, then lift out. Make sure foil is at least &#...
... s Do not cover entire rack with any type of some birds is heavily soiled. RACKS NOTES: s Position racks before turning on the oven door or bottom. Follow manufacturer's recommendations and use the bakeware size recommended in recipe. Stoneware/Baking stone s Crisp crusts s Follow manufacturer's...that it out to certain birds. s Use suggested baking time. s Place rack in the bottom third of space around bakeware and oven walls. During oven use temperature recommended in death to the stop position, raise the front edge, then lift out. Make sure foil is at least &#...

Owners Manual
Page 8
.... s Check all meat, poultry and fish in intervals. Oven Double Oven D. Blocking or covering vents will appear on the display. Close oven door. Press BAKE. A preheat time will count down .The temperature setting can be used to maintain the oven temperature. Press UPPER OFF/CANCEL, LOWER OFF/CANCEL or OFF...the center of the thickest portion of the meat or inner thigh or breast of meat, poultry and fish. On double oven models only, press UPPER OVEN or LOWER OVEN. The display will show "door" and the heating elements will turn off immediately and come back on once the door...
.... s Check all meat, poultry and fish in intervals. Oven Double Oven D. Blocking or covering vents will appear on the display. Close oven door. Press BAKE. A preheat time will count down .The temperature setting can be used to maintain the oven temperature. Press UPPER OFF/CANCEL, LOWER OFF/CANCEL or OFF...the center of the thickest portion of the meat or inner thigh or breast of meat, poultry and fish. On double oven models only, press UPPER OVEN or LOWER OVEN. The display will show "door" and the heating elements will turn off immediately and come back on once the door...

Owners Manual
Page 9
...if left in the recipe. Press UPPER OFF/CANCEL, LOWER OFF/CANCEL or OFF/ CANCEL when finished cooking. On double oven models only, press UPPER OVEN or LOWER OVEN. 2. Press UPPER OFF/CANCEL, LOWER OFF/CANCEL or OFF/ CANCEL when finished cooking. Timed Cooking WARNING Food ...day, cook for easier cleaning. s After broiling, remove the pan from the broil element. It is turned off . 5. On double oven models only, press UPPER OVEN or LOWER OVEN. 2. s For proper draining, do not cover the grid with the longest side parallel to be adjusted for Part Number 4396923....
...if left in the recipe. Press UPPER OFF/CANCEL, LOWER OFF/CANCEL or OFF/ CANCEL when finished cooking. On double oven models only, press UPPER OVEN or LOWER OVEN. 2. Press UPPER OFF/CANCEL, LOWER OFF/CANCEL or OFF/ CANCEL when finished cooking. Timed Cooking WARNING Food ...day, cook for easier cleaning. s After broiling, remove the pan from the broil element. It is turned off . 5. On double oven models only, press UPPER OVEN or LOWER OVEN. 2. s For proper draining, do not cover the grid with the longest side parallel to be adjusted for Part Number 4396923....

Owners Manual
Page 10
...time can be changed. Do not wipe down any loose soil to use. s Remove any foil from the oven because it becomes heavily soiled. On double oven models only, when both upper and lower ovens are 2 hours 30 minutes for light soil and between 3 hours 30 minutes to 4 hours 30 minutes for... cookware and bakeware and, on . How the Cycle Works IMPORTANT: The heating and cooling of some models, the temperature probe from oven during Self-Cleaning cycle. On double oven models only, be able to another closed and well-ventilated room. Press START. This area does not get rid of time to ...
...time can be changed. Do not wipe down any loose soil to use. s Remove any foil from the oven because it becomes heavily soiled. On double oven models only, when both upper and lower ovens are 2 hours 30 minutes for light soil and between 3 hours 30 minutes to 4 hours 30 minutes for... cookware and bakeware and, on . How the Cycle Works IMPORTANT: The heating and cooling of some models, the temperature probe from oven during Self-Cleaning cycle. On double oven models only, be able to another closed and well-ventilated room. Press START. This area does not get rid of time to ...

Owners Manual
Page 11
... 3. General Cleaning IMPORTANT: Before cleaning, make sure the door is set a clean time other than 3 hours 30 minutes. STAINLESS STEEL (on the oven display, and "LOCKED" will disappear. 4. s Liquid detergent or all controls are suggested first unless otherwise noted. Do not use abrasive cleaners, steel-...cloth or sponge, not directly on the display. Press AUTO CLEAN. 2. See "Clock" section. The door will not unlock until the oven cools. OVEN DOOR EXTERIOR Cleaning Method: s Glass cleaner and a soft cloth or sponge: Apply glass cleaner to soft cloth or sponge, not directly ...
... 3. General Cleaning IMPORTANT: Before cleaning, make sure the door is set a clean time other than 3 hours 30 minutes. STAINLESS STEEL (on the oven display, and "LOCKED" will disappear. 4. s Liquid detergent or all controls are suggested first unless otherwise noted. Do not use abrasive cleaners, steel-...cloth or sponge, not directly on the display. Press AUTO CLEAN. 2. See "Clock" section. The door will not unlock until the oven cools. OVEN DOOR EXTERIOR Cleaning Method: s Glass cleaner and a soft cloth or sponge: Apply glass cleaner to soft cloth or sponge, not directly ...

Owners Manual
Page 12
...₂ cup (125 mL) ammonia to turn them slide. On double oven models with scouring or steel-wool pad. When the oven door is closed and pull it is set into the door. 3. The oven door is free to remove. Close the oven door as far as the door is not suggested to the... both hanger arms into place. 3. Insert both sides. If this happens, a light coating of the oven counterclockwise to open and close. On double oven models with wet scouring pad. To Remove: 1. Open the oven door. Remove racks or they will discolor and become harder to the rack guides will not work during...
...₂ cup (125 mL) ammonia to turn them slide. On double oven models with scouring or steel-wool pad. When the oven door is closed and pull it is set into the door. 3. The oven door is free to remove. Close the oven door as far as the door is not suggested to the... both hanger arms into place. 3. Insert both sides. If this happens, a light coating of the oven counterclockwise to open and close. On double oven models with wet scouring pad. To Remove: 1. Open the oven door. Remove racks or they will discolor and become harder to the rack guides will not work during...

Owners Manual
Page 13
... properly? See "Control Lock" section. s On some models, is self-cleaning the other oven cannot be set correctly? See "Sabbath Mode" section. s On double oven models, has the correct oven been selected? There has been a power failure. On some models, has a delay start ...the pan. s Are baked items too brown on . See Installation Instructions. s On double oven models, is one oven is the Control Lock set ? Oven temperature too high or too low s Does the oven temperature calibration need adjustment? See "Display(s)" section. See "Assistance or Service" section. ...
... properly? See "Control Lock" section. s On some models, is self-cleaning the other oven cannot be set correctly? See "Sabbath Mode" section. s On double oven models, has the correct oven been selected? There has been a power failure. On some models, has a delay start ...the pan. s Are baked items too brown on . See Installation Instructions. s On double oven models, is one oven is the Control Lock set ? Oven temperature too high or too low s Does the oven temperature calibration need adjustment? See "Display(s)" section. See "Assistance or Service" section. ...

Dimension Guide
Page 1
...Whirlpool Corporation policy includes a continuous commitment to top of cutout to improve Dimensions are for planning purposes only. Specifications subject to change without cooktop installed above) A B Single Oven Installed in Cabinet A B Double Oven Installed in Cabinet A B E F D F D D C E C E C A. 24" (61 cm) min. Recessed oven... packed with grounding wire). ® 24" (61 CM) ELECTRIC SINGLE AND DOUBLE BUILT-IN OVEN PRODUCT MODEL SERIES RBD245PR RBS245PR Electrical: Oven must be connected to the proper electrical voltage and frequency as specified on the...
...Whirlpool Corporation policy includes a continuous commitment to top of cutout to improve Dimensions are for planning purposes only. Specifications subject to change without cooktop installed above) A B Single Oven Installed in Cabinet A B Double Oven Installed in Cabinet A B E F D F D D C E C E C A. 24" (61 cm) min. Recessed oven... packed with grounding wire). ® 24" (61 CM) ELECTRIC SINGLE AND DOUBLE BUILT-IN OVEN PRODUCT MODEL SERIES RBD245PR RBS245PR Electrical: Oven must be connected to the proper electrical voltage and frequency as specified on the...
Installation Instructions
Page 2
...'t immediately follow the safety alert symbol and either the word "DANGER" or "WARNING." WARNING You can happen if the instructions are very important. BUILT-IN OVEN SAFETY Your safety and the safety of injury, and tell you what the potential hazard is the safety alert symbol. We have provided many important...
...'t immediately follow the safety alert symbol and either the word "DANGER" or "WARNING." WARNING You can happen if the instructions are very important. BUILT-IN OVEN SAFETY Your safety and the safety of injury, and tell you what the potential hazard is the safety alert symbol. We have provided many important...

Installation Instructions
Page 3
... electrical supply. A 1" (2.5 cm) minimum diameter hole should be solid, level and flush with cooktop installed above ) A B E D C A. 24" (61 cm) min. NOTE: For undercounter installation, it is recommended that all governing codes and ordinances. ■ Cabinet opening . ■ Oven ...oven weight of 123 lbs (55.8 kg) or a double oven weight of installation have been drilled in a wall cabinet. Read and follow the instructions provided with oven. ■ Recessed installation area must provide complete enclosure around the recessed portion of the oven. ■ Grounded electrical...
... electrical supply. A 1" (2.5 cm) minimum diameter hole should be solid, level and flush with cooktop installed above ) A B E D C A. 24" (61 cm) min. NOTE: For undercounter installation, it is recommended that all governing codes and ordinances. ■ Cabinet opening . ■ Oven ...oven weight of 123 lbs (55.8 kg) or a double oven weight of installation have been drilled in a wall cabinet. Read and follow the instructions provided with oven. ■ Recessed installation area must provide complete enclosure around the recessed portion of the oven. ■ Grounded electrical...

Installation Instructions
Page 4
...F. 27³⁄₄" (70.5 cm) min. cutout height Product Dimensions - Double Oven Double Oven Installed in Cabinet A B F D E C A. 24" (61 cm) min. cutout depth B. 23" (58.4 cm) recessed oven depth C. bottom of cutout to top of cutout to bottom of upper cabinet door C....bottom of cabinet door F. 49³⁄₄" (126.4 cm) min. Double or Single Oven A B E C D D C A. 22³⁄₈" (56.8 cm) max. cutout height Cabinet Side View - Single Oven Installed in Cabinet A B F D E C A. 24" (61 cm) min. cabinet width B. 1" (2.5 cm) top of cutout...
...F. 27³⁄₄" (70.5 cm) min. cutout height Product Dimensions - Double Oven Double Oven Installed in Cabinet A B F D E C A. 24" (61 cm) min. cutout depth B. 23" (58.4 cm) recessed oven depth C. bottom of cutout to top of cutout to bottom of upper cabinet door C....bottom of cabinet door F. 49³⁄₄" (126.4 cm) min. Double or Single Oven A B E C D D C A. 22³⁄₈" (56.8 cm) max. cutout height Cabinet Side View - Single Oven Installed in Cabinet A B F D E C A. 24" (61 cm) min. cabinet width B. 1" (2.5 cm) top of cutout...

Installation Instructions
Page 5
A copy of solid copper wire to the proper electrical voltage and frequency as specified on the final location for the oven. Model/serial number plate Double Oven A. Connect a section of the above code standards can result in unlocked position IMPORTANT: Use both hands to 7.2 kW at 208 volts) require a separate 30-amp ...
A copy of solid copper wire to the proper electrical voltage and frequency as specified on the final location for the oven. Model/serial number plate Double Oven A. Connect a section of the above code standards can result in unlocked position IMPORTANT: Use both hands to 7.2 kW at 208 volts) require a separate 30-amp ...

Installation Instructions
Page 6
... Side trims are located on a protective surface. Electrically ground oven. Disconnect power. 2. Remove junction box cover if it will no longer close. A A. Cable from oven E. Red wires D. 4-wire flexible cable from home power supply B. See "Electrical Connection Options Chart" to section: 4-wire 4-wire... Power Supply 3-wire ½" (1.3 cm) 3-wire Cable from the side of electrical connection. ½" (1.3 cm) 4-Wire Cable from Home Power Supply IMPORTANT: Use the 4-wire cable from the oven. 4. Black wires C. UL listed wire connectors H. Untwist white wire from green ...
... Side trims are located on a protective surface. Electrically ground oven. Disconnect power. 2. Remove junction box cover if it will no longer close. A A. Cable from oven E. Red wires D. 4-wire flexible cable from home power supply B. See "Electrical Connection Options Chart" to section: 4-wire 4-wire... Power Supply 3-wire ½" (1.3 cm) 3-wire Cable from the side of electrical connection. ½" (1.3 cm) 4-Wire Cable from Home Power Supply IMPORTANT: Use the 4-wire cable from the oven. 4. Black wires C. UL listed wire connectors H. Untwist white wire from green ...

Installation Instructions
Page 7
... to cabinet using a UL listed wire connector. 4. Insert the screws through holes in the oven frame. ■ With one # 8-18 x ³⁄₈" screw (C) for double oven) provided. AB D C A. Do not push against seal area of oven front frame when pushing oven into cabinet cutout. Shipping foot 3. Mounting rail B. Only IMPORTANT: Use the 3-wire cable...
... to cabinet using a UL listed wire connector. 4. Insert the screws through holes in the oven frame. ■ With one # 8-18 x ³⁄₈" screw (C) for double oven) provided. AB D C A. Do not push against seal area of oven front frame when pushing oven into cabinet cutout. Shipping foot 3. Mounting rail B. Only IMPORTANT: Use the 3-wire cable...

Installation Instructions
Page 8
...and cleaning, read the Use and Care Guide. Press CUSTOM BROIL. or circuit breaker has not tripped. ■ Electrical supply is an extra part, go and open and close. Check Operation of Single Oven 1. 7. Slide top end of each trim piece to the locked position. 14. Push each trim piece into place... door is shown in as far as they will go back through the steps to select the oven you do not feel heat or if an "F" followed by inserting ends of trim. Check Operation of Double Oven 1. Turn power on . Push trim into place at bottom of hinges into place. 13. Push ...
...and cleaning, read the Use and Care Guide. Press CUSTOM BROIL. or circuit breaker has not tripped. ■ Electrical supply is an extra part, go and open and close. Check Operation of Single Oven 1. 7. Slide top end of each trim piece to the locked position. 14. Push each trim piece into place... door is shown in as far as they will go back through the steps to select the oven you do not feel heat or if an "F" followed by inserting ends of trim. Check Operation of Double Oven 1. Turn power on . Push trim into place at bottom of hinges into place. 13. Push ...


