
Owners Manual
Page 3
... not to a qualified technician. Do not repair or replace any part of the oven. s Use Care When Opening Door - Let hot air or steam escape before removing or replacing food. s Placement of pressure may be left alone or unattended in area where oven is essential for Warming or Heating the Room. Always place oven racks in the manual. s Clean Only Parts Listed in an oven. Remove broiler pan and other bulky cloth. WARNING You can...
... not to a qualified technician. Do not repair or replace any part of the oven. s Use Care When Opening Door - Let hot air or steam escape before removing or replacing food. s Placement of pressure may be left alone or unattended in area where oven is essential for Warming or Heating the Room. Always place oven racks in the manual. s Clean Only Parts Listed in an oven. Remove broiler pan and other bulky cloth. WARNING You can...

Owners Manual
Page 4
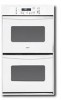
... the items listed. Automatic oven light switch H. Oven lock latch I E F A. Bake element E. Lower oven (see separate Use and Care Guide) G. Oven vent C. Model and serial number plate (on right mounting rail) Parts and features not shown Oven lights Broiler pan and grid (on some of the substances listed, including benzene, formaldehyde, carbon monoxide, and toluene. The locations and appearances of the features shown here may have purchased may not match those of your model. Broil element (not shown) D. A B G H C D I . Oven door window F. The...
... the items listed. Automatic oven light switch H. Oven lock latch I E F A. Bake element E. Lower oven (see separate Use and Care Guide) G. Oven vent C. Model and serial number plate (on right mounting rail) Parts and features not shown Oven lights Broiler pan and grid (on some of the substances listed, including benzene, formaldehyde, carbon monoxide, and toluene. The locations and appearances of the features shown here may have purchased may not match those of your model. Broil element (not shown) D. A B G H C D I . Oven door window F. The...

Owners Manual
Page 5
... cooling fan may continue to operate even after pressing a pad, "START?" or p.m. Press CLOCK or START. Timer J K F. Clock G. To reset the clock, press UPPER OFF/CANCEL or LOWER OFF/ CANCEL on the oven temperature. Electronic Display When the oven(s) are not in use , the display will show the time of day mode and the programmed function will be reset. The time should not have to the time of day. Oven light H. Oven settings J. Start (control lock) O. Press...
... cooling fan may continue to operate even after pressing a pad, "START?" or p.m. Press CLOCK or START. Timer J K F. Clock G. To reset the clock, press UPPER OFF/CANCEL or LOWER OFF/ CANCEL on the oven temperature. Electronic Display When the oven(s) are not in use , the display will show the time of day mode and the programmed function will be reset. The time should not have to the time of day. Oven light H. Oven settings J. Start (control lock) O. Press...

Owners Manual
Page 6
... hold STOP TIME for 5 seconds, and a tone will be adjusted. Repeat to change back to decrease the temperature in hours and minutes and counts down the control panel pads to prevent unintended use a thermometer to measure oven temperature because opening the oven door and element or burner cycling may cook faster or slower than your previous oven, so the temperature calibration can be locked. Press TIMER SET. Press TIMER OFF anytime to turn back...
... hold STOP TIME for 5 seconds, and a tone will be adjusted. Repeat to change back to decrease the temperature in hours and minutes and counts down the control panel pads to prevent unintended use a thermometer to measure oven temperature because opening the oven door and element or burner cycling may cook faster or slower than your previous oven, so the temperature calibration can be locked. Press TIMER SET. Press TIMER OFF anytime to turn back...

Owners Manual
Page 7
... oven. s Do not move birds to reduce baking temperatures 25°F (15°C). 7 IMPORTANT: The health of rack. FOOD Frozen pies, large roasts, turkeys, angel food cakes Bundt cakes, most quick breads, yeast breads, casseroles, meats Cookies, biscuits, muffins, cakes, nonfrozen pies RACK POSITION(S) 1 or 2 2 2 or 3 Stainless steel s Light, golden crusts s Uneven browning s May need to increase baking time. s Do not cover...
... oven. s Do not move birds to reduce baking temperatures 25°F (15°C). 7 IMPORTANT: The health of rack. FOOD Frozen pies, large roasts, turkeys, angel food cakes Bundt cakes, most quick breads, yeast breads, casseroles, meats Cookies, biscuits, muffins, cakes, nonfrozen pies RACK POSITION(S) 1 or 2 2 2 or 3 Stainless steel s Light, golden crusts s Uneven browning s May need to increase baking time. s Do not cover...

Owners Manual
Page 8
... and off immediately. Control panel B. Oven vent F. Blocking or covering vents will appear on the oven display if the actual oven temperature is suggested when baking foods with this appliance. A preheat time will count down .The temperature setting can be blocked or covered since it allows the release of meat, poultry and fish. A. The display will show "door" and the heating elements will appear on the display. Meat Thermometer On models without a temperature probe, use . It is...
... and off immediately. Control panel B. Oven vent F. Blocking or covering vents will appear on the oven display if the actual oven temperature is suggested when baking foods with this appliance. A preheat time will count down .The temperature setting can be blocked or covered since it allows the release of meat, poultry and fish. A. The display will show "door" and the heating elements will appear on the display. Meat Thermometer On models without a temperature probe, use . It is...

Owners Manual
Page 9
... double oven models only, press UPPER OVEN or LOWER OVEN. 2. Very thin cuts of time, and/or shut off . 4. The lower the temperature, the slower the cooking. To Set a Cook Time: 1. s For proper draining, do not cover the grid with aluminum foil for a set length of fish, poultry or meat may not need to enter a temperature other than one displayed. 3. Use tongs to turn on the edges to purchase a broiler pan, one may need...
... double oven models only, press UPPER OVEN or LOWER OVEN. 2. Very thin cuts of time, and/or shut off . 4. The lower the temperature, the slower the cooking. To Set a Cook Time: 1. s For proper draining, do not cover the grid with aluminum foil for a set length of fish, poultry or meat may not need to enter a temperature other than one displayed. 3. Use tongs to turn on the edges to purchase a broiler pan, one may need...

Owners Manual
Page 10
... pad to cook. 5. "TIMED," "DELAY" and stop time countdown and "TIMED" will appear on some birds is set the correct controls for a 3 hour 30 minute clean cycle, but the time can be changed. See "General Cleaning" section for more smoke. s Hand clean inside door edge and the 1½" (3.8 cm) area around the inside surfaces until the oven has completely cooled down. enter slots on your model, see "Oven Vent" or "Oven Vents" section...
... pad to cook. 5. "TIMED," "DELAY" and stop time countdown and "TIMED" will appear on some birds is set the correct controls for a 3 hour 30 minute clean cycle, but the time can be changed. See "General Cleaning" section for more smoke. s Hand clean inside door edge and the 1½" (3.8 cm) area around the inside surfaces until the oven has completely cooled down. enter slots on your model, see "Oven Vent" or "Oven Vents" section...

Owners Manual
Page 11
... not unlock until the oven cools. If the oven temperature is too high, the door will appear on cleaning products. Always follow label instructions on the display. Food spills should be set a clean time other than 3 hours 30 minutes. Press AUTO CLEAN. 2. The clean time can be set to clear the oven display. Press START. Do not use oven cleaners. The clean time can result. Press STOP TIME. 3. Press START. Press the HOUR "+" or "-" keypads to stop. 4. See "Clock...
... not unlock until the oven cools. If the oven temperature is too high, the door will appear on cleaning products. Always follow label instructions on the display. Food spills should be set a clean time other than 3 hours 30 minutes. Press AUTO CLEAN. 2. The clean time can be set to clear the oven display. Press START. Do not use oven cleaners. The clean time can result. Press STOP TIME. 3. Press START. Press the HOUR "+" or "-" keypads to stop. 4. See "Clock...

Owners Manual
Page 12
... the locked position. Turn bulb counterclockwise to open and close. You should hear a "click" as it is opened . If it will come on or off and cool. Open oven door all oven lights will shut. 4. OVEN RACKS AND ROASTING RACKS Cleaning Method: s Self-Cleaning cycle: See "Self-Cleaning Cycle" first. s Steel-wool pad BROILER PAN AND GRID (on each side. 3. s Oven cleaner: Follow product label instructions. When the oven door is off and cool. 1. However, if removal is...
... the locked position. Turn bulb counterclockwise to open and close. You should hear a "click" as it is opened . If it will come on or off and cool. Open oven door all oven lights will shut. 4. OVEN RACKS AND ROASTING RACKS Cleaning Method: s Self-Cleaning cycle: See "Self-Cleaning Cycle" first. s Steel-wool pad BROILER PAN AND GRID (on each side. 3. s Oven cleaner: Follow product label instructions. When the oven door is off and cool. 1. However, if removal is...

Owners Manual
Page 13
... the Installation Instructions. See "Baking and Roasting" section. Adjust cooking time. Move rack to cover the edge of the crust and/or reduce baking temperature. 13 Oven will not operate s Has a household fuse blown, or has a circuit breaker tripped? s On some models, is one oven is the Sabbath Mode set correctly? On some models, has a delay start been set ? See "Display(s)" section. When one oven self-cleaning? See "Oven Temperature Control" section. s Is the proper bakeware being used ? s Is there proper air circulation around...
... the Installation Instructions. See "Baking and Roasting" section. Adjust cooking time. Move rack to cover the edge of the crust and/or reduce baking temperature. 13 Oven will not operate s Has a household fuse blown, or has a circuit breaker tripped? s On some models, is one oven is the Sabbath Mode set correctly? On some models, has a delay start been set ? See "Display(s)" section. When one oven self-cleaning? See "Oven Temperature Control" section. s Is the proper bakeware being used ? s Is there proper air circulation around...

Owners Manual
Page 15
... accordance with electrical or plumbing codes, or use of consumables or cleaning products not approved by this information on the model and serial number label located on how to use or when it . Repairs to parts or systems resulting from unauthorized modifications made to repair or replace appliance light bulbs, air filters or water filters. This warranty is used in the country in materials or workmanship and is reported to Whirlpool within...
... accordance with electrical or plumbing codes, or use of consumables or cleaning products not approved by this information on the model and serial number label located on how to use or when it . Repairs to parts or systems resulting from unauthorized modifications made to repair or replace appliance light bulbs, air filters or water filters. This warranty is used in the country in materials or workmanship and is reported to Whirlpool within...

Dimension Guide
Page 1
...max. ® 24" (61 CM) ELECTRIC SINGLE AND DOUBLE BUILT-IN OVEN PRODUCT MODEL SERIES RBD245PR RBS245PR Electrical: Oven must be connected to the proper electrical voltage and frequency as specified on the oven frame.) Models rated from 7.3 to 9.6 kW at 240 volts (5.5 to 7.2 kW at 208 volts) require a separate 30-amp circuit. cutout height A. 24" (61 cm) min. Specifications subject to change materials and specifications without cooktop installed above) A B Single Oven Installed in Cabinet A B Double Oven Installed in Cabinet A B E F D F D D C E C E C A. 24" (61 cm...
...max. ® 24" (61 CM) ELECTRIC SINGLE AND DOUBLE BUILT-IN OVEN PRODUCT MODEL SERIES RBD245PR RBS245PR Electrical: Oven must be connected to the proper electrical voltage and frequency as specified on the oven frame.) Models rated from 7.3 to 9.6 kW at 240 volts (5.5 to 7.2 kW at 208 volts) require a separate 30-amp circuit. cutout height A. 24" (61 cm) min. Specifications subject to change materials and specifications without cooktop installed above) A B Single Oven Installed in Cabinet A B Double Oven Installed in Cabinet A B E F D F D D C E C E C A. 24" (61 cm...

Installation Instructions
Page 3
... cutout to support a single oven weight of 123 lbs (55.8 kg) or a double oven weight of cabinet cutout. Tools needed ■ Phillips screwdriver ■ Measuring tape ■ Hand or electric drill (for wall cabinet installations) ■ 1" (25 mm) drill bit (for this type of installation have been drilled in the upper or lower right or left cabinet. Refer to the junction box. Product Dimensions - A 1" (2.5 cm) minimum diameter hole should be used. See "Electrical Requirements...
... cutout to support a single oven weight of 123 lbs (55.8 kg) or a double oven weight of cabinet cutout. Tools needed ■ Phillips screwdriver ■ Measuring tape ■ Hand or electric drill (for wall cabinet installations) ■ 1" (25 mm) drill bit (for this type of installation have been drilled in the upper or lower right or left cabinet. Refer to the junction box. Product Dimensions - A 1" (2.5 cm) minimum diameter hole should be used. See "Electrical Requirements...

Installation Instructions
Page 4
...;₂" (3.8 cm) min. Double Oven Double Oven Installed in Cabinet A B F D E C A. 24" (61 cm) min. cabinet width B. 1" (2.5 cm) top of cutout to bottom of upper cabinet door C. 14³⁄₄" (37.5 cm) bottom of cutout to floor D. 22¹⁄₂" (57.2 cm) cutout width E. 1¹⁄₂" (3.8 cm) min. Double or Single Oven A B E C D D C A. 22³⁄₈" (56.8 cm) max. Recessed oven E. cutout height Product Dimensions - recessed width B. 51" (129...
...;₂" (3.8 cm) min. Double Oven Double Oven Installed in Cabinet A B F D E C A. 24" (61 cm) min. cabinet width B. 1" (2.5 cm) top of cutout to bottom of upper cabinet door C. 14³⁄₄" (37.5 cm) bottom of cutout to floor D. 22¹⁄₂" (57.2 cm) cutout width E. 1¹⁄₂" (3.8 cm) min. Double or Single Oven A B E C D D C A. 22³⁄₈" (56.8 cm) max. Recessed oven E. cutout height Product Dimensions - recessed width B. 51" (129...

Installation Instructions
Page 5
... are in locked position B. Model/serial number plate Double Oven A. See "Make Electrical Connection" section. ■ Flexible cable from inside the bag containing literature. 5. INSTALLATION INSTRUCTIONS Prepare Built-In Oven 1. WARNING Excessive Weight Hazard Use two or more people to the oven's final location. 7. Move oven and cardboard close to move and install oven. This oven must conform with grounding wire). The model/serial number rating plate is located at 208 volts) require a separate 30-amp circuit. ■ A time-delay fuse or circuit breaker is recommended...
... are in locked position B. Model/serial number plate Double Oven A. See "Make Electrical Connection" section. ■ Flexible cable from inside the bag containing literature. 5. INSTALLATION INSTRUCTIONS Prepare Built-In Oven 1. WARNING Excessive Weight Hazard Use two or more people to the oven's final location. 7. Move oven and cardboard close to move and install oven. This oven must conform with grounding wire). The model/serial number rating plate is located at 208 volts) require a separate 30-amp circuit. ■ A time-delay fuse or circuit breaker is recommended...

Installation Instructions
Page 6
... oven E. Use 8 gauge solid copper wire. Electrically ground oven. where local codes do not allow grounding through a UL listed or CSA approved conduit connector. 6. Set the oven door aside on the side of the oven door with a neutral (white) power supply wire and a cabinet-connected green (or bare) ground wire twisted together. 1. Failure to the junction box. Remove junction box cover if it will no longer close the oven door until it is installed...
... oven E. Use 8 gauge solid copper wire. Electrically ground oven. where local codes do not allow grounding through a UL listed or CSA approved conduit connector. 6. Set the oven door aside on the side of the oven door with a neutral (white) power supply wire and a cabinet-connected green (or bare) ground wire twisted together. 1. Failure to the junction box. Remove junction box cover if it will no longer close the oven door until it is installed...

Installation Instructions
Page 7
... cabinet. Oven vent 7 3-Wire Cable from home power supply where local codes permit a 3-wire connection. A B C G H D E I . Using 2 or more people to remove screws attaching the shipping feet. 4. Use the oven opening as an area to do so can result in back or other injury. 1. See the following instructions to install. ■ Insert the vent tabs (B) into cabinet cutout. Vent tab C. # 8-18 x ³⁄₈" screw D. UL listed wire connectors I F A. Securely fasten oven to cabinet using...
... cabinet. Oven vent 7 3-Wire Cable from home power supply where local codes permit a 3-wire connection. A B C G H D E I . Using 2 or more people to remove screws attaching the shipping feet. 4. Use the oven opening as an area to do so can result in back or other injury. 1. See the following instructions to install. ■ Insert the vent tabs (B) into cabinet cutout. Vent tab C. # 8-18 x ³⁄₈" screw D. UL listed wire connectors I F A. Securely fasten oven to cabinet using...

Installation Instructions
Page 8
... replace screw. 9. Press START. or circuit breaker has not tripped. ■ Electrical supply is free to the locked position. 14. A A. Complete Installation 1. "PF" should appear in the display. 2. Repeat "Check Operation of Double Oven 1. If it is intact and tight; Display panel will light briefly, and "PF" should appear in the display. 18. For oven use and cleaning, read the Use and Care Guide. Check Operation of Single Oven" steps 2-5. Push each trim piece upward onto oven...
... replace screw. 9. Press START. or circuit breaker has not tripped. ■ Electrical supply is free to the locked position. 14. A A. Complete Installation 1. "PF" should appear in the display. 2. Repeat "Check Operation of Double Oven 1. If it is intact and tight; Display panel will light briefly, and "PF" should appear in the display. 18. For oven use and cleaning, read the Use and Care Guide. Check Operation of Single Oven" steps 2-5. Push each trim piece upward onto oven...

Warranty
Page 1
... loss due to determine if another warranty applies. Major appliances with original model/serial numbers that is contrary to published user or operator instructions and/or installation instructions. 4. If outside the 50 United States and Canada, contact your authorized Whirlpool dealer to refrigerator or freezer product failures. 7. Service calls to repair or replace appliance light bulbs, air filters or water filters. IMPLIED WARRANTIES, INCLUDING WARRANTIES OF MERCHANTABILITY OR FITNESS FOR A PARTICULAR...
... loss due to determine if another warranty applies. Major appliances with original model/serial numbers that is contrary to published user or operator instructions and/or installation instructions. 4. If outside the 50 United States and Canada, contact your authorized Whirlpool dealer to refrigerator or freezer product failures. 7. Service calls to repair or replace appliance light bulbs, air filters or water filters. IMPLIED WARRANTIES, INCLUDING WARRANTIES OF MERCHANTABILITY OR FITNESS FOR A PARTICULAR...


