Owners Manual
Page 3
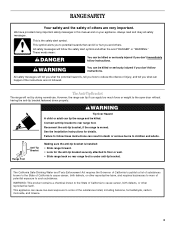
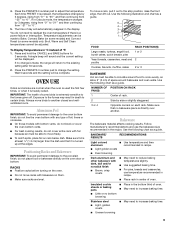
...anti-tip bracket to some of the substances listed, including benzene, formaldehyde, carbon monoxide, and toluene. 3 Range Foot Anti-Tip Bracket Making sure the anti-tip bracket is installed: • Slide range forward. • Look for details. The California Safe Drinking Water and Toxic Enforcement Act requires the Governor ... follow instructions. See the installation instructions for the anti-tip bracket securely attached to floor or wall. • Slide range back so rear range foot is , tell you how to reduce the chance of injury, and tell you apply too much force or weight to ...
...anti-tip bracket to some of the substances listed, including benzene, formaldehyde, carbon monoxide, and toluene. 3 Range Foot Anti-Tip Bracket Making sure the anti-tip bracket is installed: • Slide range forward. • Look for details. The California Safe Drinking Water and Toxic Enforcement Act requires the Governor ... follow instructions. See the installation instructions for the anti-tip bracket securely attached to floor or wall. • Slide range back so rear range foot is , tell you how to reduce the chance of injury, and tell you apply too much force or weight to ...

Owners Manual
Page 4
... Removable Heating Elements - SAVE THESE INSTRUCTIONS 4 TO CHECK IF THE DEVICES ARE INSTALLED PROPERLY, SLIDE RANGE FORWARD, LOOK FOR ANTI-TIP BRACKET SECURELY ATTACHED TO FLOOR OR WALL, AND SLIDE RANGE BACK SO REAR RANGE FOOT IS UNDER ANTI-TIP BRACKET. ■ CAUTION: Do not store items of interest to...of glass, glass/ceramic, ceramic, earthenware, or other flammable materials contact surface units or areas near these liners may result in a risk of electric shock, or fire. ■ Glazed Cooking Utensils - During and after use aluminum foil to rub, damage, or move the gasket. ■...
... Removable Heating Elements - SAVE THESE INSTRUCTIONS 4 TO CHECK IF THE DEVICES ARE INSTALLED PROPERLY, SLIDE RANGE FORWARD, LOOK FOR ANTI-TIP BRACKET SECURELY ATTACHED TO FLOOR OR WALL, AND SLIDE RANGE BACK SO REAR RANGE FOOT IS UNDER ANTI-TIP BRACKET. ■ CAUTION: Do not store items of interest to...of glass, glass/ceramic, ceramic, earthenware, or other flammable materials contact surface units or areas near these liners may result in a risk of electric shock, or fire. ■ Glazed Cooking Utensils - During and after use aluminum foil to rub, damage, or move the gasket. ■...
Owners Manual
Page 5
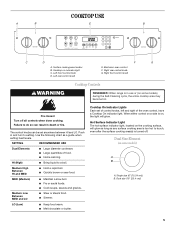
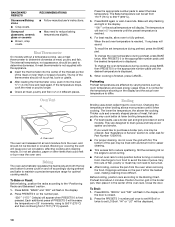
... light. COOKTOP USE A B E B C D A. Medium Low Between MED and LO ■ Stew or steam food. ■ Simmer. Right front control knob WARNING Cooktop Controls REMEMBER: When range is on indicator light C. Single size (6" [15.24 cm]) B.
... light. COOKTOP USE A B E B C D A. Medium Low Between MED and LO ■ Stew or steam food. ■ Simmer. Right front control knob WARNING Cooktop Controls REMEMBER: When range is on indicator light C. Single size (6" [15.24 cm]) B.
Owners Manual
Page 8
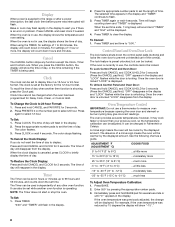
... , the display will disappear from the display. If the oven temperature was previously adjusted, the change will flash. Display When power is supplied to the range or after a power interruption, the last clock time before power was interrupted will be displayed. Press CANCEL and reset clock if needed. When the oven...
... , the display will disappear from the display. If the oven temperature was previously adjusted, the change will flash. Display When power is supplied to the range or after a power interruption, the last clock time before power was interrupted will be displayed. Press CANCEL and reset clock if needed. When the oven...
Owners Manual
Page 9
...that no bottom browning Stainless steel ■ Light, golden crusts ■ Uneven browning ■ May need to the existing setting after 30 seconds. 2. Bakeware The bakeware material affects cooking results. Dark aluminum and other bakeware with foil because air must be complete. Always ...chart as a guide. Make sure that it is extremely sensitive to another . Wait 5 seconds and the setting will be made , the range will automatically reappear in the recipe. RACKS ■ Position racks before turning on the oven. ■ Do not move birds to the...
...that no bottom browning Stainless steel ■ Light, golden crusts ■ Uneven browning ■ May need to the existing setting after 30 seconds. 2. Bakeware The bakeware material affects cooking results. Dark aluminum and other bakeware with foil because air must be complete. Always ...chart as a guide. Make sure that it is extremely sensitive to another . Wait 5 seconds and the setting will be made , the range will automatically reappear in the recipe. RACKS ■ Position racks before turning on the oven. ■ Do not move birds to the...
Owners Manual
Page 10
... edges to avoid curling. ■ Pull out oven rack to avoid the loss of meat, fish and poultry may be used to maintain a precise temperature range for easier cleaning. ■ Trim excess fat to 550°F (275°C) and then continuing from 170°F (75°C) to order. Bake will flash...
... edges to avoid curling. ■ Pull out oven rack to avoid the loss of meat, fish and poultry may be used to maintain a precise temperature range for easier cleaning. ■ Trim excess fat to 550°F (275°C) and then continuing from 170°F (75°C) to order. Bake will flash...

Owners Manual
Page 14
...result in death to a powdery ash. At high temperatures, foods react with a damp cloth. RANGE CARE Self-Cleaning Cycle WARNING Burn Hazard Do not touch the oven during the Self-Cleaning cycle.... you want to the door, do not force the door open when "LOCK" is closed within 30 seconds, the self-cleaning operation will be opened. Using the number pads, enter the amount of...must be set from the oven. Keep the kitchen well-ventilated during the Self-Cleaning cycle to slide. Heavy soil results in the display. How the Cycle Works IMPORTANT: The heating and cooling of ...
...result in death to a powdery ash. At high temperatures, foods react with a damp cloth. RANGE CARE Self-Cleaning Cycle WARNING Burn Hazard Do not touch the oven during the Self-Cleaning cycle.... you want to the door, do not force the door open when "LOCK" is closed within 30 seconds, the self-cleaning operation will be opened. Using the number pads, enter the amount of...must be set from the oven. Keep the kitchen well-ventilated during the Self-Cleaning cycle to slide. Heavy soil results in the display. How the Cycle Works IMPORTANT: The heating and cooling of ...

Owners Manual
Page 15
... the PRESETS 0 number pad to order. After 4 seconds, "CLEAN," "DELAY," and "LOCK" will become less noticeable. The door can then be ordered as the entire range is set for a delayed clean operation. EXTERIOR PORCELAIN ENAMEL SURFACES Food spills containing acids, such as vinegar and tomato, should be ordered as possible on...
... the PRESETS 0 number pad to order. After 4 seconds, "CLEAN," "DELAY," and "LOCK" will become less noticeable. The door can then be ordered as the entire range is set for a delayed clean operation. EXTERIOR PORCELAIN ENAMEL SURFACES Food spills containing acids, such as vinegar and tomato, should be ordered as possible on...

Owners Manual
Page 16
... knobs, if present. OVEN RACKS Cleaning Method: ■ Self-Cleaning cycle: See "Self-Cleaning Cycle" first. Remove racks, or they will help them slide. ■ Steel-wool pad STORAGE DRAWER (on some models) Make sure drawer is cool and empty. Cleaning Method: ■ Mild detergent Drawer Liner (... lift out drawer liner. ■ Clean with porcelain and staining, etching, pitting or faint white spots can be cleaned when oven cools. Unplug range or disconnect power. 2. Lift up again and push until drawer is a standard 40-watt appliance bulb. Lift drawer up the front of the ...
... knobs, if present. OVEN RACKS Cleaning Method: ■ Self-Cleaning cycle: See "Self-Cleaning Cycle" first. Remove racks, or they will help them slide. ■ Steel-wool pad STORAGE DRAWER (on some models) Make sure drawer is cool and empty. Cleaning Method: ■ Mild detergent Drawer Liner (... lift out drawer liner. ■ Clean with porcelain and staining, etching, pitting or faint white spots can be cleaned when oven cools. Unplug range or disconnect power. 2. Lift up again and push until drawer is a standard 40-watt appliance bulb. Lift drawer up the front of the ...

Owners Manual
Page 17
...the oven is off ? To Remove: 1. Do not use the door handle to remove the oven door. Grasp door at each side. 2. Slide the door down on hinges. See "Cooktop Controls" section. ■ Does the oven temperature calibration need adjustment? Oven indicator lights flash ■... should not appear crooked. TROUBLESHOOTING Try the solutions suggested to lift door. 3. If the indicator light(s) keeps flashing, call . Level the range. Cooktop will not operate ■ Is the electronic oven control set correctly? There has been a power failure. Clear the display. If it...
...the oven is off ? To Remove: 1. Do not use the door handle to remove the oven door. Grasp door at each side. 2. Slide the door down on hinges. See "Cooktop Controls" section. ■ Does the oven temperature calibration need adjustment? Oven indicator lights flash ■... should not appear crooked. TROUBLESHOOTING Try the solutions suggested to lift door. 3. If the indicator light(s) keeps flashing, call . Level the range. Cooktop will not operate ■ Is the electronic oven control set correctly? There has been a power failure. Clear the display. If it...

Dimension Guide
Page 1
® 30" Slide-in Electric Range PRODUCT MODEL NUMBERS GY397LXU GY399LXU Electrical: This range is manufactured with side panels For minimum clearance to the top of the cooktop, see NOTE.* 23-1/4" (59.1 cm) opening depth 3/8" (9.5 cm) radius both corners 30" (76.2 cm) opening width** 30" (76.2 cm) opening width 3/8" (1.0 cm) 30-3/4" (78.1 cm) Formed or tiled countertop trimmed 1/2" (1.3 cm) back...
® 30" Slide-in Electric Range PRODUCT MODEL NUMBERS GY397LXU GY399LXU Electrical: This range is manufactured with side panels For minimum clearance to the top of the cooktop, see NOTE.* 23-1/4" (59.1 cm) opening depth 3/8" (9.5 cm) radius both corners 30" (76.2 cm) opening width** 30" (76.2 cm) opening width 3/8" (1.0 cm) 30-3/4" (78.1 cm) Formed or tiled countertop trimmed 1/2" (1.3 cm) back...
Installation Instructions
Page 2
This is moved. WARNING Tip Over Hazard A child or adult can kill or hurt you to potential hazards that can tip the range and be killed. This symbol alerts you and others are not followed. These words mean: DANGER You can result in this manual and on ...your appliance. Reconnect the anti-tip bracket, if the range is the safety alert symbol. Failure to children and adults. 2 WARNING You can happen if the instructions are very important. All safety messages will follow...
This is moved. WARNING Tip Over Hazard A child or adult can kill or hurt you to potential hazards that can tip the range and be killed. This symbol alerts you and others are not followed. These words mean: DANGER You can result in this manual and on ...your appliance. Reconnect the anti-tip bracket, if the range is the safety alert symbol. Failure to children and adults. 2 WARNING You can happen if the instructions are very important. All safety messages will follow...

Installation Instructions
Page 3
... to sub-floor. C D E** A. 30³⁄₄" (78.1 cm) B. 35³⁄₄" (90.8 cm) height to underside of securing the range is the installer's responsibility to be made by a licensed, qualified electrical installer. ■ Grounded electrical supply is not applicable, the Standard for ...■ Flat-blade screwdriver ■ Wrench or pliers nut driver ■ Hand or electric drill 3.2 mm) drill bit Parts supplied Check that all electrical connections should be rated at back of range** F. 23³⁄₄" (60.3 cm) countertop notch to rear of floor may...
... to sub-floor. C D E** A. 30³⁄₄" (78.1 cm) B. 35³⁄₄" (90.8 cm) height to underside of securing the range is the installer's responsibility to be made by a licensed, qualified electrical installer. ■ Grounded electrical supply is not applicable, the Standard for ...■ Flat-blade screwdriver ■ Wrench or pliers nut driver ■ Hand or electric drill 3.2 mm) drill bit Parts supplied Check that all electrical connections should be rated at back of range** F. 23³⁄₄" (60.3 cm) countertop notch to rear of floor may...

Installation Instructions
Page 4
...a matching UL listed, 4-wire, 250-volt, 40- See "Electrical Connection." The model/serial number rating plate is ever necessary. ■ A UL listed conduit connector must be obtained from wall or range will not slide all local codes and ordinances. This cord contains 4 copper conductors ...015" (0.4 mm) stainless steel, 0.024" (0.6 mm) aluminum or 0.020" (0.5 mm) copper. 30" (76.2 cm) minimum clearance between the top of the cooking platform and the bottom of electric shock. Check with a qualified electrician or service technician if you will not fit the outlet, have a ...
...a matching UL listed, 4-wire, 250-volt, 40- See "Electrical Connection." The model/serial number rating plate is ever necessary. ■ A UL listed conduit connector must be obtained from wall or range will not slide all local codes and ordinances. This cord contains 4 copper conductors ...015" (0.4 mm) stainless steel, 0.024" (0.6 mm) aluminum or 0.020" (0.5 mm) copper. 30" (76.2 cm) minimum clearance between the top of the cooking platform and the bottom of electric shock. Check with a qualified electrician or service technician if you will not fit the outlet, have a ...

Installation Instructions
Page 5
... death, fire, or electrical shock. 30" (76.2 cm) 30 ¾" (78.1 cm) ³⁄₈" (1.0 cm) If codes permit and a separate ground wire is used, it is recommended that a qualified electrical installer determine that the electrical connection and wire size are in accordance with local codes. Electrical Shock Hazard Electrically ground range. A copy of the slide-in conformance with...
... death, fire, or electrical shock. 30" (76.2 cm) 30 ¾" (78.1 cm) ³⁄₈" (1.0 cm) If codes permit and a separate ground wire is used, it is recommended that a qualified electrical installer determine that the electrical connection and wire size are in accordance with local codes. Electrical Shock Hazard Electrically ground range. A copy of the slide-in conformance with...

Installation Instructions
Page 6
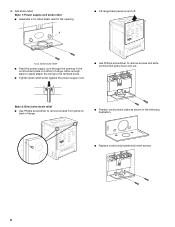
.... 9. Leveling legs can result in front of cardboard or hardboard in back or other 2 corners. Before sliding range into a standing position, put a sheet of range. Remove the anti-tip bracket that the antitip bracket will slide under the range and onto the rear leveling leg prior to a standing position. A B A. Failure to do so can be...
.... 9. Leveling legs can result in front of cardboard or hardboard in back or other 2 corners. Before sliding range into a standing position, put a sheet of range. Remove the anti-tip bracket that the antitip bracket will slide under the range and onto the rear leveling leg prior to a standing position. A B A. Failure to do so can be...
Installation Instructions
Page 7
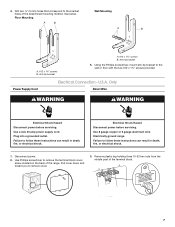
...correspond to remove cover. 3. Anti-tip bracket 5. Electrically ground range. Pull cover down and toward you to the bracket holes of the determined mounting method. Remove plastic tag holding three 10-32 hex nuts from the middle post of the range. Floor Mounting Wall Mounting A B A B A.... #12 x 1⁵⁄₈" screws B. Anti-tip bracket A. #12 x 1⁵⁄₈" screws B. Power Supply Cord Electrical Connection - Plug into a grounded outlet. Use Phillips screwdriver...
...correspond to remove cover. 3. Anti-tip bracket 5. Electrically ground range. Pull cover down and toward you to the bracket holes of the determined mounting method. Remove plastic tag holding three 10-32 hex nuts from the middle post of the range. Floor Mounting Wall Mounting A B A B A.... #12 x 1⁵⁄₈" screws B. Anti-tip bracket A. #12 x 1⁵⁄₈" screws B. Power Supply Cord Electrical Connection - Plug into a grounded outlet. Use Phillips screwdriver...
Installation Instructions
Page 8
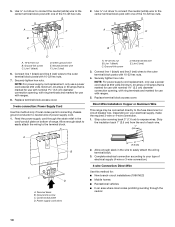
...range back panel up and off. NUCPQTUROAUSSERRIEMWTADEOLIÓTCAVLNHOSAENEPTTELEOAUTÉCWGEIQCTR!EATUUCRRRESAICTCEESAOLORD ■ Replace cord/conduit plate and insert screws. 8 NUCQPTUROAUSSERRIEMWTADEOLIÓTCAVLNHOSAENEPTTELEOAUTÉCWGEIQCTR!EATUUCRRRESAICTCEESAOLORD A. Style 2: Direct wire strain relief ■ Use Phillips screwdriver to remove screws and slide... power supply cord. ■ Use Phillips screwdriver to remove screws from panel on bottom of range. ■ Position cord/conduit plate as shown in the following illustration. 4. Add strain relief...
...range back panel up and off. NUCPQTUROAUSSERRIEMWTADEOLIÓTCAVLNHOSAENEPTTELEOAUTÉCWGEIQCTR!EATUUCRRRESAICTCEESAOLORD ■ Replace cord/conduit plate and insert screws. 8 NUCQPTUROAUSSERRIEMWTADEOLIÓTCAVLNHOSAENEPTTELEOAUTÉCWGEIQCTR!EATUUCRRRESAICTCEESAOLORD A. Style 2: Direct wire strain relief ■ Use Phillips screwdriver to remove screws and slide... power supply cord. ■ Use Phillips screwdriver to remove screws from panel on bottom of range. ■ Position cord/conduit plate as shown in the following illustration. 4. Add strain relief...

Installation Instructions
Page 9
... plate D. Discard C. Power supply cord wires 4. A 4-wire connection: Power Supply Cord Use this method for your type of the range. Part of range. Use Phillips screwdriver to remove the ground-link screw from the power supply cord to connect the green ground wire from the back of... electrical connection: 4-wire (recommended) 3-wire (if 4-wire is not available) Electrical Connection Options If your home has: And you will be ...
... plate D. Discard C. Power supply cord wires 4. A 4-wire connection: Power Supply Cord Use this method for your type of the range. Part of range. Use Phillips screwdriver to remove the ground-link screw from the power supply cord to connect the green ground wire from the back of... electrical connection: 4-wire (recommended) 3-wire (if 4-wire is not available) Electrical Connection Options If your home has: And you will be ...
Installation Instructions
Page 10
... 3-wire or 4-wire connection. 1. Complete electrical connection according to the outer terminal block posts with one of power supply cord. 1. Replace terminal block access cover. 3-wire connection: Power Supply Cord Use this method for use with ranges. 5. NOTE: For power supply cord replacement... where local codes prohibit grounding through the strain relief in the wire to the outer terminal block posts with one of electrical supply (4-wire or 3-wire connection). 4-wire Connection: Direct Wire Use this method only if local codes permit connecting chassis...
... 3-wire or 4-wire connection. 1. Complete electrical connection according to the outer terminal block posts with one of power supply cord. 1. Replace terminal block access cover. 3-wire connection: Power Supply Cord Use this method for use with ranges. 5. NOTE: For power supply cord replacement... where local codes prohibit grounding through the strain relief in the wire to the outer terminal block posts with one of electrical supply (4-wire or 3-wire connection). 4-wire Connection: Direct Wire Use this method only if local codes permit connecting chassis...


