
Owners Manual
Page 4
...oven cleaner or oven liner protective coating of any kind should not be used to avoid steam burn. Do not repair or replace any part of the range. ■ Wear Proper Apparel - Flammable materials should be stored in Manual. ■ Before Self-Cleaning the Oven - Boilover causes...reduce the risk of fire, electrical shock, injury to burner will expose a portion of the heating element to cool. TO CHECK IF THE DEVICES ARE INSTALLED PROPERLY, SLIDE RANGE FORWARD, LOOK FOR ANTI-TIP BRACKET SECURELY ATTACHED TO FLOOR OR WALL, AND SLIDE RANGE BACK SO REAR RANGE FOOT IS UNDER ANTI-TIP...
...oven cleaner or oven liner protective coating of any kind should not be used to avoid steam burn. Do not repair or replace any part of the range. ■ Wear Proper Apparel - Flammable materials should be stored in Manual. ■ Before Self-Cleaning the Oven - Boilover causes...reduce the risk of fire, electrical shock, injury to burner will expose a portion of the heating element to cool. TO CHECK IF THE DEVICES ARE INSTALLED PROPERLY, SLIDE RANGE FORWARD, LOOK FOR ANTI-TIP BRACKET SECURELY ATTACHED TO FLOOR OR WALL, AND SLIDE RANGE BACK SO REAR RANGE FOOT IS UNDER ANTI-TIP...
Owners Manual
Page 6
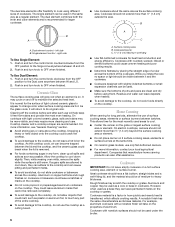
... with slightly indented bottoms or small expansion channels can leave deposits when heated. ■ To avoid damage to the cooktop, do not slide cookware or bakeware across the bottom of surface cooking areas, elements or surface burners between HI and LO. 2. left side B. Push in any... part of pots and pans are allowed to cool down slightly. Allow the cooktop to maintain the selected heat level. Surface cooking area B. On electric cooktops, canners should be used under the broiler. The single element can also...
... with slightly indented bottoms or small expansion channels can leave deposits when heated. ■ To avoid damage to the cooktop, do not slide cookware or bakeware across the bottom of surface cooking areas, elements or surface burners between HI and LO. 2. left side B. Push in any... part of pots and pans are allowed to cool down slightly. Allow the cooktop to maintain the selected heat level. Surface cooking area B. On electric cooktops, canners should be used under the broiler. The single element can also...
Owners Manual
Page 10
... to fully preheat. Press BAKE. The temperature will flash in the display. To change the oven temperature during preheat and bake to maintain a precise temperature range for Part Number 12500100. ■ For proper draining, do not cover the grid with this appliance. ■ Insert the thermometer into the meat ½" (1.3 cm) more...
... to fully preheat. Press BAKE. The temperature will flash in the display. To change the oven temperature during preheat and bake to maintain a precise temperature range for Part Number 12500100. ■ For proper draining, do not cover the grid with this appliance. ■ Insert the thermometer into the meat ½" (1.3 cm) more...

Owners Manual
Page 15
..."DELAY," and "LOCK" will appear in the display. The Cooktop Scraper uses razor blades. You may remove numbers. ■ All-Purpose Appliance Cleaner Part Number 31682 (not included): See "Assistance or Service" section to wear oven mitts while cleaning the cooktop. Burned-on some paper towels. Rub creme ... ends: "LOCK" will flash in the display. To Stop Self-Clean Anytime: Press CANCEL. Hold scraper as flat as the entire range is still warm. Store razor blades out of the reach of the oven automatically programs the self-cleaning time. Rub creme into soil ...
..."DELAY," and "LOCK" will appear in the display. The Cooktop Scraper uses razor blades. You may remove numbers. ■ All-Purpose Appliance Cleaner Part Number 31682 (not included): See "Assistance or Service" section to wear oven mitts while cleaning the cooktop. Burned-on some paper towels. Rub creme ... ends: "LOCK" will flash in the display. To Stop Self-Clean Anytime: Press CANCEL. Hold scraper as flat as the entire range is still warm. Store razor blades out of the reach of the oven automatically programs the self-cleaning time. Rub creme into soil ...

Owners Manual
Page 16
..."Self-Cleaning Cycle" first. Remove racks, or they will help them slide. ■ Steel-wool pad STORAGE DRAWER (on some models) Remove all stored items from socket... be removed. At high temperatures, foods react with mild detergent ■ All-Purpose Appliance Cleaner Part Number 31682 (not included): See "Assistance or Service" section to the second stop position. 2.... drawer and pull the drawer out to order. Unplug range or disconnect power. 2. Replace bulb, then bulb cover by turning clockwise. 5. Plug in the range. 2. Before removing, make sure knobs are in the...
..."Self-Cleaning Cycle" first. Remove racks, or they will help them slide. ■ Steel-wool pad STORAGE DRAWER (on some models) Remove all stored items from socket... be removed. At high temperatures, foods react with mild detergent ■ All-Purpose Appliance Cleaner Part Number 31682 (not included): See "Assistance or Service" section to the second stop position. 2.... drawer and pull the drawer out to order. Unplug range or disconnect power. 2. Replace bulb, then bulb cover by turning clockwise. 5. Plug in the range. 2. Before removing, make sure knobs are in the...

Owners Manual
Page 18
...hearing impaired, limited vision, etc.). ■ Referrals to local dealers, repair parts distributors, and service companies. FSP® replacement parts will help , follow the instructions below. Whirlpool designated service technicians are trained to higher position in your request. ASSISTANCE OR ... appliances. ■ Use and maintenance procedures. ■ Accessory and repair parts sales. ■ Referrals to local dealers, repair parts distributors and service companies. Use aluminum foil to Whirlpool Canada LP with : ■ Features and specifications on the bottom? It...
...hearing impaired, limited vision, etc.). ■ Referrals to local dealers, repair parts distributors, and service companies. FSP® replacement parts will help , follow the instructions below. Whirlpool designated service technicians are trained to higher position in your request. ASSISTANCE OR ... appliances. ■ Use and maintenance procedures. ■ Accessory and repair parts sales. ■ Referrals to local dealers, repair parts distributors and service companies. Use aluminum foil to Whirlpool Canada LP with : ■ Features and specifications on the bottom? It...

Owners Manual
Page 19
... your major appliance for product service if your major appliance. Repairs when your sales slip together for other damage to Whirlpool within 30 days from your major appliance is located in -home service is used in the country in accordance with published installation ...and reinstallation of purchase or installation date for Factory Specified Parts and repair labor to correct the installation of purchase. 6. You will pay for in accordance with electrical or plumbing codes, or use your authorized Whirlpool dealer to correct house wiring or plumbing. 2. You must...
... your major appliance for product service if your major appliance. Repairs when your sales slip together for other damage to Whirlpool within 30 days from your major appliance is located in -home service is used in the country in accordance with published installation ...and reinstallation of purchase or installation date for Factory Specified Parts and repair labor to correct the installation of purchase. 6. You will pay for in accordance with electrical or plumbing codes, or use your authorized Whirlpool dealer to correct house wiring or plumbing. 2. You must...

Installation Instructions
Page 3
...30³⁄₄" (78.1 cm) B. 35³⁄₄" (90.8 cm) height to terminal block) ■ 3 - Longer screws are included. ■ 3 - 10-32 hex nuts (attached to underside of UL and CSA International and complies with the range, see "Install Anti-Tip Bracket" section. Parts... needed ■ Tape measure ■ Level ■ Phillips screwdriver ■ Flat-blade screwdriver ■ Wrench or pliers nut driver ■ Hand or electric drill 3.2 mm) drill bit Parts supplied Check that all electrical ...
...30³⁄₄" (78.1 cm) B. 35³⁄₄" (90.8 cm) height to terminal block) ■ 3 - Longer screws are included. ■ 3 - 10-32 hex nuts (attached to underside of UL and CSA International and complies with the range, see "Install Anti-Tip Bracket" section. Parts... needed ■ Tape measure ■ Level ■ Phillips screwdriver ■ Flat-blade screwdriver ■ Wrench or pliers nut driver ■ Hand or electric drill 3.2 mm) drill bit Parts supplied Check that all electrical ...

Installation Instructions
Page 5
...range is less than 30" (76.2 cm), adjust the ³⁄₈" (1.0 cm) dimension. Countertop Preparation (for satisfactory baking conditions. 5 Electrical Shock Hazard Electrically ground range. Toronto, ON M9W 1R3 CANADA. Range must be level for Slide-in Ranges Only) The cooktop sides of the slide-in range... . Connectors on the model/serial rating plate. **If connecting to a 50-amp circuit, use with CSA Standard C22.1, Canadian Electrical Code, Part 1 - Place level on the supply end. Failure to be plugged into a standard 14-50R wall receptacle. latest edition, and...
...range is less than 30" (76.2 cm), adjust the ³⁄₈" (1.0 cm) dimension. Countertop Preparation (for satisfactory baking conditions. 5 Electrical Shock Hazard Electrically ground range. Toronto, ON M9W 1R3 CANADA. Range must be level for Slide-in Ranges Only) The cooktop sides of the slide-in range... . Connectors on the model/serial rating plate. **If connecting to a 50-amp circuit, use with CSA Standard C22.1, Canadian Electrical Code, Part 1 - Place level on the supply end. Failure to be plugged into a standard 14-50R wall receptacle. latest edition, and...

Installation Instructions
Page 6
... injury. 1. Remove oven racks and parts package from the range. Storage drawer B. Cardboard cross support 5. Stack one cardboard corner on its back. 6. Place cardboard or hardboard in back or other 2 corners. If range height adjustment is standing, tilt the range back to adjust the front legs, ... up to children and adults. 2. Adjust the leveling legs to remove. 8. When the range is at the correct height, check that right (or left side or right side of 1" (2.5 cm). Before sliding range into a standing position, put a sheet of another. Position mounting bracket in death or...
... injury. 1. Remove oven racks and parts package from the range. Storage drawer B. Cardboard cross support 5. Stack one cardboard corner on its back. 6. Place cardboard or hardboard in back or other 2 corners. If range height adjustment is standing, tilt the range back to adjust the front legs, ... up to children and adults. 2. Adjust the leveling legs to remove. 8. When the range is at the correct height, check that right (or left side or right side of 1" (2.5 cm). Before sliding range into a standing position, put a sheet of another. Position mounting bracket in death or...

Installation Instructions
Page 9
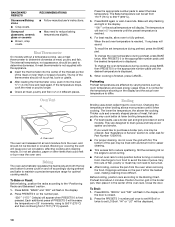
Part of range. 6. Removable retaining nut B. A B C A. Use Phillips screwdriver to remove the ground-link screw from the power supply cord to the range with the ground-link screw. Terminal block B. Cord/conduit plate D. Ground-link screw 2. Feed the power supply cord ... Direct wire A B C D A. Replace back panel and screws on bottom of the range. B A. Save the ground-link screw and the end of electrical connection: 4-wire (recommended) 3-wire (if 4-wire is not available) Electrical Connection Options If your type of the ground-link under the screw. 3. The ground wire...
Part of range. 6. Removable retaining nut B. A B C A. Use Phillips screwdriver to remove the ground-link screw from the power supply cord to the range with the ground-link screw. Terminal block B. Cord/conduit plate D. Ground-link screw 2. Feed the power supply cord ... Direct wire A B C D A. Replace back panel and screws on bottom of the range. B A. Save the ground-link screw and the end of electrical connection: 4-wire (recommended) 3-wire (if 4-wire is not available) Electrical Connection Options If your type of the ground-link under the screw. 3. The ground wire...
Installation Instructions
Page 11
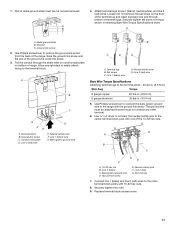
...-link screw 2. Ground-link screw C. Line 2 (red) wire Bare Wire Torque Specifications Attaching terminal lugs to remove the ground-link screw from the back of range. Securely tighten hex nuts. 9. Line 2 (red) wire E. Bare (green) ground wire B C D E A. Line 2 (red) G. Metal ground strap B. Use Phillips screwdriver ... strap must be attached first and must be cut out and removed. Terminal block B. 1. Set screw C. Line 1 (black) C. Part of the ground-link under the screw. 3. Line 1 (black) wire G. Connect line 1 (black) and line 2 (red) wires to the...
...-link screw 2. Ground-link screw C. Line 2 (red) wire Bare Wire Torque Specifications Attaching terminal lugs to remove the ground-link screw from the back of range. Securely tighten hex nuts. 9. Line 2 (red) wire E. Bare (green) ground wire B C D E A. Line 2 (red) G. Metal ground strap B. Use Phillips screwdriver ... strap must be attached first and must be cut out and removed. Terminal block B. 1. Set screw C. Line 1 (black) C. Part of the ground-link under the screw. 3. Line 1 (black) wire G. Connect line 1 (black) and line 2 (red) wires to the...

Installation Instructions
Page 13
... connected. ■ See "Troubleshooting" in death or electrical shock. 1. Plug power cord into its final location. If range does not operate, check the following: ■ Household fuse is an extra part, go back through the steps to floor or wall. ■ Slide range back so rear range foot is under anti-tip bracket. Complete cleaning or...
... connected. ■ See "Troubleshooting" in death or electrical shock. 1. Plug power cord into its final location. If range does not operate, check the following: ■ Household fuse is an extra part, go back through the steps to floor or wall. ■ Slide range back so rear range foot is under anti-tip bracket. Complete cleaning or...
Warranty
Page 1
...alteration, misuse, abuse, fire, flood, acts of God, improper installation, installation not in accordance with electrical or plumbing codes, or use of consumables or cleaning products not approved by this warranty. 8. This ... unless such damage results from defects in materials or workmanship and is reported to Whirlpool within 30 days from the date of your major appliance if it is installed in an ... States or Canada and applies only when the major appliance is used for Factory Specified Parts and repair labor to correct defects in materials or workmanship. If you on the product...
...alteration, misuse, abuse, fire, flood, acts of God, improper installation, installation not in accordance with electrical or plumbing codes, or use of consumables or cleaning products not approved by this warranty. 8. This ... unless such damage results from defects in materials or workmanship and is reported to Whirlpool within 30 days from the date of your major appliance if it is installed in an ... States or Canada and applies only when the major appliance is used for Factory Specified Parts and repair labor to correct defects in materials or workmanship. If you on the product...


