
Installation Guide
Page 2
... U.S.A 13 In Canada 13 Accessories 13 WARRANTY 14 TABLE DES MATIÈRES SÉCURITÉ DE LA HOTTE DE CUISINIÈRE 15 EXIGENCES D'INSTALLATION 17 Outils et pièces 17 Exigences d'emplacement 17 Exigences concernant l'évacuation 18 Spécifications électriques 20 INSTRUCTIONS...
... U.S.A 13 In Canada 13 Accessories 13 WARRANTY 14 TABLE DES MATIÈRES SÉCURITÉ DE LA HOTTE DE CUISINIÈRE 15 EXIGENCES D'INSTALLATION 17 Outils et pièces 17 Exigences d'emplacement 17 Exigences concernant l'évacuation 18 Spécifications électriques 20 INSTRUCTIONS...

Installation Guide
Page 3
... EVENT OF A RANGE TOP GREASE FIRE, OBSERVE THE FOLLOWING:a ■ SMOTHER FLAMES with a damaged cord or plug. You know how to the service panel. ■ Installation work and electrical wiring must always be done by NFPA. ■ WARNING: To reduce the risk of the surface element. aBased on low or medium...
... EVENT OF A RANGE TOP GREASE FIRE, OBSERVE THE FOLLOWING:a ■ SMOTHER FLAMES with a damaged cord or plug. You know how to the service panel. ■ Installation work and electrical wiring must always be done by NFPA. ■ WARNING: To reduce the risk of the surface element. aBased on low or medium...

Installation Guide
Page 4
... to order. ■ 6" (15.2 cm) dia. Grounded electrical outlet is available from packages. For non-vented (recirculating) Installation see "For Nonvented (recirculating) Installations Only" in ceiling and wall where canopy hood will also need : ■ 1 wall or roof cap ■ Metal vent... system For non-vented (recirculating) installations, you will be installed must be used. Recirculation Kit Part Number W10349327 is required. Product Dimensions 7¹⁄₄" (18.4 cm) 8¹⁄₈...
... to order. ■ 6" (15.2 cm) dia. Grounded electrical outlet is available from packages. For non-vented (recirculating) Installation see "For Nonvented (recirculating) Installations Only" in ceiling and wall where canopy hood will also need : ■ 1 wall or roof cap ■ Metal vent... system For non-vented (recirculating) installations, you will be installed must be used. Recirculation Kit Part Number W10349327 is required. Product Dimensions 7¹⁄₄" (18.4 cm) 8¹⁄₈...

Installation Guide
Page 5
... in your HVAC professional for specific requirements in the vent system. ■ The vent system must terminate to the outdoors, except for installation (not included). Venting Methods This canopy hood is available from gas cooking surfaces. ceiling height 7' 5" (2.26 m) 9' 2" (2.79... m) 9' 6" (2.9 m) *NOTE: The range hood chimneys are adjustable and designed to minimize backward cold air flow and a thermal break should be installed immediately above the hood. 5 ceiling height Max. Rear discharge A 90° elbow may require the use 4" (10.2 cm) laundry-type wall cap...
... in your HVAC professional for specific requirements in the vent system. ■ The vent system must terminate to the outdoors, except for installation (not included). Venting Methods This canopy hood is available from gas cooking surfaces. ceiling height 7' 5" (2.26 m) 9' 2" (2.79... m) 9' 6" (2.9 m) *NOTE: The range hood chimneys are adjustable and designed to minimize backward cold air flow and a thermal break should be installed immediately above the hood. 5 ceiling height Max. Rear discharge A 90° elbow may require the use 4" (10.2 cm) laundry-type wall cap...

Installation Guide
Page 6
... electrical circuit is required. ■ If the house has aluminum wiring, follow the procedure below: 1. For Non-Vented (recirculating) Installations If it is recommended that a qualified electrician determine that the electrical installation is adequate and in conformance with National Electrical Code, ANSI/NFPA 70 (latest edition), or CSA Standards C22.1-94, Canadian...
... electrical circuit is required. ■ If the house has aluminum wiring, follow the procedure below: 1. For Non-Vented (recirculating) Installations If it is recommended that a qualified electrician determine that the electrical installation is adequate and in conformance with National Electrical Code, ANSI/NFPA 70 (latest edition), or CSA Standards C22.1-94, Canadian...

Installation Guide
Page 7
...ceiling or wall for a gas cooking surface, and a suggested maximum of the fastener locations through the template to move and install range hood. Installations using telescoping upper and lower vent cover assembly 1. Determine and mark the centerline on wall about ¹⁄₈" (3.0...: All canopy mounting screws must be required. Disconnect power. 10. Position vent cover bracket on the wall where the canopy hood will be installed into , additional wall framing supports may be enough ½" conduit and wires from the ceiling. 2. Mark a reference line on wall C....
...ceiling or wall for a gas cooking surface, and a suggested maximum of the fastener locations through the template to move and install range hood. Installations using telescoping upper and lower vent cover assembly 1. Determine and mark the centerline on wall about ¹⁄₈" (3.0...: All canopy mounting screws must be required. Disconnect power. 10. Position vent cover bracket on the wall where the canopy hood will be installed into , additional wall framing supports may be enough ½" conduit and wires from the ceiling. 2. Mark a reference line on wall C....

Installation Guide
Page 8
... piece. 2. Connect Vent System 1. Vent cover bracket B. 2.9 x 6.5 mm screws C. Vent transition B. 3.5 x 9.5 mm screw For vented installations only: 1. Seal connection with the Recirculation Kit. Remove the air deflector. 5. Using 2 or more people, hang range hood on 2 mounting screws... through the mounting slots on top of the air deflector. 6. assembly screws provided with clamps. 3. Install 2 - 5 x 45 mm lower mounting screws and tighten. Deflector 2. A. X = length to the measured size (X). 4. Reassemble the air deflector ...
... piece. 2. Connect Vent System 1. Vent cover bracket B. 2.9 x 6.5 mm screws C. Vent transition B. 3.5 x 9.5 mm screw For vented installations only: 1. Seal connection with the Recirculation Kit. Remove the air deflector. 5. Using 2 or more people, hang range hood on 2 mounting screws... through the mounting slots on top of the air deflector. 6. assembly screws provided with clamps. 3. Install 2 - 5 x 45 mm lower mounting screws and tighten. Deflector 2. A. X = length to the measured size (X). 4. Reassemble the air deflector ...
Installation Guide
Page 9
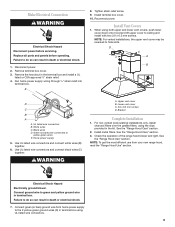
... new range hood, read the "Range Hood Use" section. D C C A B D C B A A. Green (or bare) wire connected to ceiling and install with two 2.9 x 6.5 mm screws. Use UL listed wire connectors and connect black wires (C) together. Run home power supply wiring through ¹⁄₂" strain ...Failure to do so can result in death or electrical shock. 7. Tighten strain relief screw. 9. For non-vented (recirculating) installations only, install charcoal filters over the grease filters, using both upper and lower vent covers, push lower cover down onto hood and lift upper...
... new range hood, read the "Range Hood Use" section. D C C A B D C B A A. Green (or bare) wire connected to ceiling and install with two 2.9 x 6.5 mm screws. Use UL listed wire connectors and connect black wires (C) together. Run home power supply wiring through ¹⁄₂" strain ...Failure to do so can result in death or electrical shock. 7. Tighten strain relief screw. 9. For non-vented (recirculating) installations only, install charcoal filters over the grease filters, using both upper and lower vent covers, push lower cover down onto hood and lift upper...
Installation Guide
Page 10
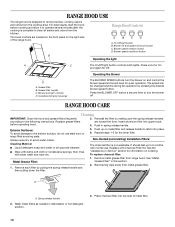
..., cooking vapors and odors from the kitchen. See "Metal Grease Filter" in spring release handle. Bend spring clips away from range hood. Non-Vented (recirculating) Installation Filters: Cleaning Method: ■ Liquid detergent soap and water, or all smoke and odors from the cooktop area. Repeat steps 1-5 for Off. Wash metal filters...
..., cooking vapors and odors from the kitchen. See "Metal Grease Filter" in spring release handle. Bend spring clips away from range hood. Non-Vented (recirculating) Installation Filters: Cleaning Method: ■ Liquid detergent soap and water, or all smoke and odors from the cooktop area. Repeat steps 1-5 for Off. Wash metal filters...

Installation Guide
Page 13
... replacement parts If you need further assistance, you use only factory specified parts. Call the Whirlpool Customer eXperience Center toll free: 1-800-253-1301 or visit our website at www.whirlpool.ca. Accessories Recirculation Kit (for non-vented installations only) Order Part Number W10349327 Charcoal Filter Kit (for assistance or service, please know...
... replacement parts If you need further assistance, you use only factory specified parts. Call the Whirlpool Customer eXperience Center toll free: 1-800-253-1301 or visit our website at www.whirlpool.ca. Accessories Recirculation Kit (for non-vented installations only) Order Part Number W10349327 Charcoal Filter Kit (for assistance or service, please know...

Installation Guide
Page 14
...resulting from accident, alteration, misuse, abuse, fire, flood, acts of God, improper installation, installation not in accordance with the product, Whirlpool Corporation or Whirlpool Canada LP (hereafter "Whirlpool") will need it is used for other damage to better help you obtain assistance or... and Canada, contact your major appliance, to published user or operator instructions and/or installation instructions. 4. Service calls to correct the installation of your authorized Whirlpool dealer to repair or replace appliance light bulbs, air filters or water filters. IMPLIED ...
...resulting from accident, alteration, misuse, abuse, fire, flood, acts of God, improper installation, installation not in accordance with the product, Whirlpool Corporation or Whirlpool Canada LP (hereafter "Whirlpool") will need it is used for other damage to better help you obtain assistance or... and Canada, contact your major appliance, to published user or operator instructions and/or installation instructions. 4. Service calls to correct the installation of your authorized Whirlpool dealer to repair or replace appliance light bulbs, air filters or water filters. IMPLIED ...

Warranty Information
Page 1
... be repaired in the home and only in a remote area where service by calling Whirlpool. Damage resulting from accident, alteration, misuse, abuse, fire, flood, acts of God, improper installation, installation not in materials or workmanship and is reported to Whirlpool within 30 days from the date of purchase. 6. Expenses for travel and transportation for...
... be repaired in the home and only in a remote area where service by calling Whirlpool. Damage resulting from accident, alteration, misuse, abuse, fire, flood, acts of God, improper installation, installation not in materials or workmanship and is reported to Whirlpool within 30 days from the date of purchase. 6. Expenses for travel and transportation for...
