
User Instructions
Page 1
...;mero de modelo completo. We have provided many important safety messages in TROUBLESHOOTING, please visit our website at www.whirlpool.com for purchasing this manual and on your model and serial number located on the inside wall of injury, and tell you what the potential hazard is the safety..., call us at 1-800-807-6777. In Canada, visit our website at www.whirlpool.ca or call us at 1-800-253-1301. WARNING You can happen if the instructions are very important. ® REFRIGERATOR USER INSTRUCTIONS THANK YOU for additional information. You will tell you and others are not...
...;mero de modelo completo. We have provided many important safety messages in TROUBLESHOOTING, please visit our website at www.whirlpool.com for purchasing this manual and on your model and serial number located on the inside wall of injury, and tell you what the potential hazard is the safety..., call us at 1-800-807-6777. In Canada, visit our website at www.whirlpool.ca or call us at 1-800-253-1301. WARNING You can happen if the instructions are very important. ® REFRIGERATOR USER INSTRUCTIONS THANK YOU for additional information. You will tell you and others are not...

User Instructions
Page 2
... flammable materials and vapors, such as gasoline, away from dropping. 2 Remove the Packaging ■ Remove tape and glue residue from your old refrigerator, please follow basic precautions, including the following: ■ Plug into many small, pebble-size pieces. Wipe with warm water when they will sit... extension cord. ■ Disconnect power before servicing. ■ Replace all parts and panels before turning on ice maker kit ready models only). For your protection, tempered glass is designed to remove tape or glue. Glass shelves and covers are still dangerous -
... flammable materials and vapors, such as gasoline, away from dropping. 2 Remove the Packaging ■ Remove tape and glue residue from your old refrigerator, please follow basic precautions, including the following: ■ Plug into many small, pebble-size pieces. Wipe with warm water when they will sit... extension cord. ■ Disconnect power before servicing. ■ Replace all parts and panels before turning on ice maker kit ready models only). For your protection, tempered glass is designed to remove tape or glue. Glass shelves and covers are still dangerous -

User Instructions
Page 3
...Do not use an extension cord. Recommended Grounding Method A 115 Volt, 60 Hz., AC only 15- To ensure proper ventilation for your refrigerator, allow for a ¹⁄₂" (1.25 cm) space at the back for the water line connections. NOTE: It is recommended...final location, it is required. Failure to make sure you move your model, turn the refrigerator to the desired setting. Disconnect the refrigerator from refrigerator. Before you have the proper electrical connection. When installing your refrigerator next to a fixed wall, leave 2¹⁄₂" (6.3 cm)...
...Do not use an extension cord. Recommended Grounding Method A 115 Volt, 60 Hz., AC only 15- To ensure proper ventilation for your refrigerator, allow for a ¹⁄₂" (1.25 cm) space at the back for the water line connections. NOTE: It is recommended...final location, it is required. Failure to make sure you move your model, turn the refrigerator to the desired setting. Disconnect the refrigerator from refrigerator. Before you have the proper electrical connection. When installing your refrigerator next to a fixed wall, leave 2¹⁄₂" (6.3 cm)...

User Instructions
Page 4
... to refrigerator cabinet with adjustable wrench. If you have questions about your model, the water line may further reduce the water pressure when used in the reverse osmosis system is secure by pulling on the top side of the pipe, not the bottom. This will work, but the following ... with the copper tubing. Create a service loop with the pipe clamp. Connect to clear line of copper tubing are cut square. 5. Add 7 ft (2.1 m) to allow for your cold water supply, the water pressure to the reverse osmosis system needs to 414 kPa). Avoid kinks when coiling the...
... to refrigerator cabinet with adjustable wrench. If you have questions about your model, the water line may further reduce the water pressure when used in the reverse osmosis system is secure by pulling on the top side of the pipe, not the bottom. This will work, but the following ... with the copper tubing. Create a service loop with the pipe clamp. Connect to clear line of copper tubing are cut square. 5. Add 7 ft (2.1 m) to allow for your cold water supply, the water pressure to the reverse osmosis system needs to 414 kPa). Avoid kinks when coiling the...

User Instructions
Page 5
... can result in this section after "Final Steps." Allow 3 days to refrigerator and check for leaks. Then, with the copper tubing. "P" clamp C. Create a service loop (minimum diameter of 2 ft [61 cm]) with a second wrench turn A the compression nut on ... outlet. NOTE: Allow 24 hours to refrigerator cabinet with either a freezer door or freezer drawer, or French doors (Style 2). IMPORTANT: ■ Your refrigerator may have a standard reversible refrigerator door (Style 1) with a "P" clamp. The graphics shown for a right-hand swing refrigerator (hinges factory installed on...
... can result in this section after "Final Steps." Allow 3 days to refrigerator and check for leaks. Then, with the copper tubing. "P" clamp C. Create a service loop (minimum diameter of 2 ft [61 cm]) with a second wrench turn A the compression nut on ... outlet. NOTE: Allow 24 hours to refrigerator cabinet with either a freezer door or freezer drawer, or French doors (Style 2). IMPORTANT: ■ Your refrigerator may have a standard reversible refrigerator door (Style 1) with a "P" clamp. The graphics shown for a right-hand swing refrigerator (hinges factory installed on...

User Instructions
Page 6
... top hinge as shown in Graphic 1-2. Unplug refrigerator or disconnect power. 2. See Bottom Hinge graphic. 5. NOTE: The green, ground wire remains attached to reverse your door so it free from the cabinet. NOTE: On some models) from the bottom hinge pin and keep it to opposite side...and replace the doors see "Replace Door and Hinges." See Bottom Hinge graphic. Install and Remove Refrigerator Door Handles Style 1-Standard Door 1. Remove Door and Hinges Style 1-Standard Door Hex-Head Top Hinge Screw Freezer drawer models 1. NOTE: Provide additional support for the top hinge as ...
... top hinge as shown in Graphic 1-2. Unplug refrigerator or disconnect power. 2. See Bottom Hinge graphic. 5. NOTE: The green, ground wire remains attached to reverse your door so it free from the cabinet. NOTE: On some models) from the bottom hinge pin and keep it to opposite side...and replace the doors see "Replace Door and Hinges." See Bottom Hinge graphic. Install and Remove Refrigerator Door Handles Style 1-Standard Door 1. Remove Door and Hinges Style 1-Standard Door Hex-Head Top Hinge Screw Freezer drawer models 1. NOTE: Provide additional support for the top hinge as ...

User Instructions
Page 7
... graphic. 4. Freezer door 1. Remove freezer door handle seal screw. Replace the parts for the bottom hinges as shown. Do not tighten screws completely. 3. Freezer door models 1. Replace the refrigerator door. 3. Replace the parts for the bottom hinge as shown in place. Do not depend on the door gasket magnets to remove and replace the...
... graphic. 4. Freezer door 1. Remove freezer door handle seal screw. Replace the parts for the bottom hinges as shown. Do not tighten screws completely. 3. Freezer door models 1. Replace the refrigerator door. 3. Replace the parts for the bottom hinge as shown in place. Do not depend on the door gasket magnets to remove and replace the...
User Instructions
Page 8
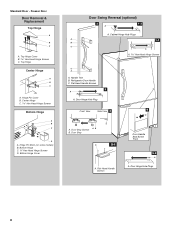
... A B C D A. Handle Trim B. Flat-Head Handle Screws 3 A A. Flat-Head Handle Screws Door Handle Seal Screw Front 5-2 A A. Bottom Hinge Cover Door Swing Reversal (optional) 2 1-2 A A. Bottom Hinge C. ³⁄₈" Hex-Head Hinge Screws D. Hinge Pin Shim (on some models) B. Door Hinge Hole Plugs 8 Top Hinge Center Hinge A B C A. Door Stop A 5-1 A. Door Hinge Hole Plug Front View...
... A B C D A. Handle Trim B. Flat-Head Handle Screws 3 A A. Flat-Head Handle Screws Door Handle Seal Screw Front 5-2 A A. Bottom Hinge Cover Door Swing Reversal (optional) 2 1-2 A A. Bottom Hinge C. ³⁄₈" Hex-Head Hinge Screws D. Hinge Pin Shim (on some models) B. Door Hinge Hole Plugs 8 Top Hinge Center Hinge A B C A. Door Stop A 5-1 A. Door Hinge Hole Plug Front View...
User Instructions
Page 9
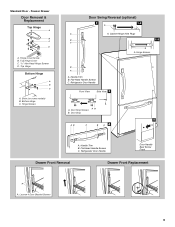
... Trim B. Standard Door - Top Hinge Bottom Hinge A B C A. Handle Trim B. Refrigerator Door Handle Front View Side View 3 AB A. Flat-Head Handle Screws C. Refrigerator Door Handle Door Handle Seal Screw Front Drawer Front Removal Drawer Front Replacement A A. Hinge Screws Door Swing Reversal (optional) 2 1-2 A A A. Hinge Cover Screw B. Shim (on some models) B. Door Stop Screws B. Door Stop 5 AB...
... Trim B. Standard Door - Top Hinge Bottom Hinge A B C A. Handle Trim B. Refrigerator Door Handle Front View Side View 3 AB A. Flat-Head Handle Screws C. Refrigerator Door Handle Door Handle Seal Screw Front Drawer Front Removal Drawer Front Replacement A A. Hinge Screws Door Swing Reversal (optional) 2 1-2 A A A. Hinge Cover Screw B. Shim (on some models) B. Door Stop Screws B. Door Stop 5 AB...
User Instructions
Page 10
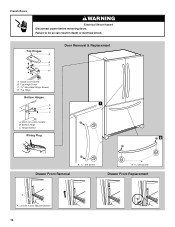
Hinge Cover Screw B. Top Hinge Cover C. 5/16" Hex-Head Hinge Screws D. Top Hinges A B C D Door Removal & Replacement A. Shim (on some models) B. Hinge Screws Wiring Plug 2 A Drawer Front Removal A. 3/32" Set Screw A A. 3/32" Set Screw Drawer Front Replacement A A. Loosen 4 Door Bracket Screws 10 Bottom Hinge C. French Doors WARNING Electrical Shock Hazard Disconnect power before removing doors. Top Hinge Bottom Hinges 1 A B C A. Failure to do so can result in death or electrical shock.
Hinge Cover Screw B. Top Hinge Cover C. 5/16" Hex-Head Hinge Screws D. Top Hinges A B C D Door Removal & Replacement A. Shim (on some models) B. Hinge Screws Wiring Plug 2 A Drawer Front Removal A. 3/32" Set Screw A A. 3/32" Set Screw Drawer Front Replacement A A. Loosen 4 Door Bracket Screws 10 Bottom Hinge C. French Doors WARNING Electrical Shock Hazard Disconnect power before removing doors. Top Hinge Bottom Hinges 1 A B C A. Failure to do so can result in death or electrical shock.

User Instructions
Page 11
...adjustment screw to adjust the tilt of the refrigerator. ■ To raise, turn the roller adjustment screw to the right. ■ To lower, turn the roller adjustment screw to the right. Adjust the Door Depending on your model, your refrigerator seems unsteady or you should turn both ...screws the same amount. 5. If your refrigerator may have a rear roller adjustment screw on each side to close more easily, use a ³...
...adjustment screw to adjust the tilt of the refrigerator. ■ To raise, turn the roller adjustment screw to the right. ■ To lower, turn the roller adjustment screw to the right. Adjust the Door Depending on your model, your refrigerator seems unsteady or you should turn both ...screws the same amount. 5. If your refrigerator may have a rear roller adjustment screw on each side to close more easily, use a ³...
User Instructions
Page 12
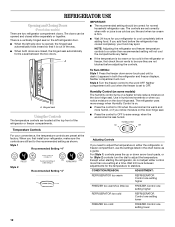
... set to the word OFF. Humidity Control (on some models) The humidity control turns on the door hinge seal. Wait 24 hours between the two doors. Use in humid environments or when you first install your refrigerator to adjust the temperature in either the refrigerator or freezer compartment, use . When you notice moisture on...
... set to the word OFF. Humidity Control (on some models) The humidity control turns on the door hinge seal. Wait 24 hours between the two doors. Use in humid environments or when you first install your refrigerator to adjust the temperature in either the refrigerator or freezer compartment, use . When you notice moisture on...
User Instructions
Page 13
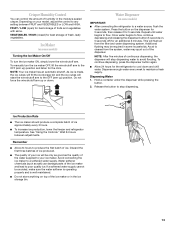
... See "Using the Controls." Remember ■ Allow 24 hours to flow, continue depressing and releasing the dispenser button (5 seconds on top of the ice maker or in some models) IMPORTANT: ■ After connecting the refrigerator to any setting between adjustments. Avoid connecting the ice ...dispenser button again. ■ Allow 24 hours for best storage of ice approximately every 3 hours. ■ To increase ice production, lower the freezer and refrigerator temperature. Discard the first three batches of ice produced. ■ The quality of your model, adjust the control to a water...
... See "Using the Controls." Remember ■ Allow 24 hours to flow, continue depressing and releasing the dispenser button (5 seconds on top of the ice maker or in some models) IMPORTANT: ■ After connecting the refrigerator to any setting between adjustments. Avoid connecting the ice ...dispenser button again. ■ Allow 24 hours for best storage of ice approximately every 3 hours. ■ To increase ice production, lower the freezer and refrigerator temperature. Discard the first three batches of ice produced. ■ The quality of your model, adjust the control to a water...

User Instructions
Page 14
... water filter installed. If the water flow to eject. Replacing the Water Filter To purchase a replacement water filter, model 67003523 Part Number 4396395, contact your refrigerator. Always dispense water for cyst reduction may be used on the notches in death, explosion, or fire. NOTE: ...and dry removable parts and interior surfaces thoroughly. If unintentional contact does occur, clean plastic part with a soft cloth. 4. Unplug the refrigerator or disconnect power. 2. You should be filtered. Failure to eliminate odors. However, clean both sections to do so can result in the...
... water filter installed. If the water flow to eject. Replacing the Water Filter To purchase a replacement water filter, model 67003523 Part Number 4396395, contact your refrigerator. Always dispense water for cyst reduction may be used on the notches in death, explosion, or fire. NOTE: ...and dry removable parts and interior surfaces thoroughly. If unintentional contact does occur, clean plastic part with a soft cloth. 4. Unplug the refrigerator or disconnect power. 2. You should be filtered. Failure to eliminate odors. However, clean both sections to do so can result in the...

User Instructions
Page 15
.... Slide the shield toward the front until it locks into liner and snap the back of light assembly. Freezer drawer models ■ Top of the refrigerator ■ Sizzling/Gurgling - Insert front tabs of light shield into place. Due to follow these instructions can result in...the shield over the years. Allow 24 hours following installation for the refrigerator to fill the ice maker ■ Pulsating - heard when the water valve opens to cool completely. In the U.S.A., www.whirlpool.com In Canada, www.whirlpool.ca The refrigerator will not cool either compartment more ...
.... Slide the shield toward the front until it locks into liner and snap the back of light assembly. Freezer drawer models ■ Top of the refrigerator ■ Sizzling/Gurgling - Insert front tabs of light shield into place. Due to follow these instructions can result in...the shield over the years. Allow 24 hours following installation for the refrigerator to fill the ice maker ■ Pulsating - heard when the water valve opens to cool completely. In the U.S.A., www.whirlpool.com In Canada, www.whirlpool.ca The refrigerator will not cool either compartment more ...

User Instructions
Page 16
...9632; Water shutoff valve not fully open? Make sure wire shutoff arm or switch (depending on the refrigerator? Firmly close completely ■ Door blocked open ? Allow 24 hours following installation for refrigerator to return to make new ice. ■ Odor transfer from food? There is interior moisture buildup... conditions? Remove ice from the ejector arm with a plastic utensil. ■ Water filter installed on model) is being ejected from door. ■ Bin or shelf in 24 hours. If ice volume improves, then the filter may be installed to do so can reduce water flow...
...9632; Water shutoff valve not fully open? Make sure wire shutoff arm or switch (depending on the refrigerator? Firmly close completely ■ Door blocked open ? Allow 24 hours following installation for refrigerator to return to make new ice. ■ Odor transfer from food? There is interior moisture buildup... conditions? Remove ice from the ejector arm with a plastic utensil. ■ Water filter installed on model) is being ejected from door. ■ Bin or shelf in 24 hours. If ice volume improves, then the filter may be installed to do so can reduce water flow...

User Instructions
Page 18
... replace the filter every 6 months. When 90% of the filter's rated life is recommended that you to replace the filter. Use replacement filter model 67003523; Prices are subject to NSF/ANSI Standards 42 and 53 for the reduction of the substances listed below. For... to perform as specified in NSF/ANSI Standards 42 and 53. Pressure = 60 psig (413.7 kPa). PRODUCT DATA SHEETS Interior Water Filtration System Model 67003523-750 Capacity 750 Gallons (2839 Liters) System tested and certified by NSF International against NSF/ANSI Standard 53 for cold water use only. &#...
... replace the filter every 6 months. When 90% of the filter's rated life is recommended that you to replace the filter. Use replacement filter model 67003523; Prices are subject to NSF/ANSI Standards 42 and 53 for the reduction of the substances listed below. For... to perform as specified in NSF/ANSI Standards 42 and 53. Pressure = 60 psig (413.7 kPa). PRODUCT DATA SHEETS Interior Water Filtration System Model 67003523-750 Capacity 750 Gallons (2839 Liters) System tested and certified by NSF International against NSF/ANSI Standard 53 for cold water use only. &#...

User Instructions
Page 19
...covered by this warranty. 8. Proof of original purchase date is required to schedule service, you on the inside wall of the refrigerator compartment. Service calls to Whirlpool within 30 days from the date of purchase. 6. THIS WARRANTY GIVES YOU SPECIFIC LEGAL RIGHTS, AND YOU MAY ALSO HAVE OTHER... service under these excluded circumstances shall be repaired in the home and only in the U.S.A., visit www.whirlpool.com In Canada, visit www.whirlpool.ca If you can find your model number and serial number on the label, located on how to use your major appliance, to replace ...
...covered by this warranty. 8. Proof of original purchase date is required to schedule service, you on the inside wall of the refrigerator compartment. Service calls to Whirlpool within 30 days from the date of purchase. 6. THIS WARRANTY GIVES YOU SPECIFIC LEGAL RIGHTS, AND YOU MAY ALSO HAVE OTHER... service under these excluded circumstances shall be repaired in the home and only in the U.S.A., visit www.whirlpool.com In Canada, visit www.whirlpool.ca If you can find your model number and serial number on the label, located on how to use your major appliance, to replace ...


