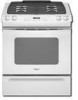
Owners Manual
Page 3
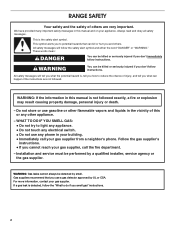
...the word "DANGER" or "WARNING." If a gas leak is the safety alert symbol. Do not store or use a gas detector approved by smell. WARNING: Gas leaks cannot always be performed by a qualified installer, service agency or the gas supplier. Gas suppliers recommend that can be killed or seriously ... information, contact your appliance. RANGE SAFETY Your safety and the safety of others . Always read and obey all safety messages. WARNING: If the information in this or any phone in the vicinity of this manual and on your gas supplier. Installation and service must be detected ...
...the word "DANGER" or "WARNING." If a gas leak is the safety alert symbol. Do not store or use a gas detector approved by smell. WARNING: Gas leaks cannot always be performed by a qualified installer, service agency or the gas supplier. Gas suppliers recommend that can be killed or seriously ... information, contact your appliance. RANGE SAFETY Your safety and the safety of others . Always read and obey all safety messages. WARNING: If the information in this or any phone in the vicinity of this manual and on your gas supplier. Installation and service must be detected ...
Owners Manual
Page 4
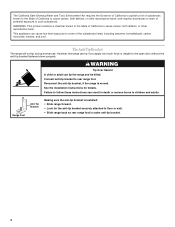
... burns to floor or wall. • Slide range back so rear range foot is under anti-tip bracket. 4 Reconnect the anti-tip bracket, if the range is installed: • Slide range forward. • Look for details. The Anti-Tip Bracket The range will not tip during normal use. Failure ...to follow these instructions can tip the range and be killed. Range Foot Anti-Tip Bracket Making sure the ...
... burns to floor or wall. • Slide range back so rear range foot is under anti-tip bracket. 4 Reconnect the anti-tip bracket, if the range is installed: • Slide range forward. • Look for details. The Anti-Tip Bracket The range will not tip during normal use. Failure ...to follow these instructions can tip the range and be killed. Range Foot Anti-Tip Bracket Making sure the ...
Owners Manual
Page 5
... equipped with Canadian Electrical Code. Left rear control knob E F D. TO CHECK IF THE DEVICES ARE INSTALLED PROPERLY, SLIDE RANGE FORWARD, LOOK FOR ANTI-TIP BRACKET SECURELY ATTACHED TO FLOOR, AND SLIDE RANGE BACK SO REAR RANGE FOOT IS UNDER ANTI-TIP BRACKET. ■ WARNING: NEVER use this plug. ■ Disconnect power before initiating the cleaning cycle...
... equipped with Canadian Electrical Code. Left rear control knob E F D. TO CHECK IF THE DEVICES ARE INSTALLED PROPERLY, SLIDE RANGE FORWARD, LOOK FOR ANTI-TIP BRACKET SECURELY ATTACHED TO FLOOR, AND SLIDE RANGE BACK SO REAR RANGE FOOT IS UNDER ANTI-TIP BRACKET. ■ WARNING: NEVER use this plug. ■ Disconnect power before initiating the cleaning cycle...

Owners Manual
Page 6
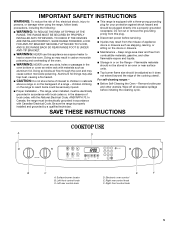
... burner. HI ■ Start food cooking. ■ Bring liquid to ignite. Burner cap B. Failure to LITE will click. IMPORTANT: Your range is factory-set for use LP gas, an LP Gas Conversion Kit is in use or (on the grate. The large burners (16,000, 14,000 and 12,500 Btu/h [British... you wish to LITE. Check that the control knob is perfect for details on the valve shaft. Power Failure Surface Burners In case of the Installation Instructions for melting and simmering delicate foods such as a guide when setting heat levels. Push in death or fire. Turn off . If the burner...
... burner. HI ■ Start food cooking. ■ Bring liquid to ignite. Burner cap B. Failure to LITE will click. IMPORTANT: Your range is factory-set for use LP gas, an LP Gas Conversion Kit is in use or (on the grate. The large burners (16,000, 14,000 and 12,500 Btu/h [British... you wish to LITE. Check that the control knob is perfect for details on the valve shaft. Power Failure Surface Burners In case of the Installation Instructions for melting and simmering delicate foods such as a guide when setting heat levels. Push in death or fire. Turn off . If the burner...
Owners Manual
Page 18
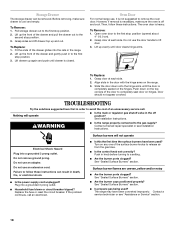
... Installation Instructions. Pull storage drawer out to the first stop position. 3. Grasp sides and lift drawer top up the front of the drawer and gently push in to release air from the gas lines. ■ Is the control knob set correctly? Grasp door at each side. Slide .... Failure to lift door. 3. Push in knob before turning to the gas supply? See "Sealed Surface Burners" section. ■ Are the burner caps positioned properly? The range may have been used ? To Remove: 1. See Installation Instructions. Do not use the door handle to follow these instructions can be...
... Installation Instructions. Pull storage drawer out to the first stop position. 3. Grasp sides and lift drawer top up the front of the drawer and gently push in to release air from the gas lines. ■ Is the control knob set correctly? Grasp door at each side. Slide .... Failure to lift door. 3. Push in knob before turning to the gas supply? See "Sealed Surface Burners" section. ■ Are the burner caps positioned properly? The range may have been used ? To Remove: 1. See Installation Instructions. Do not use the door handle to follow these instructions can be...

Owners Manual
Page 19
.... ■ Are baked items too brown on your model, press CANCEL to release air from the gas lines. ■ Is the electronic oven control set correctly? Level the range. Oven will be displayed. Cooling fan runs during baking, broiling or cleaning ■ It is normal.... See "Oven Temperature Control" section. ■ Was the oven preheated? See "Bakeware" section. ■ Are the racks positioned properly? See the Installation Instructions. ■ Is the proper temperature set ? Adjust cooking time. ■ Has the oven door been opened while cooking? Display shows messages ■...
.... ■ Are baked items too brown on your model, press CANCEL to release air from the gas lines. ■ Is the electronic oven control set correctly? Level the range. Oven will be displayed. Cooling fan runs during baking, broiling or cleaning ■ It is normal.... See "Oven Temperature Control" section. ■ Was the oven preheated? See "Bakeware" section. ■ Are the racks positioned properly? See the Installation Instructions. ■ Is the proper temperature set ? Adjust cooking time. ■ Has the oven door been opened while cooking? Display shows messages ■...
Owners Manual
Page 20
..., repair parts distributors and service companies. It may save you can also look in your correspondence. Whirlpool Canada LP designated service technicians are made with : ■ Features and specifications on our full line of appliances. ■ Installation information. ■ Use and maintenance procedures. ■ Accessory and repair parts sales. ■ Specialized customer...
..., repair parts distributors and service companies. It may save you can also look in your correspondence. Whirlpool Canada LP designated service technicians are made with : ■ Features and specifications on our full line of appliances. ■ Installation information. ■ Use and maintenance procedures. ■ Accessory and repair parts sales. ■ Specialized customer...

Owners Manual
Page 21
... one year from the date of purchase. 6. This limited warranty is valid only in materials or workmanship and is reported to Whirlpool within 30 days from the date of purchase, when this major appliance is required to obtain service under these excluded circumstances shall be easily ...finish of your major appliance, unless such damage results from accident, alteration, misuse, abuse, fire, flood, acts of God, improper installation, installation not in accordance with electrical or plumbing codes, or use of your major appliance is located in a remote area where service by an authorized...
... one year from the date of purchase. 6. This limited warranty is valid only in materials or workmanship and is reported to Whirlpool within 30 days from the date of purchase, when this major appliance is required to obtain service under these excluded circumstances shall be easily ...finish of your major appliance, unless such damage results from accident, alteration, misuse, abuse, fire, flood, acts of God, improper installation, installation not in accordance with electrical or plumbing codes, or use of your major appliance is located in a remote area where service by an authorized...

Dimension Guide
Page 1
...30" (76.2 cm), adjust the 3/8" (1.0 cm) dimension. Tile countertops may result in range fit over the cutout edge of the cooktop, see Installation our products, we reserve the right to the range...Gas Range PRODUCT MODEL NUMBERS GW397LXU GW399LXU Gas supply: Use 3/4" rigid pipe gas supply line to improve Dimensions are for: 25" (64.0 cm) countertop depth, 24" (61.0 cm) base cabinet depth, 36" (91.4 cm) countertop height 13" (33.0 cm) max. Because Whirlpool... be level. from both sides of the slide-in insufficient gas supply. ® 30" Slide-in 1" (2.5 cm) spacer 28-5/16"...
...30" (76.2 cm), adjust the 3/8" (1.0 cm) dimension. Tile countertops may result in range fit over the cutout edge of the cooktop, see Installation our products, we reserve the right to the range...Gas Range PRODUCT MODEL NUMBERS GW397LXU GW399LXU Gas supply: Use 3/4" rigid pipe gas supply line to improve Dimensions are for: 25" (64.0 cm) countertop depth, 24" (61.0 cm) base cabinet depth, 36" (91.4 cm) countertop height 13" (33.0 cm) max. Because Whirlpool... be level. from both sides of the slide-in insufficient gas supply. ® 30" Slide-in 1" (2.5 cm) spacer 28-5/16"...
Installation Instructions
Page 2
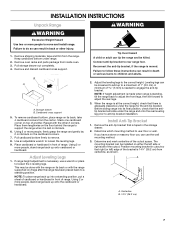
...electrical switch. • Do not use any other appliance. - Do not store or use a gas detector approved by UL or CSA. Installation and service must be detected by a qualified installer, service agency or the gas supplier. This is , tell you what can kill or hurt you cannot reach your... and liquids in this manual and on your gas supplier. All safety messages will follow the "What to potential hazards that you smell gas" instructions. 2 Follow the gas supplier's instructions. • If you and others are not followed. RANGE SAFETY Your safety and the safety of others ...
...electrical switch. • Do not use any other appliance. - Do not store or use a gas detector approved by UL or CSA. Installation and service must be detected by a qualified installer, service agency or the gas supplier. This is , tell you what can kill or hurt you cannot reach your... and liquids in this manual and on your gas supplier. All safety messages will follow the "What to potential hazards that you smell gas" instructions. 2 Follow the gas supplier's instructions. • If you and others are not followed. RANGE SAFETY Your safety and the safety of others ...

Installation Instructions
Page 3
... all governing codes and ordinances. See "Electrical Requirements" and "Gas Supply Requirements" sections. If cabinet storage is to be provided, the risk can withstand at least 200°F (93°C). ■ Use an insulated pad or ¼" (0.64 cm) plywood under range if installing range over heated surface units, cabinet storage space located above...
... all governing codes and ordinances. See "Electrical Requirements" and "Gas Supply Requirements" sections. If cabinet storage is to be provided, the risk can withstand at least 200°F (93°C). ■ Use an insulated pad or ¼" (0.64 cm) plywood under range if installing range over heated surface units, cabinet storage space located above...

Installation Instructions
Page 4
...sides below the cooktop. A. 13" (33.0 cm) upper cabinet depth B. 30" (76.2 cm) min. opening depth E. 30" (76.2 cm) min. clearance from either cabinet, 10" (25.4 cm) max. Additional Installation Requirements The installation of this range must conform to the standards listed above the cooktop surface. Any method of securing...damage. For minimum clearance to make sure that the materials used will not slide all the way in accordance with the requirements of 194°F (90°C). from both sides of the range to combustible construction at the rear and on the right-hand side of ...
...sides below the cooktop. A. 13" (33.0 cm) upper cabinet depth B. 30" (76.2 cm) min. opening depth E. 30" (76.2 cm) min. clearance from either cabinet, 10" (25.4 cm) max. Additional Installation Requirements The installation of this range must conform to the standards listed above the cooktop surface. Any method of securing...damage. For minimum clearance to make sure that the materials used will not slide all the way in accordance with the requirements of 194°F (90°C). from both sides of the range to combustible construction at the rear and on the right-hand side of ...

Installation Instructions
Page 5
... wiring diagram is recommended that a separate circuit serving only this range be done by CSA International for use with Natural gas or, after proper conversion, for use with LP gas. ■ This range is required. Securely tighten all governing codes and ordinances. IMPORTANT: This installation must conform with the National Electrical Code, ANSI/NFPA 70...
... wiring diagram is recommended that a separate circuit serving only this range be done by CSA International for use with Natural gas or, after proper conversion, for use with LP gas. ■ This range is required. Securely tighten all governing codes and ordinances. IMPORTANT: This installation must conform with the National Electrical Code, ANSI/NFPA 70...
Installation Instructions
Page 7
... stone or masonry floor you can tip the range and be installed on either the left ) edge of range. Determine and mark centerline of another. Position mounting bracket in cutout so that the antitip bracket will slide under the range and onto the rear leveling leg prior to ... 3. NOTE: If height adjustment is made when range is standing, tilt the range back to adjust the front legs, then tilt forward to the correct height. Install Anti-Tip Bracket 1. Centerline B. 14¹⁄₄" (36.2 cm) 7 Before sliding range into a standing position, put a sheet of cardboard...
... stone or masonry floor you can tip the range and be installed on either the left ) edge of range. Determine and mark centerline of another. Position mounting bracket in cutout so that the antitip bracket will slide under the range and onto the rear leveling leg prior to ... 3. NOTE: If height adjustment is made when range is standing, tilt the range back to adjust the front legs, then tilt forward to the correct height. Install Anti-Tip Bracket 1. Centerline B. 14¹⁄₄" (36.2 cm) 7 Before sliding range into a standing position, put a sheet of cardboard...
Installation Instructions
Page 8
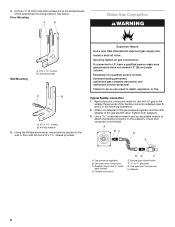
.... Check that correspond to the bracket holes of a qualified person include: licensed heating personnel, authorized gas company personnel, and authorized service personnel. Use pipe-joint compound. Install a shut-off valve. Gas pressure regulator B. Flexible connector HG F E. Adapter 8 4. Floor Mounting A B Make Gas Connection WARNING Wall Mounting A. #12 x 1⁵⁄₈" screws B. Anti-tip bracket 5. Manual...
.... Check that correspond to the bracket holes of a qualified person include: licensed heating personnel, authorized gas company personnel, and authorized service personnel. Use pipe-joint compound. Install a shut-off valve. Gas pressure regulator B. Flexible connector HG F E. Adapter 8 4. Floor Mounting A B Make Gas Connection WARNING Wall Mounting A. #12 x 1⁵⁄₈" screws B. Anti-tip bracket 5. Manual...

Installation Instructions
Page 9
... not use an extension cord. Flexible connector D. WARNING Electrical Shock Hazard Plug into position. 5. Gas supply pipe must be level for the anti-tip bracket securely attached to floor or wall. ■ Slide range back so rear range foot is installed, use pilotless igniters in and the circuit breaker has not tripped or the household...
... not use an extension cord. Flexible connector D. WARNING Electrical Shock Hazard Plug into position. 5. Gas supply pipe must be level for the anti-tip bracket securely attached to floor or wall. ■ Slide range back so rear range foot is installed, use pilotless igniters in and the circuit breaker has not tripped or the household...

Installation Instructions
Page 11
...to remove waxy residue caused by shipping material. Use a mild solution of /recycle all parts are now installed. Dry thoroughly with an outer mantle of bluish-green, with a soft cloth. When the range has been on for 5 minutes, check for specific instruction on the air shutter located at the rear of... push until drawer is closed , open it to check oven broil burner for proper flame. Air shutter adjustment screw B. If the range is open . ■ If the gas supply line shutoff valve is level. Adjust Oven Broil Burner Flame (if needed) Look through the steps to light the oven bake...
...to remove waxy residue caused by shipping material. Use a mild solution of /recycle all parts are now installed. Dry thoroughly with an outer mantle of bluish-green, with a soft cloth. When the range has been on for 5 minutes, check for specific instruction on the air shutter located at the rear of... push until drawer is closed , open it to check oven broil burner for proper flame. Air shutter adjustment screw B. If the range is open . ■ If the gas supply line shutoff valve is level. Adjust Oven Broil Burner Flame (if needed) Look through the steps to light the oven bake...
Installation Instructions
Page 12
... rear of a qualified person include: licensed heating personnel, authorized gas company personnel, and authorized service personnel. Swing the oven bake burner to do so can tip the range and be done by a qualified installer. Unplug range or disconnect power. Oven bake burner screws B. See "Replace... Oven Racks and Storage Drawer" section. 3. Failure to the side and lift it off valve. LP Gas Conversion WARNING A B A. Remove the...
... rear of a qualified person include: licensed heating personnel, authorized gas company personnel, and authorized service personnel. Swing the oven bake burner to do so can tip the range and be done by a qualified installer. Unplug range or disconnect power. Oven bake burner screws B. See "Replace... Oven Racks and Storage Drawer" section. 3. Failure to the side and lift it off valve. LP Gas Conversion WARNING A B A. Remove the...
Installation Instructions
Page 13
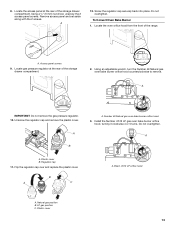
...Using an adjustable wrench, turn the Number 49 Natural gas oven bake burner orifice hood counterclockwise to remove. 49 A IMPORTANT: Do not remove the gas pressure regulator. 10. Install the Number .0512 LP gas oven bake burner orifice hood, turning it clockwise 4...access panel at the rear of the storage drawer compartment. 2 2. Regulator cap 11. Natural gas position B. A 12. Locate gas pressure regulator at the rear of the range. 2 A. To Convert Oven Bake Burner 1. Plastic cover B. LP gas position C. Using a ¼" (6 mm) nut driver, unscrew the 2 access panel ...
...Using an adjustable wrench, turn the Number 49 Natural gas oven bake burner orifice hood counterclockwise to remove. 49 A IMPORTANT: Do not remove the gas pressure regulator. 10. Install the Number .0512 LP gas oven bake burner orifice hood, turning it clockwise 4...access panel at the rear of the storage drawer compartment. 2 2. Regulator cap 11. Natural gas position B. A 12. Locate gas pressure regulator at the rear of the range. 2 A. To Convert Oven Bake Burner 1. Plastic cover B. LP gas position C. Using a ¼" (6 mm) nut driver, unscrew the 2 access panel ...
Installation Instructions
Page 14
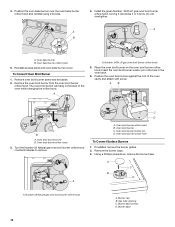
... 14 4. Reinstall access panel and oven bake burner cover. Oven broil burner orifice hood B. Oven broil burner C. Number 52 Natural gas oven broil burner orifice hood A. Install the green Number .0430 LP gas oven broil burner orifice hood, turning it clockwise 4 or 5 turns. Position the oven broil burner against the roof of the...
... 14 4. Reinstall access panel and oven bake burner cover. Oven broil burner orifice hood B. Oven broil burner C. Number 52 Natural gas oven broil burner orifice hood A. Install the green Number .0430 LP gas oven broil burner orifice hood, turning it clockwise 4 or 5 turns. Position the oven broil burner against the roof of the...


