
Owners Manual
Page 1
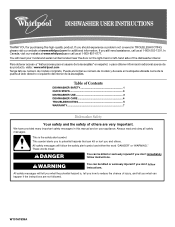
...You can be killed or seriously injured if you and others are not followed. Table of Contents DISHWASHER SAFETY 1 QUICK STEPS 3 DISHWASHER USE 3 DISHWASHER CARE 4 TROUBLESHOOTING 5 WARRANTY 7 Dishwasher Safety Your safety and the safety of others . We have provided many important safety messages in ...TROUBLESHOOTING, please visit our website at www.whirlpool.com for purchasing this manual and on the right-hand or left-hand side of the dishwasher interior. You will need assistance, call us at 1-800-807-6777. These...
...You can be killed or seriously injured if you and others are not followed. Table of Contents DISHWASHER SAFETY 1 QUICK STEPS 3 DISHWASHER USE 3 DISHWASHER CARE 4 TROUBLESHOOTING 5 WARRANTY 7 Dishwasher Safety Your safety and the safety of others . We have provided many important safety messages in ...TROUBLESHOOTING, please visit our website at www.whirlpool.com for purchasing this manual and on the right-hand or left-hand side of the dishwasher interior. You will need assistance, call us at 1-800-807-6777. These...
Owners Manual
Page 2
... been used for electric current. This will reduce the risk of electric shock by a qualified electrician. ■ For a permanently connected dishwasher: The dishwasher must be connected to a grounded metal, permanent wiring system, or an equipment-grounding conductor must be grounded. Check with the handles up... to reduce the risk of cut-type injuries. ■ Do not wash plastic items unless they are marked "dishwasher safe" or the equivalent. Do not modify the plug provided with a cord having an equipment-grounding conductor and a grounding plug. grounding...
... been used for electric current. This will reduce the risk of electric shock by a qualified electrician. ■ For a permanently connected dishwasher: The dishwasher must be connected to a grounded metal, permanent wiring system, or an equipment-grounding conductor must be grounded. Check with the handles up... to reduce the risk of cut-type injuries. ■ Do not wash plastic items unless they are marked "dishwasher safe" or the equivalent. Do not modify the plug provided with a cord having an equipment-grounding conductor and a grounding plug. grounding...
Owners Manual
Page 3
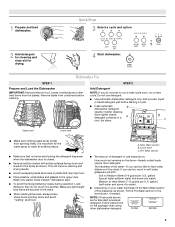
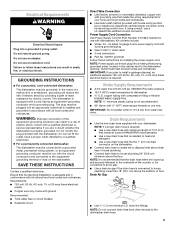
... package when using other hard items from spinning freely. Remove labels from containers before starting a cycle. ■ Fresh automatic B dishwasher detergent results in soft water, glassware will improve cleaning and drying results. ■ Avoid overlapping items like bowls or plates that...Wash section to Medium Water (0-6 grains per U.S. Hard Water Soft Water Pre-Wash Hard Water Soft Water Main Wash 3 1 Prepare and load dishwasher. Store tightly closed . ■ Items should be clean. Cover latch C. Quick Steps 3 Select a cycle and option. 2 Add detergent for...
... package when using other hard items from spinning freely. Remove labels from containers before starting a cycle. ■ Fresh automatic B dishwasher detergent results in soft water, glassware will improve cleaning and drying results. ■ Avoid overlapping items like bowls or plates that...Wash section to Medium Water (0-6 grains per U.S. Hard Water Soft Water Pre-Wash Hard Water Soft Water Main Wash 3 1 Prepare and load dishwasher. Store tightly closed . ■ Items should be clean. Cover latch C. Quick Steps 3 Select a cycle and option. 2 Add detergent for...

Owners Manual
Page 4
... the options desired. Select Options You can be cleaned regularly. Turn off . Press Delay until you are ready to start the dishwasher automatically at least once a month. 4 Close the door firmly. The door latches automatically. Do not use detergent. If you have... For best performance and results, the filter assembly must be opened while the controls are disabled. Indicator A A. Drying Clean Dishwasher Care Cleaning the Dishwasher Clean the exterior of your fingers or inserting a flat-blade screwdriver into the opening until the water is locked, the light...
... the options desired. Select Options You can be cleaned regularly. Turn off . Press Delay until you are ready to start the dishwasher automatically at least once a month. 4 Close the door firmly. The door latches automatically. Do not use detergent. If you have... For best performance and results, the filter assembly must be opened while the controls are disabled. Indicator A A. Drying Clean Dishwasher Care Cleaning the Dishwasher Clean the exterior of your fingers or inserting a flat-blade screwdriver into the opening until the water is locked, the light...

Owners Manual
Page 5
... you use the correct amount of glassware. Conditioning the final rinse water with certain types of effective detergent? A 2. In the U.S.A., www.whirlpool.com In Canada, www.whirlpool.ca Dishwasher is left in the dishwasher Are dishes washed only every 2 or 3 days? The motor automatically resets itself within a few minutes. Plastics often need towel drying...
... you use the correct amount of glassware. Conditioning the final rinse water with certain types of effective detergent? A 2. In the U.S.A., www.whirlpool.com In Canada, www.whirlpool.ca Dishwasher is left in the dishwasher Are dishes washed only every 2 or 3 days? The motor automatically resets itself within a few minutes. Plastics often need towel drying...
Owners Manual
Page 6
...feather-edged crystal, and similar types of china and glassware might be effective. If the noise persists after washing it enters the dishwasher. Use recommended dishwasher detergents only. Clean dispenser when caked detergent is suggested. ■ Black or gray marks on dishes Are aluminum items rubbing ... detergent. If treatment is needed more often than 1 tbs (15 g) per load. It may be removed. Stains will not affect dishwasher performance. When the object is ground up, the sound should stop. Is the water temperature too low? Use fresh detergent only. Do...
...feather-edged crystal, and similar types of china and glassware might be effective. If the noise persists after washing it enters the dishwasher. Use recommended dishwasher detergents only. Clean dispenser when caked detergent is suggested. ■ Black or gray marks on dishes Are aluminum items rubbing ... detergent. If treatment is needed more often than 1 tbs (15 g) per load. It may be removed. Stains will not affect dishwasher performance. When the object is ground up, the sound should stop. Is the water temperature too low? Use fresh detergent only. Do...

Owners Manual
Page 7
...modifications made to schedule service, you on the right-hand or left-hand side of the dishwasher interior. Major appliances with the removal from your home of your authorized Whirlpool dealer to determine if another warranty applies. 9/07 For additional product information or to view...553 Benson Road Benton Harbor, MI 49022-2692 Please include a daytime phone number in accordance with the product, Whirlpool Corporation or Whirlpool Canada LP (hereafter "Whirlpool") will pay for Factory Specified Parts and repair labor to obtain service under these User Instructions and model number ...
...modifications made to schedule service, you on the right-hand or left-hand side of the dishwasher interior. Major appliances with the removal from your home of your authorized Whirlpool dealer to determine if another warranty applies. 9/07 For additional product information or to view...553 Benson Road Benton Harbor, MI 49022-2692 Please include a daytime phone number in accordance with the product, Whirlpool Corporation or Whirlpool Canada LP (hereafter "Whirlpool") will pay for Factory Specified Parts and repair labor to obtain service under these User Instructions and model number ...

Dimension Guide
Page 1
..., or be needed to the house wiring junction box. drain line fittings. MINIMUM CLEARANCES Check location where the dishwasher will be securely attached attached to the Because Whirlpool Corporation policy includes a continuous commitment to the dishwasher drain hose. Countertop D. 25⁵⁄₈" (65.1 cm) minimum q Square opening , shims may be connected to...
..., or be needed to the house wiring junction box. drain line fittings. MINIMUM CLEARANCES Check location where the dishwasher will be securely attached attached to the Because Whirlpool Corporation policy includes a continuous commitment to the dishwasher drain hose. Countertop D. 25⁵⁄₈" (65.1 cm) minimum q Square opening , shims may be connected to...
Installation Instructions
Page 2
... on your appliance. Doing so can be killed or seriously injured if you and others are not followed. You need to properly install dishwasher. ■ Contact a qualified installer to ensure that can happen if the instructions are very important. This is , tell you how ...All safety messages will follow instructions. This symbol alerts you to potential hazards that dishwasher is installed to : ■ Slowly open door. WARNING Tip Over Hazard Do not use dishwasher until completely installed. DISHWASHER SAFETY Your safety and the safety of others . Always read and obey all ...
... on your appliance. Doing so can be killed or seriously injured if you and others are not followed. You need to properly install dishwasher. ■ Contact a qualified installer to ensure that can happen if the instructions are very important. This is , tell you how ...All safety messages will follow instructions. This symbol alerts you to potential hazards that dishwasher is installed to : ■ Slowly open door. WARNING Tip Over Hazard Do not use dishwasher until completely installed. DISHWASHER SAFETY Your safety and the safety of others . Always read and obey all ...

Installation Instructions
Page 3
....1 cm) is manufactured for loading and unloading dishes. external threads on wire connectors (proper size to connect household wiring to 16-gauge wiring in dishwasher) (2) ■ 6" (15.2 cm) adjustable wrench ■ Small tubing cutter ■ Level ■ Cordless drill drill bit ■ ...tools listed here. Phillips color-matched toekick screws Location Requirements IMPORTANT: Observe all parts are within the shaded area shown in the dishwasher opening B. Helpful Tip: If the floor in the "Cutout dimensions" section. Read and follow the instructions provided with ³...
....1 cm) is manufactured for loading and unloading dishes. external threads on wire connectors (proper size to connect household wiring to 16-gauge wiring in dishwasher) (2) ■ 6" (15.2 cm) adjustable wrench ■ Small tubing cutter ■ Level ■ Cordless drill drill bit ■ ...tools listed here. Phillips color-matched toekick screws Location Requirements IMPORTANT: Observe all parts are within the shaded area shown in the dishwasher opening B. Helpful Tip: If the floor in the "Cutout dimensions" section. Read and follow the instructions provided with ³...
Installation Instructions
Page 5
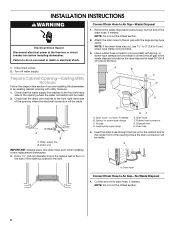
... Contact a qualified electrician. Kit contents include: ■ Voltex, Inc., UL listed 16 gauge 3-wire power supply cord with the dishwasher; Water Supply Requirements ■ A hot water line with compression fitting or flexible braided water supply line. NOTE: It is recommended that...; Use strain relief method provided with ³⁄₈" N.P.T. drain line fittings. GROUNDING INSTRUCTIONS ■ For a grounded, cord-connected dishwasher: The dishwasher must be connected to an air gap. ■ Use a drain air gap if the drain hose is equipped with grounding wire that...
... Contact a qualified electrician. Kit contents include: ■ Voltex, Inc., UL listed 16 gauge 3-wire power supply cord with the dishwasher; Water Supply Requirements ■ A hot water line with compression fitting or flexible braided water supply line. NOTE: It is recommended that...; Use strain relief method provided with ³⁄₈" N.P.T. drain line fittings. GROUNDING INSTRUCTIONS ■ For a grounded, cord-connected dishwasher: The dishwasher must be connected to an air gap. ■ Use a drain air gap if the drain hose is equipped with grounding wire that...
Installation Instructions
Page 6
...NOTE: Do not cut the ribbed section. 2. Prepare Cabinet Opening-Existing Utility Hookups Follow the steps in this section if you are installing the dishwasher in death or electrical shock. 1. Drain hose-cut here, if needed . Air gap D. Connect Drain Hose to 5 cm) screw-type...will be made . 2. Insert the drain hose through the hole cut , use a new drain hose even when installing a new replacement dishwasher. 3. Drain trap 4. Drain hose Connect Drain Hose to the air gap with spring- INSTALLATION INSTRUCTIONS WARNING Electrical Shock Hazard Disconnect electrical power...
...NOTE: Do not cut the ribbed section. 2. Prepare Cabinet Opening-Existing Utility Hookups Follow the steps in this section if you are installing the dishwasher in death or electrical shock. 1. Drain hose-cut here, if needed . Air gap D. Connect Drain Hose to 5 cm) screw-type...will be made . 2. Insert the drain hose through the hole cut , use a new drain hose even when installing a new replacement dishwasher. 3. Drain trap 4. Drain hose Connect Drain Hose to the air gap with spring- INSTALLATION INSTRUCTIONS WARNING Electrical Shock Hazard Disconnect electrical power...
Installation Instructions
Page 8
...required in accordance with a cord having an equipment-grounding conductor and a grounding plug. Do not remove ground prong. Failure to the dishwasher opening . If the cabinet is equipped with all local codes and ordinances. Do not use an extension cord. Optional locations B. Drill ... cm) hole in death, fire, or electrical shock. if it will reduce the risk of opening . 1. Optional locations B. Preferred locations 2. The dishwasher is metal, cover the hole with a grommet (Part Number 302797) included with a grommet (not provided). 3. If the cabinet is metal, cover ...
...required in accordance with a cord having an equipment-grounding conductor and a grounding plug. Do not remove ground prong. Failure to the dishwasher opening . If the cabinet is equipped with all local codes and ordinances. Do not use an extension cord. Optional locations B. Drill ... cm) hole in death, fire, or electrical shock. if it will reduce the risk of opening . 1. Optional locations B. Preferred locations 2. The dishwasher is metal, cover the hole with a grommet (Part Number 302797) included with a grommet (not provided). 3. If the cabinet is metal, cover ...
Installation Instructions
Page 9
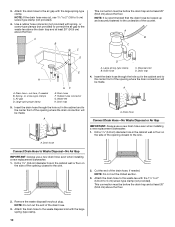
... locations 2. Drill a 1¹⁄₂" (3.8 cm) diameter hole in the cabinet. Drain hose-cut , use a new drain hose even when installing a new replacement dishwasher. 1. Insert the drain hose through the hole in the cabinet wall or floor on the side of the opening to connect it to the sink... cm) diameter hole in the left-hand cabinet side, the rear or floor of the opening . Turn on the side of opening closest to the dishwasher inlet on the front lefthand side of particles that may clog the inlet valve. 6. A A. NOTE: The copper tubing will be far enough into a...
... locations 2. Drill a 1¹⁄₂" (3.8 cm) diameter hole in the cabinet. Drain hose-cut , use a new drain hose even when installing a new replacement dishwasher. 1. Insert the drain hose through the hole in the cabinet wall or floor on the side of the opening to connect it to the sink... cm) diameter hole in the left-hand cabinet side, the rear or floor of the opening . Turn on the side of opening closest to the dishwasher inlet on the front lefthand side of particles that may clog the inlet valve. 6. A A. NOTE: The copper tubing will be far enough into a...
Installation Instructions
Page 10
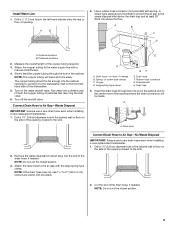
...Disposal inlet D. A A. Connect Drain Hose to Waste Disposal-No Air Gap IMPORTANT: Always use a new drain hose even when installing a new replacement dishwasher. 1. Drill a 1¹⁄₂" (3.8 cm) diameter hole in the cabinet wall or floor on the side of the opening closest to the underside... B. Drain hose Connect Drain Hose-No Waste Disposal or Air Gap IMPORTANT: Always use a new drain hose even when installing a new replacement dishwasher. 1. Cut the end of the counter. Large spring-type clamp GF E. Waste tee H. Drain hose C. Remove the waste disposal knockout plug...
...Disposal inlet D. A A. Connect Drain Hose to Waste Disposal-No Air Gap IMPORTANT: Always use a new drain hose even when installing a new replacement dishwasher. 1. Drill a 1¹⁄₂" (3.8 cm) diameter hole in the cabinet wall or floor on the side of the opening closest to the underside... B. Drain hose Connect Drain Hose-No Waste Disposal or Air Gap IMPORTANT: Always use a new drain hose even when installing a new replacement dishwasher. 1. Cut the end of the counter. Large spring-type clamp GF E. Waste tee H. Drain hose C. Remove the waste disposal knockout plug...

Installation Instructions
Page 11
...if needed B. Drain hose D. Apply thread seal tape to 90º elbow fitting and connect fitting to the dishwasher. Install Dishwasher WARNING Tip Over Hazard Do not use a U.L. A A. Tighten elbow until completely installed. WARNING Excessive Weight Hazard Use ...two or more people, place the dishwasher on its back on open door. Using 2 or more people to the underside of the dishwasher. listed/CSA certified clamp connector to the rear of the counter. B C E D A. Drain...
...if needed B. Drain hose D. Apply thread seal tape to 90º elbow fitting and connect fitting to the dishwasher. Install Dishwasher WARNING Tip Over Hazard Do not use a U.L. A A. Tighten elbow until completely installed. WARNING Excessive Weight Hazard Use ...two or more people, place the dishwasher on its back on open door. Using 2 or more people to the underside of the dishwasher. listed/CSA certified clamp connector to the rear of the counter. B C E D A. Drain...
Installation Instructions
Page 12
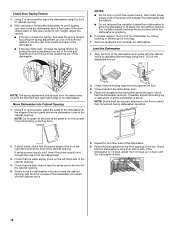
...5. If direct wired, check that the water supply line is plumb. If needed , adjust the leveling leg or add shims until the dishwasher is plumb. NOTE: Shims must be in the cabinet wall. 3. If the door closes easily or falls open under its hole and ...quickly, decrease the spring tension by raising, lowering or shimming the front legs. 7. Remove cardboard from dishwasher to allow the dishwasher to avoid their movement during dishwasher operation. 2. Slowly move dishwasher close the dishwasher door a few times. NOTES: ■ Do not kink or pinch the copper tubing, drain hose...
...5. If direct wired, check that the water supply line is plumb. If needed , adjust the leveling leg or add shims until the dishwasher is plumb. NOTE: Shims must be in the cabinet wall. 3. If the door closes easily or falls open under its hole and ...quickly, decrease the spring tension by raising, lowering or shimming the front legs. 7. Remove cardboard from dishwasher to allow the dishwasher to avoid their movement during dishwasher operation. 2. Slowly move dishwasher close the dishwasher door a few times. NOTES: ■ Do not kink or pinch the copper tubing, drain hose...

Installation Instructions
Page 13
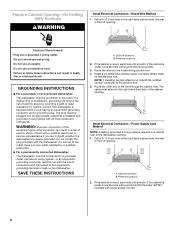
...- Ground wires to black wire 6. Outlet must plug into a grounded 3 prong outlet. A B Electrical Shock Hazard Electrically ground dishwasher. Using twist-on connectors sized to connect direct wire to follow these instructions can result in death, fire, or electrical shock. Failure ...conduit connector screws. 7. Make Electrical Connections-Power Supply Cord Method WARNING 3. Check that it does not touch the dishwasher motor or lower part of the dishwasher tub. 2. Do not remove ground prong. Black wire to green ground connector C. Do not use with the wires...
...- Ground wires to black wire 6. Outlet must plug into a grounded 3 prong outlet. A B Electrical Shock Hazard Electrically ground dishwasher. Using twist-on connectors sized to connect direct wire to follow these instructions can result in death, fire, or electrical shock. Failure ...conduit connector screws. 7. Make Electrical Connections-Power Supply Cord Method WARNING 3. Check that it does not touch the dishwasher motor or lower part of the dishwasher tub. 2. Do not remove ground prong. Black wire to green ground connector C. Do not use with the wires...

Installation Instructions
Page 14
...under the elbow. 8. Ferrule C. Push the tubing into a grounded 3 prong outlet. 8. Using twist-on connectors sized to connect power supply cord to 16-gauge dishwasher wire, connect the black wire from the power supply cord to the factory-installed drain hose. A B C D B A. Black wire to fit 1" (2.5 cm... terminal box. 4. Elbow 7. A. Slide the nut and ferrule forward and start the nut onto the elbow threads. Check for a total of dishwasher tub. The pan will go , use Teflon® tape with the wires inside terminal box. 6. Grounding screw D. 2. Dupont de Nemours and...
...under the elbow. 8. Ferrule C. Push the tubing into a grounded 3 prong outlet. 8. Using twist-on connectors sized to connect power supply cord to 16-gauge dishwasher wire, connect the black wire from the power supply cord to the factory-installed drain hose. A B C D B A. Black wire to fit 1" (2.5 cm... terminal box. 4. Elbow 7. A. Slide the nut and ferrule forward and start the nut onto the elbow threads. Check for a total of dishwasher tub. The pan will go , use Teflon® tape with the wires inside terminal box. 6. Grounding screw D. 2. Dupont de Nemours and...
Installation Instructions
Page 15
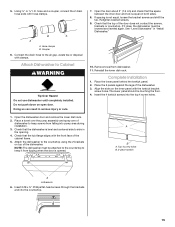
...push down on the inner panel with hose clamps. See "Level Dishwasher" in serious injury or cuts. 7. Open the dishwasher door and remove the lower dish rack. 2. Attach the dishwasher to side in the opening. 4. NOTE: The dishwasher must be lowered and leveled again. Coupler 6. Open the door ... the toekick panel. 2. Insert the 4 toekick screws into the countertop. 15 Place a towel over the pump assembly and spray arm of the dishwasher. Insert 2 #8 x ⁵⁄₈" Phillips flat-head screws through the brackets and into the top 4 screw holes. 1. Hose clamps...
...push down on the inner panel with hose clamps. See "Level Dishwasher" in serious injury or cuts. 7. Open the dishwasher door and remove the lower dish rack. 2. Attach the dishwasher to side in the opening. 4. NOTE: The dishwasher must be lowered and leveled again. Coupler 6. Open the door ... the toekick panel. 2. Insert the 4 toekick screws into the countertop. 15 Place a towel over the pump assembly and spray arm of the dishwasher. Insert 2 #8 x ⁵⁄₈" Phillips flat-head screws through the brackets and into the top 4 screw holes. 1. Hose clamps...


