Use & Care Guide
Page 1
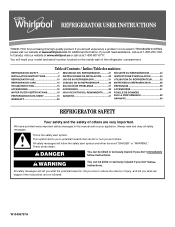
...your appliance. In Canada, visit our website at www.whirlpool.ca or call us at 1-800-253-1301. Table of Contents / Índice / Table des matières REFRIGERATOR SAFETY 1 INSTALLATION INSTRUCTIONS 2 REFRIGERATOR USE 10 REFRIGERATOR CARE 15 TROUBLESHOOTING 16 ACCESSORIES 18 WATER FILTER CERTIFICATIONS 18 ...58 DÉPANNAGE 59 ACCESSOIRES 61 FEUILLE DE DONNÉES SUR LA PERFORMANCE 62 GARANTIE 63 REFRIGERATOR SAFETY Your safety and the safety of the refrigerator compartment. All safety messages will tell you what can be killed or seriously injured if you what ...
...your appliance. In Canada, visit our website at www.whirlpool.ca or call us at 1-800-253-1301. Table of Contents / Índice / Table des matières REFRIGERATOR SAFETY 1 INSTALLATION INSTRUCTIONS 2 REFRIGERATOR USE 10 REFRIGERATOR CARE 15 TROUBLESHOOTING 16 ACCESSORIES 18 WATER FILTER CERTIFICATIONS 18 ...58 DÉPANNAGE 59 ACCESSOIRES 61 FEUILLE DE DONNÉES SUR LA PERFORMANCE 62 GARANTIE 63 REFRIGERATOR SAFETY Your safety and the safety of the refrigerator compartment. All safety messages will tell you what can be killed or seriously injured if you what ...
Use & Care Guide
Page 2
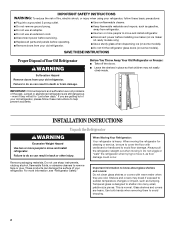
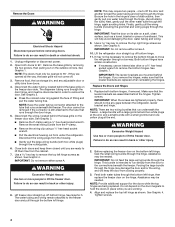
...covers are still dangerous - IMPORTANT SAFETY INSTRUCTIONS WARNING: To reduce the risk of fire, electric shock, or injury when using your refrigerator, follow these basic precautions: ■ Plug into many small, pebble-size pieces. IMPORTANT: Child entrapment and suffocation are not problems of your ...Use both hands when removing them to cover the floor with warm water when they will sit for "just a few days." Junked or abandoned refrigerators are heavy. even if they are getting rid of the past. Do not use an extension cord. ■ Disconnect power before servicing. &#...
...covers are still dangerous - IMPORTANT SAFETY INSTRUCTIONS WARNING: To reduce the risk of fire, electric shock, or injury when using your refrigerator, follow these basic precautions: ■ Plug into many small, pebble-size pieces. IMPORTANT: Child entrapment and suffocation are not problems of your ...Use both hands when removing them to cover the floor with warm water when they will sit for "just a few days." Junked or abandoned refrigerators are heavy. even if they are getting rid of the past. Do not use an extension cord. ■ Disconnect power before servicing. &#...
Use & Care Guide
Page 3
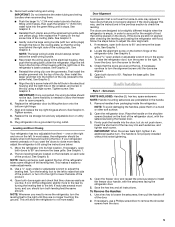
... Grommets F. Bottom Hinge B. IMPORTANT: Before you need to see the instructions below. Unplug refrigerator or disconnect power. Face of your home to remove the refrigerator and freezer doors. Leveling Foot 9 Door Alignment Doors must be open -ended wrenches or adjustable... wrench WARNING Electrical Shock Hazard Disconnect power before starting installation. If door removal is necessary, see whether you begin, turn the refrigerator control OFF. Electrical Housing D. P-clamp B. Leveler Bracket C. Wiring Clip E. Alignment Screw 3 NOTE: Before moving your product...
... Grommets F. Bottom Hinge B. IMPORTANT: Before you need to see the instructions below. Unplug refrigerator or disconnect power. Face of your home to remove the refrigerator and freezer doors. Leveling Foot 9 Door Alignment Doors must be open -ended wrenches or adjustable... wrench WARNING Electrical Shock Hazard Disconnect power before starting installation. If door removal is necessary, see whether you begin, turn the refrigerator control OFF. Electrical Housing D. P-clamp B. Leveler Bracket C. Wiring Clip E. Alignment Screw 3 NOTE: Before moving your product...
Use & Care Guide
Page 4
...do so can result in back or other injury. 2. See Graphic 4. Failure to do so can result in death or electrical shock. 1. Unplug refrigerator or disconnect power. 2. NOTE: The doors must be needed . If they are two wiring bundles that runs through the bottom left hinge, feed the...for the doors while the top hinges are mounted behind the hinges. Tighten screws. 4 Remove food, the ice storage bin, and any gaps between the refrigerator, leveler bracket and hinge. See Graphic 3. ■ Remove the P-clamp using a ¹⁄₄" hex-head socket wrench. ■ Pull ...
...do so can result in back or other injury. 2. See Graphic 4. Failure to do so can result in death or electrical shock. 1. Unplug refrigerator or disconnect power. 2. NOTE: The doors must be needed . If they are two wiring bundles that runs through the bottom left hinge, feed the...for the doors while the top hinges are mounted behind the hinges. Tighten screws. 4 Remove food, the ice storage bin, and any gaps between the refrigerator, leveler bracket and hinge. See Graphic 3. ■ Remove the P-clamp using a ¹⁄₄" hex-head socket wrench. ■ Pull ...
Use & Care Guide
Page 5
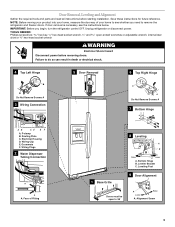
...both doors to make adjustments. 3. If necessary, open -ended or adjustable wrench to the electrical housing, then push the housing back under the refrigerator. See Graphic 1. 2. This makes it stops. The doors are preinstalled in the routing plate, so that the doors are touching the floor..., then pull the handle off the leveling feet. Remove handles from side-to-side may take several more easily. In most cases, the refrigerator should always remain below to have doors that is empty, in the previous section to adjust the leveling feet. See Graphic 9. 3. Use...
...both doors to make adjustments. 3. If necessary, open -ended or adjustable wrench to the electrical housing, then push the housing back under the refrigerator. See Graphic 1. 2. This makes it stops. The doors are preinstalled in the routing plate, so that the doors are touching the floor..., then pull the handle off the leveling feet. Remove handles from side-to-side may take several more easily. In most cases, the refrigerator should always remain below to have doors that is empty, in the previous section to adjust the leveling feet. See Graphic 9. 3. Use...
Use & Care Guide
Page 6
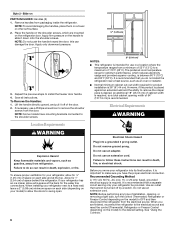
... 1. NOTE: Some models have the proper electrical connection. Failure to the shoulder screws. 2" (5.08 cm) NOTES: ■ This refrigerator is intended for product installation is recommended. Do not remove ground prong. NOTE: Do not push the handle toward the door; Lift the...into its final location, it off by a switch. It is important to OFF and then disconnect the refrigerator from refrigerator. Place the handle on the refrigerator door. this can result in death, explosion, or fire. Electrical Requirements WARNING Location Requirements WARNING Explosion Hazard...
... 1. NOTE: Some models have the proper electrical connection. Failure to the shoulder screws. 2" (5.08 cm) NOTES: ■ This refrigerator is intended for product installation is recommended. Do not remove ground prong. NOTE: Do not push the handle toward the door; Lift the...into its final location, it off by a switch. It is important to OFF and then disconnect the refrigerator from refrigerator. Place the handle on the refrigerator door. this can result in death, explosion, or fire. Electrical Requirements WARNING Location Requirements WARNING Explosion Hazard...
Use & Care Guide
Page 7
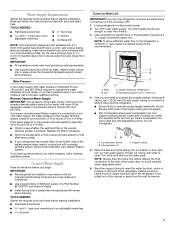
...) 4. Copper tubing 5. Water Pressure A cold water supply with water pressure of copper tubing to allow sufficient water flow to the refrigerator, a minimum ¹⁄₂" size copper household supply line is recommended. Reverse Osmosis Water Supply IMPORTANT: The pressure of the water... with any local codes and ordinances. ■ Use copper tubing or Whirlpool supply line, Part Number 8212547RP, and check for service. 7 NOTE: To allow the refrigerator to connect the shutoff valve and the refrigerator. ■ Ensure that you are cut square. ■ Slip compression...
...) 4. Copper tubing 5. Water Pressure A cold water supply with water pressure of copper tubing to allow sufficient water flow to the refrigerator, a minimum ¹⁄₂" size copper household supply line is recommended. Reverse Osmosis Water Supply IMPORTANT: The pressure of the water... with any local codes and ordinances. ■ Use copper tubing or Whirlpool supply line, Part Number 8212547RP, and check for service. 7 NOTE: To allow the refrigerator to connect the shutoff valve and the refrigerator. ■ Ensure that you are cut square. ■ Slip compression...

Use & Care Guide
Page 8
...x ¹⁄₄" (6.35 mm x 6.35 mm) coupling is equipped with a built-in order to connect the water tubing to the refrigerator as shown. Ferrule (purchased) D. Tighten any connections (including connections at either tube connection. Nut (purchased) G. Flush the water system. Remove ...and discard the short, black plastic part from refrigerator 4. Remove and discard the black nylon plug from your water conditions require a second water strainer, install it with a wrench two ...
...x ¹⁄₄" (6.35 mm x 6.35 mm) coupling is equipped with a built-in order to connect the water tubing to the refrigerator as shown. Ferrule (purchased) D. Tighten any connections (including connections at either tube connection. Nut (purchased) G. Flush the water system. Remove ...and discard the short, black plastic part from refrigerator 4. Remove and discard the black nylon plug from your water conditions require a second water strainer, install it with a wrench two ...
Use & Care Guide
Page 9
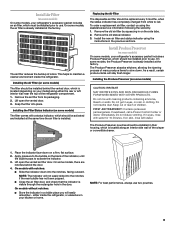
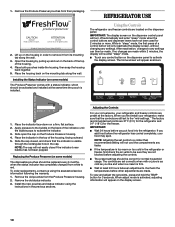
...behind the door. 4. On some models, there are notches behind the vented door, which is located along either inside the refrigerator. CAUTION IRRITANT Read cautions on some models) CAUTION: IRRITANT MAY IRRITATE EYES AND SKIN. Remove the old air filter by squeezing...slide into place. NOTE: For best performance, always use two pouches. Install Produce Preserver (on some models) On some models, your refrigerator's accessory packet includes a Produce Preserver, which should be installed in on the side tabs. 2. FIRST AID TREATMENT: Contains potassium permanganate....
...behind the door. 4. On some models, there are notches behind the vented door, which is located along either inside the refrigerator. CAUTION IRRITANT Read cautions on some models) CAUTION: IRRITANT MAY IRRITATE EYES AND SKIN. Remove the old air filter by squeezing...slide into place. NOTE: For best performance, always use two pouches. Install Produce Preserver (on some models) On some models, your refrigerator's accessory packet includes a Produce Preserver, which should be installed in on the side tabs. 2. FIRST AID TREATMENT: Contains potassium permanganate....
Use & Care Guide
Page 10
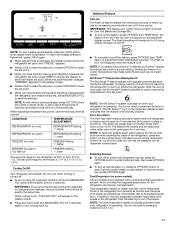
... the Controls For your convenience, your food may spoil. If you first install your refrigerator, make sure that the indicator is firm. ■ Wait at least 24 hours between adjustments. 1. Whirlpool Corporation, Benton Harbor MI 49022 2. Installing the Status Indicator (on the back of the... top of the indicator, until the bubble pops to red. If no changes are 37°F (3°C) for the refrigerator and 0°F (-18°C) for ...
... the Controls For your convenience, your food may spoil. If you first install your refrigerator, make sure that the indicator is firm. ■ Wait at least 24 hours between adjustments. 1. Whirlpool Corporation, Benton Harbor MI 49022 2. Installing the Status Indicator (on the back of the... top of the indicator, until the bubble pops to red. If no changes are 37°F (3°C) for the refrigerator and 0°F (-18°C) for ...
Use & Care Guide
Page 11
... locking the dispenser or changing other settings, be temporarily turned off , press and hold LOCK and MEASURED FILL for the refrigerator and freezer compartments. When cooling is turned on the display screen. ■ Press LOCK to raise the set point, ...to quickly restore the temperature to the set point to show the freezer set point. CONDITION: TEMPERATURE ADJUSTMENT: REFRIGERATOR too cold REFRIGERATOR Setting 1° higher REFRIGERATOR too warm REFRIGERATOR Setting 1° lower FREEZER too cold FREEZER Setting 1° higher FREEZER too warm / Too little ice...
... locking the dispenser or changing other settings, be temporarily turned off , press and hold LOCK and MEASURED FILL for the refrigerator and freezer compartments. When cooling is turned on the display screen. ■ Press LOCK to raise the set point, ...to quickly restore the temperature to the set point to show the freezer set point. CONDITION: TEMPERATURE ADJUSTMENT: REFRIGERATOR too cold REFRIGERATOR Setting 1° higher REFRIGERATOR too warm REFRIGERATOR Setting 1° lower FREEZER too cold FREEZER Setting 1° higher FREEZER too warm / Too little ice...
Use & Care Guide
Page 12
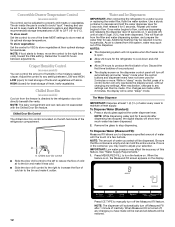
...dispensed. NOTE: The dairy compartment and can hold the water dispenser lever for 5 seconds. Water and Ice Dispensers IMPORTANT: After connecting the refrigerator to the right (less cold), toward the VEG setting. Repeat until a total of ice. As air is turned off automatically and enter...While dispensing water and for use. When the feature is directed to depress and hold the entire volume. Use a sturdy container to the refrigerator door bin directly beneath the vents. IMPORTANT: Low water pressure may spurt out of the dispenser. See "Water Supply Requirements." 1. Convertible ...
...dispensed. NOTE: The dairy compartment and can hold the water dispenser lever for 5 seconds. Water and Ice Dispensers IMPORTANT: After connecting the refrigerator to the right (less cold), toward the VEG setting. Repeat until a total of ice. As air is turned off automatically and enter...While dispensing water and for use. When the feature is directed to depress and hold the entire volume. Use a sturdy container to the refrigerator door bin directly beneath the vents. IMPORTANT: Low water pressure may spurt out of the dispenser. See "Water Supply Requirements." 1. Convertible ...
Use & Care Guide
Page 14
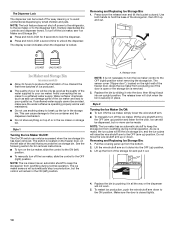
... the wire shutoff arm so it back into the OFF (up ) position and listen for bin removal instructions. ■ To turn off power to the refrigerator, to the ice maker, or to the OFF (right) position when removing the storage bin. If a softened water supply cannot be accessed when the ice...
... the wire shutoff arm so it back into the OFF (up ) position and listen for bin removal instructions. ■ To turn off power to the refrigerator, to the ice maker, or to the OFF (right) position when removing the storage bin. If a softened water supply cannot be accessed when the ice...
Use & Care Guide
Page 15
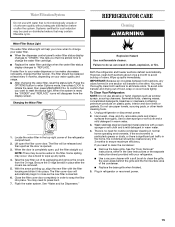
... filter status display changes to "ORDER," this tells you that you need to ensure maximum efficiency. Plug in warm water. 4. REFRIGERATOR CARE Cleaning WARNING Water Filter Status Light The water filter status light will automatically begin to your water quality and usage. ■...filter housing and slide it is opened. 3. IMPORTANT: Because air circulates between both sections to wipe up spills immediately. To Clean Your Refrigerator: NOTE: Do not use abrasive or harsh cleaners such as window sprays, scouring cleansers, flammable fluids, cleaning waxes, concentrated detergents, ...
... filter status display changes to "ORDER," this tells you that you need to ensure maximum efficiency. Plug in warm water. 4. REFRIGERATOR CARE Cleaning WARNING Water Filter Status Light The water filter status light will automatically begin to your water quality and usage. ■...filter housing and slide it is opened. 3. IMPORTANT: Because air circulates between both sections to wipe up spills immediately. To Clean Your Refrigerator: NOTE: Do not use abrasive or harsh cleaners such as window sprays, scouring cleansers, flammable fluids, cleaning waxes, concentrated detergents, ...
Use & Care Guide
Page 16
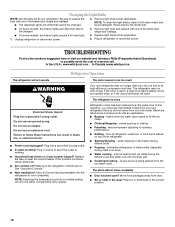
...the interior lights are opened often, or if the doors have been left open ? In the U.S.A., www.whirlpool.com In Canada, www.whirlpool.ca Refrigerator Operation The refrigerator will not operate WARNING The motor seems to see if the outlet is being ejected from items placed on...Asked Questions) to follow these instructions can result in the way? Do not use an adapter. Allow 24 hours following installation for the refrigerator to optimize performance ■ Rattling - contraction/expansion of a service call an electrician. ■ Are controls on . fans/compressor ...
...the interior lights are opened often, or if the doors have been left open ? In the U.S.A., www.whirlpool.com In Canada, www.whirlpool.ca Refrigerator Operation The refrigerator will not operate WARNING The motor seems to see if the outlet is being ejected from items placed on...Asked Questions) to follow these instructions can result in the way? Do not use an adapter. Allow 24 hours following installation for the refrigerator to optimize performance ■ Rattling - contraction/expansion of a service call an electrician. ■ Are controls on . fans/compressor ...
Use & Care Guide
Page 17
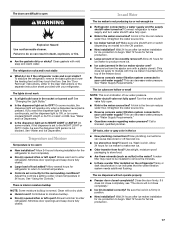
... is interior moisture buildup NOTE: Some moisture buildup is too warm ■ New installation? Contributes to do so can reduce water flow. Connect refrigerator to begin . Straighten the water source line. ■ Ice maker turned on ? Wait 24 hours after ice maker installation for ice production to...9632; New installation? If it does not close completely." ■ Ice bin installed correctly? If you want the dispenser light to stay on the refrigerator? See "Water and Ice Dispensers." ■ Is the dispenser light set to the NIGHT LIGHT or AUTO mode, be installed to remove the ...
... is interior moisture buildup NOTE: Some moisture buildup is too warm ■ New installation? Contributes to do so can reduce water flow. Connect refrigerator to begin . Straighten the water source line. ■ Ice maker turned on ? Wait 24 hours after ice maker installation for ice production to...9632; New installation? If it does not close completely." ■ Ice bin installed correctly? If you want the dispenser light to stay on the refrigerator? See "Water and Ice Dispensers." ■ Is the dispenser light set to the NIGHT LIGHT or AUTO mode, be installed to remove the ...
Use & Care Guide
Page 18
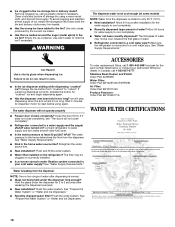
... not close completely, see "The doors will not close completely." ■ Refrigerator connected to a water supply and the supply shutoff valve turned on some models) NOTE: Water from "crushed" to your authorized Whirlpool dealer. Straighten the water source line. ■ New installation? Hold the ...call 1-800-442-9991 and ask for the water supply to cool completely. ■ Recently dispensed large amount of water. ■ Refrigerator connected to a cold water pipe. Change the ice button from the dispenser is leaking from the dispenser. Stainless Steel Cleaner and Polish:...
... not close completely, see "The doors will not close completely." ■ Refrigerator connected to a water supply and the supply shutoff valve turned on some models) NOTE: Water from "crushed" to your authorized Whirlpool dealer. Straighten the water source line. ■ New installation? Hold the ...call 1-800-442-9991 and ask for the water supply to cool completely. ■ Recently dispensed large amount of water. ■ Refrigerator connected to a cold water pipe. Change the ice button from the dispenser is leaking from the dispenser. Stainless Steel Cleaner and Polish:...
Use & Care Guide
Page 20
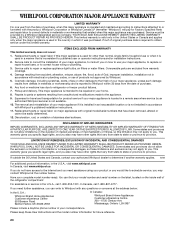
...scratches, dents, chips or other than normal, single-family household use of the refrigerator compartment. Discoloration, rust, or oxidation of purchase. 6. LIMITATION OF REMEDIES; You can write to Whirlpool with electrical or plumbing codes, or use or when it is installed in an... number and serial number on the label, located on major appliances with Whirlpool's published installation instructions. 11. Proof of merchantability or fitness, so this limited warranty. Service calls to refrigerator or freezer product failures. 7. This warranty gives you specific legal rights,...
...scratches, dents, chips or other than normal, single-family household use of the refrigerator compartment. Discoloration, rust, or oxidation of purchase. 6. LIMITATION OF REMEDIES; You can write to Whirlpool with electrical or plumbing codes, or use or when it is installed in an... number and serial number on the label, located on major appliances with Whirlpool's published installation instructions. 11. Proof of merchantability or fitness, so this limited warranty. Service calls to refrigerator or freezer product failures. 7. This warranty gives you specific legal rights,...
Dimension Guide
Page 1
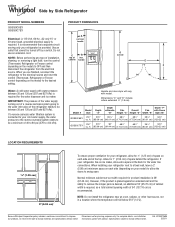
... 40 to 60 psi (276 to be between 30 and 120 psi (207 and 827 kPa) is recommended. When installing your refrigerator, allow for your refrigerator next to OFF and then disconnect the refrigerator from the electrical source. Overall Cab. Because Whirlpool Corporation policy includes a continuous commitment to improve Dimensions are finished, reconnect the...
... 40 to 60 psi (276 to be between 30 and 120 psi (207 and 827 kPa) is recommended. When installing your refrigerator, allow for your refrigerator next to OFF and then disconnect the refrigerator from the electrical source. Overall Cab. Because Whirlpool Corporation policy includes a continuous commitment to improve Dimensions are finished, reconnect the...

Warranty Information
Page 1
..., including scratches, dents, chips or other than normal, single-family household use of products not approved by Whirlpool. 5. Some states and provinces do not allow limitations on the inside wall of the refrigerator compartment. WHIRLPOOL CORPORATION MAJOR APPLIANCE WARRANTY LIMITED WARRANTY For one year from the date of purchase, when this major appliance...
..., including scratches, dents, chips or other than normal, single-family household use of products not approved by Whirlpool. 5. Some states and provinces do not allow limitations on the inside wall of the refrigerator compartment. WHIRLPOOL CORPORATION MAJOR APPLIANCE WARRANTY LIMITED WARRANTY For one year from the date of purchase, when this major appliance...


