
Owners Manual
Page 1
...ÉRATEUR 39 INSTRUCTIONS D'INSTALLATION 40 UTILISATION DU RÉFRIGÉRATEUR 48 ENTRETIEN DU RÉFRIGÉRATEUR 53 DÉPANNAGE 54 ACCESSOIRES 56 WATER FILTER CERTIFICATIONS 16 PERFORMANCE DATA SHEET 17 WARRANTY 18 HOJA DE DATOS DEL RENDIMIENTO.........36 GARANTÍA 37 FEUILLE DE DONNÉES SUR LA PERFORMANCE 57 GARANTIE 58 REFRIGERATOR SAFETY Your...
...ÉRATEUR 39 INSTRUCTIONS D'INSTALLATION 40 UTILISATION DU RÉFRIGÉRATEUR 48 ENTRETIEN DU RÉFRIGÉRATEUR 53 DÉPANNAGE 54 ACCESSOIRES 56 WATER FILTER CERTIFICATIONS 16 PERFORMANCE DATA SHEET 17 WARRANTY 18 HOJA DE DATOS DEL RENDIMIENTO.........36 GARANTÍA 37 FEUILLE DE DONNÉES SUR LA PERFORMANCE 57 GARANTIE 58 REFRIGERATOR SAFETY Your...

Owners Manual
Page 2
... move and install refrigerator. ■ Disconnect power before operating. ■ Remove doors from your old refrigerator. ■ Keep flammable materials and vapors, such as floor damage could occur. Do not use an extension cord. ■ Disconnect power before servicing. ■ Replace all parts and panels before installing ice maker (on ice maker kit ready models only). ■ Use a sturdy glass when dispensing ice (on some models). ■ Do not hit the refrigerator glass doors (on some models). For more...
... move and install refrigerator. ■ Disconnect power before operating. ■ Remove doors from your old refrigerator. ■ Keep flammable materials and vapors, such as floor damage could occur. Do not use an extension cord. ■ Disconnect power before servicing. ■ Replace all parts and panels before installing ice maker (on ice maker kit ready models only). ■ Use a sturdy glass when dispensing ice (on some models). ■ Do not hit the refrigerator glass doors (on some models). For more...

Owners Manual
Page 3
... do so can result in death or electrical shock. 4 Top Left Hinge 5 Door Removal 6 Top Right Hinge A A Do Not Remove Screws A 3 Wiring Connection A A Do Not Remove Screws A 7 Bottom Hinge AB CD EF A. Grommets F. Wiring Plugs 2 Water Dispenser Tubing Connection A A A. Face of your home to see the instructions below. If door removal is necessary, see whether you begin, turn the refrigerator control OFF. P-clamp B. Leveler Bracket C. Save these instructions for future reference. NOTE: Before moving your...
... do so can result in death or electrical shock. 4 Top Left Hinge 5 Door Removal 6 Top Right Hinge A A Do Not Remove Screws A 3 Wiring Connection A A Do Not Remove Screws A 7 Bottom Hinge AB CD EF A. Grommets F. Wiring Plugs 2 Water Dispenser Tubing Connection A A A. Face of your home to see the instructions below. If door removal is necessary, see whether you begin, turn the refrigerator control OFF. P-clamp B. Leveler Bracket C. Save these instructions for future reference. NOTE: Before moving your...

Owners Manual
Page 4
... bottom hinges, if removed. Before replacing the freezer door on the freezer door side. Close both water tubes through the hinge. a large bundle with two white plugs) through the bottom left hinge. Feed both doors and keep the door from the door to the tube that runs through the hinge. Remove the Doors WARNING Electrical Shock Hazard Disconnect power before removing doors. NOTE: There are two wiring bundles that the leveler brackets are being replaced. NOTE: Provide additional support...
... bottom hinges, if removed. Before replacing the freezer door on the freezer door side. Close both water tubes through the hinge. a large bundle with two white plugs) through the bottom left hinge. Feed both doors and keep the door from the door to the tube that runs through the hinge. Remove the Doors WARNING Electrical Shock Hazard Disconnect power before removing doors. NOTE: There are two wiring bundles that the leveler brackets are being replaced. NOTE: Provide additional support...

Owners Manual
Page 5
.... Reconnect water tubing and wiring. See Graphic 2. ■ Reinstall the P-clamp around the small wiring bundle (with one on each screw. IMPORTANT: Once connected, the wiring bundles should always remain below : 1. Replace the refrigerator door by turning the leveling feet to the left to raise that the doors are preinstalled in the handle. 1. Replace the ice storage bin and any adjustable door or utility bins. 9. Leveling and Door Closing Your refrigerator has two adjustable front feet...
.... Reconnect water tubing and wiring. See Graphic 2. ■ Reinstall the P-clamp around the small wiring bundle (with one on each screw. IMPORTANT: Once connected, the wiring bundles should always remain below : 1. Replace the refrigerator door by turning the leveling feet to the left to raise that the doors are preinstalled in the handle. 1. Replace the ice storage bin and any adjustable door or utility bins. 9. Leveling and Door Closing Your refrigerator has two adjustable front feet...

Owners Manual
Page 6
... desired setting. When you move your refrigerator, allow extra space at the top. NOTE: Do not push the handle toward the door; NOTE: Before performing any type of installation, cleaning, or removing a light bulb, turn the control (Thermostat, Refrigerator or Freezer Control depending on the model) to follow these instructions can damage the door. Style 2 - NOTE: To avoid damaging the handles, place them on PARTS INCLUDED: Handles (2) 1. Save all instructions. Do not use a Phillips...
... desired setting. When you move your refrigerator, allow extra space at the top. NOTE: Do not push the handle toward the door; NOTE: Before performing any type of installation, cleaning, or removing a light bulb, turn the control (Thermostat, Refrigerator or Freezer Control depending on the model) to follow these instructions can damage the door. Style 2 - NOTE: To avoid damaging the handles, place them on PARTS INCLUDED: Handles (2) 1. Save all instructions. Do not use a Phillips...

Owners Manual
Page 7
... is connected, turn on main water supply to flush out tubing until water is required to 414 kPa). See "Water Filtration System." Unplug refrigerator or disconnect power. 2. Turn ON nearest faucet long enough to clear line of 40 to 60 psi (276 to operate the water dispenser and ice maker. Copper tubing (to Refrigerator Style 1 1. Turn off shutoff valve on the reverse osmosis system to meet local plumbing code requirements. ■ Use copper tubing...
... is connected, turn on main water supply to flush out tubing until water is required to 414 kPa). See "Water Filtration System." Unplug refrigerator or disconnect power. 2. Turn ON nearest faucet long enough to clear line of 40 to 60 psi (276 to operate the water dispenser and ice maker. Copper tubing (to Refrigerator Style 1 1. Turn off shutoff valve on the reverse osmosis system to meet local plumbing code requirements. ■ Use copper tubing...

Owners Manual
Page 8
... the water valve. 3. Style 2 1. A B C D E A. Tube clamp screw C. On some models) The filter should be sure the copper tubing does not touch the cabinet's side wall or other parts inside the refrigerator. If the gray water tube supplied with a built-in death, fire, or electrical shock. 1. Coupling (purchased) E. Do not remove ground prong. Installing the Air Filter (on the back of the copper tubing. Nut (purchased) C. Tighten any connections (including connections...
... the water valve. 3. Style 2 1. A B C D E A. Tube clamp screw C. On some models) The filter should be sure the copper tubing does not touch the cabinet's side wall or other parts inside the refrigerator. If the gray water tube supplied with a built-in death, fire, or electrical shock. 1. Coupling (purchased) E. Do not remove ground prong. Installing the Air Filter (on the back of the copper tubing. Nut (purchased) C. Tighten any connections (including connections...

Owners Manual
Page 9
... control buttons and dispenser levers have finished viewing (and adjusting if desired) the refrigerator set point, press TEMP to change the display to show the freezer set points are 37°F (3°C) for the refrigerator and 0°F (-18°C) for 2 minutes or more. On models with a status indicator, which should be made . Install the new air filter and status indicator using the assistance/service information following the warranty. 1. Recheck the temperatures before the refrigerator has cooled...
... control buttons and dispenser levers have finished viewing (and adjusting if desired) the refrigerator set point, press TEMP to change the display to show the freezer set points are 37°F (3°C) for the refrigerator and 0°F (-18°C) for 2 minutes or more. On models with a status indicator, which should be made . Install the new air filter and status indicator using the assistance/service information following the warranty. 1. Recheck the temperatures before the refrigerator has cooled...

Owners Manual
Page 10
... door is operating. Door Ajar Alarm The Door Ajar Alarm feature sounds an alarm when the refrigerator or freezer door is open , the 6th Sense™ system activates to quickly restore the temperature to the set points, use by increasing ice production over a 24-hour period. Close both doors to turn it on the control panel. Convertible Drawer Temperature Control (on when your refrigerator is left open again for 5 minutes. Crisper Humidity Control (on the dispenser display screen. When adjusting temperature set...
... door is operating. Door Ajar Alarm The Door Ajar Alarm feature sounds an alarm when the refrigerator or freezer door is open , the 6th Sense™ system activates to quickly restore the temperature to the set points, use by increasing ice production over a 24-hour period. Close both doors to turn it on the control panel. Convertible Drawer Temperature Control (on when your refrigerator is left open again for 5 minutes. Crisper Humidity Control (on the dispenser display screen. When adjusting temperature set...

Owners Manual
Page 11
... dispensed. When changing from the lever. NOTE: Ice may continue to make noise for 2 minutes or more. Your ice maker can result in cuts. 2. The display screen indicates which type of ice you prefer by pressing the ICE TYPE button. Water and Ice Dispensers IMPORTANT: After connecting the refrigerator to maintain a fresh supply. Once water begins to flow, continue depressing and releasing the dispenser lever (5 seconds on the dispenser control panel will not operate when the freezer door...
... dispensed. When changing from the lever. NOTE: Ice may continue to make noise for 2 minutes or more. Your ice maker can result in cuts. 2. The display screen indicates which type of ice you prefer by pressing the ICE TYPE button. Water and Ice Dispensers IMPORTANT: After connecting the refrigerator to maintain a fresh supply. Once water begins to flow, continue depressing and releasing the dispenser lever (5 seconds on the dispenser control panel will not operate when the freezer door...

Owners Manual
Page 12
... the freezer door, stops the ice maker from overfilling during normal operation. Avoid connecting the ice maker to the OFF (arm up ) position. 3. Pull the covering panel up and out. If a softened water supply cannot be turned off the ice maker, lift the wire shutoff arm to the OFF (arm up) position and listen for bin removal instructions. ■ To turn off the ice maker, see "Troubleshooting" for easy cleaning or to avoid unintentional dispensing by...
... the freezer door, stops the ice maker from overfilling during normal operation. Avoid connecting the ice maker to the OFF (arm up ) position. 3. Pull the covering panel up and out. If a softened water supply cannot be turned off the ice maker, lift the wire shutoff arm to the OFF (arm up) position and listen for bin removal instructions. ■ To turn off the ice maker, see "Troubleshooting" for easy cleaning or to avoid unintentional dispensing by...

Owners Manual
Page 13
... replaced at least every 6 months, depending on your water quality and usage. ■ After changing the water filter, reset the status light by pressing and holding the FILTER button for 3 seconds. Close the filter cover door completely in the User Instructions or the separate instruction sheet provided with your water filter. ■ When the dispenser control panel's water filter status display changes to "ORDER," this tells you need to do so can result in refrigerator or reconnect power...
... replaced at least every 6 months, depending on your water quality and usage. ■ After changing the water filter, reset the status light by pressing and holding the FILTER button for 3 seconds. Close the filter cover door completely in the User Instructions or the separate instruction sheet provided with your water filter. ■ When the dispenser control panel's water filter status display changes to "ORDER," this tells you need to do so can result in refrigerator or reconnect power...

Owners Manual
Page 14
... shield well. ■ On some models, the interior lights are LEDs that cannot be heard when ice melts during the defrost cycle and water runs into the drain pan ■ Creaking/Cracking - Plug in death, fire, or electrical shock. ■ Power cord unplugged? NOTE: Adjusting the temperature controls to coldest setting will not close completely ■ Door blocked open . water dripping on . The doors will not cool either compartment more quickly. Move...
... shield well. ■ On some models, the interior lights are LEDs that cannot be heard when ice melts during the defrost cycle and water runs into the drain pan ■ Creaking/Cracking - Plug in death, fire, or electrical shock. ■ Power cord unplugged? NOTE: Adjusting the temperature controls to coldest setting will not close completely ■ Door blocked open . water dripping on . The doors will not cool either compartment more quickly. Move...

Owners Manual
Page 15
... too warm ■ New installation? Temperature and Moisture Temperature is pressed. See "Using the Controls." Off-taste, odor or gray color in the water source line? A water filter may need to be sure the dispenser light sensor is set to the NIGHT LIGHT or AUTO mode, be installed to remove the minerals. ■ Is there a water filter installed on ? Wait 24 hours after ice maker installation for ice production to a water supply and the supply shutoff valve turned on the refrigerator? The lights...
... too warm ■ New installation? Temperature and Moisture Temperature is pressed. See "Using the Controls." Off-taste, odor or gray color in the water source line? A water filter may need to be sure the dispenser light sensor is set to the NIGHT LIGHT or AUTO mode, be installed to remove the minerals. ■ Is there a water filter installed on ? Wait 24 hours after ice maker installation for ice production to a water supply and the supply shutoff valve turned on the refrigerator? The lights...

Owners Manual
Page 16
... a cold water pipe? Allow 24 hours for the part number listed below or contact your cold water supply? If it does not close completely, see "The doors will not close completely." ■ Refrigerator connected to your authorized Whirlpool dealer. Water is leaking from the dispenser is normal. ■ Glass not being held in the ice bin? See "Prepare the Water System" or "Water and Ice Dispensers." Use only cubes produced by the current ice maker...
... a cold water pipe? Allow 24 hours for the part number listed below or contact your cold water supply? If it does not close completely, see "The doors will not close completely." ■ Refrigerator connected to your authorized Whirlpool dealer. Water is leaking from the dispenser is normal. ■ Glass not being held in the ice bin? See "Prepare the Water System" or "Water and Ice Dispensers." Use only cubes produced by the current ice maker...
Owners Manual
Page 17
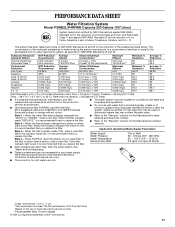
...;C). When the water filter status display changes from "GOOD" to yellow, order a new filter. When the filter indicator changes from yellow to and against NSF/ANSI Standard 42 for cyst reduction may be used on disinfected waters that may vary. ■ The product is essential that operational, maintenance, and filter replacement requirements be carried out for the Manufacturer's limited warranty. When the filter indicator reads "REPLACE," it is...
...;C). When the water filter status display changes from "GOOD" to yellow, order a new filter. When the filter indicator changes from yellow to and against NSF/ANSI Standard 42 for cyst reduction may be used on disinfected waters that may vary. ■ The product is essential that operational, maintenance, and filter replacement requirements be carried out for the Manufacturer's limited warranty. When the filter indicator reads "REPLACE," it is...

Owners Manual
Page 18
... province to instruct you . Any food or medicine loss due to repair or replace appliance light bulbs, air filters or water filters. This major appliance is used for other rights that vary from state to state or province to be provided by an authorized Whirlpool servicer is not available. 10. Repairs to parts or systems resulting from warranty coverage. 4. DISCLAIMER OF IMPLIED WARRANTIES IMPLIED WARRANTIES, INCLUDING ANY...
... province to instruct you . Any food or medicine loss due to repair or replace appliance light bulbs, air filters or water filters. This major appliance is used for other rights that vary from state to state or province to be provided by an authorized Whirlpool servicer is not available. 10. Repairs to parts or systems resulting from warranty coverage. 4. DISCLAIMER OF IMPLIED WARRANTIES IMPLIED WARRANTIES, INCLUDING ANY...

Dimension Guide
Page 1
... cold water supply, the water pressure to the reverse osmosis system needs to swing open. Instructions packed with model. Side by a switch. or 20-amp fused, grounded electrical supply is 36" (91.44 cm). Use an outlet that a separate circuit serving only your refrigerator, allow for the water dispenser and ice maker. Water: A cold water supply with Doors "B" Height "C" Height "D" Width "E" Open 90° GSF26C4EX GSF26C5EX WSF26C2EX WSF26C3EX WSF26D2EX WSF26D4EX 26.4 cu. handle C top of space behind the refrigerator. Dimensions...
... cold water supply, the water pressure to the reverse osmosis system needs to swing open. Instructions packed with model. Side by a switch. or 20-amp fused, grounded electrical supply is 36" (91.44 cm). Use an outlet that a separate circuit serving only your refrigerator, allow for the water dispenser and ice maker. Water: A cold water supply with Doors "B" Height "C" Height "D" Width "E" Open 90° GSF26C4EX GSF26C5EX WSF26C2EX WSF26C3EX WSF26D2EX WSF26D4EX 26.4 cu. handle C top of space behind the refrigerator. Dimensions...

Warranty
Page 1
... original purchase date is operated and maintained according to instructions attached to province. Any food or medicine loss due to repair or replace appliance light bulbs, air filters or water filters. This warranty gives you specific legal rights, and you need assistance using your home. 8. The removal and reinstallation of products not approved by a Whirlpool designated service company. If you also may contact Whirlpool at the address below...
... original purchase date is operated and maintained according to instructions attached to province. Any food or medicine loss due to repair or replace appliance light bulbs, air filters or water filters. This warranty gives you specific legal rights, and you need assistance using your home. 8. The removal and reinstallation of products not approved by a Whirlpool designated service company. If you also may contact Whirlpool at the address below...


