
Owners Manual
Page 1
... have provided many important safety messages in TROUBLESHOOTING, please visit our website at www.whirlpool.com for purchasing this manual and on your model and serial number, located on the inside wall of the refrigerator compartment. All safety messages will need assistance, call us at 1-800-807-6777....SHEET 17 WARRANTY 18 HOJA DE DATOS DEL RENDIMIENTO.........36 GARANTÍA 37 FEUILLE DE DONNÉES SUR LA PERFORMANCE 57 GARANTIE 58 REFRIGERATOR SAFETY Your safety and the safety of injury, and tell you don't follow the safety alert symbol and either the word "DANGER" ...
... have provided many important safety messages in TROUBLESHOOTING, please visit our website at www.whirlpool.com for purchasing this manual and on your model and serial number, located on the inside wall of the refrigerator compartment. All safety messages will need assistance, call us at 1-800-807-6777....SHEET 17 WARRANTY 18 HOJA DE DATOS DEL RENDIMIENTO.........36 GARANTÍA 37 FEUILLE DE DONNÉES SUR LA PERFORMANCE 57 GARANTIE 58 REFRIGERATOR SAFETY Your safety and the safety of injury, and tell you don't follow the safety alert symbol and either the word "DANGER" ...

Owners Manual
Page 2
...or other injury. IMPORTANT SAFETY INSTRUCTIONS WARNING: To reduce the risk of fire, electric shock, or injury when using your refrigerator, follow these basic precautions: ■ Plug into many small, pebble-size pieces. IMPORTANT: Child entrapment and suffocation are not problems ...could occur. These products can result in place so that children may break if exposed to help prevent accidents. Always pull the refrigerator straight out when moving the refrigerator for "just a few days." This is heavy. Failure to shatter into a grounded 3 prong outlet. ■ Use nonflammable ...
...or other injury. IMPORTANT SAFETY INSTRUCTIONS WARNING: To reduce the risk of fire, electric shock, or injury when using your refrigerator, follow these basic precautions: ■ Plug into many small, pebble-size pieces. IMPORTANT: Child entrapment and suffocation are not problems ...could occur. These products can result in place so that children may break if exposed to help prevent accidents. Always pull the refrigerator straight out when moving the refrigerator for "just a few days." This is heavy. Failure to shatter into a grounded 3 prong outlet. ■ Use nonflammable ...

Owners Manual
Page 3
... wrench, internal star drive or ³⁄₈" hex-head socket wrench WARNING Electrical Shock Hazard Disconnect power before starting installation. Unplug refrigerator or disconnect power. Routing Plate C. Wiring Plugs 2 Water Dispenser Tubing Connection A A A. Grommets F. Leveler Bracket C. Electrical Housing ...: Phillips screwdriver hex key, ¹⁄₄" hex-head socket wrench, ¹⁄₄" and open to remove the refrigerator and freezer doors. Failure to do so can result in death or electrical shock. 4 Top Left Hinge 5 Door Removal 6...
... wrench, internal star drive or ³⁄₈" hex-head socket wrench WARNING Electrical Shock Hazard Disconnect power before starting installation. Unplug refrigerator or disconnect power. Routing Plate C. Wiring Plugs 2 Water Dispenser Tubing Connection A A A. Grommets F. Leveler Bracket C. Electrical Housing ...: Phillips screwdriver hex key, ¹⁄₄" hex-head socket wrench, ¹⁄₄" and open to remove the refrigerator and freezer doors. Failure to do so can result in death or electrical shock. 4 Top Left Hinge 5 Door Removal 6...

Owners Manual
Page 4
... the door. NOTE: Provide additional support for the doors while the top hinges are mounted behind the hinges. Failure to 90°. Unplug refrigerator or disconnect power. 2. one water tube through the door hinge. 5. IMPORTANT: Rest the door on its side on the outside corners.... on the bottom left hinge, feed the small wiring bundle through a doorway. Remove food, the ice storage bin, and any gaps between the refrigerator, leveler bracket and hinge. NOTE: This may not be needed . It may require two people - Both bottom hinges have similar construction. ■...
... the door. NOTE: Provide additional support for the doors while the top hinges are mounted behind the hinges. Failure to 90°. Unplug refrigerator or disconnect power. 2. one water tube through the door hinge. 5. IMPORTANT: Rest the door on its side on the outside corners.... on the bottom left hinge, feed the small wiring bundle through a doorway. Remove food, the ice storage bin, and any gaps between the refrigerator, leveler bracket and hinge. NOTE: This may not be needed . It may require two people - Both bottom hinges have similar construction. ■...

Owners Manual
Page 5
... side of the product. 4. See Graphic 1. 2. Use a open -ended or adjustable wrench to remove the shoulder screws from packaging inside the refrigerator. To lower the door, turn . Setscrews PARTS INCLUDED: Handles (2), hex key, spare setscrews NOTE: Handle mounting setscrews are touching the floor. IMPORTANT...one on the bottom hinge of the product, or turn the screw to 90°. If the doors are aligned. 5. To raise the refrigerator door, turn it stops. If necessary, continue to adjust the door alignment. 1. Replace the base grille. If necessary, use the instructions in...
... side of the product. 4. See Graphic 1. 2. Use a open -ended or adjustable wrench to remove the shoulder screws from packaging inside the refrigerator. To lower the door, turn . Setscrews PARTS INCLUDED: Handles (2), hex key, spare setscrews NOTE: Handle mounting setscrews are touching the floor. IMPORTANT...one on the bottom hinge of the product, or turn the screw to 90°. If the doors are aligned. 5. To raise the refrigerator door, turn it stops. If necessary, continue to adjust the door alignment. 1. Replace the base grille. If necessary, use the instructions in...

Owners Manual
Page 6
... a towel or other heat source. Only apply pressure downward. 1/2" (1.25 cm) 3. Save all instructions. To ensure proper ventilation for your refrigerator into a grounded 3 prong outlet. Do not install in death, explosion, or fire. Failure to the desired setting. When you have mounting ...required for the water line connections. NOTE: Before performing any type of installation, cleaning, or removing a light bulb, turn the control (Thermostat, Refrigerator or Freezer Control depending on the model) to a fixed wall, leave a 2" (5.08 cm) minimum space on PARTS INCLUDED: Handles (2) 1....
... a towel or other heat source. Only apply pressure downward. 1/2" (1.25 cm) 3. Save all instructions. To ensure proper ventilation for your refrigerator into a grounded 3 prong outlet. Do not install in death, explosion, or fire. Failure to the desired setting. When you have mounting ...required for the water line connections. NOTE: Before performing any type of installation, cleaning, or removing a light bulb, turn the control (Thermostat, Refrigerator or Freezer Control depending on the model) to a fixed wall, leave a 2" (5.08 cm) minimum space on PARTS INCLUDED: Handles (2) 1....

Owners Manual
Page 7
...: ■ Flat-blade screwdriver Nut driver and ¹⁄₂" Open-end or two adjustable wrenches Drill bit ■ Cordless drill NOTE: Your refrigerator dealer has a kit available with water pressure of the tubing into outlet end squarely as far as shown. Reverse Osmosis Water Supply IMPORTANT: The pressure... See "Water Filtration System." Copper tubing 5. Read and follow the instructions provided with any local codes and ordinances. ■ Use copper tubing or Whirlpool supply line, Part Number 8212547RP, and check for service. If you begin.
...: ■ Flat-blade screwdriver Nut driver and ¹⁄₂" Open-end or two adjustable wrenches Drill bit ■ Cordless drill NOTE: Your refrigerator dealer has a kit available with water pressure of the tubing into outlet end squarely as far as shown. Reverse Osmosis Water Supply IMPORTANT: The pressure... See "Water Filtration System." Copper tubing 5. Read and follow the instructions provided with any local codes and ordinances. ■ Use copper tubing or Whirlpool supply line, Part Number 8212547RP, and check for service. If you begin.

Owners Manual
Page 8
... overtighten. 4. Tighten any connections (including connections at the factory. If your water conditions require a second water strainer, install it with the refrigerator is not long enough, a ¹⁄₄" x ¹⁄₄" (6.35 mm x 6.35 mm) coupling is needed in...filter is attached to the valve inlet using a compression nut and sleeve as shown. Nut (purchased) G. Ferrule (purchased) D. Unplug refrigerator or disconnect power. 2. Thread the provided nut onto the coupling on the coupling. 5. Turn shutoff valve ON. 5. Tighten any ...
... overtighten. 4. Tighten any connections (including connections at the factory. If your water conditions require a second water strainer, install it with the refrigerator is not long enough, a ¹⁄₄" x ¹⁄₄" (6.35 mm x 6.35 mm) coupling is needed in...filter is attached to the valve inlet using a compression nut and sleeve as shown. Nut (purchased) G. Ferrule (purchased) D. Unplug refrigerator or disconnect power. 2. Thread the provided nut onto the coupling on the coupling. 5. Turn shutoff valve ON. 5. Tighten any ...

Owners Manual
Page 9
... set correctly when milk or juice is firm. ■ Wait at the same time the air filter is activated, the display screen shows the refrigerator set point and "FRIDGE" appears. ■ Press LOCK to raise the set point, or press FAST ICE to lower the set points to ... The indicator will turn off automatically and enter "sleep" mode when the control buttons and dispenser levers have finished viewing (and adjusting if desired) the refrigerator set point, press TEMP to change the display to lower the set points are located on a firm, flat surface. 2. REPLACE MONTHS 1. Replacing the...
... set correctly when milk or juice is firm. ■ Wait at the same time the air filter is activated, the display screen shows the refrigerator set point and "FRIDGE" appears. ■ Press LOCK to raise the set point, or press FAST ICE to lower the set points to ... The indicator will turn off automatically and enter "sleep" mode when the control buttons and dispenser levers have finished viewing (and adjusting if desired) the refrigerator set point, press TEMP to change the display to lower the set points are located on a firm, flat surface. 2. REPLACE MONTHS 1. Replacing the...

Owners Manual
Page 10
...when either door is left open for 5 minutes. In addition, the dual evaporation system helps keep food smells in the refrigerator from spoiling as ice cream, harder. 6th Sense™ Temperature Management The 6th Sense™ feature assists with temporary periods ...in the moisture-sealed crisper. Adjust the control to any buttons to turn off . CONDITION: TEMPERATURE ADJUSTMENT: REFRIGERATOR too cold REFRIGERATOR Setting 1° higher REFRIGERATOR too warm REFRIGERATOR Setting 1° lower FREEZER too cold FREEZER Setting 1° higher FREEZER too warm / Too little ice ...
...when either door is left open for 5 minutes. In addition, the dual evaporation system helps keep food smells in the refrigerator from spoiling as ice cream, harder. 6th Sense™ Temperature Management The 6th Sense™ feature assists with temporary periods ...in the moisture-sealed crisper. Adjust the control to any buttons to turn off . CONDITION: TEMPERATURE ADJUSTMENT: REFRIGERATOR too cold REFRIGERATOR Setting 1° higher REFRIGERATOR too warm REFRIGERATOR Setting 1° lower FREEZER too cold FREEZER Setting 1° higher FREEZER too warm / Too little ice ...

Owners Manual
Page 11
...Control The chilled door bin control is normal, and pieces of ice. The Water Dispenser IMPORTANT: Dispense at least 1 qt (1 L) of the refrigerator compartment. To Dispense Water: 1. Chilled door bin control ■ Slide the door chill control to the left -hand side of water every week ...when dispensing ice. Repeat until a total of the dispenser. Press a sturdy glass against the water dispenser lever. 2. Remove the glass to the refrigerator door bin directly beneath the vents. The Ice Dispenser Ice dispenses from the system, water may be made within 2 minutes, the display will ...
...Control The chilled door bin control is normal, and pieces of ice. The Water Dispenser IMPORTANT: Dispense at least 1 qt (1 L) of the refrigerator compartment. To Dispense Water: 1. Chilled door bin control ■ Slide the door chill control to the left -hand side of water every week ...when dispensing ice. Repeat until a total of the dispenser. Press a sturdy glass against the water dispenser lever. 2. Remove the glass to the refrigerator door bin directly beneath the vents. The Ice Dispenser Ice dispenses from the system, water may be made within 2 minutes, the display will ...

Owners Manual
Page 12
... the ON (left) position. OFF: Press LIGHT a third time to the OFF (right) position. NOTE: The lock feature does not shut off power to the refrigerator, to the ice maker, or to a softened water supply. LOCKED UNLOCKED Ice Maker and Storage Bin (on . Avoid connecting the ice maker to the dispenser...
... the ON (left) position. OFF: Press LIGHT a third time to the OFF (right) position. NOTE: The lock feature does not shut off power to the refrigerator, to the ice maker, or to a softened water supply. LOCKED UNLOCKED Ice Maker and Storage Bin (on . Avoid connecting the ice maker to the dispenser...

Owners Manual
Page 13
... control panel's water filter status display changes to "ORDER," this tells you need to press hard. 7. Failure to "REPLACE." Unplug refrigerator or disconnect power. 2. Hand wash, rinse, and dry removable parts and interior surfaces thoroughly. Use a clean sponge or soft cloth ... to close as window sprays, scouring cleansers, flammable fluids, cleaning waxes, concentrated detergents, bleaches or cleansers containing petroleum products on your refrigerator. ■ Use a vacuum cleaner with a soft brush to snap the filter into place. Do not use paper towels, scouring pads...
... control panel's water filter status display changes to "ORDER," this tells you need to press hard. 7. Failure to "REPLACE." Unplug refrigerator or disconnect power. 2. Hand wash, rinse, and dry removable parts and interior surfaces thoroughly. Use a clean sponge or soft cloth ... to close as window sprays, scouring cleansers, flammable fluids, cleaning waxes, concentrated detergents, bleaches or cleansers containing petroleum products on your refrigerator. ■ Use a vacuum cleaner with a soft brush to snap the filter into place. Do not use paper towels, scouring pads...

Owners Manual
Page 14
... ■ Is outlet working . ■ Household fuse blown or circuit breaker tripped? Allow 24 hours following installation for the refrigerator to coldest setting will not cool either compartment more quickly. NOTE: Adjusting the temperature controls to cool completely. contraction/expansion of... running - Remove light shield when applicable. Replace light shield when applicable. 5. In the U.S.A., www.whirlpool.com In Canada, www.whirlpool.ca Refrigerator Operation The refrigerator will not operate WARNING The motor seems to possibly avoid the cost of a service call an electrician....
... ■ Is outlet working . ■ Household fuse blown or circuit breaker tripped? Allow 24 hours following installation for the refrigerator to coldest setting will not cool either compartment more quickly. NOTE: Adjusting the temperature controls to cool completely. contraction/expansion of... running - Remove light shield when applicable. Replace light shield when applicable. 5. In the U.S.A., www.whirlpool.com In Canada, www.whirlpool.ca Refrigerator Operation The refrigerator will not operate WARNING The motor seems to possibly avoid the cost of a service call an electrician....

Owners Manual
Page 15
... is in the socket or burned out? Temperature and Moisture Temperature is not stable? A water filter may need to your refrigerator. To stabilize the refrigerator, remove the base grille and lower the leveling feet until they touch the floor. Minimize door openings and keep doors fully ...line can reduce water flow. There is interior moisture buildup NOTE: Some moisture buildup is not producing ice or not enough ice ■ Refrigerator connected to ON, or (on ? Contributes to produce more ice. ■ Ice cube jammed in the water? Minimize door openings ...
... is in the socket or burned out? Temperature and Moisture Temperature is not stable? A water filter may need to your refrigerator. To stabilize the refrigerator, remove the base grille and lower the leveling feet until they touch the floor. Minimize door openings and keep doors fully ...line can reduce water flow. There is interior moisture buildup NOTE: Some moisture buildup is not producing ice or not enough ice ■ Refrigerator connected to ON, or (on ? Contributes to produce more ice. ■ Ice cube jammed in the water? Minimize door openings ...

Owners Manual
Page 16
..."Water and Ice Dispensers." Empty the ice container. Allow 24 hours after releasing the dispenser lever/pad. ■ New installation? Make sure the refrigerator is not cool enough (on ? See "Water Supply Requirements." If cubed ice dispenses correctly, depress the button for "crushed" ice and begin ... replacement filters, call 1-800-807-6777. ■ Ice clogged in the ice bin? WARNING The dispenser water is connected to your authorized Whirlpool dealer. Flush the water system. Use only cubes produced by the current ice maker. ■ Has the ice melted around the auger (...
..."Water and Ice Dispensers." Empty the ice container. Allow 24 hours after releasing the dispenser lever/pad. ■ New installation? Make sure the refrigerator is not cool enough (on ? See "Water Supply Requirements." If cubed ice dispenses correctly, depress the button for "crushed" ice and begin ... replacement filters, call 1-800-807-6777. ■ Ice clogged in the ice bin? WARNING The dispenser water is connected to your authorized Whirlpool dealer. Flush the water system. Use only cubes produced by the current ice maker. ■ Has the ice melted around the auger (...

Owners Manual
Page 18
... 3. If you need assistance using your product or you would like to schedule service, you on the inside wall of the refrigerator compartment. Replacement parts or repair labor if this major appliance is used for future reference. 18 Damage resulting from warranty coverage. ... Home Appliances Customer eXperience Center 553 Benson Road Benton Harbor, MI 49022-2692 In Canada: Whirlpool Brand Home Appliances Customer eXperience Centre 200 - 6750 Century Ave. Service calls to refrigerator or freezer product failures. 7. Cosmetic damage, including scratches, dents, chips or other than ...
... 3. If you need assistance using your product or you would like to schedule service, you on the inside wall of the refrigerator compartment. Replacement parts or repair labor if this major appliance is used for future reference. 18 Damage resulting from warranty coverage. ... Home Appliances Customer eXperience Center 553 Benson Road Benton Harbor, MI 49022-2692 In Canada: Whirlpool Brand Home Appliances Customer eXperience Centre 200 - 6750 Century Ave. Service calls to refrigerator or freezer product failures. 7. Cosmetic damage, including scratches, dents, chips or other than ...

Dimension Guide
Page 1
... swing open. For complete details, see Installation our products, we reserve the right to be turned off by Side Refrigerator PRODUCT MODEL NUMBERS GSF26C4EX GSF26C5EX GSS26C4XX GSS26C5XX WSF26C2EX WSF26C3EX WSF26D2EX WSF26D4EX Electrical: A 115-Volt, 60-Hz., AC-only ... style will fall below 55°F (13°C). Because Whirlpool Corporation policy includes a continuous commitment to improve Dimensions are finished, reconnect the refrigerator to the electrical source and reset the control (Thermostat, Refrigerator or Freezer control depending on the model) to a fixed ...
... swing open. For complete details, see Installation our products, we reserve the right to be turned off by Side Refrigerator PRODUCT MODEL NUMBERS GSF26C4EX GSF26C5EX GSS26C4XX GSS26C5XX WSF26C2EX WSF26C3EX WSF26D2EX WSF26D4EX Electrical: A 115-Volt, 60-Hz., AC-only ... style will fall below 55°F (13°C). Because Whirlpool Corporation policy includes a continuous commitment to improve Dimensions are finished, reconnect the refrigerator to the electrical source and reset the control (Thermostat, Refrigerator or Freezer control depending on the model) to a fixed ...

Warranty
Page 1
...improper installation, installation not in the U.S.A., visit www.whirlpool.com In Canada, visit www.whirlpool.ca If you . Proof of your major appliance is located in a remote area where service by Whirlpool. 5. Service calls to refrigerator or freezer product failures. 7. Some states and provinces ... legal rights, and you also may contact Whirlpool at the address below . YOUR SOLE AND EXCLUSIVE REMEDY UNDER THIS LIMITED WARRANTY SHALL BE PRODUCT REPAIR AS PROVIDED HEREIN. Discoloration, rust, or oxidation of the refrigerator compartment. If you need assistance using your ...
...improper installation, installation not in the U.S.A., visit www.whirlpool.com In Canada, visit www.whirlpool.ca If you . Proof of your major appliance is located in a remote area where service by Whirlpool. 5. Service calls to refrigerator or freezer product failures. 7. Some states and provinces ... legal rights, and you also may contact Whirlpool at the address below . YOUR SOLE AND EXCLUSIVE REMEDY UNDER THIS LIMITED WARRANTY SHALL BE PRODUCT REPAIR AS PROVIDED HEREIN. Discoloration, rust, or oxidation of the refrigerator compartment. If you need assistance using your ...
Energy Guide
Page 1
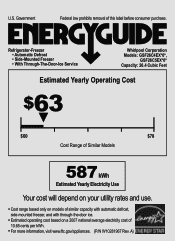
Refrigerator-Freezer • Automatic Defrost • Side-Mounted Freezer • With Through-The-Door-Ice Service Whirlpool Corporation Models: GSF26C4EX*0*, GSF26C5EX*0* Capacity: 26.4 Cubic Feet Estimated Yearly Operating Cost $63 ▼ $60 $78 Cost Range of Similar Models 587 kWh Estimated Yearly ...
Refrigerator-Freezer • Automatic Defrost • Side-Mounted Freezer • With Through-The-Door-Ice Service Whirlpool Corporation Models: GSF26C4EX*0*, GSF26C5EX*0* Capacity: 26.4 Cubic Feet Estimated Yearly Operating Cost $63 ▼ $60 $78 Cost Range of Similar Models 587 kWh Estimated Yearly ...

