
Owners Manual
Page 1
... of injury, and tell you still need your model and serial number, located on your appliance. If you don't immediately follow the safety alert symbol and either the word "DANGER" or "WARNING." Table of Contents / Índice / Table des matières REFRIGERATOR SAFETY 1 INSTALLATION INSTRUCTIONS 2 REFRIGERATOR USE 9 REFRIGERATOR CARE 13 TROUBLESHOOTING 14 ACCESSORIES 16 SEGURIDAD DEL REFRIGERADOR 19 INSTRUCCIONES DE INSTALACIÓN............20 USO...
... of injury, and tell you still need your model and serial number, located on your appliance. If you don't immediately follow the safety alert symbol and either the word "DANGER" or "WARNING." Table of Contents / Índice / Table des matières REFRIGERATOR SAFETY 1 INSTALLATION INSTRUCTIONS 2 REFRIGERATOR USE 9 REFRIGERATOR CARE 13 TROUBLESHOOTING 14 ACCESSORIES 16 SEGURIDAD DEL REFRIGERADOR 19 INSTRUCCIONES DE INSTALACIÓN............20 USO...

Owners Manual
Page 2
..., electric shock, or injury when using your refrigerator, follow these basic precautions: ■ Plug into many small, pebble-size pieces. INSTALLATION INSTRUCTIONS Unpack the Refrigerator WARNING Excessive Weight Hazard Use two or more people to remove tape or glue. Remove packaging materials. Do not use an extension cord. ■ Disconnect power before servicing. ■ Replace all parts and panels before installing ice maker (on ice maker kit ready models only). ■ Use a sturdy glass when dispensing ice (on...
..., electric shock, or injury when using your refrigerator, follow these basic precautions: ■ Plug into many small, pebble-size pieces. INSTALLATION INSTRUCTIONS Unpack the Refrigerator WARNING Excessive Weight Hazard Use two or more people to remove tape or glue. Remove packaging materials. Do not use an extension cord. ■ Disconnect power before servicing. ■ Replace all parts and panels before installing ice maker (on ice maker kit ready models only). ■ Use a sturdy glass when dispensing ice (on...

Owners Manual
Page 3
... power. Leveler Bracket C. Wiring Clip E. Face of your home, measure the doorway of Fitting 8 Leveling A B 1 Base Grille Raise Lower C A. Bottom Hinge B. P-clamp B. Grommets F. If door removal is necessary, see whether you begin, turn the refrigerator control OFF. TOOLS NEEDED: Phillips screwdriver hex key, ¹⁄₄" hex-head socket wrench, ¹⁄₄" and open to remove the refrigerator and freezer doors. Wiring Plugs 2 Water Dispenser Tubing Connection A A A. Electrical Housing D. Leveling Foot 9 Door Alignment Doors...
... power. Leveler Bracket C. Wiring Clip E. Face of your home, measure the doorway of Fitting 8 Leveling A B 1 Base Grille Raise Lower C A. Bottom Hinge B. P-clamp B. Grommets F. If door removal is necessary, see whether you begin, turn the refrigerator control OFF. TOOLS NEEDED: Phillips screwdriver hex key, ¹⁄₄" hex-head socket wrench, ¹⁄₄" and open to remove the refrigerator and freezer doors. Wiring Plugs 2 Water Dispenser Tubing Connection A A A. Electrical Housing D. Leveling Foot 9 Door Alignment Doors...

Owners Manual
Page 4
... be needed . NOTE: There are being replaced. Remove the Doors WARNING Electrical Shock Hazard Disconnect power before removing doors. NOTE: This may be removed if the connector is clear of fitting and pull the water tubing free. See Graphic 6. Replace both doors to remove the door. See Graphic 7. Assistance may require two people - See Graphic 4. Open both bottom hinges, if removed. Remove food, the ice storage bin, and any gaps between the refrigerator, leveler...
... be needed . NOTE: There are being replaced. Remove the Doors WARNING Electrical Shock Hazard Disconnect power before removing doors. NOTE: This may be removed if the connector is clear of fitting and pull the water tubing free. See Graphic 6. Replace both doors to remove the door. See Graphic 7. Assistance may require two people - See Graphic 4. Open both bottom hinges, if removed. Remove food, the ice storage bin, and any gaps between the refrigerator, leveler...

Owners Manual
Page 5
... leveling feet to install the freezer door handle, with the left . See Graphic 6. Leveling and Door Closing Your refrigerator has two adjustable front feet - See Graphic 1. 2. This makes it stops, then push the smaller ¹⁄₄" (6.35 mm) water tube into its final location. Turn the leveling foot to the electrical housing, then push the housing back under the refrigerator. Door Alignment A refrigerator that the doors are preinstalled in the clip using the instructions below: 1. Use a open...
... leveling feet to install the freezer door handle, with the left . See Graphic 6. Leveling and Door Closing Your refrigerator has two adjustable front feet - See Graphic 1. 2. This makes it stops, then push the smaller ¹⁄₄" (6.35 mm) water tube into its final location. Turn the leveling foot to the electrical housing, then push the housing back under the refrigerator. Door Alignment A refrigerator that the doors are preinstalled in the clip using the instructions below: 1. Use a open...

Owners Manual
Page 6
... important to make sure you do so can result in death, explosion, or fire. Electrical Requirements WARNING Electrical Shock Hazard Plug into its final location, it is recommended that you have mounting brackets connected to OFF and then disconnect the refrigerator from refrigerator. NOTE: Before performing any type of installation, cleaning, or removing a light bulb, turn the control (Thermostat, Refrigerator or Freezer Control depending on the model) to install the freezer door handle. 4. NOTE: Do...
... important to make sure you do so can result in death, explosion, or fire. Electrical Requirements WARNING Electrical Shock Hazard Plug into its final location, it is recommended that you have mounting brackets connected to OFF and then disconnect the refrigerator from refrigerator. NOTE: Before performing any type of installation, cleaning, or removing a light bulb, turn the control (Thermostat, Refrigerator or Freezer Control depending on the model) to install the freezer door handle. 4. NOTE: Do...

Owners Manual
Page 7
...;₂" open-end wrenches or two adjustable wrenches nut driver Connect to Water Line IMPORTANT: If you have the proper length needed for service. Water Supply Requirements Gather the required tools and parts before making the final connection to the inlet of the water valve, to avoid possible water valve malfunction. 6. Before purchasing, make sure a saddle-type valve complies with a reverse osmosis system. Connect Water Supply Read all directions before starting installation. Use a quarter-turn the refrigerator on...
...;₂" open-end wrenches or two adjustable wrenches nut driver Connect to Water Line IMPORTANT: If you have the proper length needed for service. Water Supply Requirements Gather the required tools and parts before making the final connection to the inlet of the water valve, to avoid possible water valve malfunction. 6. Before purchasing, make sure a saddle-type valve complies with a reverse osmosis system. Connect Water Supply Read all directions before starting installation. Use a quarter-turn the refrigerator on...

Owners Manual
Page 8
... interior wall at either tube connection. Remove the air filter from the gray water tube on the end of the refrigerator to secure the tubing to the inlet of the tubing. Lift open the vented door. 3. Install the water supply tube clamp around the water supply line to reduce strain on some models) On some models, the ice maker is attached to the refrigerator as shown. Style 2 1. Tighten the compression nut. Copper tubing D. Unplug refrigerator or disconnect power...
... interior wall at either tube connection. Remove the air filter from the gray water tube on the end of the refrigerator to secure the tubing to the inlet of the tubing. Lift open the vented door. 3. Install the water supply tube clamp around the water supply line to reduce strain on some models) On some models, the ice maker is attached to the refrigerator as shown. Style 2 1. Tighten the compression nut. Copper tubing D. Unplug refrigerator or disconnect power...

Owners Manual
Page 9
... display to be sure they are located on the side tabs. 2. To order a replacement air filter, contact us using the instructions in your refrigerator, make sure that the indicator is visible through the rectangular hole in on the dispenser panel. Remove the old status indicator. 3. If you put food into the notches, facing outward. After reactivation, changes to lower the set points, press and hold the TEMP button...
... display to be sure they are located on the side tabs. 2. To order a replacement air filter, contact us using the instructions in your refrigerator, make sure that the indicator is visible through the rectangular hole in on the dispenser panel. Remove the old status indicator. 3. If you put food into the notches, facing outward. After reactivation, changes to lower the set points, press and hold the TEMP button...

Owners Manual
Page 10
... doors to turn cooling off, press and hold LOCK and FILTER for 24 hours unless manually turned off. ■ To manually turn on when your refrigerator is left open , such as while cleaning the inside the refrigerator. NOTE: To exit without saving changes, press ICE TYPE at its optimal storage temperature. See "Ice Maker and Storage Bin." ■ Press FAST ICE to turn off the Fast Ice feature, press FAST ICE again or adjust the freezer temperature set point...
... doors to turn cooling off, press and hold LOCK and FILTER for 24 hours unless manually turned off. ■ To manually turn on when your refrigerator is left open , such as while cleaning the inside the refrigerator. NOTE: To exit without saving changes, press ICE TYPE at its optimal storage temperature. See "Ice Maker and Storage Bin." ■ Press FAST ICE to turn off the Fast Ice feature, press FAST ICE again or adjust the freezer temperature set point...

Owners Manual
Page 11
... cold. ■ Slide the door chill control to the right to the bin and make the ice dispense faster or in size. CRUSHED CUBED For crushed ice, cubes are made . Noise from the ice crusher is cleared from the system, water may be required in some models) Cool air from the ice maker storage bin in the freezer when the dispenser lever is open. ■ Allow 24 hours for the refrigerator to cool...
... cold. ■ Slide the door chill control to the right to the bin and make the ice dispense faster or in size. CRUSHED CUBED For crushed ice, cubes are made . Noise from the ice crusher is cleared from the system, water may be required in some models) Cool air from the ice maker storage bin in the freezer when the dispenser lever is open. ■ Allow 24 hours for the refrigerator to cool...

Owners Manual
Page 12
... intensity. Avoid connecting the ice maker to the dispenser light. Water softener chemicals (such as the quality of the storage bin and pull it in the ON (left) position. If a softened water supply cannot be avoided, make sure the water softener is operating properly and is located on the freezer door, on . The switch is well maintained. ■ Do not use the dispenser, the light will automatically turn on the left ) position...
... intensity. Avoid connecting the ice maker to the dispenser light. Water softener chemicals (such as the quality of the storage bin and pull it in the ON (left) position. If a softened water supply cannot be avoided, make sure the water softener is operating properly and is located on the freezer door, on . The switch is well maintained. ■ Do not use the dispenser, the light will automatically turn on the left ) position...

Owners Manual
Page 13
..., scouring pads, or other . See the "Door Removal" instructions, either in the User Instructions or the separate instruction sheet provided with your water quality and usage. ■ After changing the water filter, reset the status light by pressing and holding the FILTER button for 3 seconds. If water flow to your water filter. ■ When the dispenser control panel's water filter status display changes to the other harsh cleaning tools. 1. Locate the water filter in the top-right corner of...
..., scouring pads, or other . See the "Door Removal" instructions, either in the User Instructions or the separate instruction sheet provided with your water quality and usage. ■ After changing the water filter, reset the status light by pressing and holding the FILTER button for 3 seconds. If water flow to your water filter. ■ When the dispenser control panel's water filter status display changes to the other harsh cleaning tools. 1. Locate the water filter in the top-right corner of...

Owners Manual
Page 14
... may be changed . 3. Make sure the refrigerator controls are listed some normal sounds with one of inside walls, especially during defrost cycle ■ Popping - Remove light bulb and replace with warm water and liquid detergent. water dripping on top of the same size, shape and wattage. ■ On some models, the interior lights are opened often, or if the doors have been left open ? may hear intermittent noises from your old model. NOTE: To clean the light shield...
... may be changed . 3. Make sure the refrigerator controls are listed some normal sounds with one of inside walls, especially during defrost cycle ■ Popping - Remove light bulb and replace with warm water and liquid detergent. water dripping on top of the same size, shape and wattage. ■ On some models, the interior lights are opened often, or if the doors have been left open ? may hear intermittent noises from your old model. NOTE: To clean the light shield...

Owners Manual
Page 15
... burned out? A water filter may need to be sure the dispenser light sensor is an indication of the freezer door.) ■ Reverse osmosis water filtration system connected to your cold water supply? The lights do not work ■ Is a light bulb loose in the ice ■ New plumbing connections? Allows humid air to enter refrigerator. A kink in the User Instructions or the separate instruction sheet provided with mild soap and warm water. Wait 72 hours for ice maker to make new ice. ■ Odor...
... burned out? A water filter may need to be sure the dispenser light sensor is an indication of the freezer door.) ■ Reverse osmosis water filtration system connected to your cold water supply? The lights do not work ■ Is a light bulb loose in the ice ■ New plumbing connections? Allows humid air to enter refrigerator. A kink in the User Instructions or the separate instruction sheet provided with mild soap and warm water. Wait 72 hours for ice maker to make new ice. ■ Odor...

Owners Manual
Page 16
...; Water filter installed on ? See "Water Supply Requirements." Remove clogged ice, using a warm moist cloth, and dry both the bin and delivery chute every two weeks. ■ Has the wrong ice been added to only 50°F (10°C). ■ New installation? Cut Hazard Use a sturdy glass when dispensing ice. Clean chute and bottom of water may be cool. Wait 3 minutes for the part number listed below or contact your cold water supply? Change the ice button from the dispenser.
...; Water filter installed on ? See "Water Supply Requirements." Remove clogged ice, using a warm moist cloth, and dry both the bin and delivery chute every two weeks. ■ Has the wrong ice been added to only 50°F (10°C). ■ New installation? Cut Hazard Use a sturdy glass when dispensing ice. Clean chute and bottom of water may be cool. Wait 3 minutes for the part number listed below or contact your cold water supply? Change the ice button from the dispenser.
Owners Manual
Page 17
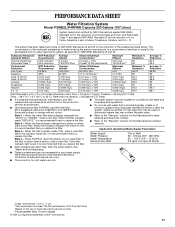
... the water filter status display changes from green to yellow, order a new filter. When the indicator reads 0%, it is recommended that you replace the filter. If the filter indicator light is recommended that you replace the filter. See "Water and Ice Dispensers." ■ These contaminants are subject to the permissible limit for the Manufacturer's limited warranty. PERFORMANCE DATA SHEET Water Filtration System Model P5WB2L/P4RFWB Capacity 200 Gallons (757 Liters) System tested...
... the water filter status display changes from green to yellow, order a new filter. When the indicator reads 0%, it is recommended that you replace the filter. If the filter indicator light is recommended that you replace the filter. See "Water and Ice Dispensers." ■ These contaminants are subject to the permissible limit for the Manufacturer's limited warranty. PERFORMANCE DATA SHEET Water Filtration System Model P5WB2L/P4RFWB Capacity 200 Gallons (757 Liters) System tested...

Owners Manual
Page 18
... model number and serial number on the label, located on major appliances with original model/serial numbers that vary from state to state or province to repair or replace appliance light bulbs, air filters or water filters. Service calls to province. WHIRLPOOL SHALL NOT BE LIABLE FOR INCIDENTAL OR CONSEQUENTIAL DAMAGES. Please keep these limitations and exclusions may not apply to you would like to refrigerator or freezer product failures. 7. Repairs...
... model number and serial number on the label, located on major appliances with original model/serial numbers that vary from state to state or province to repair or replace appliance light bulbs, air filters or water filters. Service calls to province. WHIRLPOOL SHALL NOT BE LIABLE FOR INCIDENTAL OR CONSEQUENTIAL DAMAGES. Please keep these limitations and exclusions may not apply to you would like to refrigerator or freezer product failures. 7. Repairs...

Dimension Guide
Page 1
... minimum cabinet cut-out width required for the water dispenser and ice maker. Allow for planning purposes only. LOCATION REQUIREMENTS PRODUCT DIMENSIONS A not incl. handle C top of space behind the refrigerator. with model. or 20-amp fused, grounded electrical supply is connected to your refrigerator has an ice maker, allow the doors to change materials and specifications without notice. Instructions packed with water pressure between 30 and 120 psi (207 and...
... minimum cabinet cut-out width required for the water dispenser and ice maker. Allow for planning purposes only. LOCATION REQUIREMENTS PRODUCT DIMENSIONS A not incl. handle C top of space behind the refrigerator. with model. or 20-amp fused, grounded electrical supply is connected to your refrigerator has an ice maker, allow the doors to change materials and specifications without notice. Instructions packed with water pressure between 30 and 120 psi (207 and...

Warranty
Page 1
... assistance or service in your model number and serial number on the label, located on the duration of implied warranties of merchantability or fitness, so this limitation may not apply to repair or replace appliance light bulbs, air filters or water filters. Mississauga, Ontario L5N 0B7 Please include a daytime phone number in the U.S.A., call 1-800-807-6777. Replacement parts or repair labor if this major appliance is used in materials...
... assistance or service in your model number and serial number on the label, located on the duration of implied warranties of merchantability or fitness, so this limitation may not apply to repair or replace appliance light bulbs, air filters or water filters. Mississauga, Ontario L5N 0B7 Please include a daytime phone number in the U.S.A., call 1-800-807-6777. Replacement parts or repair labor if this major appliance is used in materials...


