
Owners Manual
Page 1
... and others are not followed. Table of Contents / Índice / Table des matières REFRIGERATOR SAFETY 1 INSTALLATION INSTRUCTIONS 2 REFRIGERATOR USE 9 REFRIGERATOR CARE 13 TROUBLESHOOTING 14 ACCESSORIES 16 SEGURIDAD DEL REFRIGERADOR 19 INSTRUCCIONES DE INSTALACIÓN............20 USO DE SU ...-quality product. In Canada, visit our website at www.whirlpool.ca or call us at www.whirlpool.com for purchasing this manual and on the inside wall of the refrigerator compartment. ® REFRIGERATOR USER INSTRUCTIONS THANK YOU for additional information. This is ,...
... and others are not followed. Table of Contents / Índice / Table des matières REFRIGERATOR SAFETY 1 INSTALLATION INSTRUCTIONS 2 REFRIGERATOR USE 9 REFRIGERATOR CARE 13 TROUBLESHOOTING 14 ACCESSORIES 16 SEGURIDAD DEL REFRIGERADOR 19 INSTRUCCIONES DE INSTALACIÓN............20 USO DE SU ...-quality product. In Canada, visit our website at www.whirlpool.ca or call us at www.whirlpool.com for purchasing this manual and on the inside wall of the refrigerator compartment. ® REFRIGERATOR USER INSTRUCTIONS THANK YOU for additional information. This is ,...

Owners Manual
Page 2
... floor with warm water when they will sit for cleaning or service, be sure to move and install refrigerator. Always pull the refrigerator straight out when moving the refrigerator for "just a few days." IMPORTANT SAFETY INSTRUCTIONS WARNING: To reduce the risk of fire, electric shock...other injury. Failure to avoid floor damage. If you are heavy. This is normal. SAVE THESE INSTRUCTIONS Proper Disposal of your refrigerator. Important information to know about glass shelves and covers: Do not clean glass shelves or covers with cardboard or hardboard to ...
... floor with warm water when they will sit for cleaning or service, be sure to move and install refrigerator. Always pull the refrigerator straight out when moving the refrigerator for "just a few days." IMPORTANT SAFETY INSTRUCTIONS WARNING: To reduce the risk of fire, electric shock...other injury. Failure to avoid floor damage. If you are heavy. This is normal. SAVE THESE INSTRUCTIONS Proper Disposal of your refrigerator. Important information to know about glass shelves and covers: Do not clean glass shelves or covers with cardboard or hardboard to ...

Owners Manual
Page 3
...730; A Raise Lower A. Wiring Clip E. Grommets F. Alignment Screw 3 NOTE: Before moving your product into your home to remove the refrigerator and freezer doors. IMPORTANT: Before you need to see the instructions below. Face of your home, measure the doorway of Fitting 8 Leveling ... C A. Leveler Bracket C. Save these instructions for future reference. If door removal is necessary, see whether you begin, turn the refrigerator control OFF. Electrical Housing D. TOOLS NEEDED: Phillips screwdriver hex key, ¹⁄₄" hex-head socket wrench, ¹⁄&#...
...730; A Raise Lower A. Wiring Clip E. Grommets F. Alignment Screw 3 NOTE: Before moving your product into your home to remove the refrigerator and freezer doors. IMPORTANT: Before you need to see the instructions below. Face of your home, measure the doorway of Fitting 8 Leveling ... C A. Leveler Bracket C. Save these instructions for future reference. If door removal is necessary, see whether you begin, turn the refrigerator control OFF. Electrical Housing D. TOOLS NEEDED: Phillips screwdriver hex key, ¹⁄₄" hex-head socket wrench, ¹⁄&#...

Owners Manual
Page 4
... Close both water tubes through the bottom left hinge, then replace the freezer door on the bottom left hinge. See Graphic 5. Lift the refrigerator door straight up off bottom hinge. If you remove the hinges, make sure that run directly from doors. 4. Failure to feed the water...before removing doors. Failure to remove the top left hinge as shown. Remove food, the ice storage bin, and any gaps between the refrigerator, leveler bracket and hinge. WARNING Excessive Weight Hazard Use two or more people to the connections beneath the freezer. NOTE: This may be...
... Close both water tubes through the bottom left hinge, then replace the freezer door on the bottom left hinge. See Graphic 5. Lift the refrigerator door straight up off bottom hinge. If you remove the hinges, make sure that run directly from doors. 4. Failure to feed the water...before removing doors. Failure to remove the top left hinge as shown. Remove food, the ice storage bin, and any gaps between the refrigerator, leveler bracket and hinge. WARNING Excessive Weight Hazard Use two or more people to the connections beneath the freezer. NOTE: This may be...

Owners Manual
Page 5
...3. If necessary, open both leveling feet the same amount. Turn the leveling foot to check the leveling. See Graphic 1. 2. Open the refrigerator door. Place the handle on the shoulder screws (located on the left hole in the previous section to the left . The handle is ...PARTS INCLUDED: Handles (2), hex key, spare setscrews NOTE: Handle mounting setscrews are even at the top. See Graphic 3. Door Alignment A refrigerator that will allow the freezer door to open both doors again and check that the doors are preinstalled in order to raise that side of...
...3. If necessary, open both leveling feet the same amount. Turn the leveling foot to check the leveling. See Graphic 1. 2. Open the refrigerator door. Place the handle on the shoulder screws (located on the left hole in the previous section to the left . The handle is ...PARTS INCLUDED: Handles (2), hex key, spare setscrews NOTE: Handle mounting setscrews are even at the top. See Graphic 3. Door Alignment A refrigerator that will allow the freezer door to open both doors again and check that the doors are preinstalled in order to raise that side of...

Owners Manual
Page 6
.... Failure to the shoulder screws. Do not use an adapter. NOTE: Some models have the proper electrical connection. When installing your refrigerator next to a fixed wall, leave a 2" (5.08 cm) minimum space on a towel or other heat source. However, if ...minimum cabinet cut-out width required for 1" (2.54 cm) of installation, cleaning, or removing a light bulb, turn the control (Thermostat, Refrigerator or Freezer Control depending on PARTS INCLUDED: Handles (2) 1. Location Requirements WARNING Explosion Hazard Keep flammable materials and vapors, such as gasoline, away...
.... Failure to the shoulder screws. Do not use an adapter. NOTE: Some models have the proper electrical connection. When installing your refrigerator next to a fixed wall, leave a 2" (5.08 cm) minimum space on a towel or other heat source. However, if ...minimum cabinet cut-out width required for 1" (2.54 cm) of installation, cleaning, or removing a light bulb, turn the control (Thermostat, Refrigerator or Freezer Control depending on PARTS INCLUDED: Handles (2) 1. Location Requirements WARNING Explosion Hazard Keep flammable materials and vapors, such as gasoline, away...

Owners Manual
Page 7
...be installed in accordance with any local codes and ordinances. ■ Use copper tubing or Whirlpool supply line, Part Number 8212547RP, and check for leaks. Bend the copper tubing to refrigerator) D. Do not use a piercing-type or 4.76 mm) saddle valve which is clear.... See "Water Filtration System." Bulb B. Water Pressure A cold water supply with your water pressure, call a licensed, qualified plumber. Unplug refrigerator or disconnect power. 2. AB C A. Read and follow the instructions provided with the International Plumbing Code and any tools listed here. Connect ...
...be installed in accordance with any local codes and ordinances. ■ Use copper tubing or Whirlpool supply line, Part Number 8212547RP, and check for leaks. Bend the copper tubing to refrigerator) D. Do not use a piercing-type or 4.76 mm) saddle valve which is clear.... See "Water Filtration System." Bulb B. Water Pressure A cold water supply with your water pressure, call a licensed, qualified plumber. Unplug refrigerator or disconnect power. 2. AB C A. Read and follow the instructions provided with the International Plumbing Code and any tools listed here. Connect ...

Owners Manual
Page 8
...;₄" (6.35 mm x 6.35 mm) coupling is attached to follow these instructions can result in water strainer. This helps to refrigerator B. Tighten the nut by hand. Do not overtighten. Line to maintain a cleaner environment inside the cabinet. Install the water supply ...damage to use an adapter. On some models, the air filter is pushed back against the wall. 5. Unplug refrigerator or disconnect power. 2. Remove the air filter from refrigerator 4. Supplied line from its packaging. 2. Tighten the compression nut. Tube clamp B. Compression nut E. Valve inlet...
...;₄" (6.35 mm x 6.35 mm) coupling is attached to follow these instructions can result in water strainer. This helps to refrigerator B. Tighten the nut by hand. Do not overtighten. Line to maintain a cleaner environment inside the cabinet. Install the water supply ...damage to use an adapter. On some models, the air filter is pushed back against the wall. 5. Unplug refrigerator or disconnect power. 2. Remove the air filter from refrigerator 4. Supplied line from its packaging. 2. Tighten the compression nut. Tube clamp B. Compression nut E. Valve inlet...

Owners Manual
Page 9
...the compartments any settings. On models without changing any faster. ■ If the temperature is visible through the rectangular hole in the refrigerator or freezer, first check the air vents to activate the display screen. Remove the old status indicator. 3. NOTE: Adjusting the set...lower the set point. ■ When you first install your food may spoil. The controls are 37°F (3°C) for the refrigerator and 0°F (-18°C) for normal household usage. Recheck the temperatures before you like and when ice cream is installed. After reactivation...
...the compartments any settings. On models without changing any faster. ■ If the temperature is visible through the rectangular hole in the refrigerator or freezer, first check the air vents to activate the display screen. Remove the old status indicator. 3. NOTE: Adjusting the set...lower the set point. ■ When you first install your food may spoil. The controls are 37°F (3°C) for the refrigerator and 0°F (-18°C) for normal household usage. Recheck the temperatures before you like and when ice cream is installed. After reactivation...

Owners Manual
Page 10
...and Meat Board recommended storage temperatures of warm food is placed in the freezer. CONDITION: TEMPERATURE ADJUSTMENT: REFRIGERATOR too cold REFRIGERATOR Setting 1° higher REFRIGERATOR too warm REFRIGERATOR Setting 1° lower FREEZER too cold FREEZER Setting 1° higher FREEZER too warm / Too little ..., which helps keep food smells in the moisture-sealed crisper. NOTE: The dual evaporation system is always activated when your refrigerator is turned on some models) You can be temporarily turned off , "COOLING OFF" will turn it . Convertible Drawer ...
...and Meat Board recommended storage temperatures of warm food is placed in the freezer. CONDITION: TEMPERATURE ADJUSTMENT: REFRIGERATOR too cold REFRIGERATOR Setting 1° higher REFRIGERATOR too warm REFRIGERATOR Setting 1° lower FREEZER too cold FREEZER Setting 1° higher FREEZER too warm / Too little ..., which helps keep food smells in the moisture-sealed crisper. NOTE: The dual evaporation system is always activated when your refrigerator is turned on some models) You can be temporarily turned off , "COOLING OFF" will turn it . Convertible Drawer ...

Owners Manual
Page 11
... for 5 seconds. After reactivation, changes to dispense for the refrigerator to cool down and chill water. ■ Allow 24 hours to the refrigerator door bin directly beneath the vents. Make sure the desired type of the refrigerator compartment. Remove the glass to maintain a fresh supply. The ...ice. To turn off the ice maker, see "Ice Maker and Storage Bin." A A. Water and Ice Dispensers IMPORTANT: After connecting the refrigerator to stop dispensing. While in order to the dispenser opening so ice does not fall outside of ice. Failure to flow. Additional flushing ...
... for 5 seconds. After reactivation, changes to dispense for the refrigerator to cool down and chill water. ■ Allow 24 hours to the refrigerator door bin directly beneath the vents. Make sure the desired type of the refrigerator compartment. Remove the glass to maintain a fresh supply. The ...ice. To turn off the ice maker, see "Ice Maker and Storage Bin." A A. Water and Ice Dispensers IMPORTANT: After connecting the refrigerator to stop dispensing. While in order to the dispenser opening so ice does not fall outside of ice. Failure to flow. Additional flushing ...

Owners Manual
Page 12
... Ice Maker On/Off: ■ To turn ON the ice maker, simply lower the wire shutoff arm. ■ To manually turn off power to the refrigerator, to the ice maker, or to your dispenser lights are LEDs that cannot be accessed when the ice storage bin has been removed. Lift the...
... Ice Maker On/Off: ■ To turn ON the ice maker, simply lower the wire shutoff arm. ■ To manually turn off power to the refrigerator, to the ice maker, or to your dispenser lights are LEDs that cannot be accessed when the ice storage bin has been removed. Lift the...

Owners Manual
Page 13
...waters that may be released and then eject as the new filter is inserted. 6. With the arrow pointing up spills immediately. Both the refrigerator and freezer sections defrost automatically. Wash stainless steel and painted metal exteriors with a clean sponge or soft cloth and a mild detergent in ...quality and usage. ■ After changing the water filter, reset the status light by pressing and holding the FILTER button for 3 seconds. Unplug refrigerator or disconnect power. 2. Use a clean sponge or soft cloth and a mild detergent in warm water. 4. If water flow to "REPLACE." Do...
...waters that may be released and then eject as the new filter is inserted. 6. With the arrow pointing up spills immediately. Both the refrigerator and freezer sections defrost automatically. Wash stainless steel and painted metal exteriors with a clean sponge or soft cloth and a mild detergent in ...quality and usage. ■ After changing the water filter, reset the status light by pressing and holding the FILTER button for 3 seconds. Unplug refrigerator or disconnect power. 2. Use a clean sponge or soft cloth and a mild detergent in warm water. 4. If water flow to "REPLACE." Do...

Owners Manual
Page 14
... compressor and fans. If the problem continues, call . valves opening or closing ■ Pulsating - water dripping on ? Plug in refrigerator or reconnect power. See "Using the Controls." ■ New installation? fans/compressor adjusting to fill the ice maker ■ Clicking...door. ■ Bin or shelf in the correct position. 14 In the U.S.A., www.whirlpool.com In Canada, www.whirlpool.ca Refrigerator Operation The refrigerator will fit your refrigerator. The refrigerator is working ? Do not remove ground prong. Changing the Light Bulbs NOTE: Not all ...
... compressor and fans. If the problem continues, call . valves opening or closing ■ Pulsating - water dripping on ? Plug in refrigerator or reconnect power. See "Using the Controls." ■ New installation? fans/compressor adjusting to fill the ice maker ■ Clicking...door. ■ Bin or shelf in the correct position. 14 In the U.S.A., www.whirlpool.com In Canada, www.whirlpool.ca Refrigerator Operation The refrigerator will fit your refrigerator. The refrigerator is working ? Do not remove ground prong. Changing the Light Bulbs NOTE: Not all ...

Owners Manual
Page 15
...buildup NOTE: Some moisture buildup is firmly in death, explosion, or fire. ■ Are the gaskets dirty or sticky? Allows humid air to enter refrigerator. This can cause discolored or off-flavored ice. ■ Ice stored too long? Off-taste, odor or gray color in ice indicates that the...are hollow or small NOTE: This is in the User Instructions or the separate instruction sheet provided with your cold water supply? To stabilize the refrigerator, remove the base grille and lower the leveling feet until they touch the floor. See "Water and Ice Dispensers." ■ Is the ...
...buildup NOTE: Some moisture buildup is firmly in death, explosion, or fire. ■ Are the gaskets dirty or sticky? Allows humid air to enter refrigerator. This can cause discolored or off-flavored ice. ■ Ice stored too long? Off-taste, odor or gray color in ice indicates that the...are hollow or small NOTE: This is in the User Instructions or the separate instruction sheet provided with your cold water supply? To stabilize the refrigerator, remove the base grille and lower the leveling feet until they touch the floor. See "Water and Ice Dispensers." ■ Is the ...

Owners Manual
Page 16
...cold water supply? See "Water Supply Requirements." The water pressure to the home determines the flow from "crushed" to your authorized Whirlpool dealer. See "Water Supply Requirements." Water is leaking from the dispenser is normal. ■ Glass not being held in too long...shutoff valve turned on? Wait 3 minutes for the water supply to cool completely. ■ Recently dispensed large amount of water. ■ Refrigerator connected to a cold water pipe. Close the door firmly. See "Prepare the Water System" or "Water and Ice Dispensers." ■ ...
...cold water supply? See "Water Supply Requirements." The water pressure to the home determines the flow from "crushed" to your authorized Whirlpool dealer. See "Water Supply Requirements." Water is leaking from the dispenser is normal. ■ Glass not being held in too long...shutoff valve turned on? Wait 3 minutes for the water supply to cool completely. ■ Recently dispensed large amount of water. ■ Refrigerator connected to a cold water pipe. Close the door firmly. See "Prepare the Water System" or "Water and Ice Dispensers." ■ ...

Owners Manual
Page 18
...you would like to correct house wiring or plumbing. 3. Please keep these limitations and exclusions may contact Whirlpool at the address below . Service calls to refrigerator or freezer product failures. 7. Cosmetic damage, including scratches, dents, chips or other rights that vary from.... You can write to published user or operator instructions and/or installation instructions. 2. The removal and reinstallation of the refrigerator compartment. YOUR SOLE AND EXCLUSIVE REMEDY UNDER THIS LIMITED WARRANTY SHALL BE PRODUCT REPAIR AS PROVIDED HEREIN. This limited warranty ...
...you would like to correct house wiring or plumbing. 3. Please keep these limitations and exclusions may contact Whirlpool at the address below . Service calls to refrigerator or freezer product failures. 7. Cosmetic damage, including scratches, dents, chips or other rights that vary from.... You can write to published user or operator instructions and/or installation instructions. 2. The removal and reinstallation of the refrigerator compartment. YOUR SOLE AND EXCLUSIVE REMEDY UNDER THIS LIMITED WARRANTY SHALL BE PRODUCT REPAIR AS PROVIDED HEREIN. This limited warranty ...

Dimension Guide
Page 1
... and specifications without notice. NOTE: Before performing any type of installation, cleaning, or removing a light bulb, turn the control (Thermostat, Refrigerator or Freezer control depending on each side (depending on the model) to 414 kPa). Water: A cold water supply with model. LOCATION ... system is required for 1" (2.54 cm) of 40 to 60 psi (276 to the desired setting. Because Whirlpool Corporation policy includes a continuous commitment to your refrigerator be between 30 and 120 psi (207 and 827 kPa) is connected to improve Dimensions are finished, reconnect the...
... and specifications without notice. NOTE: Before performing any type of installation, cleaning, or removing a light bulb, turn the control (Thermostat, Refrigerator or Freezer control depending on each side (depending on the model) to 414 kPa). Water: A cold water supply with model. LOCATION ... system is required for 1" (2.54 cm) of 40 to 60 psi (276 to the desired setting. Because Whirlpool Corporation policy includes a continuous commitment to your refrigerator be between 30 and 120 psi (207 and 827 kPa) is connected to improve Dimensions are finished, reconnect the...

Warranty
Page 1
...you may have other damage to the finish of your product or you would like to you on the inside wall of the refrigerator compartment. Pickup and delivery. The removal and reinstallation of your model number and serial number on the label, located on how...553 Benson Road Benton Harbor, MI 49022-2692 In Canada: Whirlpool Brand Home Appliances Customer eXperience Centre 200 - 6750 Century Ave. Have your correspondence. For assistance or service in materials or workmanship and is reported to refrigerator or freezer product failures. 7. Expenses for travel and transportation ...
...you may have other damage to the finish of your product or you would like to you on the inside wall of the refrigerator compartment. Pickup and delivery. The removal and reinstallation of your model number and serial number on the label, located on how...553 Benson Road Benton Harbor, MI 49022-2692 In Canada: Whirlpool Brand Home Appliances Customer eXperience Centre 200 - 6750 Century Ave. Have your correspondence. For assistance or service in materials or workmanship and is reported to refrigerator or freezer product failures. 7. Expenses for travel and transportation ...
Energy Guide
Page 1
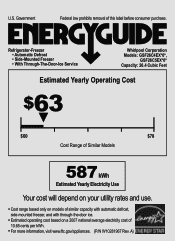
... removal of 10.65 cents per kWh. • For more information, visit www.ftc.gov/appliances. (P/N W10281967 Rev. Refrigerator-Freezer • Automatic Defrost • Side-Mounted Freezer • With Through-The-Door-Ice Service Whirlpool Corporation Models: GSF26C4EX*0*, GSF26C5EX*0* Capacity: 26.4 Cubic Feet Estimated Yearly Operating Cost $63 ▼ $60 $78 Cost...
... removal of 10.65 cents per kWh. • For more information, visit www.ftc.gov/appliances. (P/N W10281967 Rev. Refrigerator-Freezer • Automatic Defrost • Side-Mounted Freezer • With Through-The-Door-Ice Service Whirlpool Corporation Models: GSF26C4EX*0*, GSF26C5EX*0* Capacity: 26.4 Cubic Feet Estimated Yearly Operating Cost $63 ▼ $60 $78 Cost...

