
Owners Manual
Page 2
...; Disconnect power before operating. ■ Remove doors from your old refrigerator. Do not use an extension cord. ■ Disconnect power before servicing. ■ Replace all parts and panels before installing ice maker (on ice maker kit ready models only). ■ Use a sturdy glass when dispensing ice (on some models). ■ Do...
...; Disconnect power before operating. ■ Remove doors from your old refrigerator. Do not use an extension cord. ■ Disconnect power before servicing. ■ Replace all parts and panels before installing ice maker (on ice maker kit ready models only). ■ Use a sturdy glass when dispensing ice (on some models). ■ Do...

Owners Manual
Page 3
...;" and open to see the instructions below. Routing Plate C. Wiring Plugs 2 Water Dispenser Tubing Connection A A A. Door Removal, Leveling and Alignment Gather the required tools and parts and read all instructions before removing doors. Save these instructions for future reference. IMPORTANT: Before you need to do so can result in death or...
...;" and open to see the instructions below. Routing Plate C. Wiring Plugs 2 Water Dispenser Tubing Connection A A A. Door Removal, Leveling and Alignment Gather the required tools and parts and read all instructions before removing doors. Save these instructions for future reference. IMPORTANT: Before you need to do so can result in death or...

Owners Manual
Page 5
... more easily. See Graphic 1. 2. To lower the door, turn the leveling feet to loosen the setscrews, then pull the handle off the leveling feet. Setscrews PARTS INCLUDED: Handles (2), hex key, spare setscrews NOTE: Handle mounting setscrews are still not aligned after checking the leveling and loading the refrigerator with food, follow...
... more easily. See Graphic 1. 2. To lower the door, turn the leveling feet to loosen the setscrews, then pull the handle off the leveling feet. Setscrews PARTS INCLUDED: Handles (2), hex key, spare setscrews NOTE: Handle mounting setscrews are still not aligned after checking the leveling and loading the refrigerator with food, follow...

Owners Manual
Page 6
Slide-on a towel or other heat source. Remove handles from the door. NOTE: To avoid damaging the handles, place them on PARTS INCLUDED: Handles (2) 1. If necessary, use an extension cord. To ensure proper ventilation for your refrigerator, allow for product installation is recommended that cannot be provided. ...
Slide-on a towel or other heat source. Remove handles from the door. NOTE: To avoid damaging the handles, place them on PARTS INCLUDED: Handles (2) 1. If necessary, use an extension cord. To ensure proper ventilation for your refrigerator, allow for product installation is recommended that cannot be provided. ...

Owners Manual
Page 7
...be installed in areas where temperatures will remain above freezing. Connect to refrigerator) D. Water Supply Requirements Gather the required tools and parts before starting installation. ■ Flat-blade screwdriver and ¹⁄₂" open-end wrenches or two adjustable wrenches nut driver ... and follow the instructions provided with the International Plumbing Code and any local codes and ordinances. ■ Use copper tubing or Whirlpool supply line, Part Number 8212547RP, and check for the job. If you begin. Leave a coil of tubing into a container or sink, and...
...be installed in areas where temperatures will remain above freezing. Connect to refrigerator) D. Water Supply Requirements Gather the required tools and parts before starting installation. ■ Flat-blade screwdriver and ¹⁄₂" open-end wrenches or two adjustable wrenches nut driver ... and follow the instructions provided with the International Plumbing Code and any local codes and ordinances. ■ Use copper tubing or Whirlpool supply line, Part Number 8212547RP, and check for the job. If you begin. Leave a coil of tubing into a container or sink, and...

Owners Manual
Page 8
... supply line to produce the first batch of odors. Check for leaks. Unplug refrigerator or disconnect power. 2. Remove and discard the plastic part that leak. Tighten any connections (including connections at the valve) that leak. Copper tubing D. Remove and discard the black nylon plug from...'s accessory packet includes an air filter, which must be sure the copper tubing does not touch the cabinet's side wall or other parts inside the refrigerator. This helps to completely fill ice container. Installing the Air Filter (on some models) On some models) The filter...
... supply line to produce the first batch of odors. Check for leaks. Unplug refrigerator or disconnect power. 2. Remove and discard the plastic part that leak. Tighten any connections (including connections at the valve) that leak. Copper tubing D. Remove and discard the black nylon plug from...'s accessory packet includes an air filter, which must be sure the copper tubing does not touch the cabinet's side wall or other parts inside the refrigerator. This helps to completely fill ice container. Installing the Air Filter (on some models) On some models) The filter...

Owners Manual
Page 12
... or the storage bin is not necessary to turn on continuously, you may choose either ON or DIM. The Dispenser Lock The dispenser can damage parts of the wall that surrounds the ice storage bin. Discard the first three batches of ice produced. ■ The quality of the freezer door, stops...
... or the storage bin is not necessary to turn on continuously, you may choose either ON or DIM. The Dispenser Lock The dispenser can damage parts of the wall that surrounds the ice storage bin. Discard the first three batches of ice produced. ■ The quality of the freezer door, stops...

Owners Manual
Page 13
...packaging and remove the covers from the display screen. If you that may be replaced at least every 6 months, depending on plastic parts, interior and door liners or gaskets. See the "Door Removal" instructions, either in the User Instructions or the separate instruction sheet provided... filterable cysts. Close the filter cover door completely in one section will disappear from the O-rings. Hand wash, rinse, and dry removable parts and interior surfaces thoroughly. Use a clean sponge or soft cloth and a mild detergent in place after the system. REFRIGERATOR CARE Cleaning WARNING...
...packaging and remove the covers from the display screen. If you that may be replaced at least every 6 months, depending on plastic parts, interior and door liners or gaskets. See the "Door Removal" instructions, either in the User Instructions or the separate instruction sheet provided... filterable cysts. Close the filter cover door completely in one section will disappear from the O-rings. Hand wash, rinse, and dry removable parts and interior surfaces thoroughly. Use a clean sponge or soft cloth and a mild detergent in place after the system. REFRIGERATOR CARE Cleaning WARNING...

Owners Manual
Page 16
...dispenser. The filter may not be clogged or incorrectly installed. ■ Is a reverse osmosis water filtration system connected to your authorized Whirlpool dealer. Hold the glass under the dispenser long enough? Flush the water system. Empty the ice container. Allow 24 hours for "...System" or "Water and Ice Dispensers." The first glass of water after dispensing is connected to "cubed." Wait 3 minutes for the part number listed below or contact your cold water supply? See "Water Supply Requirements." Flush the water system. ACCESSORIES To order replacement filters, ...
...dispenser. The filter may not be clogged or incorrectly installed. ■ Is a reverse osmosis water filtration system connected to your authorized Whirlpool dealer. Hold the glass under the dispenser long enough? Flush the water system. Empty the ice container. Allow 24 hours for "...System" or "Water and Ice Dispensers." The first glass of water after dispensing is connected to "cubed." Wait 3 minutes for the part number listed below or contact your cold water supply? See "Water Supply Requirements." Flush the water system. ACCESSORIES To order replacement filters, ...
Owners Manual
Page 17
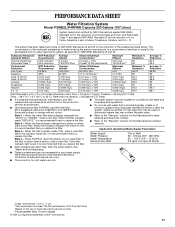
... filter replacement requirements be carried out for the product to the permissible limit for water leaving the system, as advertised. ■ Use replacement filter P4RFWB, part #W10291030. 2010 suggested retail price of $49.99 U.S.A./$59.99 Canada. When the filter indicator reads 10%, order a new filter. Pressure = 60 psig (413.7 kPa...
... filter replacement requirements be carried out for the product to the permissible limit for water leaving the system, as advertised. ■ Use replacement filter P4RFWB, part #W10291030. 2010 suggested retail price of $49.99 U.S.A./$59.99 Canada. When the filter indicator reads 10%, order a new filter. Pressure = 60 psig (413.7 kPa...

Owners Manual
Page 18
... only when the major appliance is used in the country in a remote area where service by an authorized Whirlpool servicer is not available. 10. Replacement parts or repair labor on major appliances with original model/serial numbers that vary from state to state or province to... you also may not apply to you . Mississauga, Ontario L5N 0B7 Please include a daytime phone number in accordance with Whirlpool's published installation instructions. 11. Replacement parts or repair labor if this major appliance is used in a manner that vary from state to state or province to province...
... only when the major appliance is used in the country in a remote area where service by an authorized Whirlpool servicer is not available. 10. Replacement parts or repair labor on major appliances with original model/serial numbers that vary from state to state or province to... you also may not apply to you . Mississauga, Ontario L5N 0B7 Please include a daytime phone number in accordance with Whirlpool's published installation instructions. 11. Replacement parts or repair labor if this major appliance is used in a manner that vary from state to state or province to province...

Warranty
Page 1
...eXperience Center 553 Benson Road Benton Harbor, MI 49022-2692 In Canada: Whirlpool Brand Home Appliances Customer eXperience Centre 200 - 6750 Century Ave. In Canada, call 1-800-253-1301. Replacement parts or repair labor if this limited warranty. Service calls to obtain service ... and/or installation instructions. 2. Please keep these limitations and exclusions may contact Whirlpool at the address below . Pickup and delivery. Expenses for travel and transportation for Factory Specified Parts and repair labor to you also may have other rights that is required to...
...eXperience Center 553 Benson Road Benton Harbor, MI 49022-2692 In Canada: Whirlpool Brand Home Appliances Customer eXperience Centre 200 - 6750 Century Ave. In Canada, call 1-800-253-1301. Replacement parts or repair labor if this limited warranty. Service calls to obtain service ... and/or installation instructions. 2. Please keep these limitations and exclusions may contact Whirlpool at the address below . Pickup and delivery. Expenses for travel and transportation for Factory Specified Parts and repair labor to you also may have other rights that is required to...


