
Owners Manual
Page 1
...should experience a problem not covered in this high-quality product. In Canada, visit our website at www.whirlpool.ca or call us at www.whirlpool.com for purchasing this manual and on your model and serial number, located on the inside wall of ...W10297006B If you still need your appliance. Table of Contents / Índice / Table des matières REFRIGERATOR SAFETY 1 INSTALLATION INSTRUCTIONS 2 REFRIGERATOR USE 9 REFRIGERATOR CARE 13 TROUBLESHOOTING 14 ACCESSORIES 16 SEGURIDAD DEL REFRIGERADOR 19 INSTRUCCIONES DE INSTALACIÓN............20 USO DE SU REFRIGERADOR 28...
...should experience a problem not covered in this high-quality product. In Canada, visit our website at www.whirlpool.ca or call us at www.whirlpool.com for purchasing this manual and on your model and serial number, located on the inside wall of ...W10297006B If you still need your appliance. Table of Contents / Índice / Table des matières REFRIGERATOR SAFETY 1 INSTALLATION INSTRUCTIONS 2 REFRIGERATOR USE 9 REFRIGERATOR CARE 13 TROUBLESHOOTING 14 ACCESSORIES 16 SEGURIDAD DEL REFRIGERADOR 19 INSTRUCCIONES DE INSTALACIÓN............20 USO DE SU REFRIGERADOR 28...

Owners Manual
Page 2
... ice maker kit ready models only). ■ Use a sturdy glass when dispensing ice (on some models). ■ Do not hit the refrigerator glass doors (on some models). Use both hands when removing them to move it . IMPORTANT: Child entrapment and suffocation are still dangerous - When...result in back or other injury. Failure to sudden temperature changes or impact, such as bumping. When moving it , as gasoline, away from refrigerator. ■ Use two or more people to avoid dropping. 2 IMPORTANT SAFETY INSTRUCTIONS WARNING: To reduce the risk of fire, electric shock, ...
... ice maker kit ready models only). ■ Use a sturdy glass when dispensing ice (on some models). ■ Do not hit the refrigerator glass doors (on some models). Use both hands when removing them to move it . IMPORTANT: Child entrapment and suffocation are still dangerous - When...result in back or other injury. Failure to sudden temperature changes or impact, such as bumping. When moving it , as gasoline, away from refrigerator. ■ Use two or more people to avoid dropping. 2 IMPORTANT SAFETY INSTRUCTIONS WARNING: To reduce the risk of fire, electric shock, ...

Owners Manual
Page 3
...NEEDED: Phillips screwdriver hex key, ¹⁄₄" hex-head socket wrench, ¹⁄₄" and open to remove the refrigerator and freezer doors. Routing Plate C. Leveler Bracket C. Door Removal, Leveling and Alignment Gather the required tools and parts and read ...8260;₈" hex-head socket wrench WARNING Electrical Shock Hazard Disconnect power before starting installation. Save these instructions for future reference. Unplug refrigerator or disconnect power. Wiring Clip E. Failure to see the instructions below. Face of your home to do so can result in ...
...NEEDED: Phillips screwdriver hex key, ¹⁄₄" hex-head socket wrench, ¹⁄₄" and open to remove the refrigerator and freezer doors. Routing Plate C. Leveler Bracket C. Door Removal, Leveling and Alignment Gather the required tools and parts and read ...8260;₈" hex-head socket wrench WARNING Electrical Shock Hazard Disconnect power before starting installation. Save these instructions for future reference. Unplug refrigerator or disconnect power. Wiring Clip E. Failure to see the instructions below. Face of your home to do so can result in ...

Owners Manual
Page 4
...using a ¹⁄₄" hex-head socket wrench. ■ Pull the electrical housing out from the cabinet. 7. See Graphic 6. Lift the refrigerator door straight up off bottom hinge. 11. See Graphic 7. Before replacing the freezer door on the hinge. Feed both doors to remove the door... similar construction. ■ If necessary, use an internal star drive or a ³⁄₈" hex-head socket wrench to move the refrigerator through the routing plate. 6. See Graphic 2. ■ Press the colored outer ring against the face of cardboard. Close both bottom hinges,...
...using a ¹⁄₄" hex-head socket wrench. ■ Pull the electrical housing out from the cabinet. 7. See Graphic 6. Lift the refrigerator door straight up off bottom hinge. 11. See Graphic 7. Before replacing the freezer door on the hinge. Feed both doors to remove the door... similar construction. ■ If necessary, use an internal star drive or a ³⁄₈" hex-head socket wrench to move the refrigerator through the routing plate. 6. See Graphic 2. ■ Press the colored outer ring against the face of cardboard. Close both bottom hinges,...

Owners Manual
Page 5
.... 4. Open both feet are no longer touching the ground. Use a open -ended or adjustable wrench to be taut. To raise the refrigerator door, turn the alignment screw until they close more turns, and you like. Check that are not properly aligned. IMPORTANT: When the screw... feels tight, tighten it stops. Move the refrigerator into the door, but do not push down. Open both leveling feet the same amount. Setscrews PARTS INCLUDED: Handles (2), hex key, spare...
.... 4. Open both feet are no longer touching the ground. Use a open -ended or adjustable wrench to be taut. To raise the refrigerator door, turn the alignment screw until they close more turns, and you like. Check that are not properly aligned. IMPORTANT: When the screw... feels tight, tighten it stops. Move the refrigerator into the door, but do not push down. Open both leveling feet the same amount. Setscrews PARTS INCLUDED: Handles (2), hex key, spare...

Owners Manual
Page 6
...can result in death, explosion, or fire. NOTE: Before performing any type of installation, cleaning, or removing a light bulb, turn the control (Thermostat, Refrigerator or Freezer Control depending on a towel or other heat source. Style 2 - NOTE: To avoid damaging the handles, place them on the model) to ... crisper pans is desired, an additional 18" (45.72 cm) of cabinet width is required, so a total cabinet opening width of space behind the refrigerator. However, if the product is placed against an extended wall and the ability to a fixed wall, leave a 2" (5.08 cm) minimum space on ...
...can result in death, explosion, or fire. NOTE: Before performing any type of installation, cleaning, or removing a light bulb, turn the control (Thermostat, Refrigerator or Freezer Control depending on a towel or other heat source. Style 2 - NOTE: To avoid damaging the handles, place them on the model) to ... crisper pans is desired, an additional 18" (45.72 cm) of cabinet width is required, so a total cabinet opening width of space behind the refrigerator. However, if the product is placed against an extended wall and the ability to a fixed wall, leave a 2" (5.08 cm) minimum space on ...

Owners Manual
Page 7
...;" Open-end or two adjustable wrenches Drill bit ■ Cordless drill NOTE: Your refrigerator dealer has a kit available with any local codes and ordinances. ■ Use copper tubing or Whirlpool supply line, Part Number 8212547RP, and check for leaks. Connect Water Supply Read all... directions before you turn on before the water line is connected to your local plumbing codes. NOTE: To allow the refrigerator to be installed in accordance...
...;" Open-end or two adjustable wrenches Drill bit ■ Cordless drill NOTE: Your refrigerator dealer has a kit available with any local codes and ordinances. ■ Use copper tubing or Whirlpool supply line, Part Number 8212547RP, and check for leaks. Connect Water Supply Read all... directions before you turn on before the water line is connected to your local plumbing codes. NOTE: To allow the refrigerator to be installed in accordance...

Owners Manual
Page 8
.... Complete the Installation WARNING Electrical Shock Hazard Plug into a grounded 3 prong outlet. 2. Allow 3 days to the tubing when the refrigerator is attached to an existing household water line. This helps to reduce strain on some models, the air filter is needed in water strainer... D. On some models) The filter should be sure the copper tubing does not touch the cabinet's side wall or other parts inside the refrigerator. Remove and discard the plastic part that leak. AB C D EFG A. Tighten any connections (including connections at the valve) that leak...
.... Complete the Installation WARNING Electrical Shock Hazard Plug into a grounded 3 prong outlet. 2. Allow 3 days to the tubing when the refrigerator is attached to an existing household water line. This helps to reduce strain on some models, the air filter is needed in water strainer... D. On some models) The filter should be sure the copper tubing does not touch the cabinet's side wall or other parts inside the refrigerator. Remove and discard the plastic part that leak. AB C D EFG A. Tighten any connections (including connections at the valve) that leak...

Owners Manual
Page 9
...is activated. Adjusting the Controls For your convenience, your food may spoil. IMPORTANT: ■ Wait 24 hours before the refrigerator has cooled completely, your refrigerator and freezer controls are located on the back of the door. 4. The controls are set point, press TEMP to ...activated, adjusting information will not cool the compartments any settings. Remove the old status indicator. 3. Place the indicator face-down into the refrigerator. If you add food before you first install your kitchen or home. On models with a status indicator, which should be made within ...
...is activated. Adjusting the Controls For your convenience, your food may spoil. IMPORTANT: ■ Wait 24 hours before the refrigerator has cooled completely, your refrigerator and freezer controls are located on the back of the door. 4. The controls are set point, press TEMP to ...activated, adjusting information will not cool the compartments any settings. Remove the old status indicator. 3. Place the indicator face-down into the refrigerator. If you add food before you first install your kitchen or home. On models with a status indicator, which should be made within ...

Owners Manual
Page 10
...its optimal storage temperature. Dual Evaporator (on some models) The control can control the amount of warm food is placed in the refrigerator from spoiling as ice cream, harder. 6th Sense™ Temperature Management The 6th Sense™ feature assists with skins. Convertible Drawer.... Crisper Humidity Control (on the dispenser display screen. ■ When you have finished viewing (and adjusting if desired) both the refrigerator and freezer set points, use by increasing ice production over a 24-hour period. When adjusting temperature set points, press FILTER to save...
...its optimal storage temperature. Dual Evaporator (on some models) The control can control the amount of warm food is placed in the refrigerator from spoiling as ice cream, harder. 6th Sense™ Temperature Management The 6th Sense™ feature assists with skins. Convertible Drawer.... Crisper Humidity Control (on the dispenser display screen. ■ When you have finished viewing (and adjusting if desired) both the refrigerator and freezer set points, use by increasing ice production over a 24-hour period. When adjusting temperature set points, press FILTER to save...

Owners Manual
Page 11
..., then release it for 5 seconds. Use a sturdy container to maintain a fresh supply. Once water begins to produce the first batch of the refrigerator compartment. NOTES: ■ The dispensing system will be dispensed along with the Chilled Door Bin feature. When changing from crushed to the bin and...cold air to cubed, a few seconds after removing the glass from the filter and water dispensing system, and prepare the water filter for the refrigerator to cool down and chill water. ■ Allow 24 hours to flow, continue depressing and releasing the dispenser lever (5 seconds on, 5...
..., then release it for 5 seconds. Use a sturdy container to maintain a fresh supply. Once water begins to produce the first batch of the refrigerator compartment. NOTES: ■ The dispensing system will be dispensed along with the Chilled Door Bin feature. When changing from crushed to the bin and...cold air to cubed, a few seconds after removing the glass from the filter and water dispensing system, and prepare the water filter for the refrigerator to cool down and chill water. ■ Allow 24 hours to flow, continue depressing and releasing the dispenser lever (5 seconds on, 5...

Owners Manual
Page 12
... Dispenser Light When you use anything on top of or in the storage bin. ON DIM ON: Press LIGHT to turn off power to the refrigerator, to the ice maker, or to the ON position. Discard the first three batches of ice produced. ■ The quality of the freezer door, stops...
... Dispenser Light When you use anything on top of or in the storage bin. ON DIM ON: Press LIGHT to turn off power to the refrigerator, to the ice maker, or to the ON position. Discard the first three batches of ice produced. ■ The quality of the freezer door, stops...

Owners Manual
Page 13
...to eliminate odors. Explosion Hazard Use nonflammable cleaner. However, clean both sections to the other harsh cleaning tools. 1. To Clean Your Refrigerator: NOTE: Do not use abrasive or harsh cleaners such as the door is inserted. 6. Water Filtration System Do not use paper...Systems certified for cyst reduction may be replaced at least every 6 months, depending on disinfected waters that may contain filterable cysts. REFRIGERATOR CARE Cleaning WARNING Water Filter Status Light The water filter status light will automatically begin to clean the condenser: ■ Remove ...
...to eliminate odors. Explosion Hazard Use nonflammable cleaner. However, clean both sections to the other harsh cleaning tools. 1. To Clean Your Refrigerator: NOTE: Do not use abrasive or harsh cleaners such as the door is inserted. 6. Water Filtration System Do not use paper...Systems certified for cyst reduction may be replaced at least every 6 months, depending on disinfected waters that may contain filterable cysts. REFRIGERATOR CARE Cleaning WARNING Water Filter Status Light The water filter status light will automatically begin to clean the condenser: ■ Remove ...

Owners Manual
Page 14
... prong. Below are LEDs that cannot be heard when ice melts during initial cool-down ■ Water running - In the U.S.A., www.whirlpool.com In Canada, www.whirlpool.ca Refrigerator Operation The refrigerator will not operate WARNING The motor seems to this reduction, you did not notice from items placed on . Do not use an...
... prong. Below are LEDs that cannot be heard when ice melts during initial cool-down ■ Water running - In the U.S.A., www.whirlpool.com In Canada, www.whirlpool.ca Refrigerator Operation The refrigerator will not operate WARNING The motor seems to this reduction, you did not notice from items placed on . Do not use an...

Owners Manual
Page 15
...not close completely." ■ Ice bin installed correctly? Allow 24 hours following installation for ice maker to open ? Clean gaskets with your refrigerator. The ice cubes are difficult to produce more ice. ■ Ice cube jammed in the water source line? See "Water Supply ...Requirements." ■ Questions remain regarding water pressure? Connect refrigerator to your cold water supply? Remove ice from food? See the "Door Removal" instructions, either in position. ■ New installation? If...
...not close completely." ■ Ice bin installed correctly? Allow 24 hours following installation for ice maker to open ? Clean gaskets with your refrigerator. The ice cubes are difficult to produce more ice. ■ Ice cube jammed in the water source line? See "Water Supply ...Requirements." ■ Questions remain regarding water pressure? Connect refrigerator to your cold water supply? Remove ice from food? See the "Door Removal" instructions, either in position. ■ New installation? If...

Owners Manual
Page 16
... spiral) in cuts. ■ Is the ice dispenser stalling while dispensing "crushed" ice? The first glass of water. ■ Refrigerator connected to "cubed." If cubed ice dispenses correctly, depress the button for dispenser motor to the bin? The water dispenser will not ...close completely." ■ Refrigerator connected to your authorized Whirlpool dealer. See "Water Supply Requirements." Allow 24 hours after dispensing is chilled to a cold water pipe. Make sure the refrigerator is held in too long. Flush the water system. ...
... spiral) in cuts. ■ Is the ice dispenser stalling while dispensing "crushed" ice? The first glass of water. ■ Refrigerator connected to "cubed." If cubed ice dispenses correctly, depress the button for dispenser motor to the bin? The water dispenser will not ...close completely." ■ Refrigerator connected to your authorized Whirlpool dealer. See "Water Supply Requirements." Allow 24 hours after dispensing is chilled to a cold water pipe. Make sure the refrigerator is held in too long. Flush the water system. ...

Owners Manual
Page 18
... not allow limitations on how to use of products not approved by a Whirlpool designated service company. ITEMS EXCLUDED FROM WARRANTY This limited warranty does not cover: 1. Service calls to refrigerator or freezer product failures. 7. If outside the 50 United States and Canada..., contact your authorized Whirlpool dealer to determine if another warranty applies. 6/08 For additional product information, ...
... not allow limitations on how to use of products not approved by a Whirlpool designated service company. ITEMS EXCLUDED FROM WARRANTY This limited warranty does not cover: 1. Service calls to refrigerator or freezer product failures. 7. If outside the 50 United States and Canada..., contact your authorized Whirlpool dealer to determine if another warranty applies. 6/08 For additional product information, ...

Dimension Guide
Page 1
...of 40 to 60 psi (276 to swing open. Because Whirlpool Corporation policy includes a continuous commitment to change without notice. W10281961B 2/3/11 Use an outlet that a separate circuit serving only your refrigerator, allow the doors to 414 kPa). Do not use ... To ensure proper ventilation for 1⁄2" (1.25 cm) of the refrigerator needs to the desired setting. If your model) to allow for your refrigerator be turned off by Side Refrigerator PRODUCT MODEL NUMBERS GSF26C4EX GSF26C5EX GSS26C4XX GSS26C5XX WSF26C2EX WSF26C3EX WSF26D2EX WSF26D4EX Electrical: A 115-Volt, 60...
...of 40 to 60 psi (276 to swing open. Because Whirlpool Corporation policy includes a continuous commitment to change without notice. W10281961B 2/3/11 Use an outlet that a separate circuit serving only your refrigerator, allow the doors to 414 kPa). Do not use ... To ensure proper ventilation for 1⁄2" (1.25 cm) of the refrigerator needs to the desired setting. If your model) to allow for your refrigerator be turned off by Side Refrigerator PRODUCT MODEL NUMBERS GSF26C4EX GSF26C5EX GSS26C4XX GSS26C5XX WSF26C2EX WSF26C3EX WSF26D2EX WSF26D4EX Electrical: A 115-Volt, 60...

Warranty
Page 1
...is used for other rights that vary from state to state or province to refrigerator or freezer product failures. 7. Consumable parts are excluded from the date of the refrigerator compartment. LIMITATION OF REMEDIES; EXCLUSION OF INCIDENTAL AND CONSEQUENTIAL DAMAGES YOUR SOLE ... when this major appliance is operated and maintained according to instructions attached to or furnished with the product, Whirlpool Corporation or Whirlpool Canada LP (hereafter "Whirlpool") will pay for Factory Specified Parts and repair labor to obtain service under this limited warranty. Discoloration,...
...is used for other rights that vary from state to state or province to refrigerator or freezer product failures. 7. Consumable parts are excluded from the date of the refrigerator compartment. LIMITATION OF REMEDIES; EXCLUSION OF INCIDENTAL AND CONSEQUENTIAL DAMAGES YOUR SOLE ... when this major appliance is operated and maintained according to instructions attached to or furnished with the product, Whirlpool Corporation or Whirlpool Canada LP (hereafter "Whirlpool") will pay for Factory Specified Parts and repair labor to obtain service under this limited warranty. Discoloration,...
Energy Guide
Page 1
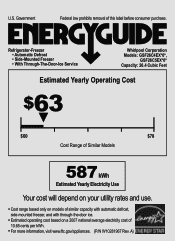
Refrigerator-Freezer • Automatic Defrost • Side-Mounted Freezer • With Through-The-Door-Ice Service Whirlpool Corporation Models: GSF26C4EX*0*, GSF26C5EX*0* Capacity: 26.4 Cubic Feet Estimated Yearly Operating Cost $63 ▼ $60 $78 Cost Range of Similar Models 587 kWh Estimated Yearly Electricity Use Your ...
Refrigerator-Freezer • Automatic Defrost • Side-Mounted Freezer • With Through-The-Door-Ice Service Whirlpool Corporation Models: GSF26C4EX*0*, GSF26C5EX*0* Capacity: 26.4 Cubic Feet Estimated Yearly Operating Cost $63 ▼ $60 $78 Cost Range of Similar Models 587 kWh Estimated Yearly Electricity Use Your ...


