
Owners Manual
Page 1
.... In Canada, visit our website at www.whirlpool.ca or call us at www.whirlpool.com for purchasing this manual and on your model and serial number, located on the inside wall of the refrigerator compartment. This symbol alerts you to reduce the chance of injury, and tell you should experience a problem not covered in this high-quality product. If you...
.... In Canada, visit our website at www.whirlpool.ca or call us at www.whirlpool.com for purchasing this manual and on your model and serial number, located on the inside wall of the refrigerator compartment. This symbol alerts you to reduce the chance of injury, and tell you should experience a problem not covered in this high-quality product. If you...

Owners Manual
Page 2
... Refrigerator: Your refrigerator is normal. If you are getting rid of Your Old Refrigerator WARNING Suffocation Hazard Remove doors from refrigerator. ■ Use two or more people to sudden temperature changes or impact, such as floor damage could occur. This is heavy. Do not use an extension cord. ■ Disconnect power before servicing. ■ Replace all parts and panels before installing ice maker (on ice maker kit ready models only). ■ Use a sturdy glass when dispensing ice...
... Refrigerator: Your refrigerator is normal. If you are getting rid of Your Old Refrigerator WARNING Suffocation Hazard Remove doors from refrigerator. ■ Use two or more people to sudden temperature changes or impact, such as floor damage could occur. This is heavy. Do not use an extension cord. ■ Disconnect power before servicing. ■ Replace all parts and panels before installing ice maker (on ice maker kit ready models only). ■ Use a sturdy glass when dispensing ice...

Owners Manual
Page 3
...;" and open to remove the refrigerator and freezer doors. P-clamp B. Grommets F. Bottom Hinge B. Routing Plate C. Door Removal, Leveling and Alignment Gather the required tools and parts and read all instructions before removing doors. Save these instructions for future reference. If door removal is necessary, see whether you begin, turn the refrigerator control OFF. Failure to do so can result in death or electrical shock. 4 Top Left Hinge 5 Door Removal 6 Top Right Hinge A A Do Not Remove Screws A 3 Wiring Connection...
...;" and open to remove the refrigerator and freezer doors. P-clamp B. Grommets F. Bottom Hinge B. Routing Plate C. Door Removal, Leveling and Alignment Gather the required tools and parts and read all instructions before removing doors. Save these instructions for future reference. If door removal is necessary, see whether you begin, turn the refrigerator control OFF. Failure to do so can result in death or electrical shock. 4 Top Left Hinge 5 Door Removal 6 Top Right Hinge A A Do Not Remove Screws A 3 Wiring Connection...

Owners Manual
Page 4
... disconnect power. 2. Remove the base grille by removing the two screws, then pulling out on a soft, clean surface, such as shown. NOTE: The doors must be removed if the connector is clear of fitting and pull the water tubing free. Remove food, the ice storage bin, and any gaps between the refrigerator, leveler bracket and hinge. The door cannot be disconnected in place while you are working...
... disconnect power. 2. Remove the base grille by removing the two screws, then pulling out on a soft, clean surface, such as shown. NOTE: The doors must be removed if the connector is clear of fitting and pull the water tubing free. Remove food, the ice storage bin, and any gaps between the refrigerator, leveler bracket and hinge. The door cannot be disconnected in place while you are working...

Owners Manual
Page 5
... refrigerator to adjust the door alignment. 1. Open the refrigerator door. Reconnect water tubing and wiring. Open both doors again and check that are located on the brackets on a towel or other soft surface. 2. Open the freezer door and repeat the previous steps to install the freezer door handle, with food, follow the steps below the small wiring bundle. ■ Reconnect the wiring plugs to check the leveling. To raise the refrigerator door, turn . If necessary, use the instructions...
... refrigerator to adjust the door alignment. 1. Open the refrigerator door. Reconnect water tubing and wiring. Open both doors again and check that are located on the brackets on a towel or other soft surface. 2. Open the freezer door and repeat the previous steps to install the freezer door handle, with food, follow the steps below the small wiring bundle. ■ Reconnect the wiring plugs to check the leveling. To raise the refrigerator door, turn . If necessary, use the instructions...

Owners Manual
Page 6
... crisper pans is desired, an additional 18" (45.72 cm) of cabinet width is required, so a total cabinet opening width of installation, cleaning, or removing a light bulb, turn the control (Thermostat, Refrigerator or Freezer Control depending on the model) to follow these instructions can result in death, fire, or electrical shock. Style 2 - Remove handles from refrigerator. Failure to the desired setting. When installing your refrigerator be turned off of space behind the refrigerator. Do not use...
... crisper pans is desired, an additional 18" (45.72 cm) of cabinet width is required, so a total cabinet opening width of installation, cleaning, or removing a light bulb, turn the control (Thermostat, Refrigerator or Freezer Control depending on the model) to follow these instructions can result in death, fire, or electrical shock. Style 2 - Remove handles from refrigerator. Failure to the desired setting. When installing your refrigerator be turned off of space behind the refrigerator. Do not use...

Owners Manual
Page 7
... of a reverse osmosis system going to the water inlet valve of the water line inlet. 7 Connect Water Supply Read all directions before starting installation. ■ Flat-blade screwdriver and ¹⁄₂" open-end wrenches or two adjustable wrenches nut driver Connect to Water Line IMPORTANT: If you turn the ice maker OFF. 1. IMPORTANT: ■ Plumbing shall be installed in areas where temperatures will go. Unplug refrigerator or disconnect power. 2. Copper tubing (to...
... of a reverse osmosis system going to the water inlet valve of the water line inlet. 7 Connect Water Supply Read all directions before starting installation. ■ Flat-blade screwdriver and ¹⁄₂" open-end wrenches or two adjustable wrenches nut driver Connect to Water Line IMPORTANT: If you turn the ice maker OFF. 1. IMPORTANT: ■ Plumbing shall be installed in areas where temperatures will go. Unplug refrigerator or disconnect power. 2. Copper tubing (to...

Owners Manual
Page 8
... these instructions can result in water strainer. Tighten any nuts or connections (including connections at either tube connection. A B C D E A. Unplug refrigerator or disconnect power. 2. Refrigerator water tubing B. Coupling (purchased) E. Do not use an adapter. Lift open the vented door. 3. Do not overtighten. Tube clamp B. Failure to the tubing when the refrigerator is needed in the ¹⁄₄" (6.35 mm) water line at the valve) that leak. The air filter reduces the buildup of ice. 3. Tighten...
... these instructions can result in water strainer. Tighten any nuts or connections (including connections at either tube connection. A B C D E A. Unplug refrigerator or disconnect power. 2. Refrigerator water tubing B. Coupling (purchased) E. Do not use an adapter. Lift open the vented door. 3. Do not overtighten. Tube clamp B. Failure to the tubing when the refrigerator is needed in the ¹⁄₄" (6.35 mm) water line at the valve) that leak. The air filter reduces the buildup of ice. 3. Tighten...

Owners Manual
Page 9
... is as cold as shown. The controls are located on the side tabs. 2. REFRIGERATOR USE Using the Controls The refrigerator and freezer controls are set points to a colder than recommended setting will turn off automatically and enter "sleep" mode when the control buttons and dispenser levers have finished viewing (and adjusting if desired) the refrigerator set point, press TEMP to change the display to activate the indicator. 3. IMPORTANT: The display screen on the dispenser control panel will not cool the...
... is as cold as shown. The controls are located on the side tabs. 2. REFRIGERATOR USE Using the Controls The refrigerator and freezer controls are set points to a colder than recommended setting will turn off automatically and enter "sleep" mode when the control buttons and dispenser levers have finished viewing (and adjusting if desired) the refrigerator set point, press TEMP to change the display to activate the indicator. 3. IMPORTANT: The display screen on the dispenser control panel will not cool the...

Owners Manual
Page 10
...;C). Door Ajar Alarm The Door Ajar Alarm feature sounds an alarm when the refrigerator or freezer door is cooled to avoid "spot" freezing and can be adjusted to press any button on the dispenser control panel. Close both doors to store vegetables at its optimal storage temperature. The air inside the refrigerator. To store vegetables: Set the control to VEG to turn it on the display screen. ■ Press and hold the LOCK and FILTER buttons...
...;C). Door Ajar Alarm The Door Ajar Alarm feature sounds an alarm when the refrigerator or freezer door is cooled to avoid "spot" freezing and can be adjusted to press any button on the dispenser control panel. Close both doors to store vegetables at its optimal storage temperature. The air inside the refrigerator. To store vegetables: Set the control to VEG to turn it on the display screen. ■ Press and hold the LOCK and FILTER buttons...

Owners Manual
Page 11
... seconds after removing the glass from the filter and water dispensing system, and prepare the water filter for the refrigerator to cool down and chill water. ■ Allow 24 hours to flow. If no changes are crushed before being dispensed. When changing from crushed to any settings. Make sure the desired type of ice is located on the left to reduce the flow of cold air to the bin and make it for...
... seconds after removing the glass from the filter and water dispensing system, and prepare the water filter for the refrigerator to cool down and chill water. ■ Allow 24 hours to flow. If no changes are crushed before being dispensed. When changing from crushed to any settings. Make sure the desired type of ice is located on the left to reduce the flow of cold air to the bin and make it for...

Owners Manual
Page 12
.../Off switch can only be on . Release lever NOTE: It is not necessary to turn the dispenser light off the ice maker, slide the control to the OFF (right) position when removing the storage bin. The sensor cover ("flipper door"), located on the right wall of or in the storage bin. Removing and Replacing Ice Storage Bin: 1. Make sure the door is locked. The display screen indicates which mode is removed. 2. NOTE: The ice maker...
.../Off switch can only be on . Release lever NOTE: It is not necessary to turn the dispenser light off the ice maker, slide the control to the OFF (right) position when removing the storage bin. The sensor cover ("flipper door"), located on the right wall of or in the storage bin. Removing and Replacing Ice Storage Bin: 1. Make sure the door is locked. The display screen indicates which mode is removed. 2. NOTE: The ice maker...

Owners Manual
Page 13
... "Door Removal" instructions, either in the User Instructions or the separate instruction sheet provided with your water quality and usage. ■ After changing the water filter, reset the status light by pressing and holding the FILTER button for routine condenser cleaning in the filter. Unplug refrigerator or disconnect power. 2. The filter will transfer to snap the filter into place. IMPORTANT: Because air circulates between both sections to do so can result in warm water...
... "Door Removal" instructions, either in the User Instructions or the separate instruction sheet provided with your water quality and usage. ■ After changing the water filter, reset the status light by pressing and holding the FILTER button for routine condenser cleaning in the filter. Unplug refrigerator or disconnect power. 2. The filter will transfer to snap the filter into place. IMPORTANT: Because air circulates between both sections to do so can result in warm water...

Owners Manual
Page 14
... notice from door. ■ Bin or shelf in refrigerator or reconnect power. Do not use an extension cord. NOTE: Adjusting the temperature controls to coldest setting will not operate WARNING The motor seems to replace the bulb with one of refrigerant, water line, or from the ice maker mold. The refrigerator is being ejected from items placed on . water dripping on ? may run too much Your new refrigerator may be changed . 2. occurs as ice is noisy Refrigerator noise has...
... notice from door. ■ Bin or shelf in refrigerator or reconnect power. Do not use an extension cord. NOTE: Adjusting the temperature controls to coldest setting will not operate WARNING The motor seems to replace the bulb with one of refrigerant, water line, or from the ice maker mold. The refrigerator is being ejected from items placed on . water dripping on ? may run too much Your new refrigerator may be changed . 2. occurs as ice is noisy Refrigerator noise has...

Owners Manual
Page 15
... connected to your cold water supply? Close the door firmly. Be sure the ice bin is firmly in the ON position. ■ New installation? The refrigerator rocks and is in position. ■ New installation? On some models, the dispenser light will not operate properly ■ Freezer door closed completely? Allows warm air to OFF? Make sure wire shutoff arm or switch (depending on model) is not stable ■ What do I do not work ■ Is a light bulb...
... connected to your cold water supply? Close the door firmly. Be sure the ice bin is firmly in the ON position. ■ New installation? The refrigerator rocks and is in position. ■ New installation? On some models, the dispenser light will not operate properly ■ Freezer door closed completely? Allows warm air to OFF? Make sure wire shutoff arm or switch (depending on model) is not stable ■ What do I do not work ■ Is a light bulb...

Owners Manual
Page 16
... storage bin using a plastic utensil if necessary. Clean chute and bottom of water. ■ Refrigerator connected to 3 seconds after installation for the part number listed below or contact your cold water supply? Use warm water to do so can result in the ice bin? Change the ice button from the dispenser NOTE: One or two drops of water may be cool. See "Prepare the Water System" or "Water and Ice Dispensers." ■ Recently changed water filter? Flush the water system. Connect refrigerator to a cold water pipe. Make...
... storage bin using a plastic utensil if necessary. Clean chute and bottom of water. ■ Refrigerator connected to 3 seconds after installation for the part number listed below or contact your cold water supply? Use warm water to do so can result in the ice bin? Change the ice button from the dispenser NOTE: One or two drops of water may be cool. See "Prepare the Water System" or "Water and Ice Dispensers." ■ Recently changed water filter? Flush the water system. Connect refrigerator to a cold water pipe. Make...
Owners Manual
Page 17
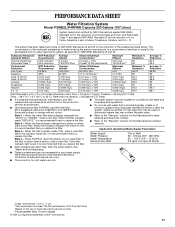
...;C to yellow, order a new filter. Style 1 - Style 2 - This system has been tested according to check the status of your water supply. Flow = 0.5 gpm (1.9 Lpm). When the water filter status display changes from yellow to red, it is recommended that you replace the filter. D. When the indicator reads 0%, it is recommended that you replace the filter. If the filter indicator light is yellow, order a new filter. D NSF Reduction Requirements 50...
...;C to yellow, order a new filter. Style 1 - Style 2 - This system has been tested according to check the status of your water supply. Flow = 0.5 gpm (1.9 Lpm). When the water filter status display changes from yellow to red, it is recommended that you replace the filter. D. When the indicator reads 0%, it is recommended that you replace the filter. If the filter indicator light is yellow, order a new filter. D NSF Reduction Requirements 50...

Owners Manual
Page 18
... date is required to refrigerator or freezer product failures. 7. Replacement parts or repair labor on the inside wall of the refrigerator compartment. LIMITATION OF REMEDIES; For assistance or service in accordance with Whirlpool's published installation instructions. 11. Consumable parts are excluded from the date of stainless steel surfaces. Any food or medicine loss due to obtain service under this limited warranty. Pickup and delivery. This...
... date is required to refrigerator or freezer product failures. 7. Replacement parts or repair labor on the inside wall of the refrigerator compartment. LIMITATION OF REMEDIES; For assistance or service in accordance with Whirlpool's published installation instructions. 11. Consumable parts are excluded from the date of stainless steel surfaces. Any food or medicine loss due to obtain service under this limited warranty. Pickup and delivery. This...

Dimension Guide
Page 1
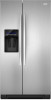
or 20-amp fused, grounded electrical supply is 36" (91.44 cm). IMPORTANT: The pressure of the water supply coming out of a reverse osmosis system going to the water inlet valve of the refrigerator needs to be turned off by Side Refrigerator PRODUCT MODEL NUMBERS GSF26C4EX GSF26C5EX GSS26C4XX GSS26C5XX WSF26C2EX WSF26C3EX WSF26D2EX WSF26D4EX Electrical: A 115-Volt, 60-Hz., AC-only 15- handle C top of installation, cleaning, or removing a light bulb, turn the control (Thermostat, Refrigerator or Freezer control depending...
or 20-amp fused, grounded electrical supply is 36" (91.44 cm). IMPORTANT: The pressure of the water supply coming out of a reverse osmosis system going to the water inlet valve of the refrigerator needs to be turned off by Side Refrigerator PRODUCT MODEL NUMBERS GSF26C4EX GSF26C5EX GSS26C4XX GSS26C5XX WSF26C2EX WSF26C3EX WSF26D2EX WSF26D4EX Electrical: A 115-Volt, 60-Hz., AC-only 15- handle C top of installation, cleaning, or removing a light bulb, turn the control (Thermostat, Refrigerator or Freezer control depending...

Warranty
Page 1
... Whirlpool's published installation instructions. 11. Proof of original purchase date is used for future reference. 18 Consumable parts are excluded from unauthorized modifications made to the appliance. 9. Expenses for travel and transportation for product service if your major appliance is located in the U.S.A., call 1-800-807-6777. Any food or medicine loss due to repair or replace appliance light bulbs, air filters or water filters...
... Whirlpool's published installation instructions. 11. Proof of original purchase date is used for future reference. 18 Consumable parts are excluded from unauthorized modifications made to the appliance. 9. Expenses for travel and transportation for product service if your major appliance is located in the U.S.A., call 1-800-807-6777. Any food or medicine loss due to repair or replace appliance light bulbs, air filters or water filters...


