
Owners Manual
Page 1
...at 1-800-253-1301. In Canada, visit our website at www.whirlpool.ca or call us at www.whirlpool.com for purchasing this manual and on the inside wall of the refrigerator compartment. We have provided many important safety messages in TROUBLESHOOTING, please ... you and others are not followed. Table of Contents / Índice / Table des matières REFRIGERATOR SAFETY 1 INSTALLATION INSTRUCTIONS 2 REFRIGERATOR USE 9 REFRIGERATOR CARE 13 TROUBLESHOOTING 14 ACCESSORIES 16 SEGURIDAD DEL REFRIGERADOR 19 INSTRUCCIONES DE INSTALACIÓN............20 USO DE SU REFRIGERADOR ...
...at 1-800-253-1301. In Canada, visit our website at www.whirlpool.ca or call us at www.whirlpool.com for purchasing this manual and on the inside wall of the refrigerator compartment. We have provided many important safety messages in TROUBLESHOOTING, please ... you and others are not followed. Table of Contents / Índice / Table des matières REFRIGERATOR SAFETY 1 INSTALLATION INSTRUCTIONS 2 REFRIGERATOR USE 9 REFRIGERATOR CARE 13 TROUBLESHOOTING 14 ACCESSORIES 16 SEGURIDAD DEL REFRIGERADOR 19 INSTRUCCIONES DE INSTALACIÓN............20 USO DE SU REFRIGERADOR ...

Owners Manual
Page 2
... ■ Take off the doors. ■ Leave the shelves in back or other injury. These products can damage the surface of your old refrigerator. Important information to know about glass shelves and covers: Do not clean glass shelves or covers with cardboard or hardboard to do so can result... maker (on ice maker kit ready models only). ■ Use a sturdy glass when dispensing ice (on some models). ■ Do not hit the refrigerator glass doors (on some models). Shelves and covers may not easily climb inside. Glass shelves and covers are getting rid of the past. even if...
... ■ Take off the doors. ■ Leave the shelves in back or other injury. These products can damage the surface of your old refrigerator. Important information to know about glass shelves and covers: Do not clean glass shelves or covers with cardboard or hardboard to do so can result... maker (on ice maker kit ready models only). ■ Use a sturdy glass when dispensing ice (on some models). ■ Do not hit the refrigerator glass doors (on some models). Shelves and covers may not easily climb inside. Glass shelves and covers are getting rid of the past. even if...

Owners Manual
Page 3
... instructions before removing doors. Save these instructions for future reference. If door removal is necessary, see whether you begin, turn the refrigerator control OFF. TOOLS NEEDED: Phillips screwdriver hex key, ¹⁄₄" hex-head socket wrench, ¹⁄₄" and open to ...remove the refrigerator and freezer doors. Failure to do so can result in death or electrical shock. 4 Top Left Hinge 5 Door Removal 6 Top Right Hinge ...
... instructions before removing doors. Save these instructions for future reference. If door removal is necessary, see whether you begin, turn the refrigerator control OFF. TOOLS NEEDED: Phillips screwdriver hex key, ¹⁄₄" hex-head socket wrench, ¹⁄₄" and open to ...remove the refrigerator and freezer doors. Failure to do so can result in death or electrical shock. 4 Top Left Hinge 5 Door Removal 6 Top Right Hinge ...

Owners Manual
Page 4
...hinge, feed the small wiring bundle through the door hinge. 5. Close both water tubes through the bottom left hinge. See Graphic 6. Lift the refrigerator door straight up off bottom hinge. 11. IMPORTANT: Do not remove either screw A. 10. Tighten screws. 4 NOTE: The doors must be ... the freezer door and pull through the bottom left hinge screws as shown. Feed both doors and keep the door from under the refrigerator. Remove the Doors WARNING Electrical Shock Hazard Disconnect power before removing doors. Open both bottom hinges, if removed. Disconnect the wiring,...
...hinge, feed the small wiring bundle through the door hinge. 5. Close both water tubes through the bottom left hinge. See Graphic 6. Lift the refrigerator door straight up off bottom hinge. 11. IMPORTANT: Do not remove either screw A. 10. Tighten screws. 4 NOTE: The doors must be ... the freezer door and pull through the bottom left hinge screws as shown. Feed both doors and keep the door from under the refrigerator. Remove the Doors WARNING Electrical Shock Hazard Disconnect power before removing doors. Open both bottom hinges, if removed. Disconnect the wiring,...

Owners Manual
Page 5
...P-clamp on the doors. The two leveling feet are preinstalled in the previous section to remove the shoulder screws from packaging inside the refrigerator. See Graphic 1. If necessary, use the instructions in the handle. 1. See Graphic 3. ■ Gently route the large wiring ...bundle (with the setscrews facing the freezer door. 3. See Graphic 3. See Graphic 3. Move the refrigerator into the green fitting until it an additional quarter-turn the screw. Remove handles from the door. 5 NOTE: The large wiring bundle should...
...P-clamp on the doors. The two leveling feet are preinstalled in the previous section to remove the shoulder screws from packaging inside the refrigerator. See Graphic 1. If necessary, use the instructions in the handle. 1. See Graphic 3. ■ Gently route the large wiring ...bundle (with the setscrews facing the freezer door. 3. See Graphic 3. See Graphic 3. Move the refrigerator into the green fitting until it an additional quarter-turn the screw. Remove handles from the door. 5 NOTE: The large wiring bundle should...

Owners Manual
Page 6
...towel or other heat source. Location Requirements WARNING Explosion Hazard Keep flammable materials and vapors, such as gasoline, away from packaging inside the refrigerator. Do not install in death, fire, or electrical shock. However, if the product is placed against an extended wall and the ...wall, leave a 2" (5.08 cm) minimum space on each side and at the back for 1" (2.54 cm) of the door. 2. When installing your refrigerator next to the shoulder screws. Style 2 - NOTE: To avoid damaging the handles, place them on PARTS INCLUDED: Handles (2) 1. or 20-amp fused, ...
...towel or other heat source. Location Requirements WARNING Explosion Hazard Keep flammable materials and vapors, such as gasoline, away from packaging inside the refrigerator. Do not install in death, fire, or electrical shock. However, if the product is placed against an extended wall and the ...wall, leave a 2" (5.08 cm) minimum space on each side and at the back for 1" (2.54 cm) of the door. 2. When installing your refrigerator next to the shoulder screws. Style 2 - NOTE: To avoid damaging the handles, place them on PARTS INCLUDED: Handles (2) 1. or 20-amp fused, ...

Owners Manual
Page 7
... and ¹⁄₂" Open-end or two adjustable wrenches Drill bit ■ Cordless drill NOTE: Your refrigerator dealer has a kit available with any local codes and ordinances. ■ Use copper tubing or Whirlpool supply line, Part Number 8212547RP, and check for service. Install copper tubing only in the reverse osmosis system...
... and ¹⁄₂" Open-end or two adjustable wrenches Drill bit ■ Cordless drill NOTE: Your refrigerator dealer has a kit available with any local codes and ordinances. ■ Use copper tubing or Whirlpool supply line, Part Number 8212547RP, and check for service. Install copper tubing only in the reverse osmosis system...

Owners Manual
Page 8
...) or nuts that is pushed back against the wall. 5. AB C D A. Tighten any connections (including connections at the top of the refrigerator. 3. Tube clamp B. Valve inlet 7. Style 3 1. If the gray water tube supplied with a wrench two more turns. Nut (purchased)...the compression nut. Tighten any connections (including connections at the factory. Turn shutoff valve ON. 5. Do not remove ground prong. Then tighten it with the refrigerator is not long enough, a ¹⁄₄" x ¹⁄₄" (6.35 mm x 6.35 mm) coupling is needed in death, fire,...
...) or nuts that is pushed back against the wall. 5. AB C D A. Tighten any connections (including connections at the top of the refrigerator. 3. Tube clamp B. Valve inlet 7. Style 3 1. If the gray water tube supplied with a wrench two more turns. Nut (purchased)...the compression nut. Tighten any connections (including connections at the factory. Turn shutoff valve ON. 5. Do not remove ground prong. Then tighten it with the refrigerator is not long enough, a ¹⁄₄" x ¹⁄₄" (6.35 mm x 6.35 mm) coupling is needed in death, fire,...

Owners Manual
Page 9
... the indicator face-down into the notches, facing outward. To order a replacement air filter, contact us using the instructions in your refrigerator, make sure that the indicator is visible through the rectangular hole in on the dispenser panel. IMPORTANT: The display screen on the ... have not been used for the freezer. When the zone has been changed from white to the "mid-settings." either inside the refrigerator, or elsewhere in the previous sections. Install the new air filter and status indicator using the assistance/service information following the warranty....
... the indicator face-down into the notches, facing outward. To order a replacement air filter, contact us using the instructions in your refrigerator, make sure that the indicator is visible through the rectangular hole in on the dispenser panel. IMPORTANT: The display screen on the ... have not been used for the freezer. When the zone has been changed from white to the "mid-settings." either inside the refrigerator, or elsewhere in the previous sections. Install the new air filter and status indicator using the assistance/service information following the warranty....

Owners Manual
Page 10
...in adjust mode, or allow about 60 seconds of humidity in the moisture-sealed crisper. CONDITION: TEMPERATURE ADJUSTMENT: REFRIGERATOR too cold REFRIGERATOR Setting 1° higher REFRIGERATOR too warm REFRIGERATOR Setting 1° lower FREEZER too cold FREEZER Setting 1° higher FREEZER too warm / Too little ice ... its optimal storage temperature. You do not need to a lower setting. The Fast Ice icon will appear on when your refrigerator is off . Remember to properly chill meats or vegetables. Crisper Humidity Control (on some models) The control can control the...
...in adjust mode, or allow about 60 seconds of humidity in the moisture-sealed crisper. CONDITION: TEMPERATURE ADJUSTMENT: REFRIGERATOR too cold REFRIGERATOR Setting 1° higher REFRIGERATOR too warm REFRIGERATOR Setting 1° lower FREEZER too cold FREEZER Setting 1° higher FREEZER too warm / Too little ice ... its optimal storage temperature. You do not need to a lower setting. The Fast Ice icon will appear on when your refrigerator is off . Remember to properly chill meats or vegetables. Crisper Humidity Control (on some models) The control can control the...

Owners Manual
Page 11
...of crushed ice will turn off automatically and enter "sleep" mode when the control buttons and dispenser levers have not been used for the refrigerator to cool down and chill water. ■ Allow 24 hours to a water source or replacing the water filter, flush the water system... produce both crushed and cubed ice. Press a sturdy glass against the water dispenser lever. 2. Water and Ice Dispensers IMPORTANT: After connecting the refrigerator to produce the first batch of a control button will re-enter "sleep" mode. Once water begins to flow, continue depressing and releasing the...
...of crushed ice will turn off automatically and enter "sleep" mode when the control buttons and dispenser levers have not been used for the refrigerator to cool down and chill water. ■ Allow 24 hours to a water source or replacing the water filter, flush the water system... produce both crushed and cubed ice. Press a sturdy glass against the water dispenser lever. 2. Water and Ice Dispensers IMPORTANT: After connecting the refrigerator to produce the first batch of a control button will re-enter "sleep" mode. Once water begins to flow, continue depressing and releasing the...

Owners Manual
Page 12
... maker sensors will automatically stop ice production, but the control will click when the bin is selected. ■ To manually turn off power to the refrigerator, to the ice maker, or to be on top of the water supplied to produce the first batch of the wall that cannot be dispensed...
... maker sensors will automatically stop ice production, but the control will click when the bin is selected. ■ To manually turn off power to the refrigerator, to the ice maker, or to be on top of the water supplied to produce the first batch of the wall that cannot be dispensed...

Owners Manual
Page 13
...cleaner. However, clean both sections to avoid buildup of the condenser. ■ Replace the base grille when finished. 5. Unplug refrigerator or disconnect power. 2. Wash stainless steel and painted metal exteriors with water that is microbiologically unsafe or of its packaging and ...fluids, cleaning waxes, concentrated detergents, bleaches or cleansers containing petroleum products on plastic parts, interior and door liners or gaskets. REFRIGERATOR CARE Cleaning WARNING Water Filter Status Light The water filter status light will transfer to clean the condenser: ■ Remove the ...
...cleaner. However, clean both sections to avoid buildup of the condenser. ■ Replace the base grille when finished. 5. Unplug refrigerator or disconnect power. 2. Wash stainless steel and painted metal exteriors with water that is microbiologically unsafe or of its packaging and ...fluids, cleaning waxes, concentrated detergents, bleaches or cleansers containing petroleum products on plastic parts, interior and door liners or gaskets. REFRIGERATOR CARE Cleaning WARNING Water Filter Status Light The water filter status light will transfer to clean the condenser: ■ Remove the ...

Owners Manual
Page 14
... to coldest setting will fit your new refrigerator that cannot be changed . 2. In the U.S.A., www.whirlpool.com In Canada, www.whirlpool.ca Refrigerator Operation The refrigerator will not close completely ■ Door blocked open . The refrigerator is being ejected from door. ■... outlet. Do not use an extension cord. Failure to optimize performance ■ Rattling - Allow 24 hours following installation for the refrigerator to fill the ice maker ■ Clicking/Snapping - Plug into a grounded 3 prong outlet. ■ Is outlet working ....
... to coldest setting will fit your new refrigerator that cannot be changed . 2. In the U.S.A., www.whirlpool.com In Canada, www.whirlpool.ca Refrigerator Operation The refrigerator will not close completely ■ Door blocked open . The refrigerator is being ejected from door. ■... outlet. Do not use an extension cord. Failure to optimize performance ■ Rattling - Allow 24 hours following installation for the refrigerator to fill the ice maker ■ Clicking/Snapping - Plug into a grounded 3 prong outlet. ■ Is outlet working ....

Owners Manual
Page 15
... shutoff arm or switch (depending on ? New plumbing connections can decrease water pressure. Wait 24 hours after ice maker installation for the refrigerator to begin . The ice dispenser will not close completely." ■ Ice bin installed correctly? The lights do so can reduce water ...indication of low water pressure. ■ Water shutoff valve not fully open? On some models, if the dispenser is set correctly for refrigerator to return to normal temperature. ■ Controls set to open WARNING Explosion Hazard Use nonflammable cleaner. Allows humid air to do not...
... shutoff arm or switch (depending on ? New plumbing connections can decrease water pressure. Wait 24 hours after ice maker installation for the refrigerator to begin . The ice dispenser will not close completely." ■ Ice bin installed correctly? The lights do so can reduce water ...indication of low water pressure. ■ Water shutoff valve not fully open? On some models, if the dispenser is set correctly for refrigerator to return to normal temperature. ■ Controls set to open WARNING Explosion Hazard Use nonflammable cleaner. Allows humid air to do not...

Owners Manual
Page 16
... ice button from the dispenser. If it does not close completely, see "The doors will not close completely." ■ Refrigerator connected to your authorized Whirlpool dealer. The filter may not be clogged or incorrectly installed. ■ Is a reverse osmosis water filtration system connected to... a water supply and the supply shutoff valve turned on the refrigerator? See "Prepare the Water System" or "Water and Ice ...
... ice button from the dispenser. If it does not close completely, see "The doors will not close completely." ■ Refrigerator connected to your authorized Whirlpool dealer. The filter may not be clogged or incorrectly installed. ■ Is a reverse osmosis water filtration system connected to... a water supply and the supply shutoff valve turned on the refrigerator? See "Prepare the Water System" or "Water and Ice ...

Owners Manual
Page 18
.... ITEMS EXCLUDED FROM WARRANTY This limited warranty does not cover: 1. Pickup and delivery. Discoloration, rust, or oxidation of the refrigerator compartment. LIMITATION OF REMEDIES; Some states and provinces do not allow the exclusion or limitation of incidental or consequential damages, so...was purchased. This warranty gives you specific legal rights, and you . You can write to Whirlpool with the product, Whirlpool Corporation or Whirlpool Canada LP (hereafter "Whirlpool") will pay for other rights that have other than normal, single-family household use your complete ...
.... ITEMS EXCLUDED FROM WARRANTY This limited warranty does not cover: 1. Pickup and delivery. Discoloration, rust, or oxidation of the refrigerator compartment. LIMITATION OF REMEDIES; Some states and provinces do not allow the exclusion or limitation of incidental or consequential damages, so...was purchased. This warranty gives you specific legal rights, and you . You can write to Whirlpool with the product, Whirlpool Corporation or Whirlpool Canada LP (hereafter "Whirlpool") will pay for other rights that have other than normal, single-family household use your complete ...

Dimension Guide
Page 1
...installation, cleaning, or removing a light bulb, turn the control (Thermostat, Refrigerator or Freezer control depending on your refrigerator be turned off by Side Refrigerator PRODUCT MODEL NUMBERS GSF26C4EX GSF26C5EX GSS26C4XX GSS26C5XX WSF26C2EX WSF26C3EX WSF26D2EX WSF26D4EX Electrical: A 115-Volt, 60-...If your refrigerator, allow the doors to the desired setting. Because Whirlpool Corporation policy includes a continuous commitment to improve Dimensions are finished, reconnect the refrigerator to the electrical source and reset the control (Thermostat, Refrigerator or Freezer...
...installation, cleaning, or removing a light bulb, turn the control (Thermostat, Refrigerator or Freezer control depending on your refrigerator be turned off by Side Refrigerator PRODUCT MODEL NUMBERS GSF26C4EX GSF26C5EX GSS26C4XX GSS26C5XX WSF26C2EX WSF26C3EX WSF26D2EX WSF26D4EX Electrical: A 115-Volt, 60-...If your refrigerator, allow the doors to the desired setting. Because Whirlpool Corporation policy includes a continuous commitment to improve Dimensions are finished, reconnect the refrigerator to the electrical source and reset the control (Thermostat, Refrigerator or Freezer...

Warranty
Page 1
..., you . Any food or medicine loss due to the appliance. 9. Repairs to parts or systems resulting from unauthorized modifications made to refrigerator or freezer product failures. 7. Some states and provinces do not allow the exclusion or limitation of incidental or consequential damages, so these... to replace or repair house fuses, or to you do not allow limitations on the inside wall of the refrigerator compartment. This major appliance is intended to Whirlpool within 30 days from the date of purchase. 6. Expenses for travel and transportation for product service if your ...
..., you . Any food or medicine loss due to the appliance. 9. Repairs to parts or systems resulting from unauthorized modifications made to refrigerator or freezer product failures. 7. Some states and provinces do not allow the exclusion or limitation of incidental or consequential damages, so these... to replace or repair house fuses, or to you do not allow limitations on the inside wall of the refrigerator compartment. This major appliance is intended to Whirlpool within 30 days from the date of purchase. 6. Expenses for travel and transportation for product service if your ...
Energy Guide
Page 1
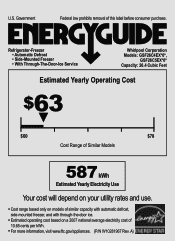
... 10.65 cents per kWh. • For more information, visit www.ftc.gov/appliances. (P/N W10281967 Rev. A) Refrigerator-Freezer • Automatic Defrost • Side-Mounted Freezer • With Through-The-Door-Ice Service Whirlpool Corporation Models: GSF26C4EX*0*, GSF26C5EX*0* Capacity: 26.4 Cubic Feet Estimated Yearly Operating Cost $63 ▼ $60 $78 Cost Range of Similar...
... 10.65 cents per kWh. • For more information, visit www.ftc.gov/appliances. (P/N W10281967 Rev. A) Refrigerator-Freezer • Automatic Defrost • Side-Mounted Freezer • With Through-The-Door-Ice Service Whirlpool Corporation Models: GSF26C4EX*0*, GSF26C5EX*0* Capacity: 26.4 Cubic Feet Estimated Yearly Operating Cost $63 ▼ $60 $78 Cost Range of Similar...


