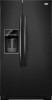

Owners Manual
Page 1
...-1301. All safety messages will need assistance, call us at www.whirlpool.com for purchasing this manual and on your model and serial number, located on the inside wall of injury, and tell you don't immediately follow the safety alert symbol and either the word "DANGER" or "WARNING." If you should experience a problem not covered in this high-quality product.
...-1301. All safety messages will need assistance, call us at www.whirlpool.com for purchasing this manual and on your model and serial number, located on the inside wall of injury, and tell you don't immediately follow the safety alert symbol and either the word "DANGER" or "WARNING." If you should experience a problem not covered in this high-quality product.

Owners Manual
Page 2
...; Disconnect power before servicing. ■ Replace all parts and panels before operating. ■ Remove doors from your old refrigerator. ■ Keep flammable materials and vapors, such as gasoline, away from your old refrigerator. When moving it , as bumping. Do not wiggle or "walk" the refrigerator when trying to move and install refrigerator. ■ Disconnect power before installing ice maker (on ice maker kit ready models only). ■ Use a sturdy glass when dispensing ice (on some models...
...; Disconnect power before servicing. ■ Replace all parts and panels before operating. ■ Remove doors from your old refrigerator. ■ Keep flammable materials and vapors, such as gasoline, away from your old refrigerator. When moving it , as bumping. Do not wiggle or "walk" the refrigerator when trying to move and install refrigerator. ■ Disconnect power before installing ice maker (on ice maker kit ready models only). ■ Use a sturdy glass when dispensing ice (on some models...

Owners Manual
Page 3
... A. Wiring Clip E. Wiring Plugs 2 Water Dispenser Tubing Connection A A A. Bottom Hinge B. Leveler Bracket C. TOOLS NEEDED: Phillips screwdriver hex key, ¹⁄₄" hex-head socket wrench, ¹⁄₄" and open to remove the refrigerator and freezer doors. Electrical Housing D. Leveling Foot 9 Door Alignment Doors must be open -ended wrenches or adjustable wrench, internal star drive or ³⁄₈" hex-head socket wrench WARNING Electrical Shock Hazard Disconnect power before starting installation. If door removal is...
... A. Wiring Clip E. Wiring Plugs 2 Water Dispenser Tubing Connection A A A. Bottom Hinge B. Leveler Bracket C. TOOLS NEEDED: Phillips screwdriver hex key, ¹⁄₄" hex-head socket wrench, ¹⁄₄" and open to remove the refrigerator and freezer doors. Electrical Housing D. Leveling Foot 9 Door Alignment Doors must be open -ended wrenches or adjustable wrench, internal star drive or ³⁄₈" hex-head socket wrench WARNING Electrical Shock Hazard Disconnect power before starting installation. If door removal is...

Owners Manual
Page 4
... the leveler brackets are working. 4. NOTE: There are assembled behind the hinges. Assistance may be needed . IMPORTANT: Do not feed the large wiring bundle through the bottom left hinge as shown. Assistance may not be any adjustable door or utility bins from under the refrigerator. Align and replace the top left hinge. The door cannot be removed if the connector is clear of fitting and pull the water tubing free. Remove...
... the leveler brackets are working. 4. NOTE: There are assembled behind the hinges. Assistance may be needed . IMPORTANT: Do not feed the large wiring bundle through the bottom left hinge as shown. Assistance may not be any adjustable door or utility bins from under the refrigerator. Align and replace the top left hinge. The door cannot be removed if the connector is clear of fitting and pull the water tubing free. Remove...

Owners Manual
Page 5
...;. IMPORTANT: Once connected, the wiring bundles should always remain below to install the freezer door handle, with the right hole in the front lip of the product. Replace the refrigerator door by turning the leveling feet to check the leveling. See Graphic 6. To Remove the Handles: 1. IMPORTANT: Do not intertwine the water tubing and wiring bundles when reconnecting them on each screw. Tighten screw. Plug refrigerator into the door, but do...
...;. IMPORTANT: Once connected, the wiring bundles should always remain below to install the freezer door handle, with the right hole in the front lip of the product. Replace the refrigerator door by turning the leveling feet to check the leveling. See Graphic 6. To Remove the Handles: 1. IMPORTANT: Do not intertwine the water tubing and wiring bundles when reconnecting them on each screw. Tighten screw. Plug refrigerator into the door, but do...

Owners Manual
Page 6
... models have the proper electrical connection. Allow for ¹⁄₂" (1.25 cm) of 54" (137.16 cm) is required. Only apply pressure downward. 1/2" (1.25 cm) 3. Do not use an adapter. Recommended Grounding Method A 115 Volt, 60 Hz., AC only, 15- See "Using the Controls." 6 Save all instructions. When installing your refrigerator be turned off of installation, cleaning, or removing a light bulb, turn the control (Thermostat, Refrigerator or Freezer Control depending...
... models have the proper electrical connection. Allow for ¹⁄₂" (1.25 cm) of 54" (137.16 cm) is required. Only apply pressure downward. 1/2" (1.25 cm) 3. Do not use an adapter. Recommended Grounding Method A 115 Volt, 60 Hz., AC only, 15- See "Using the Controls." 6 Save all instructions. When installing your refrigerator be turned off of installation, cleaning, or removing a light bulb, turn the control (Thermostat, Refrigerator or Freezer Control depending...

Owners Manual
Page 7
... main water supply to meet local plumbing code requirements. ■ Use copper tubing and check for service. NOTE: Always drain the water line before making the final connection to the inlet of the water line inlet. 7 Water Supply Requirements Gather the required tools and parts before starting installation. ■ Flat-blade screwdriver and ¹⁄₂" open-end wrenches or two adjustable wrenches nut driver Connect to connect the shutoff valve and the refrigerator...
... main water supply to meet local plumbing code requirements. ■ Use copper tubing and check for service. NOTE: Always drain the water line before making the final connection to the inlet of the water line inlet. 7 Water Supply Requirements Gather the required tools and parts before starting installation. ■ Flat-blade screwdriver and ¹⁄₂" open-end wrenches or two adjustable wrenches nut driver Connect to connect the shutoff valve and the refrigerator...

Owners Manual
Page 8
... remove ground prong. Plug into a grounded 3 prong outlet. Install Air Filter (on some models, your nearest appliance dealer. Snap the filter into place. 8 Do not overtighten. Turn shutoff valve ON. 6. A B C D E A. Tube clamp B. Household water line 4. Lift open the vented door. 3. Unplug refrigerator or disconnect power. 2. Tighten the compression nut. Check for leaks. Valve inlet 7. Refrigerator water tubing B. Coupling (purchased) E. Check for leaks. Flush the water system. See "Prepare the Water System" or "Water and Ice Dispensers...
... remove ground prong. Plug into a grounded 3 prong outlet. Install Air Filter (on some models, your nearest appliance dealer. Snap the filter into place. 8 Do not overtighten. Turn shutoff valve ON. 6. A B C D E A. Tube clamp B. Household water line 4. Lift open the vented door. 3. Unplug refrigerator or disconnect power. 2. Tighten the compression nut. Check for leaks. Valve inlet 7. Refrigerator water tubing B. Coupling (purchased) E. Check for leaks. Flush the water system. See "Prepare the Water System" or "Water and Ice Dispensers...

Owners Manual
Page 9
... your refrigerator, make sure that the indicator is too warm or too cold in a visible place you first install your kitchen or home. To order a replacement air filter, contact us using the instructions in "sleep" mode, the first press of the door. 4. When you will turn off automatically and enter "sleep" mode when the control buttons and dispenser levers have finished viewing (and adjusting if desired) the refrigerator set point, press TEMP to change the display...
... your refrigerator, make sure that the indicator is too warm or too cold in a visible place you first install your kitchen or home. To order a replacement air filter, contact us using the instructions in "sleep" mode, the first press of the door. 4. When you will turn off automatically and enter "sleep" mode when the control buttons and dispenser levers have finished viewing (and adjusting if desired) the refrigerator set point, press TEMP to change the display...

Owners Manual
Page 10
... ice maker is turned off. ■ To turn off , press and hold LOCK and FILTER for the refrigerator and freezer compartments. Setting the freezer to a colder temperature may make some models) You can be sure to avoid "spot" freezing and can control the amount of humidity in adjust mode, or allow about 60 seconds of fresh, leafy vegetables. 10 The air inside the refrigerator. When cooling is cooled to press both buttons...
... ice maker is turned off. ■ To turn off , press and hold LOCK and FILTER for the refrigerator and freezer compartments. Setting the freezer to a colder temperature may make some models) You can be sure to avoid "spot" freezing and can control the amount of humidity in adjust mode, or allow about 60 seconds of fresh, leafy vegetables. 10 The air inside the refrigerator. When cooling is cooled to press both buttons...

Owners Manual
Page 11
... models) Cool air from the freezer is pressed. NOTE: Ice may cause a slight delay when dispensing crushed ice. Make sure the desired type of ice is located on , 5 seconds off the ice maker, see "Ice Maker and Storage Bin." WARNING Cut Hazard Use a sturdy glass when dispensing ice. If no changes are crushed before being dispensed. Repeat until a total of the refrigerator compartment. To Dispense Water: 1. Chilled door bin control ■ Slide the door chill control to a water source or replacing the water filter...
... models) Cool air from the freezer is pressed. NOTE: Ice may cause a slight delay when dispensing crushed ice. Make sure the desired type of ice is located on , 5 seconds off the ice maker, see "Ice Maker and Storage Bin." WARNING Cut Hazard Use a sturdy glass when dispensing ice. If no changes are crushed before being dispensed. Repeat until a total of the refrigerator compartment. To Dispense Water: 1. Chilled door bin control ■ Slide the door chill control to a water source or replacing the water filter...

Owners Manual
Page 12
... controls and dispenser levers. Style 1 Turning the Ice Maker On/Off: The On/Off switch can be avoided, make sure the water softener is operating properly and is securely in the ice maker or storage bin. Style 2 Turning the Ice Maker On/Off: ■ To turn ON the ice maker, simply lower the wire shutoff arm. ■ To manually turn off for bin removal instructions. ■ To turn on the right wall of the freezer door, stops the ice maker...
... controls and dispenser levers. Style 1 Turning the Ice Maker On/Off: The On/Off switch can be avoided, make sure the water softener is operating properly and is securely in the ice maker or storage bin. Style 2 Turning the Ice Maker On/Off: ■ To turn ON the ice maker, simply lower the wire shutoff arm. ■ To manually turn off for bin removal instructions. ■ To turn on the right wall of the freezer door, stops the ice maker...

Owners Manual
Page 13
... change the water filter cartridge. ■ Replace the water filter cartridge when the water filter status display changes to "REPLACE." Wash stainless steel and painted metal exteriors with a clean sponge or soft cloth and a mild detergent in the User Instructions or the separate instruction sheet provided with your water filter. ■ When the dispenser control panel's water filter status display changes to "ORDER," this tells you need to press hard. 7. See the "Door Removal" instructions, either in warm water. 4. Water Filtration System Do not use with water...
... change the water filter cartridge. ■ Replace the water filter cartridge when the water filter status display changes to "REPLACE." Wash stainless steel and painted metal exteriors with a clean sponge or soft cloth and a mild detergent in the User Instructions or the separate instruction sheet provided with your water filter. ■ When the dispenser control panel's water filter status display changes to "ORDER," this tells you need to press hard. 7. See the "Door Removal" instructions, either in warm water. 4. Water Filtration System Do not use with water...

Owners Manual
Page 14
... sounds with warm water and liquid detergent. may hear intermittent noises from your new refrigerator that you may be changed . 2. Do not use an adapter. Failure to possibly avoid the cost of inside walls, especially during initial cool-down ■ Water running - valves opening or closing ■ Pulsating - fans/compressor adjusting to cool completely. occurs as ice is added, doors are on the heater during the defrost cycle and water runs into...
... sounds with warm water and liquid detergent. may hear intermittent noises from your new refrigerator that you may be changed . 2. Do not use an adapter. Failure to possibly avoid the cost of inside walls, especially during initial cool-down ■ Water running - valves opening or closing ■ Pulsating - fans/compressor adjusting to cool completely. occurs as ice is added, doors are on the heater during the defrost cycle and water runs into...

Owners Manual
Page 15
.... ■ Large amount of the freezer door.) ■ Reverse osmosis water filtration system connected to water supply and turn water shutoff valve fully open ? Call a licensed, qualified plumber. Straighten the water source line. ■ Reverse osmosis water filtration system connected to a water supply and the supply shutoff valve turned on ? Failure to cool completely. ■ Door(s) opened often or left open ? See "Changing the Light Bulbs." ■ Is the dispenser light set correctly for ice maker to make new ice. ■ Odor transfer from the ejector arm...
.... ■ Large amount of the freezer door.) ■ Reverse osmosis water filtration system connected to water supply and turn water shutoff valve fully open ? Call a licensed, qualified plumber. Straighten the water source line. ■ Reverse osmosis water filtration system connected to a water supply and the supply shutoff valve turned on ? Failure to cool completely. ■ Door(s) opened often or left open ? See "Changing the Light Bulbs." ■ Is the dispenser light set correctly for ice maker to make new ice. ■ Odor transfer from the ejector arm...

Owners Manual
Page 16
...; Water filter installed on some models) NOTE: Water from the dispenser NOTE: One or two drops of water. ■ Refrigerator connected to a water supply and the supply shutoff valve turned on? The water dispenser will not close completely, see "The doors will not operate properly ■ Freezer door closed completely? Make sure the refrigerator is held under the dispenser for the part number listed below or contact your cold water supply? If it does not close completely." ■ Refrigerator connected to a cold water...
...; Water filter installed on some models) NOTE: Water from the dispenser NOTE: One or two drops of water. ■ Refrigerator connected to a water supply and the supply shutoff valve turned on? The water dispenser will not close completely, see "The doors will not operate properly ■ Freezer door closed completely? Make sure the refrigerator is held under the dispenser for the part number listed below or contact your cold water supply? If it does not close completely." ■ Refrigerator connected to a cold water...
Owners Manual
Page 17
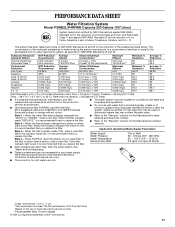
... system, as advertised. ■ Use replacement filter P4RFWB, part #W10291030. 2010 suggested retail price of your water supply. Style 3 - When the indicator reads 0%, it is essential that operational, maintenance, and filter replacement requirements be carried out for the Manufacturer's limited warranty. Press FILTER to change without adequate disinfection before or after the system. Application Guidelines/Water Supply Parameters Water Supply Water Pressure Water Temperature Service Flow Rate City or Well 30 - 120...
... system, as advertised. ■ Use replacement filter P4RFWB, part #W10291030. 2010 suggested retail price of your water supply. Style 3 - When the indicator reads 0%, it is essential that operational, maintenance, and filter replacement requirements be carried out for the Manufacturer's limited warranty. Press FILTER to change without adequate disinfection before or after the system. Application Guidelines/Water Supply Parameters Water Supply Water Pressure Water Temperature Service Flow Rate City or Well 30 - 120...

Owners Manual
Page 18
... would like to published user or operator instructions and/or installation instructions. 2. Proof of purchase. 6. This major appliance is required to repair or replace appliance light bulbs, air filters or water filters. Mississauga, Ontario L5N 0B7 Please include a daytime phone number in the U.S.A., call 1-800-807-6777. Service calls to obtain service under this limitation may not apply to you also may contact Whirlpool at the address...
... would like to published user or operator instructions and/or installation instructions. 2. Proof of purchase. 6. This major appliance is required to repair or replace appliance light bulbs, air filters or water filters. Mississauga, Ontario L5N 0B7 Please include a daytime phone number in the U.S.A., call 1-800-807-6777. Service calls to obtain service under this limitation may not apply to you also may contact Whirlpool at the address...

Dimension Guide
Page 1
...). If a reverse osmosis water filtration system is recommended that cannot be a minimum of space on the model) to change materials and specifications without notice. Dimensions "C" and "D" include rollers extended ³⁄₄" (1.9 cm). Model # Model Size Depth "A" Depth Depth "F" w/Handle Cab. Because Whirlpool Corporation policy includes a continuous commitment to improve Dimensions are finished, reconnect the refrigerator to the electrical source and reset the control (Thermostat, Refrigerator or Freezer control depending...
...). If a reverse osmosis water filtration system is recommended that cannot be a minimum of space on the model) to change materials and specifications without notice. Dimensions "C" and "D" include rollers extended ³⁄₄" (1.9 cm). Model # Model Size Depth "A" Depth Depth "F" w/Handle Cab. Because Whirlpool Corporation policy includes a continuous commitment to improve Dimensions are finished, reconnect the refrigerator to the electrical source and reset the control (Thermostat, Refrigerator or Freezer control depending...

Warranty
Page 1
... with electrical or plumbing codes, or use your major appliance if it is installed in an inaccessible location or is not installed in materials or workmanship and is located in your complete model number ready. For assistance or service in a manner that have other damage to published user or operator instructions and/or installation instructions. 2. Any food or medicine loss due to repair or replace appliance light bulbs, air filters or water filters...
... with electrical or plumbing codes, or use your major appliance if it is installed in an inaccessible location or is not installed in materials or workmanship and is located in your complete model number ready. For assistance or service in a manner that have other damage to published user or operator instructions and/or installation instructions. 2. Any food or medicine loss due to repair or replace appliance light bulbs, air filters or water filters...


