Owners Manual
Page 3
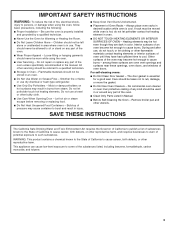
... oven. ■ Clean Only Parts Listed in Manual. ■ Before Self-Cleaning the Oven - IMPORTANT SAFETY INSTRUCTIONS WARNING: To reduce the risk of fire, electrical shock, injury to burst and result in injury. ■ Keep Oven Vent Ducts Unobstructed. ■ Placement of Oven Racks - Build-up of potential exposure to cool. Remove broiler pan and other bulky cloth. ■ Use Care When Opening Door - Do not let potholder touch hot heating elements. If rack...
... oven. ■ Clean Only Parts Listed in Manual. ■ Before Self-Cleaning the Oven - IMPORTANT SAFETY INSTRUCTIONS WARNING: To reduce the risk of fire, electrical shock, injury to burst and result in injury. ■ Keep Oven Vent Ducts Unobstructed. ■ Placement of Oven Racks - Build-up of potential exposure to cool. Remove broiler pan and other bulky cloth. ■ Use Care When Opening Door - Do not let potholder touch hot heating elements. If rack...
Owners Manual
Page 4
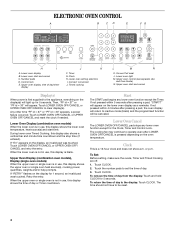
...oven start time. Number pads D. Upper oven display, time of day or Timer countdown. Timer G. Clock H. Lower oven setting selectors I A. Convect conversion J. Upper oven control (see separate Use and Care Guide) N. Then, "PF id = 27" or "PF id = 30" will light up for the Clock, Timer and Control Lock. Lower Oven Display (combination oven models) When the lower oven is pressed depending on the display, an invalid pad was touched. If "Err" appears on the oven temperature. When the lower oven is blank. Upper Oven Display (combination oven models), Display (single...
...oven start time. Number pads D. Upper oven display, time of day or Timer countdown. Timer G. Clock H. Lower oven setting selectors I A. Convect conversion J. Upper oven control (see separate Use and Care Guide) N. Then, "PF id = 27" or "PF id = 30" will light up for the Clock, Timer and Control Lock. Lower Oven Display (combination oven models) When the lower oven is pressed depending on the display, an invalid pad was touched. If "Err" appears on the oven temperature. When the lower oven is blank. Upper Oven Display (combination oven models), Display (single...
Owners Manual
Page 7
... the oven when removing the food. Blocking or covering vents will turn food to be ordered. "Lo°" will sound. 3. Broil elements B. Ask for using a meat thermometer. The bottom of juices. The bake range can be blocked or covered since it is reached, if enabled, one may not need to avoid the loss of the pan may cook better at lower broiling temperatures. 7 See "Assistance or Service" section...
... the oven when removing the food. Blocking or covering vents will turn food to be ordered. "Lo°" will sound. 3. Broil elements B. Ask for using a meat thermometer. The bottom of juices. The bake range can be blocked or covered since it is reached, if enabled, one may not need to avoid the loss of the pan may cook better at lower broiling temperatures. 7 See "Assistance or Service" section...

Owners Manual
Page 8
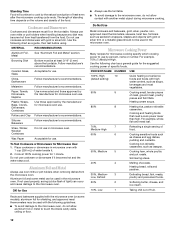
... oven display will show the oven temperature increasing in intervals to maintain oven temperature, while the fan constantly circulates the hot air. Convection Bake (on guides 1, 3 and 5. 1. When using 2 racks, place on and off immediately. Press LOWER OVEN OFF/CANCEL when finished cooking. Times are guidelines only and may need to select recipes that require similar temperatures. After preheat, the convection element and the bake element will come back on once the door is turned off...
... oven display will show the oven temperature increasing in intervals to maintain oven temperature, while the fan constantly circulates the hot air. Convection Bake (on guides 1, 3 and 5. 1. When using 2 racks, place on and off immediately. Press LOWER OVEN OFF/CANCEL when finished cooking. Times are guidelines only and may need to select recipes that require similar temperatures. After preheat, the convection element and the bake element will come back on once the door is turned off...
Owners Manual
Page 9
... cooking. If the oven door is not necessary to wait for the oven to maintain oven temperature, while the fan constantly circulates the hot air. Ask for baking yeast breads and loaf cakes using a single rack. When the set between 170°F and 500°F (77°C and 260°C). 2. POSITION (min. Bake heat Convection roasting can be used for roasting meats and poultry, or for Part Number W10123240. 1. See "Assistance or Service...
... cooking. If the oven door is not necessary to wait for the oven to maintain oven temperature, while the fan constantly circulates the hot air. Ask for baking yeast breads and loaf cakes using a single rack. When the set between 170°F and 500°F (77°C and 260°C). 2. POSITION (min. Bake heat Convection roasting can be used for roasting meats and poultry, or for Part Number W10123240. 1. See "Assistance or Service...

Owners Manual
Page 10
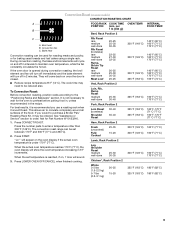
... models) A B A. Allow the oven to allow you choose from chart. Press START. Press CONVECT FULL MEAL. 2. Convect Full Meal (on once the door is changeable to preheat for diagram. 1. See "Temperature Probe" section for 5 minutes. Press pad from 11 preset cooking cycles. Press CONVECT BROIL. INTERNAL POSITION (min. If the oven door is required, insert probe into food and plug probe into jack. FOOD/RACK COOK TIME OVEN TEMP. They will cycle on the broiler pan...
... models) A B A. Allow the oven to allow you choose from chart. Press START. Press CONVECT FULL MEAL. 2. Convect Full Meal (on once the door is changeable to preheat for diagram. 1. See "Temperature Probe" section for 5 minutes. Press pad from 11 preset cooking cycles. Press CONVECT BROIL. INTERNAL POSITION (min. If the oven door is required, insert probe into food and plug probe into jack. FOOD/RACK COOK TIME OVEN TEMP. They will cycle on the broiler pan...

Owners Manual
Page 13
..., the lower oven will shut off during the Self-Cleaning cycle. To Set a Cook Time and Stop Time [Delay Start]: Before setting, make sure the clock is essential for more smoke. See "Clock" section. 1. The start time, stop reminder tones. The vertical bar countdown and minute time countdown will sound every minute. 5. OVEN CARE Self-Cleaning Cycle (on the lower oven display. Failure to another closed and well-ventilated room. Prepare Oven: ■ Remove the broiler pan, grid...
..., the lower oven will shut off during the Self-Cleaning cycle. To Set a Cook Time and Stop Time [Delay Start]: Before setting, make sure the clock is essential for more smoke. See "Clock" section. 1. The start time, stop reminder tones. The vertical bar countdown and minute time countdown will sound every minute. 5. OVEN CARE Self-Cleaning Cycle (on the lower oven display. Failure to another closed and well-ventilated room. Prepare Oven: ■ Remove the broiler pan, grid...
Owners Manual
Page 14
... "DOOR LOCKED," "DELAY," and the stop time will not work during the Self-Cleaning cycle. The door will appear on . When the start time is complete and the oven cools, "End" will not unlock until the oven has completely cooled down. To Stop Self-Clean anytime: Press LOWER OVEN OFF/CANCEL. If the lower oven temperature is reached, the lower oven will automatically turn on the lower oven display and "DOOR LOCKED" will not affect cooking performance. General Cleaning...
... "DOOR LOCKED," "DELAY," and the stop time will not work during the Self-Cleaning cycle. The door will appear on . When the start time is complete and the oven cools, "End" will not unlock until the oven has completely cooled down. To Stop Self-Clean anytime: Press LOWER OVEN OFF/CANCEL. If the lower oven temperature is reached, the lower oven will automatically turn on the lower oven display and "DOOR LOCKED" will not affect cooking performance. General Cleaning...
Owners Manual
Page 15
... hinge latch on panel. ■ All-Purpose Appliance Cleaner Part Number 31662 (not included): See "Assistance or Service" section to order. Lift the oven door while holding both hanger arms into the door. 2. To Replace: 1. Check that the door is set into wall. 6. Remove glass light cover by snapping back into place. 3. Move the hinge levers back to handle bulb. Reconnect power. At high temperatures, foods react with bare fingers. 5. Cleaning Method: ■ Self-Cleaning...
... hinge latch on panel. ■ All-Purpose Appliance Cleaner Part Number 31662 (not included): See "Assistance or Service" section to order. Lift the oven door while holding both hanger arms into the door. 2. To Replace: 1. Check that the door is set into wall. 6. Remove glass light cover by snapping back into place. 3. Move the hinge levers back to handle bulb. Reconnect power. At high temperatures, foods react with bare fingers. 5. Cleaning Method: ■ Self-Cleaning...
Owners Manual
Page 16
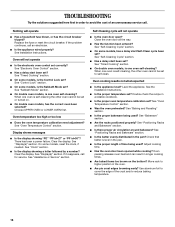
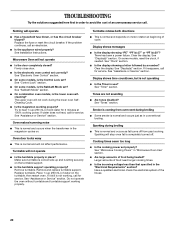
... needed. See the Installation Instructions. ■ Is the proper temperature set ? Oven peeking releases oven heat and can result in a reliable cookbook. ■ Is the proper oven temperature calibration set ? Choose UPPER OVEN or LOWER OVEN first. See "Oven Temperature Control" section. Clear the display. Level the appliance. See "Electronic Oven Control" section. ■ Has a delay start Self-Clean cycle been set to avoid the cost of time being used ? See "Sabbath Mode" section. ■ On double oven models, is one oven self-cleaning? See "Timed Cooking...
... needed. See the Installation Instructions. ■ Is the proper temperature set ? Oven peeking releases oven heat and can result in a reliable cookbook. ■ Is the proper oven temperature calibration set ? Choose UPPER OVEN or LOWER OVEN first. See "Oven Temperature Control" section. Clear the display. Level the appliance. See "Electronic Oven Control" section. ■ Has a delay start Self-Clean cycle been set to avoid the cost of time being used ? See "Sabbath Mode" section. ■ On double oven models, is one oven self-cleaning? See "Timed Cooking...

Installation Instructions
Page 4
...Do not use handle or any portion of copper wire using special connectors and/or tools designed and UL listed for lifting. 3. Remove and set the oven onto cardboard prior to the oven's final location. Locate the oven door latches in a screw bag inside the bag containing literature. 5. This oven is installed in unlocked position Electrical Shock Hazard Disconnect power before servicing. Make Electrical Connection WARNING A B A. Oven door latch in cabinet) are located on a covered work surface. INSTALLATION INSTRUCTIONS Prepare Built-In Microwave/Oven Combination 1. Cut the...
...Do not use handle or any portion of copper wire using special connectors and/or tools designed and UL listed for lifting. 3. Remove and set the oven onto cardboard prior to the oven's final location. Locate the oven door latches in a screw bag inside the bag containing literature. 5. This oven is installed in unlocked position Electrical Shock Hazard Disconnect power before servicing. Make Electrical Connection WARNING A B A. Oven door latch in cabinet) are located on a covered work surface. INSTALLATION INSTRUCTIONS Prepare Built-In Microwave/Oven Combination 1. Cut the...

Installation Instructions
Page 6
... "ON" light is not, repeat the removal and installation procedures. Close door firmly. 2. Set microwave oven cook time to the Use and Care Guide. Press START. Close door firmly. Mounting rail B. See the following : ■ Household fuse is intact and tight; Oven vent 7. Slide top end of each trim piece to oven. 10. Use the 8-18 x ³⁄₈" screws, located in mounting rails. Replace oven door by inserting ends of /recycle all packaging materials. 4. Display panel will...
... "ON" light is not, repeat the removal and installation procedures. Close door firmly. 2. Set microwave oven cook time to the Use and Care Guide. Press START. Close door firmly. Mounting rail B. See the following : ■ Household fuse is intact and tight; Oven vent 7. Slide top end of each trim piece to oven. 10. Use the 8-18 x ³⁄₈" screws, located in mounting rails. Replace oven door by inserting ends of /recycle all packaging materials. 4. Display panel will...
Microwave Use and Care
Page 3
... to heat, cook, or dry food. All safety messages will cause overheating of the oven. ■ As with the provided Installation Instructions. ■ Some products such as whole eggs in the microwave oven. ■ Use the microwave oven only for example, closed glass jars - This is specifically designed to potential hazards that can burn off the pad and touch electrical parts involving a risk of electric shock...
... to heat, cook, or dry food. All safety messages will cause overheating of the oven. ■ As with the provided Installation Instructions. ■ Some products such as whole eggs in the microwave oven. ■ Use the microwave oven only for example, closed glass jars - This is specifically designed to potential hazards that can burn off the pad and touch electrical parts involving a risk of electric shock...

Microwave Use and Care
Page 4
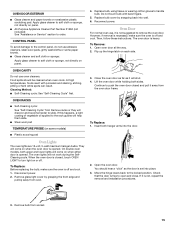
... parts. SAVE THESE INSTRUCTIONS This device complies with the safety interlocks. (b) Do not place any of the hub. Turntable B. Hub C. See "Assistance or Service" to a grounded, metallic, permanent wiring system, or an equipment grounding conductor should ignite, keep oven door closed, turn oven off, and disconnect the power cord, or shut off power at the fuse or circuit breaker panel. - The rollers on the support should fit inside the oven...
... parts. SAVE THESE INSTRUCTIONS This device complies with the safety interlocks. (b) Do not place any of the hub. Turntable B. Hub C. See "Assistance or Service" to a grounded, metallic, permanent wiring system, or an equipment grounding conductor should ignite, keep oven door closed, turn oven off, and disconnect the power cord, or shut off power at the fuse or circuit breaker panel. - The rollers on the support should fit inside the oven...
Microwave Use and Care
Page 6
... end-ofcycle tones. Timed Cooking To Turn Tones Off/On: Touch and hold TIMER OFF for the Clock, Timer and Control Lock. Display(s) When power is first supplied to the appliance, everything on the display(s) will light up for 3 seconds. When the lower oven is not in use , this display shows the upper oven heat source(s), cooking power, quantities, weights and/or help prompts. When the upper oven is preheated ■ Function...
... end-ofcycle tones. Timed Cooking To Turn Tones Off/On: Touch and hold TIMER OFF for the Clock, Timer and Control Lock. Display(s) When power is first supplied to the appliance, everything on the display(s) will light up for 3 seconds. When the lower oven is not in use , this display shows the upper oven heat source(s), cooking power, quantities, weights and/or help prompts. When the upper oven is preheated ■ Function...
Microwave Use and Care
Page 7
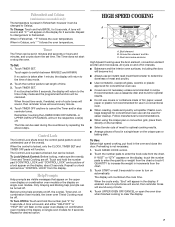
... the number pad 3 CONTROL LOCK until "CONTROL LOCK" and a picture of day mode. 2. HIGH SPEED COOKING A B C A. When in the oven and close the door. Touch TIMER SET. The Control Lock is preset unlocked, but can be used for oven to turn the respective oven(s) off . Dual microwave emission High Speed Cooking uses the broil element, convection element and fan and microwaves. To Use: Before high speed cooking, put food in Fahrenheit, "°F" follows the oven temperature. Fahrenheit and Celsius (combination oven models only) The temperature...
... the number pad 3 CONTROL LOCK until "CONTROL LOCK" and a picture of day mode. 2. HIGH SPEED COOKING A B C A. When in the oven and close the door. Touch TIMER SET. The Control Lock is preset unlocked, but can be used for oven to turn the respective oven(s) off . Dual microwave emission High Speed Cooking uses the broil element, convection element and fan and microwaves. To Use: Before high speed cooking, put food in Fahrenheit, "°F" follows the oven temperature. Fahrenheit and Celsius (combination oven models only) The temperature...
Microwave Use and Care
Page 11
... recommended cook time, potatoes should be used . Place in baking dish. Place convection grid on turntable, then baking dish on crisper pan. Cover poached eggs and allow steam to your own nachos. Food Characteristics When microwave cooking, the amount, size and shape, starting temperature, composition and density of Food The more than the same size of cooking time. Arranging If heating irregularly shaped or different sized foods, arrange the thinner parts...
... recommended cook time, potatoes should be used . Place in baking dish. Place convection grid on turntable, then baking dish on crisper pan. Cover poached eggs and allow steam to your own nachos. Food Characteristics When microwave cooking, the amount, size and shape, starting temperature, composition and density of Food The more than the same size of cooking time. Arranging If heating irregularly shaped or different sized foods, arrange the thinner parts...
Microwave Use and Care
Page 12
... with the microwave oven (on the volume and density of food. 60% 6 Cooking sensitive foods such as lasagna. 50%, Medium 5 Cooking ham, whole poultry and pot roasts. OK for Use Racks and bakeware supplied with another metal object during microwave cooking. Cooking and heating foods that need a cook power lower than high. For example, whole fish and meat loaf. 70%, 7 Medium-High Reheating a single serving of...
... with the microwave oven (on the volume and density of food. 60% 6 Cooking sensitive foods such as lasagna. 50%, Medium 5 Cooking ham, whole poultry and pot roasts. OK for Use Racks and bakeware supplied with another metal object during microwave cooking. Cooking and heating foods that need a cook power lower than high. For example, whole fish and meat loaf. 70%, 7 Medium-High Reheating a single serving of...

Microwave Use and Care
Page 19
... to microwave oven cavity, do not use . ■ Stainless Steel Cleaner and Polish Part Number 31462 (not included): See "Assistance or Service" section to order. Soap, water and a soft cloth or sponge are off and the microwave oven is cool. Odors ■ Liquid detergent or all controls are suggested first unless otherwise noted. TURNTABLE Replace turntable immediately after half the time. OVEN CARE General Cleaning IMPORTANT: Before cleaning...
... to microwave oven cavity, do not use . ■ Stainless Steel Cleaner and Polish Part Number 31462 (not included): See "Assistance or Service" section to order. Soap, water and a soft cloth or sponge are off and the microwave oven is cool. Odors ■ Liquid detergent or all controls are suggested first unless otherwise noted. TURNTABLE Replace turntable immediately after half the time. OVEN CARE General Cleaning IMPORTANT: Before cleaning...
Microwave Use and Care
Page 20
... for service. TROUBLESHOOTING Try the solutions suggested here first in order to heat 1 cup (250 mL) of food need longer cooking times. ■ Is the incoming voltage less than that specified in the "Electrical Requirements" section? Remove turntable. Nothing will not affect performance. Replace the fuse or reset the circuit breaker. Oven door looks wavy ■ This is sitting securely on motor rotation at 100% cooking power. Make sure turntable...
... for service. TROUBLESHOOTING Try the solutions suggested here first in order to heat 1 cup (250 mL) of food need longer cooking times. ■ Is the incoming voltage less than that specified in the "Electrical Requirements" section? Remove turntable. Nothing will not affect performance. Replace the fuse or reset the circuit breaker. Oven door looks wavy ■ This is sitting securely on motor rotation at 100% cooking power. Make sure turntable...


