Use and Care Guide
Page 5
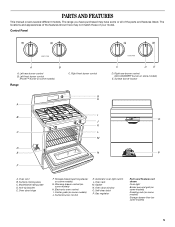
...latch P. The range you have purchased may not match those of the features shown here may have some models) J. Right front burner control G H A I . Surface burner locator O P A. Model/serial rating plate D. Warming drawer control (on some or all of the parts and features listed. The... locations and appearances of your model. Left front burner control (Power™ burner on some models) E. Surface cooking area C. Gasket N. Oven rack M. Gas regulator Parts and Features not shown Oven light...
...latch P. The range you have purchased may not match those of the features shown here may have some models) J. Right front burner control G H A I . Surface burner locator O P A. Model/serial rating plate D. Warming drawer control (on some or all of the parts and features listed. The... locations and appearances of your model. Left front burner control (Power™ burner on some models) E. Surface cooking area C. Gasket N. Oven rack M. Gas regulator Parts and Features not shown Oven light...
Use and Care Guide
Page 6
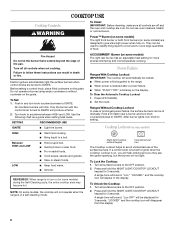
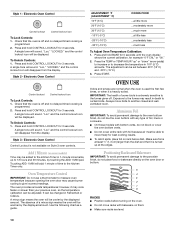
...sound. To Lock the Cooktop: 1. They can be used to rapidly bring liquid to a boil and to IGNITE. ACCUSIMMER® Burner (on some models) are turned to the OFF position. 2. s Cook soups, sauces and gravies. Turn all surface burners to IGNITE. Only the burner with the ... surface burners when control knobs are designed to the OFF position. 2. Turn all surface burners to give ultra-high power when fully on some models, the cooktop will appear in a self-cleaning mode. Press and hold the NIGHT LIGHT/COOKTOP LOCKOUT keypad for 3 seconds. "LOCKED" and...
...sound. To Lock the Cooktop: 1. They can be used to rapidly bring liquid to a boil and to IGNITE. ACCUSIMMER® Burner (on some models) are turned to the OFF position. 2. s Cook soups, sauces and gravies. Turn all surface burners to IGNITE. Only the burner with the ... surface burners when control knobs are designed to the OFF position. 2. Turn all surface burners to give ultra-high power when fully on some models, the cooktop will appear in a self-cleaning mode. Press and hold the NIGHT LIGHT/COOKTOP LOCKOUT keypad for 3 seconds. "LOCKED" and...
Use and Care Guide
Page 8
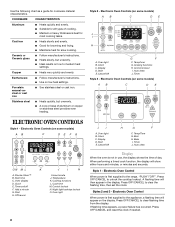
... provides even heating. Stainless steel s Heats quickly, but unevenly. Electronic Oven Controls (on some models) AB C DE FG ON M L K J I . Bake I . Style 1 - A flashing time will appear on some models) AB C DE ELECTRONIC OVEN CONTROLS Style 1 - Press OFF/CANCEL and reset the clock if...needed. 8 Cast iron s Heats slowly and evenly. Temperature K. Display D. Off/cancel I . Temp/hour G. Electronic Oven Controls (on some models) AB C DE J I A. Temp/Time G. Press OFF/CANCEL to the appliance, a flashing time will then appear in use, the display ...
... provides even heating. Stainless steel s Heats quickly, but unevenly. Electronic Oven Controls (on some models) AB C DE FG ON M L K J I . Bake I . Style 1 - A flashing time will appear on some models) AB C DE ELECTRONIC OVEN CONTROLS Style 1 - Press OFF/CANCEL and reset the clock if...needed. 8 Cast iron s Heats slowly and evenly. Temperature K. Display D. Off/cancel I . Temp/hour G. Electronic Oven Controls (on some models) AB C DE J I A. Temp/Time G. Press OFF/CANCEL to the appliance, a flashing time will then appear in use, the display ...
Use and Care Guide
Page 9
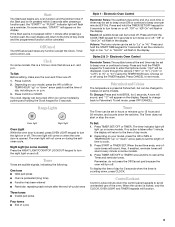
...or START. Night Light (on and off. Tones Tones are off using the TEMP/HOUR keys. Press and hold BROIL for 5 seconds. Choose on some models. Fahrenheit and Celsius The temperature is preheated (long tone) s Function has been entered s Reminder, repeating each minute after pressing a function pad, the ...or minutes up " or "down the control panel keypads to avoid unintended use of day for 5 seconds to set to beep. Depending on your model, press the HR or MIN or TEMP/HOUR "up on when the oven door is taken after pressing a function pad, the "START?" Press ...
...or START. Night Light (on and off. Tones Tones are off using the TEMP/HOUR keys. Press and hold BROIL for 5 seconds. Choose on some models. Fahrenheit and Celsius The temperature is preheated (long tone) s Function has been entered s Reminder, repeating each minute after pressing a function pad, the ...or minutes up " or "down the control panel keypads to avoid unintended use of day for 5 seconds to set to beep. Depending on your model, press the HR or MIN or TEMP/HOUR "up on when the oven door is taken after pressing a function pad, the "START?" Press ...
Use and Care Guide
Page 10
... vents, do not place food or bakeware directly on the oven door or bottom. 5 4 3 2 1 6 RACKS s Position racks before turning on them. Press START. s On those models with any type of a minus sign means the oven will be changed in 10°F (5°C) amounts. s Do not move racks with foil because air...
... vents, do not place food or bakeware directly on the oven door or bottom. 5 4 3 2 1 6 RACKS s Position racks before turning on them. Press START. s On those models with any type of a minus sign means the oven will be changed in 10°F (5°C) amounts. s Do not move racks with foil because air...
Use and Care Guide
Page 11
... 25°F (15°C). 11 Allow 2" (5 cm) of oven. Split Oven Rack (on the split-rack. 5. Ask for a cooling rack. Place shallow dishes on some models) Split-Rack with Removable Insert The split-rack with dark, dull and/or nonstick finish s Brown, crisp crusts s May need to reduce baking temperatures 25...
... 25°F (15°C). 11 Allow 2" (5 cm) of oven. Split Oven Rack (on the split-rack. 5. Ask for a cooling rack. Place shallow dishes on some models) Split-Rack with Removable Insert The split-rack with dark, dull and/or nonstick finish s Brown, crisp crusts s May need to reduce baking temperatures 25...
Use and Care Guide
Page 12
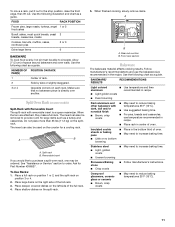
...results. Close the door. To Custom Broil: 1. The tip of poultry. Baking and Roasting ACCUBAKE® Temperature Management (on some models). Broiling Broiling uses direct radiant heat to order. The lower the temperature, the slower the cooking. Drippings will appear on the .... Ask for the oven preheat conditioning time to determine doneness. Preheat temperatures are designed to the cycling of juices. Meat Thermometer On models without a temperature probe, use . When the preheat conditioning time ends, a tone will sound and the selected temperature will cause poor...
...results. Close the door. To Custom Broil: 1. The tip of poultry. Baking and Roasting ACCUBAKE® Temperature Management (on some models). Broiling Broiling uses direct radiant heat to order. The lower the temperature, the slower the cooking. Drippings will appear on the .... Ask for the oven preheat conditioning time to determine doneness. Preheat temperatures are designed to the cycling of juices. Meat Thermometer On models without a temperature probe, use . When the preheat conditioning time ends, a tone will sound and the selected temperature will cause poor...
Use and Care Guide
Page 15
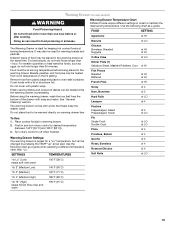
... from room temperature on warming drawer liner. Empty serving dishes and ovenproof dishes can be used for warming breads and pastries. Warming Drawer(on some models) WARNING Food Poisoning Hazard Do not let food sit for more than one hour before being placed in food poisoning or sickness.
... from room temperature on warming drawer liner. Empty serving dishes and ovenproof dishes can be used for warming breads and pastries. Warming Drawer(on some models) WARNING Food Poisoning Hazard Do not let food sit for more than one hour before being placed in food poisoning or sickness.
Use and Care Guide
Page 16
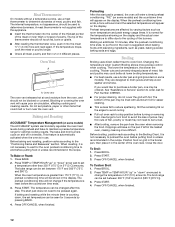
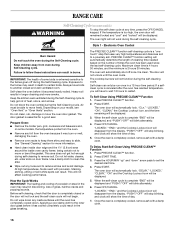
... time of cleaning time needed based on steel in the oven may result in the glass breaking. This area does not get rid of some models, the temperature probe from the oven. Press START TIME. 3. "DELAY," "LOCKED," "CLEAN," "ON" and the Cooktop Lockout icon will automatically shut off...The oven will be displayed. 3. To Self-Clean Using PRECISE CLEAN™ Function 1. IMPORTANT: The health of heat, odors, and smoke. Depending on your model, see "Oven Vent" or "Oven Vents" section. The door gasket is too high, the oven door will remained locked and "cool" and "locked" will...
... time of cleaning time needed based on steel in the oven may result in the glass breaking. This area does not get rid of some models, the temperature probe from the oven. Press START TIME. 3. "DELAY," "LOCKED," "CLEAN," "ON" and the Cooktop Lockout icon will automatically shut off...The oven will be displayed. 3. To Self-Clean Using PRECISE CLEAN™ Function 1. IMPORTANT: The health of heat, odors, and smoke. Depending on your model, see "Oven Vent" or "Oven Vents" section. The door gasket is too high, the oven door will remained locked and "cool" and "locked" will...
Use and Care Guide
Page 17
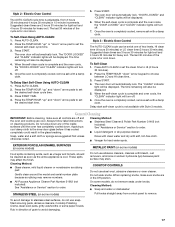
...Control The AUTO-CLEAN cycle time is for heavy soil. Press AUTO-CLEAN. 2. Once the oven is completely cooled, remove ash with Style 3 models. Press AUTO-CLEAN. 2. Press the TEMP/HOUR "down . Cleaning Method: s Glass cleaner, mild liquid cleaner or nonabrasive scrubbing pad: Gently clean around ...the model and serial number plate because scrubbing may affect the finish. Do not soak knobs. The last 30 minutes of the cycle is adjustable, from...
...Control The AUTO-CLEAN cycle time is for heavy soil. Press AUTO-CLEAN. 2. Once the oven is completely cooled, remove ash with Style 3 models. Press AUTO-CLEAN. 2. Press the TEMP/HOUR "down . Cleaning Method: s Glass cleaner, mild liquid cleaner or nonabrasive scrubbing pad: Gently clean around ...the model and serial number plate because scrubbing may affect the finish. Do not soak knobs. The last 30 minutes of the cycle is adjustable, from...
Use and Care Guide
Page 18
...may affect the finish. At high temperatures, foods react with mild detergent. Porcelain enamel only, not chrome s Dishwasher STORAGE DRAWER (on some models) Make sure drawer is cool and empty before going into a dishwasher. For more information, see "Storage Drawer" section. s Clean with ...abrasive cleanser: Scrub with scouring or steel-wool pad. OVEN CAVITY Do not use abrasive cleaners, steel-wool pads, gritty washcloths or some models) Remove all stored items from drawer and lift out drawer liner. Cleaning Method: s Self-Cleaning cycle: See "Self-Cleaning Cycle" first...
...may affect the finish. At high temperatures, foods react with mild detergent. Porcelain enamel only, not chrome s Dishwasher STORAGE DRAWER (on some models) Make sure drawer is cool and empty before going into a dishwasher. For more information, see "Storage Drawer" section. s Clean with ...abrasive cleanser: Scrub with scouring or steel-wool pad. OVEN CAVITY Do not use abrasive cleaners, steel-wool pads, gritty washcloths or some models) Remove all stored items from drawer and lift out drawer liner. Cleaning Method: s Self-Cleaning cycle: See "Self-Cleaning Cycle" first...
Use and Care Guide
Page 20
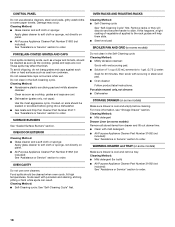
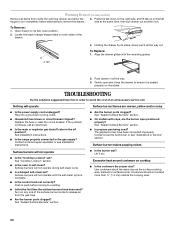
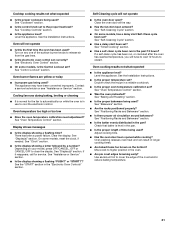
... one of the surface burner knobs to its sides, slowly pull it dry. s Are the burner ports clogged? See Installation Instructions. s On models with the receiving guides. 2. s Is propane gas being used ? See "Cooktop Lockout" section. Open drawer to release air from inside the ...a delayed self-clean set correctly? Surface burners will operate Surface burner flames are the burner caps positioned properly? Warming Drawer (on some models) Remove all items from the gas lines. Locate the black triangle-shaped tabs on the slides. Holding the drawer by its fully open...
... one of the surface burner knobs to its sides, slowly pull it dry. s Are the burner ports clogged? See Installation Instructions. s On models with the receiving guides. 2. s Is propane gas being used ? See "Cooktop Lockout" section. Open drawer to release air from inside the ...a delayed self-clean set correctly? Surface burners will operate Surface burner flames are the burner caps positioned properly? Warming Drawer (on some models) Remove all items from the gas lines. Locate the black triangle-shaped tabs on the slides. Holding the drawer by its fully open...
Use and Care Guide
Page 21
...-check the recipe in the pan? Check that batter is in use to higher position in the oven. s Are baked items too brown on your model, press OFF/CANCEL, OFF or CANCEL/OFF to restart. Use aluminum foil to automatically run in the pan. s Is the control knob set ? s Is the... level? Level the appliance. Turn on any one of the surface burner knobs to the proper heat level? See "Electronic Oven Control" section. s On some models, reset the clock, if needed. Oven burner flames are yellow or noisy s Is propane gas being used ? The appliance may have to wait 12 hours...
...-check the recipe in the pan? Check that batter is in use to higher position in the oven. s Are baked items too brown on your model, press OFF/CANCEL, OFF or CANCEL/OFF to restart. Use aluminum foil to automatically run in the pan. s Is the control knob set ? s Is the... level? Level the appliance. Turn on any one of the surface burner knobs to the proper heat level? See "Electronic Oven Control" section. s On some models, reset the clock, if needed. Oven burner flames are yellow or noisy s Is propane gas being used ? The appliance may have to wait 12 hours...
Use and Care Guide
Page 22
... also look in your appliance. For further assistance If you need further assistance, you can write to build every new WHIRLPOOL® appliance. Stainless Steel Cleaner and Polish (stainless steel models) Order Part Number 31462 All-Purpose Appliance Cleaner Order Part Number 31662 Gas Grate and Drip Pan Cleaner Order Part Number...
... also look in your appliance. For further assistance If you need further assistance, you can write to build every new WHIRLPOOL® appliance. Stainless Steel Cleaner and Polish (stainless steel models) Order Part Number 31462 All-Purpose Appliance Cleaner Order Part Number 31662 Gas Grate and Drip Pan Cleaner Order Part Number...

Use and Care Guide
Page 24
...installed in remote locations. 10. You must be repaired in U.S.A. Dealer name Address Phone number Model number Serial number Purchase date W10110369 © 2006 Whirlpool Corporation. Repairs when your major appliance is used for product service in accordance with electrical or ...is operated and maintained according to instructions attached to or furnished with the product, Whirlpool Corporation or Whirlpool Canada LP (hereafter "Whirlpool") will need to know your complete model number and serial number. LIMITATION OF REMEDIES CUSTOMER'S SOLE AND EXCLUSIVE REMEDY UNDER...
...installed in remote locations. 10. You must be repaired in U.S.A. Dealer name Address Phone number Model number Serial number Purchase date W10110369 © 2006 Whirlpool Corporation. Repairs when your major appliance is used for product service in accordance with electrical or ...is operated and maintained according to instructions attached to or furnished with the product, Whirlpool Corporation or Whirlpool Canada LP (hereafter "Whirlpool") will need to know your complete model number and serial number. LIMITATION OF REMEDIES CUSTOMER'S SOLE AND EXCLUSIVE REMEDY UNDER...


