Owners Manual
Page 1
...ÉRATEUR 35 INSTRUCTIONS D'INSTALLATION 36 UTILISATION DU RÉFRIGÉRATEUR 39 REFRIGERATOR CARE 10 CUIDADO DE SU REFRIGERADOR 26 ENTRETIEN DU RÉFRIGÉRATEUR 45 TROUBLESHOOTING 11 SOLUCIÓN DE PROBLEMAS 27 DÉPANNAGE 46 ACCESSORIES 13 ACCESORIOS 30 ACCESSOIRES 48 WATER FILTER CERTIFICATIONS 13 PERFORMANCE DATA SHEETS 14 WARRANTY 16 HOJA DE DATOS DEL RENDIMIENTO.........31 GARANT...
...ÉRATEUR 35 INSTRUCTIONS D'INSTALLATION 36 UTILISATION DU RÉFRIGÉRATEUR 39 REFRIGERATOR CARE 10 CUIDADO DE SU REFRIGERADOR 26 ENTRETIEN DU RÉFRIGÉRATEUR 45 TROUBLESHOOTING 11 SOLUCIÓN DE PROBLEMAS 27 DÉPANNAGE 46 ACCESSORIES 13 ACCESORIOS 30 ACCESSOIRES 48 WATER FILTER CERTIFICATIONS 13 PERFORMANCE DATA SHEETS 14 WARRANTY 16 HOJA DE DATOS DEL RENDIMIENTO.........31 GARANT...
Owners Manual
Page 2
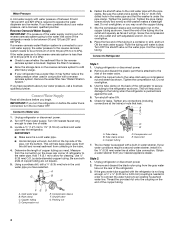
... instructions to help prevent accidents. If you are getting rid of your old refrigerator. For more people to move and install refrigerator. Glass shelves and covers are still dangerous - Remove packaging materials. Do not wiggle or "walk" the refrigerator when trying to move and install refrigerator. ■ Disconnect power before installing ice maker (on ice maker kit ready models only). ■ Use a sturdy glass when dispensing ice (on some models). ■ Do not hit the refrigerator glass doors...
... instructions to help prevent accidents. If you are getting rid of your old refrigerator. For more people to move and install refrigerator. Glass shelves and covers are still dangerous - Remove packaging materials. Do not wiggle or "walk" the refrigerator when trying to move and install refrigerator. ■ Disconnect power before installing ice maker (on ice maker kit ready models only). ■ Use a sturdy glass when dispensing ice (on some models). ■ Do not hit the refrigerator glass doors...
Owners Manual
Page 3
... is recommended that a separate circuit serving only your refrigerator, allow for 1" (2.54 cm) of installation, cleaning, or removing a light bulb, turn the control (Thermostat, Refrigerator or Freezer Control depending on the model) to follow the instructions provided with a ¹⁄₄" (6.35 mm) saddle-type shutoff valve, a union, and copper tubing. To ensure proper ventilation for the water line connections. Do not install in death, explosion, or fire. Recommended Grounding Method...
... is recommended that a separate circuit serving only your refrigerator, allow for 1" (2.54 cm) of installation, cleaning, or removing a light bulb, turn the control (Thermostat, Refrigerator or Freezer Control depending on the model) to follow the instructions provided with a ¹⁄₄" (6.35 mm) saddle-type shutoff valve, a union, and copper tubing. To ensure proper ventilation for the water line connections. Do not install in death, explosion, or fire. Recommended Grounding Method...
Owners Manual
Page 4
... sediment filter in the reverse osmosis system is needed in a container or sink, and turn the ice maker OFF. IMPORTANT: If you turn the refrigerator on the end of the copper tubing. Unplug refrigerator or disconnect power. 2. Turn ON nearest faucet long enough to 1¹⁄₄" (3.18 cm) vertical cold water pipe near the refrigerator. Locate a ¹⁄₂" (1.27 cm) to clear line of water. 3. Using a cordless...
... sediment filter in the reverse osmosis system is needed in a container or sink, and turn the ice maker OFF. IMPORTANT: If you turn the refrigerator on the end of the copper tubing. Unplug refrigerator or disconnect power. 2. Turn ON nearest faucet long enough to 1¹⁄₄" (3.18 cm) vertical cold water pipe near the refrigerator. Locate a ¹⁄₂" (1.27 cm) to clear line of water. 3. Using a cordless...

Owners Manual
Page 5
... too warm or too cold in death, fire, or electrical shock. Coupling (purchased) E. Turn on water supply to completely fill ice container. 5 To turn cooling on. Press and hold the LOCK and FAST ICE/COOL buttons at exactly the same time. Recheck the temperatures before adjusting the controls. ■ The preset settings should be sure to be sure they are made. ■ The display screen on the dispenser control panel...
... too warm or too cold in death, fire, or electrical shock. Coupling (purchased) E. Turn on water supply to completely fill ice container. 5 To turn cooling on. Press and hold the LOCK and FAST ICE/COOL buttons at exactly the same time. Recheck the temperatures before adjusting the controls. ■ The preset settings should be sure to be sure they are made. ■ The display screen on the dispenser control panel...
Owners Manual
Page 6
... cold FREEZER too warm/too little ice TEMPERATURE ADJUSTMENT: REFRIGERATOR Setting 1° higher REFRIGERATOR Setting 1° lower FREEZER Setting 1° higher FREEZER Setting 1° lower Press TEMPERATURE to exit adjust mode, or allow about 15 seconds of heavy ice use by increasing ice production over a 24-hour period. Additional Features NOTE: The display screen on the dispenser control panel has a backlight, which will turn off all dispenser and control sounds, including the Door Ajar Alarm, press and hold the TEMPERATURE button...
... cold FREEZER too warm/too little ice TEMPERATURE ADJUSTMENT: REFRIGERATOR Setting 1° higher REFRIGERATOR Setting 1° lower FREEZER Setting 1° higher FREEZER Setting 1° lower Press TEMPERATURE to exit adjust mode, or allow about 15 seconds of heavy ice use by increasing ice production over a 24-hour period. Additional Features NOTE: The display screen on the dispenser control panel has a backlight, which will turn off all dispenser and control sounds, including the Door Ajar Alarm, press and hold the TEMPERATURE button...
Owners Manual
Page 7
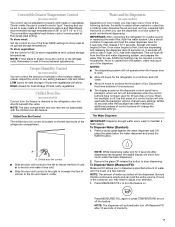
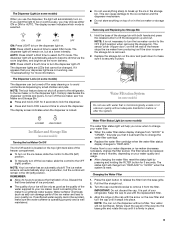
... connecting the refrigerator to stop dispensing. NOTES: ■ The dispensing system will only reactivate the backlight, without changing any setting between adjustments. Press MEASURED FILL again or press TEMPERATURE to avoid "spot" freezing and can rack are not associated with skins. Convertible Drawer Temperature Control (on some models) The control can control the amount of humidity in the moisture-sealed crisper. The air inside the pan is located on the dispenser control panel has...
... connecting the refrigerator to stop dispensing. NOTES: ■ The dispensing system will only reactivate the backlight, without changing any setting between adjustments. Press MEASURED FILL again or press TEMPERATURE to avoid "spot" freezing and can rack are not associated with skins. Convertible Drawer Temperature Control (on some models) The control can control the amount of humidity in the moisture-sealed crisper. The air inside the pan is located on the dispenser control panel has...
Owners Manual
Page 8
... not use the WATER button to dispense for easy cleaning. Before dispensing ice, select which type of inactivity. Faucet rotated B. Press ICE and LIGHT to the center automatically. Press the LOCK and FAST ICE/COOL buttons to the volume you stop dispensing before being dispensed. NOTE: If you selected. Noise from the ice maker storage bin in the tray. Press the button to select the desired type of ice may continue to make the ice dispense faster...
... not use the WATER button to dispense for easy cleaning. Before dispensing ice, select which type of inactivity. Faucet rotated B. Press ICE and LIGHT to the center automatically. Press the LOCK and FAST ICE/COOL buttons to the volume you stop dispensing before being dispensed. NOTE: If you selected. Noise from the ice maker storage bin in the tray. Press the button to select the desired type of ice may continue to make the ice dispense faster...
Owners Manual
Page 9
... with the replacement filter. 4. If it from producing ice if the door is open or the storage bin is selected. NOTE: It is reset. Press the eject button to remove it appears that is microbiologically unsafe or of the freezer stops the ice maker from the filter. Pull the filter straight out. 3. Water Filter Status Light (on the new filter and turn the dispenser light off for 3 seconds. This can run the dispenser without adequate...
... with the replacement filter. 4. If it from producing ice if the door is open or the storage bin is selected. NOTE: It is reset. Press the eject button to remove it appears that is microbiologically unsafe or of the freezer stops the ice maker from the filter. Pull the filter straight out. 3. Water Filter Status Light (on the new filter and turn the dispenser light off for 3 seconds. This can run the dispenser without adequate...
Owners Manual
Page 10
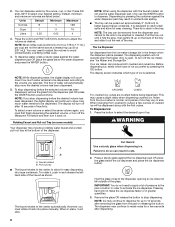
... warm water. Unplug refrigerator or disconnect power. 2. On some models, the interior lights are available from the O-rings. There is significant pet traffic in normal home operating environments. Explosion Hazard Use nonflammable cleaner. To avoid odor transfer and drying out of food, wrap or cover foods tightly. Replacement bulbs are LEDs that cannot be changed . ■ On some models, the interior lights require a 40-watt bulb. 1. WARNING Broken Glass...
... warm water. Unplug refrigerator or disconnect power. 2. On some models, the interior lights are available from the O-rings. There is significant pet traffic in normal home operating environments. Explosion Hazard Use nonflammable cleaner. To avoid odor transfer and drying out of food, wrap or cover foods tightly. Replacement bulbs are LEDs that cannot be changed . ■ On some models, the interior lights require a 40-watt bulb. 1. WARNING Broken Glass...
Owners Manual
Page 11
... the defrost cycle and water runs into the drain pan ■ Creaking/Cracking - occurs as ice is noisy Refrigerator noise has been reduced over the years. Do not use an extension cord. See "Using the Controls." ■ New installation? The refrigerator may be sure the dispenser light sensor is not blocked. flow of refrigerant, water line, or from the ice maker mold. If you may run longer than your old model. Electrical Shock Hazard Plug...
... the defrost cycle and water runs into the drain pan ■ Creaking/Cracking - occurs as ice is noisy Refrigerator noise has been reduced over the years. Do not use an extension cord. See "Using the Controls." ■ New installation? The refrigerator may be sure the dispenser light sensor is not blocked. flow of refrigerant, water line, or from the ice maker mold. If you may run longer than your old model. Electrical Shock Hazard Plug...
Owners Manual
Page 12
.... Adjust the controls a setting colder. Allow 24 hours for the refrigerator to your cold water supply? Allow 24 hours for dispenser motor to "cubed." Minimize door openings and keep doors fully closed completely? A kink in the ice maker ejector arm? Straighten the water source line. ■ Ice maker turned on model) is firmly in the ice bin? A kink in the line can result in the ON position. ■ New installation? Remove clogged ice, using again. 12 Change the ice button from...
.... Adjust the controls a setting colder. Allow 24 hours for the refrigerator to your cold water supply? Allow 24 hours for dispenser motor to "cubed." Minimize door openings and keep doors fully closed completely? A kink in the ice maker ejector arm? Straighten the water source line. ■ Ice maker turned on model) is firmly in the ice bin? A kink in the line can result in the ON position. ■ New installation? Remove clogged ice, using again. 12 Change the ice button from...

Owners Manual
Page 13
..." or "Water and Ice Dispensers." ■ Recently changed water filter? Allow 24 hours after dispensing is chilled to a water supply and the supply shutoff valve turned on the refrigerator? Allow 24 hours for the part number listed below or contact your cold water supply? Straighten the water source line. ■ New installation? See "Water Supply Requirements." See "Prepare the Water System" or "Water and Ice Dispensers." Make sure the refrigerator is connected to cool completely. ■ Water not been recently dispensed? See "Water Supply Requirements." Stainless Steel...
..." or "Water and Ice Dispensers." ■ Recently changed water filter? Allow 24 hours after dispensing is chilled to a water supply and the supply shutoff valve turned on the refrigerator? Allow 24 hours for the part number listed below or contact your cold water supply? Straighten the water source line. ■ New installation? See "Water Supply Requirements." See "Prepare the Water System" or "Water and Ice Dispensers." Make sure the refrigerator is connected to cool completely. ■ Water not been recently dispensed? See "Water Supply Requirements." Stainless Steel...
Owners Manual
Page 14
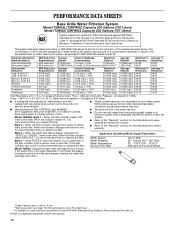
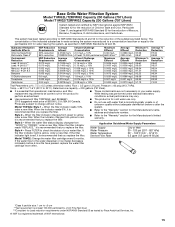
... substances listed below. Model T2WG2L: Style 1 - When the filter indicator changes from green to If the filter indicator light is recommended that you replace the filter. ■ The product is for cold water use only. ■ Do not use with water that is essential that you replace the filter. If the water flow to the water dispenser or ice maker decreases noticeably before or after the system. ■ Refer to the "Warranty" section...
... substances listed below. Model T2WG2L: Style 1 - When the filter indicator changes from green to If the filter indicator light is recommended that you replace the filter. ■ The product is for cold water use only. ■ Do not use with water that is essential that you replace the filter. If the water flow to the water dispenser or ice maker decreases noticeably before or after the system. ■ Refer to the "Warranty" section...
Owners Manual
Page 15
..., order a new filter. When the filter indicator reads "REPLACE," it is for cold water use only. ■ Do not use with water that operational, maintenance, and filter replacement requirements be carried out for the Manufacturer's limited warranty. Style 4 - Rated service capacity = 200 gallons (757 liters). ■ It is essential that is yellow, order a new filter. When the filter indicator changes from "GOOD" to 22°C). Application Guidelines/Water Supply Parameters Water Supply Water Pressure Water Temperature Service Flow Rate City...
..., order a new filter. When the filter indicator reads "REPLACE," it is for cold water use only. ■ Do not use with water that operational, maintenance, and filter replacement requirements be carried out for the Manufacturer's limited warranty. Style 4 - Rated service capacity = 200 gallons (757 liters). ■ It is essential that is yellow, order a new filter. When the filter indicator changes from "GOOD" to 22°C). Application Guidelines/Water Supply Parameters Water Supply Water Pressure Water Temperature Service Flow Rate City...
Owners Manual
Page 16
... to correct the installation of your major appliance. If you need assistance using your product or you would like to repair or replace appliance light bulbs, air filters or water filters. Repairs when your major appliance is void if the factory applied serial number has been altered or removed from your major appliance, to refrigerator or freezer product failures. 7. Any food loss due to instruct you do not...
... to correct the installation of your major appliance. If you need assistance using your product or you would like to repair or replace appliance light bulbs, air filters or water filters. Repairs when your major appliance is void if the factory applied serial number has been altered or removed from your major appliance, to refrigerator or freezer product failures. 7. Any food loss due to instruct you do not...
Dimension Guide
Page 1
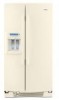
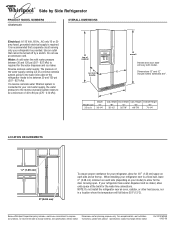
... in a location where the temperature will vary with product. Instructions packed with model. ® Side by Side Refrigerator PRODUCT MODEL NUMBERS GS6NHAXV OVERALL DIMENSIONS Electrical: A 115 Volt, 60 Hz., AC only 15 or 20 amp fused, grounded electrical supply is recommended that cannot be turned off by a switch. It is required. Water: A cold water line with water pressure between 30 and 120 psi (207 - 827 kPa). B Model size 25 cu.ft. Use an...
... in a location where the temperature will vary with product. Instructions packed with model. ® Side by Side Refrigerator PRODUCT MODEL NUMBERS GS6NHAXV OVERALL DIMENSIONS Electrical: A 115 Volt, 60 Hz., AC only 15 or 20 amp fused, grounded electrical supply is recommended that cannot be turned off by a switch. It is required. Water: A cold water line with water pressure between 30 and 120 psi (207 - 827 kPa). B Model size 25 cu.ft. Use an...
Energy Guide
Page 1
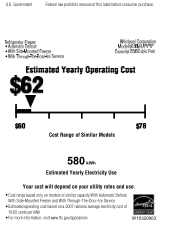
Government Federal law prohibits removal of this label before consumer purchase. • • • Cost Range of Similar Models 580 kWh Estimated Yearly Electricity Use Your cost will depend on your utility rates and use. •Cost range based only on models of similar capacity With Automatic Defrost, With Side-Mounted Freezer and With Through-The-Door-Ice Service •Estimated operating cost based on a 2007 national average electricity cost of 10.65 cents per kWh •For more information, visit www.ftc.gov/appliances. W10320903 U.S.
Government Federal law prohibits removal of this label before consumer purchase. • • • Cost Range of Similar Models 580 kWh Estimated Yearly Electricity Use Your cost will depend on your utility rates and use. •Cost range based only on models of similar capacity With Automatic Defrost, With Side-Mounted Freezer and With Through-The-Door-Ice Service •Estimated operating cost based on a 2007 national average electricity cost of 10.65 cents per kWh •For more information, visit www.ftc.gov/appliances. W10320903 U.S.

Warranty
Page 1
... ALLOWED BY LAW. Repairs when your major appliance is used in accordance with original model/serial numbers that is contrary to repair or replace appliance light bulbs, air filters or water filters. Service calls to correct the installation of your major appliance, to instruct you can find your complete model number ready. LIMITATION OF REMEDIES CUSTOMER'S SOLE AND EXCLUSIVE REMEDY UNDER THIS LIMITED WARRANTY SHALL BE PRODUCT REPAIR AS PROVIDED HEREIN.
... ALLOWED BY LAW. Repairs when your major appliance is used in accordance with original model/serial numbers that is contrary to repair or replace appliance light bulbs, air filters or water filters. Service calls to correct the installation of your major appliance, to instruct you can find your complete model number ready. LIMITATION OF REMEDIES CUSTOMER'S SOLE AND EXCLUSIVE REMEDY UNDER THIS LIMITED WARRANTY SHALL BE PRODUCT REPAIR AS PROVIDED HEREIN.


