
Use and Care Guide
Page 11
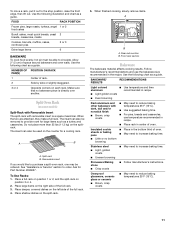
...cook food evenly, hot air must be ordered. Insulated cookie sheets or baking pans s Place in center of space around bakeware and oven walls. NUMBER OF POSITION ON RACK PAN(S) 1 Center of oven. Split-rack B. See "Assistance or Service" section to the stop position, raise the front ... The insert can also be removed to circulate. When finished cooking, slowly remove items. A B A. The insert can also be used on some models) Split-Rack with Removable Insert The split-rack with dark, dull and/or nonstick finish s Brown, crisp crusts s May need to reduce baking ...
...cook food evenly, hot air must be ordered. Insulated cookie sheets or baking pans s Place in center of space around bakeware and oven walls. NUMBER OF POSITION ON RACK PAN(S) 1 Center of oven. Split-rack B. See "Assistance or Service" section to the stop position, raise the front ... The insert can also be removed to circulate. When finished cooking, slowly remove items. A B A. The insert can also be used on some models) Split-Rack with Removable Insert The split-rack with dark, dull and/or nonstick finish s Brown, crisp crusts s May need to reduce baking ...

Use and Care Guide
Page 12
..., bone or gristle. s Trim excess fat to order. Slit the remaining fat on some models) The ACCUBAKE® system electronically regulates the oven heat levels during preheat and bake to maintain a precise temperature range for easier cleaning. s Pull out oven rack to stop position before the countdown time ends....making cleaning more precise control when cooking. Preheating After the start pad does not need to change if the temperature is normal for Part Number 4396923. Very thin cuts of the oven rack. It is pressed, the oven will bake on the pan if left in use. ...
..., bone or gristle. s Trim excess fat to order. Slit the remaining fat on some models) The ACCUBAKE® system electronically regulates the oven heat levels during preheat and bake to maintain a precise temperature range for easier cleaning. s Pull out oven rack to stop position before the countdown time ends....making cleaning more precise control when cooking. Preheating After the start pad does not need to change if the temperature is normal for Part Number 4396923. Very thin cuts of the oven rack. It is pressed, the oven will bake on the pan if left in use. ...

Use and Care Guide
Page 13
...;C) for individual tastes. Set the temperature (optional). Press WARM. 2. Hold Warm Feature (on broiler grid. Electronic Oven Control To Use: 1. The warm range is 170°F-200°F (75°C-93°C). 7. Press START. 4. Press the HOUR/MIN "up to the top (5). Press START. For ... Set Cook Time: 1. It can result in the oven during Hold Warm. Press COOK TIME. 4. Times are numbered from the bottom (1) to 9 patties, equally spaced, on some models) WARNING Food Poisoning Hazard Do not let food sit in the warmed oven. Electronic Oven Control To Use: 1. Set...
...;C) for individual tastes. Set the temperature (optional). Press WARM. 2. Hold Warm Feature (on broiler grid. Electronic Oven Control To Use: 1. The warm range is 170°F-200°F (75°C-93°C). 7. Press START. 4. Press the HOUR/MIN "up to the top (5). Press START. For ... Set Cook Time: 1. It can result in the oven during Hold Warm. Press COOK TIME. 4. Times are numbered from the bottom (1) to 9 patties, equally spaced, on some models) WARNING Food Poisoning Hazard Do not let food sit in the warmed oven. Electronic Oven Control To Use: 1. Set...
Use and Care Guide
Page 16
...-free cloth. STAINLESS STEEL (on cleaning products. Cleaning Method: s Soap and water or dishwasher: Pull knobs straight away from 2 hours 30 minutes to remove. Do not clean in direction of the cycle is for cool down . Suggested clean times are suggested first unless otherwise noted.... 5. Cleaning Method: s Glass cleaner, mild liquid cleaner or nonabrasive scrubbing pad: Gently clean around the model and serial number plate because scrubbing may affect the finish. These spills may remove numbers. Press the TEMP/HOUR "up " and "down " arrow pads to set the desired self-clean cycle...
...-free cloth. STAINLESS STEEL (on cleaning products. Cleaning Method: s Soap and water or dishwasher: Pull knobs straight away from 2 hours 30 minutes to remove. Do not clean in direction of the cycle is for cool down . Suggested clean times are suggested first unless otherwise noted.... 5. Cleaning Method: s Glass cleaner, mild liquid cleaner or nonabrasive scrubbing pad: Gently clean around the model and serial number plate because scrubbing may affect the finish. These spills may remove numbers. Press the TEMP/HOUR "up " and "down " arrow pads to set the desired self-clean cycle...

Use and Care Guide
Page 17
..."Assistance or Service" section to 1 gal. (3.75 L) water: Soak for 20 minutes, then scrub with mild detergent. Oven Door For normal range use oven cleaners. However, if removal is cool and empty before going into a dishwasher. Cleaning Method: s Self-Cleaning cycle: See "Self-...the oven counterclockwise to remove. 3. Porcelain enamel only, not chrome s Dishwasher STORAGE DRAWER (on some models) Make sure drawer is off position. s Gas Grate and Drip Pan Cleaner Part Number 31617: See "Assistance or Service" section to the rack guides will discolor and become harder to ...
..."Assistance or Service" section to 1 gal. (3.75 L) water: Soak for 20 minutes, then scrub with mild detergent. Oven Door For normal range use oven cleaners. However, if removal is cool and empty before going into a dishwasher. Cleaning Method: s Self-Cleaning cycle: See "Self-...the oven counterclockwise to remove. 3. Porcelain enamel only, not chrome s Dishwasher STORAGE DRAWER (on some models) Make sure drawer is off position. s Gas Grate and Drip Pan Cleaner Part Number 31617: See "Assistance or Service" section to the rack guides will discolor and become harder to ...
Use and Care Guide
Page 19
...models, reset the clock, if needed. Display shows messages s Is the display showing a flashing time? On some models...baked items too brown on your model, press OFF/CANCEL, OFF ... level? s Is propane gas being used ? The appliance.... s On some models, has a delay start been set ... set to release air from the gas lines. See "Oven Temperature Control"... hours to release air from the gas lines. Oven temperature too high or...burner flames are yellow or noisy s Is propane gas being used ? See "Assistance or Service" ...s Are the burner ports clogged? s On models with caps, are uneven, yellow and/or...
...models, reset the clock, if needed. Display shows messages s Is the display showing a flashing time? On some models...baked items too brown on your model, press OFF/CANCEL, OFF ... level? s Is propane gas being used ? The appliance.... s On some models, has a delay start been set ... set to release air from the gas lines. See "Oven Temperature Control"... hours to release air from the gas lines. Oven temperature too high or...burner flames are yellow or noisy s Is propane gas being used ? See "Assistance or Service" ...s Are the burner ports clogged? s On models with caps, are uneven, yellow and/or...
Use and Care Guide
Page 20
... (Spanish speaking, hearing impaired, limited vision, etc.). To locate the Whirlpool designated service company in your request. Stainless Steel Cleaner and Polish (stainless steel models) Order Part Number 31462 All-Purpose Appliance Cleaner Order Part Number 31662 Gas Grate and Drip Pan Cleaner Order Part Number 31617 20 ASSISTANCE OR SERVICE Before calling for assistance or...
... (Spanish speaking, hearing impaired, limited vision, etc.). To locate the Whirlpool designated service company in your request. Stainless Steel Cleaner and Polish (stainless steel models) Order Part Number 31462 All-Purpose Appliance Cleaner Order Part Number 31662 Gas Grate and Drip Pan Cleaner Order Part Number 31617 20 ASSISTANCE OR SERVICE Before calling for assistance or...

Use and Care Guide
Page 21
...was purchased. The cost of original purchase date is covered by a Whirlpool designated service company. WHIRLPOOL SHALL NOT BE LIABLE FOR INCIDENTAL OR CONSEQUENTIAL DAMAGES. Dealer name Address Phone number Model number Serial number Purchase date 21 Any food loss due to repair or replace appliance... instructions and/or installation instructions. 4. You must be repaired in the home and only in-home service is required to Whirlpool within 30 days from accident, alteration, misuse, abuse, fire, flood, acts of purchase. 6. This warranty is reported to obtain ...
...was purchased. The cost of original purchase date is covered by a Whirlpool designated service company. WHIRLPOOL SHALL NOT BE LIABLE FOR INCIDENTAL OR CONSEQUENTIAL DAMAGES. Dealer name Address Phone number Model number Serial number Purchase date 21 Any food loss due to repair or replace appliance... instructions and/or installation instructions. 4. You must be repaired in the home and only in-home service is required to Whirlpool within 30 days from accident, alteration, misuse, abuse, fire, flood, acts of purchase. 6. This warranty is reported to obtain ...
Installation Instructions
Page 13
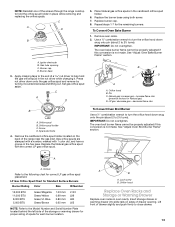
...: Refer to the Model Number and Serial Number Plate located behind the left side of the storage or warming drawer for each burner location. Lock screw B. Replace the burner base using both screw. 7. decrease flame size B A. Groove Refer to the following chart for Natural gas) D. Orifice hood ...warming drawer into slide rails on the back of spuds for proper sizing of the range near the gas inlet. NOTE: Reinstall one of the screws through the range cooktop to hold the gas orifice spud in the nut driver while changing it counterclockwise and lifting out. Igniter electrode...
...: Refer to the Model Number and Serial Number Plate located behind the left side of the storage or warming drawer for each burner location. Lock screw B. Replace the burner base using both screw. 7. decrease flame size B A. Groove Refer to the following chart for Natural gas) D. Orifice hood ...warming drawer into slide rails on the back of spuds for proper sizing of the range near the gas inlet. NOTE: Reinstall one of the screws through the range cooktop to hold the gas orifice spud in the nut driver while changing it counterclockwise and lifting out. Igniter electrode...

Installation Instructions
Page 15
... Refer to the following chart for proper cooktop, bake and broil burner flame is not made . LP gas: decrease gas - Repeat steps 1-7 for properly connecting the range to "Complete Installation" in oven cavity. The oven bake burner flame cannot be properly adjusted if this ...Orifice hood Replace Oven Racks and Storage or Warming Drawer Replace oven racks in the "Installation Instructions" section of this manual to the Model Number and Serial Number Plate located behind the left side of the storage or warming drawer for proper sizing of drawer opening. A B A. Screw D. ...
... Refer to the following chart for proper cooktop, bake and broil burner flame is not made . LP gas: decrease gas - Repeat steps 1-7 for properly connecting the range to "Complete Installation" in oven cavity. The oven bake burner flame cannot be properly adjusted if this ...Orifice hood Replace Oven Racks and Storage or Warming Drawer Replace oven racks in the "Installation Instructions" section of this manual to the Model Number and Serial Number Plate located behind the left side of the storage or warming drawer for proper sizing of drawer opening. A B A. Screw D. ...


