
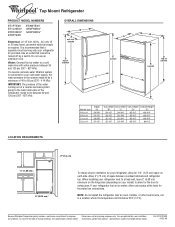
Dimension Guide
Page 1
... for your model) to allow for 1⁄ 2" (1.25 cm) space on each side. NOTE: Do not install the refrigerator near an oven, radiator, or other heat source, nor in a location where the temperature will fall below 55°F (... ft. 21 cu. Because Whirlpool Corporation policy includes a continuous commitment to the water inlet valve of cabinet Model size 18 cu. Specifications subject to a cold water line with product. If your refrigerator be turned off by a ...kPa). Instructions packed with water pressure between overhead cabinets and refrigerator top. ft. 19 cu. ft.
... for your model) to allow for 1⁄ 2" (1.25 cm) space on each side. NOTE: Do not install the refrigerator near an oven, radiator, or other heat source, nor in a location where the temperature will fall below 55°F (... ft. 21 cu. Because Whirlpool Corporation policy includes a continuous commitment to the water inlet valve of cabinet Model size 18 cu. Specifications subject to a cold water line with product. If your refrigerator be turned off by a ...kPa). Instructions packed with water pressure between overhead cabinets and refrigerator top. ft. 19 cu. ft.
User Instructions
Page 1
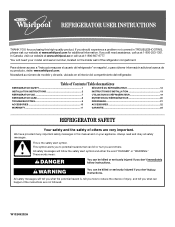
...201; DU RÉFRIGÉRATEUR 12 INSTRUCTIONS D'INSTALLATION 13 UTILISATION DU RÉFRIGÉRATEUR 19 ENTRETIEN DU RÉFRIGÉRATEUR 20 DÉPANNAGE 21 ACCESSOIRES 22 GARANTIE 23 REFRIGERATOR SAFETY Your safety and the safety of others . Always read and obey all safety messages. All safety...acceso a "Instrucciones para el usuario del refrigerador" en español, o para obtener información adicional acerca de su producto, visite: www.whirlpool.com. Necesitará su número de modelo y de serie, ubicado en el interior del compartimiento del refrigerador.
...201; DU RÉFRIGÉRATEUR 12 INSTRUCTIONS D'INSTALLATION 13 UTILISATION DU RÉFRIGÉRATEUR 19 ENTRETIEN DU RÉFRIGÉRATEUR 20 DÉPANNAGE 21 ACCESSOIRES 22 GARANTIE 23 REFRIGERATOR SAFETY Your safety and the safety of others . Always read and obey all safety messages. All safety...acceso a "Instrucciones para el usuario del refrigerador" en español, o para obtener información adicional acerca de su producto, visite: www.whirlpool.com. Necesitará su número de modelo y de serie, ubicado en el interior del compartimiento del refrigerador.
User Instructions
Page 2
... entrapment and suffocation are still dangerous - Failure to do so can result in back or other injury. Always pull the refrigerator straight out when moving the refrigerator for cleaning or service, be sure to cover the floor with warm water when they will sit for "just a few...occur. These products can result in death or brain damage. Glass shelves and covers are getting rid of your refrigerator before operating. ■ Remove doors from your old refrigerator. When moving it. Remove the Packaging Do not use an extension cord. ■ Disconnect power before installing ...
... entrapment and suffocation are still dangerous - Failure to do so can result in back or other injury. Always pull the refrigerator straight out when moving the refrigerator for cleaning or service, be sure to cover the floor with warm water when they will sit for "just a few...occur. These products can result in death or brain damage. Glass shelves and covers are getting rid of your refrigerator before operating. ■ Remove doors from your old refrigerator. When moving it. Remove the Packaging Do not use an extension cord. ■ Disconnect power before installing ...
User Instructions
Page 3
... Electrical Requirements WARNING Electrical Shock Hazard Plug into its final location, it is important to OFF and then disconnect the refrigerator from refrigerator. If the water pressure to the reverse osmosis system is required to be provided. IMPORTANT: If you have the... water pressure, call a licensed, qualified plumber. Connect the Water Supply Read all directions before you are finished, reconnect the refrigerator to Water Line 1. Location Requirements WARNING Explosion Hazard Keep flammable materials and vapors, such as gasoline, away from the electrical source...
... Electrical Requirements WARNING Electrical Shock Hazard Plug into its final location, it is important to OFF and then disconnect the refrigerator from refrigerator. If the water pressure to the reverse osmosis system is required to be provided. IMPORTANT: If you have the... water pressure, call a licensed, qualified plumber. Connect the Water Supply Read all directions before you are finished, reconnect the refrigerator to Water Line 1. Location Requirements WARNING Explosion Hazard Keep flammable materials and vapors, such as gasoline, away from the electrical source...
User Instructions
Page 4
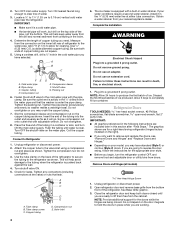
...wall. 4. Flush the tubing until you may crush the copper tubing. 7. Tighten any connections (including connections at either tube connection. Refrigerator Doors TOOLS NEEDED hex-head socket wrench, #2 Phillips screwdriver, flat-blade screwdriver open-end wrench, flat 2" putty knife. Do ...supply. Allow 3 days to follow the instructions for the appropriate door style. ■ Before you may have selected. Unplug refrigerator or disconnect power. 2. Be sure both doors closed until water is equipped with the pipe clamp. Complete the Installation WARNING ...
...wall. 4. Flush the tubing until you may crush the copper tubing. 7. Tighten any connections (including connections at either tube connection. Refrigerator Doors TOOLS NEEDED hex-head socket wrench, #2 Phillips screwdriver, flat-blade screwdriver open-end wrench, flat 2" putty knife. Do ...supply. Allow 3 days to follow the instructions for the appropriate door style. ■ Before you may have selected. Unplug refrigerator or disconnect power. 2. Be sure both doors closed until water is equipped with the pipe clamp. Complete the Installation WARNING ...
User Instructions
Page 5
... shown. Position the freezer handle on opposite side of the handle and drive the bottom screw. 8. Tighten all parts together. Remove the refrigerator handle assembly as shown. Keep all screws. See Graphic 6-3. 3. Remove the door handle sealing screws. Remove the door stop . Reverse...Handle Screw Door Handle Screw Cover Door Handle Seal Screw Front Round-Head Handle Screw Cabinet 1. See Graphic 2. 2. Remove refrigerator handle bottom trim. Align refrigerator bottom trim. Doors 1. See Base Grille graphic. Do not use an extension cord. For Style 1, remove the handle ...
... shown. Position the freezer handle on opposite side of the handle and drive the bottom screw. 8. Tighten all parts together. Remove the refrigerator handle assembly as shown. Keep all screws. See Graphic 6-3. 3. Remove the door handle sealing screws. Remove the door stop . Reverse...Handle Screw Door Handle Screw Cover Door Handle Seal Screw Front Round-Head Handle Screw Cabinet 1. See Graphic 2. 2. Remove refrigerator handle bottom trim. Align refrigerator bottom trim. Doors 1. See Base Grille graphic. Do not use an extension cord. For Style 1, remove the handle ...
User Instructions
Page 6
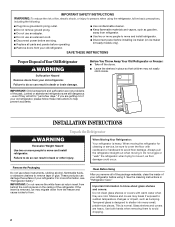
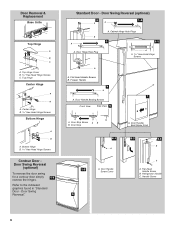
... door swing for a contour door simply 1-1 reverse the hinges. Door Hinge Hole Plug A. Cabinet Hinge Hole Plugs 3 1-1 1 A A Hex-Head Hinge Screws A A. Door Handle Screw Cover 6-2 A 6-3 B C A. Refrigerator Handle C. Door Swing Reversal (optional) 2 1-2 A A B A A. Flat-Head Handle Screw B. Door Swing Reversal." Door Handle Seal Screw Front 6-1 A 1-2 A. Handle Screw 5 6 Door Handle Sealing Screws Front View...
... door swing for a contour door simply 1-1 reverse the hinges. Door Hinge Hole Plug A. Cabinet Hinge Hole Plugs 3 1-1 1 A A Hex-Head Hinge Screws A A. Door Handle Screw Cover 6-2 A 6-3 B C A. Refrigerator Handle C. Door Swing Reversal (optional) 2 1-2 A A B A A. Flat-Head Handle Screw B. Door Swing Reversal." Door Handle Seal Screw Front 6-1 A 1-2 A. Handle Screw 5 6 Door Handle Sealing Screws Front View...
User Instructions
Page 7
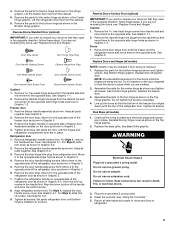
... milk or juice is as cold as a guide. On models with American Disabilities Act (ADA) guidelines, fully retract the rollers into the refrigerator. ■ If you put a spacer between adjustments and then recheck the temperatures. Have someone push against the top of the front roller... assemblies which are not blocked. Adjusting Controls The mid-settings indicated in "Refrigerator Doors." If your doors looks uneven, you tighten the top hinge screws. 4. See the Base Grille graphic in the previous section ...
... milk or juice is as cold as a guide. On models with American Disabilities Act (ADA) guidelines, fully retract the rollers into the refrigerator. ■ If you put a spacer between adjustments and then recheck the temperatures. Have someone push against the top of the front roller... assemblies which are not blocked. Adjusting Controls The mid-settings indicated in "Refrigerator Doors." If your doors looks uneven, you tighten the top hinge screws. 4. See the Base Grille graphic in the previous section ...

User Instructions
Page 8
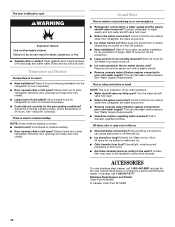
... buildup of ice in a 24-hour period in a 24-hour period. ■ To increase ice production, lower the freezer and refrigerator temperature. Do not use abrasive or harsh cleaners such as window sprays, scouring cleansers, flammable fluids, muriatic acid, cleaning waxes, concentrated ...condenser: ■ Remove the base grille. ■ Use a vacuum cleaner with a clean, soft cloth or sponge and a mild detergent in refrigerator or reconnect power. 8 As ice is no need to ensure maximum efficiency. Clean the exterior surfaces. However, clean both sections to a softened water...
... buildup of ice in a 24-hour period in a 24-hour period. ■ To increase ice production, lower the freezer and refrigerator temperature. Do not use abrasive or harsh cleaners such as window sprays, scouring cleansers, flammable fluids, muriatic acid, cleaning waxes, concentrated ...condenser: ■ Remove the base grille. ■ Use a vacuum cleaner with a clean, soft cloth or sponge and a mild detergent in refrigerator or reconnect power. 8 As ice is no need to ensure maximum efficiency. Clean the exterior surfaces. However, clean both sections to a softened water...
User Instructions
Page 9
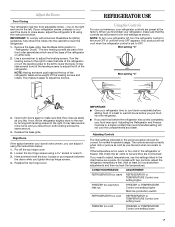
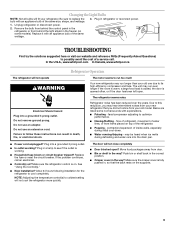
... during initial cool-down. ■ Water running/dripping - If the problem continues, call . In the U.S.A., www.whirlpool.com In Canada, www.whirlpool.ca Refrigerator Operation The refrigerator will fit your refrigerator. Failure to run too much Your new refrigerator may run longer than your old model. The unit may run even longer if the room is...
... during initial cool-down. ■ Water running/dripping - If the problem continues, call . In the U.S.A., www.whirlpool.com In Canada, www.whirlpool.ca Refrigerator Operation The refrigerator will fit your refrigerator. Failure to run too much Your new refrigerator may run longer than your old model. The unit may run even longer if the room is...
User Instructions
Page 10
... filtration system connected to your cold water supply? Allow several hours for the surrounding conditions? Adjust the control(s) a setting colder. Connect refrigerator to water supply and turn water shutoff valve fully open ? Remove ice from food? See "Water Supply Requirements." Call a licensed, ... proof packaging to your authorized Whirlpool dealer. Allows warm air to a water supply and the supply shutoff valve turned on? Ice and Water The ice maker is not producing ice or not enough ice ■ Refrigerator connected to enter refrigerator. This can reduce water flow...
... filtration system connected to your cold water supply? Allow several hours for the surrounding conditions? Adjust the control(s) a setting colder. Connect refrigerator to water supply and turn water shutoff valve fully open ? Remove ice from food? See "Water Supply Requirements." Call a licensed, ... proof packaging to your authorized Whirlpool dealer. Allows warm air to a water supply and the supply shutoff valve turned on? Ice and Water The ice maker is not producing ice or not enough ice ■ Refrigerator connected to enter refrigerator. This can reduce water flow...
User Instructions
Page 11
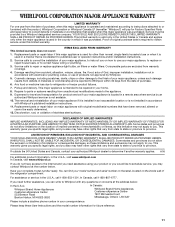
... not approved by an authorized Whirlpool servicer is not available. 10. Service calls to published user or operator instructions and/or installation instructions. 2. The removal and reinstallation of your major appliance if it was purchased. Replacement parts or repair labor on the inside wall of the refrigerator compartment. Some states and provinces...
... not approved by an authorized Whirlpool servicer is not available. 10. Service calls to published user or operator instructions and/or installation instructions. 2. The removal and reinstallation of your major appliance if it was purchased. Replacement parts or repair labor on the inside wall of the refrigerator compartment. Some states and provinces...
Parts Diagram
Page 1
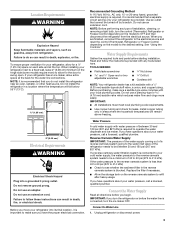
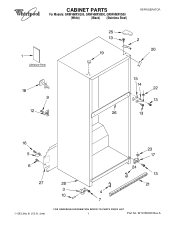
CABINET PARTS For Models: GR9FHMXVQ00, GR9FHMXVB00, GR9FHMXVS00 (White) (Black) (Stainless Steel) REFRIGERATOR 1−08 Litho In U.S.A. (rrm) 1 Part No. W10180450 Rev.A
CABINET PARTS For Models: GR9FHMXVQ00, GR9FHMXVB00, GR9FHMXVS00 (White) (Black) (Stainless Steel) REFRIGERATOR 1−08 Litho In U.S.A. (rrm) 1 Part No. W10180450 Rev.A
Parts Diagram
Page 10
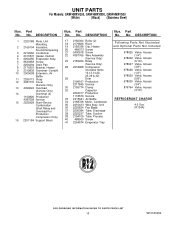
... GR9FHMXVS00 (White) (Black) (Stainless Steel) Illus. Part No. No. DESCRIPTION 17 2150304 Roller (2) 18 2179826 Rivet 19 2182338 Clip, Heater 20 489373 Screw 21 3400518 Screw 22 4387765 Wire Assembly (Service Only) 23 2183454 Relay (Service Only... Access (5/16") 978027 Valve, Access (3/8") 978028 Valve, Access (1/2") 978029 Valve, Access (5/8") 978030 Valve, Access (3/4") 876764 Valve, Access (3/16") REFRIGERANT CHARGE 4.0 Ozs. (R134A) 10 W10180450 No. DESCRIPTION 1 2320188 Plate, Unit Mounting 2 2169104 Insulation, Sound Dampening 3 2214960 Condenser 4 2315531 Heater...
... GR9FHMXVS00 (White) (Black) (Stainless Steel) Illus. Part No. No. DESCRIPTION 17 2150304 Roller (2) 18 2179826 Rivet 19 2182338 Clip, Heater 20 489373 Screw 21 3400518 Screw 22 4387765 Wire Assembly (Service Only) 23 2183454 Relay (Service Only... Access (5/16") 978027 Valve, Access (3/8") 978028 Valve, Access (1/2") 978029 Valve, Access (5/8") 978030 Valve, Access (3/4") 876764 Valve, Access (3/16") REFRIGERANT CHARGE 4.0 Ozs. (R134A) 10 W10180450 No. DESCRIPTION 1 2320188 Plate, Unit Mounting 2 2169104 Insulation, Sound Dampening 3 2214960 Condenser 4 2315531 Heater...

