
Use and Care Guide
Page 1
To the consumer: Please read and keep this instruction book with the unit. ® ELECTRIC RANGE Use & Care Guide For questions about features, operation/performance, parts, accessories or service, call: 1-800-253-1301 or visit our website at...www.whirlpool.com Table of Contents ...2 To the installer: Please leave this book for future reference. 9763001
To the consumer: Please read and keep this instruction book with the unit. ® ELECTRIC RANGE Use & Care Guide For questions about features, operation/performance, parts, accessories or service, call: 1-800-253-1301 or visit our website at...www.whirlpool.com Table of Contents ...2 To the installer: Please leave this book for future reference. 9763001
Use and Care Guide
Page 2
TABLE OF CONTENTS RANGE SAFETY ...3 The Anti-Tip Bracket ...3 PARTS AND FEATURES...5 COOKTOP USE ...8 Cooktop Controls...8 Dual Cooking Zone ...8 Warm Zone Element ...8 Ceramic Glass ...9 Coil Elements and Burner Bowls ...9 Lift-up Cooktop ...10 Home Canning ......
TABLE OF CONTENTS RANGE SAFETY ...3 The Anti-Tip Bracket ...3 PARTS AND FEATURES...5 COOKTOP USE ...8 Cooktop Controls...8 Dual Cooking Zone ...8 Warm Zone Element ...8 Ceramic Glass ...9 Coil Elements and Burner Bowls ...9 Lift-up Cooktop ...10 Home Canning ......
Use and Care Guide
Page 4
...in use a towel or other utensils. Always place oven racks in color. The door gasket is equipped with ventilating hood - s Clean Only Parts Listed in cabinets above a range or on hood or filter. Remove broiler pan and other bulky cloth. s CAUTION: Do not store items ...seal. s Do Not Heat Unopened Food Containers - s Do Not Clean Door Gasket - No commercial oven cleaner or oven liner protective coating of any part of an oven become hot enough to cool. s Clean Ventilating Hoods Frequently - s Proper Installation - Do not let potholder touch hot heating elements. Among...
...in use a towel or other utensils. Always place oven racks in color. The door gasket is equipped with ventilating hood - s Clean Only Parts Listed in cabinets above a range or on hood or filter. Remove broiler pan and other bulky cloth. s CAUTION: Do not store items ...seal. s Do Not Heat Unopened Food Containers - s Do Not Clean Door Gasket - No commercial oven cleaner or oven liner protective coating of any part of an oven become hot enough to cool. s Clean Ventilating Hoods Frequently - s Proper Installation - Do not let potholder touch hot heating elements. Among...
Use and Care Guide
Page 5
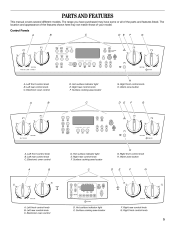
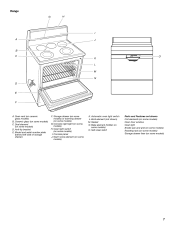
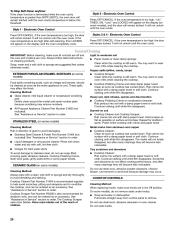
... oven control D. Right front control knob 5 Left front control knob B. Electronic oven control D. Warm zone button A B C D E F G H A. Surface cooking area locator G. Left front control knob B. PARTS AND FEATURES This manual covers several different models. The range you have purchased may not match those of the... parts and features listed. Surface cooking area locator G. Hot surface indicator light E. Left rear control knob C. Electronic oven ...
... oven control D. Right front control knob 5 Left front control knob B. Electronic oven control D. Warm zone button A B C D E F G H A. Surface cooking area locator G. Left front control knob B. PARTS AND FEATURES This manual covers several different models. The range you have purchased may not match those of the... parts and features listed. Surface cooking area locator G. Hot surface indicator light E. Left rear control knob C. Electronic oven ...
Use and Care Guide
Page 7
...) or warming drawer (on some models) D. Console panel J. Range G H I . Dual element (on some models) H. Automatic oven light switch L. Anti-tip bracket E. Gasket N. Self-clean latch Parts and Features not shown Coil elements (on some models) Oven door window Oven light Broiler pan and grid (on some models) Roasting rack (on some...
...) or warming drawer (on some models) D. Console panel J. Range G H I . Dual element (on some models) H. Automatic oven light switch L. Anti-tip bracket E. Gasket N. Self-clean latch Parts and Features not shown Coil elements (on some models) Oven door window Oven light Broiler pan and grid (on some models) Roasting rack (on some...
Use and Care Guide
Page 9
... burner bowls, make sure they can adhere to turn off . Cookware/canner C. ½" (1.3 cm) Maximum overhang s Cover all spills and soils as soon as any part of pots and pans are hot. s Do not store jars or cans above the cooktop. They could leave scratches or marks on the cooktop. Cookware...
... burner bowls, make sure they can adhere to turn off . Cookware/canner C. ½" (1.3 cm) Maximum overhang s Cover all spills and soils as soon as any part of pots and pans are hot. s Do not store jars or cans above the cooktop. They could leave scratches or marks on the cooktop. Cookware...
Use and Care Guide
Page 16
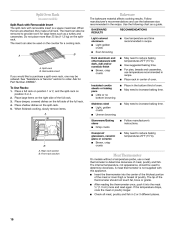
... purchase a split-oven rack, one may be used on the split-rack. 5. Place large items on position 3 or 4. 2. Place shallow dishes on the counter for Part Number 4396927. s Insert the thermometer into the meat ½" (1.3 cm) more than 25 lbs (11.3 kg) on the left side of oven. The tip of...
... purchase a split-oven rack, one may be used on the split-rack. 5. Place large items on position 3 or 4. 2. Place shallow dishes on the counter for Part Number 4396927. s Insert the thermometer into the meat ½" (1.3 cm) more than 25 lbs (11.3 kg) on the left side of oven. The tip of...
Use and Care Guide
Page 18
..., position rack according to stop position before putting food in unless recommended in the heated oven, making cleaning more precise control when cooking. Ask for Part Number 4396923. Use tongs to turn food to order. After broiling, remove the pan from the broil element. Open door to broil stop position to...
..., position rack according to stop position before putting food in unless recommended in the heated oven, making cleaning more precise control when cooking. Ask for Part Number 4396923. Use tongs to turn food to order. After broiling, remove the pan from the broil element. Open door to broil stop position to...
Use and Care Guide
Page 26
... the cooktop is too high, the door will remain locked. Continue rubbing until the oven completely cools. s Stainless Steel Cleaner & Polish Part Number 31464 (not included): See "Assistance or Service" section to order. See "Assistance or Service" section to order. Do not use...noticeable. s STAINLESS STEEL (on soil Cooktop Cleaner and Cooktop Scraper: Rub creme into surface with damp paper towel. Cooktop Cleaner Part Number 31464 is below this threshold. Electronic Oven Control Press OFF/CANCEL. Always follow label instructions on the display until white film...
... the cooktop is too high, the door will remain locked. Continue rubbing until the oven completely cools. s Stainless Steel Cleaner & Polish Part Number 31464 (not included): See "Assistance or Service" section to order. See "Assistance or Service" section to order. Do not use...noticeable. s STAINLESS STEEL (on soil Cooktop Cleaner and Cooktop Scraper: Rub creme into surface with damp paper towel. Cooktop Cleaner Part Number 31464 is below this threshold. Electronic Oven Control Press OFF/CANCEL. Always follow label instructions on the display until white film...
Use and Care Guide
Page 27
...mild detergent. STORAGE DRAWER (on some models) Cleaning Method: s Damp cloth: Make sure control knobs are cool. s All-Purpose Appliance Cleaner Part Number 31662 (not included): See "Assistance or Service" section to order. Cleaning Method: s Mild detergent (for 20 minutes, then scrub with ... If this happens, a light coating of vegetable oil applied to 1 gal. (3.75 L) water: Soak for both) s All-Purpose Appliance Cleaner Part Number 31662 (not included): See "Assistance or Service" section to order. For more information, see "Storage Drawer" section. Do not use oven ...
...mild detergent. STORAGE DRAWER (on some models) Cleaning Method: s Damp cloth: Make sure control knobs are cool. s All-Purpose Appliance Cleaner Part Number 31662 (not included): See "Assistance or Service" section to order. Cleaning Method: s Mild detergent (for 20 minutes, then scrub with ... If this happens, a light coating of vegetable oil applied to 1 gal. (3.75 L) water: Soak for both) s All-Purpose Appliance Cleaner Part Number 31662 (not included): See "Assistance or Service" section to order. For more information, see "Storage Drawer" section. Do not use oven ...
Use and Care Guide
Page 31
... a daytime phone number in your area, call us to better respond to build every new WHIRLPOOL® appliance. To locate FSP® replacement parts in your request. Accessory and repair parts sales. Gas Grate and Drip Pan Cleaner Order Part Number 31617 Split-Rack with : s s s s s Features and specifications on "Buy Accessories Online." Accessories U.S.A. Call...
... a daytime phone number in your area, call us to better respond to build every new WHIRLPOOL® appliance. To locate FSP® replacement parts in your request. Accessory and repair parts sales. Gas Grate and Drip Pan Cleaner Order Part Number 31617 Split-Rack with : s s s s s Features and specifications on "Buy Accessories Online." Accessories U.S.A. Call...
Use and Care Guide
Page 32
... light bulbs, air filters or water filters. Repairs to parts or systems resulting from warranty coverage. 3. Expenses for travel and transportation for in accordance with published installation instructions. WHIRLPOOL CORPORATION MAJOR APPLIANCE WARRANTY ONE YEAR LIMITED WARRANTY For one .... 6. Damage resulting from accident, alteration, misuse, abuse, fire, flood, acts of products not approved by a Whirlpool designated service company. Replacement parts or repair labor costs for other than normal, single-family household use your major appliance, to replace or repair house...
... light bulbs, air filters or water filters. Repairs to parts or systems resulting from warranty coverage. 3. Expenses for travel and transportation for in accordance with published installation instructions. WHIRLPOOL CORPORATION MAJOR APPLIANCE WARRANTY ONE YEAR LIMITED WARRANTY For one .... 6. Damage resulting from accident, alteration, misuse, abuse, fire, flood, acts of products not approved by a Whirlpool designated service company. Replacement parts or repair labor costs for other than normal, single-family household use your major appliance, to replace or repair house...

Installation Instructions
Page 1
... installation instructions for local electrical inspector's use. 9762996 INSTALLATION INSTRUCTIONS 30" (76 CM) FREESTANDING ELECTRIC RANGES Table of Contents RANGE SAFETY 1 INSTALLATION REQUIREMENTS 2 Tools and Parts 2 Location Requirements 2 Electrical Requirements 4 INSTALLATION INSTRUCTIONS 4 Unpack Range 4 Install Anti-Tip Bracket 5 Electrical Connection 6 Verify Anti-Tip Bracket Location 9 Level Range 10 Complete Installation 10...
... installation instructions for local electrical inspector's use. 9762996 INSTALLATION INSTRUCTIONS 30" (76 CM) FREESTANDING ELECTRIC RANGES Table of Contents RANGE SAFETY 1 INSTALLATION REQUIREMENTS 2 Tools and Parts 2 Location Requirements 2 Electrical Requirements 4 INSTALLATION INSTRUCTIONS 4 Unpack Range 4 Install Anti-Tip Bracket 5 Electrical Connection 6 Verify Anti-Tip Bracket Location 9 Level Range 10 Complete Installation 10...

Installation Instructions
Page 2
...supply cord or cable must be located for convenient use the Standard for Mobile Home Construction and Safety, Title 24, HUD Part 280). Read and follow the instructions provided with installation clearances specified on the oven frame behind the storage drawer panel. Thickness ... Requirements" section. Failure to meet codes and ordinances could lead to the Manufactured Home Construction and Safety Standard, Title 24 CFR, Part 3280 (formerly the Federal Standard for Manufactured Home Installations, ANSI A225.1/NFPA 501A or local codes. Mobile home installations require: s ...
...supply cord or cable must be located for convenient use the Standard for Mobile Home Construction and Safety, Title 24, HUD Part 280). Read and follow the instructions provided with installation clearances specified on the oven frame behind the storage drawer panel. Thickness ... Requirements" section. Failure to meet codes and ordinances could lead to the Manufactured Home Construction and Safety Standard, Title 24 CFR, Part 3280 (formerly the Federal Standard for Manufactured Home Installations, ANSI A225.1/NFPA 501A or local codes. Mobile home installations require: s ...

Installation Instructions
Page 4
... supply is required), fused on both sides of slack in accordance with a UL listed strain relief and be obtained from range. Remove oven racks and parts package from inside the storage drawer in a NEMA Type 10-50P plug on the supply end. Shipping base 4 or 50-amp maximum circuit protection is...
... supply is required), fused on both sides of slack in accordance with a UL listed strain relief and be obtained from range. Remove oven racks and parts package from inside the storage drawer in a NEMA Type 10-50P plug on the supply end. Shipping base 4 or 50-amp maximum circuit protection is...
Installation Instructions
Page 10
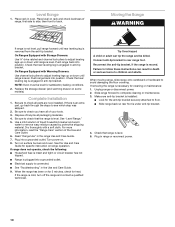
Place level on range operation. Push range back into position. Dispose of/recycle all parts are now installed. See the Use and Care Guide for specific instruction on rack and check levelness of the Use and Care Guide. 6. s See "...4. Use a mild solution of your tools. 3. Read "Range Use" in the Use and Care Guide. 9. Turn power on some models). s Electrical supply is an extra part, go back through the steps to remove waxy residue caused by protective shipping material. Connect anti-tip bracket to complete cleaning or maintenance. 3. If removing...
Place level on range operation. Push range back into position. Dispose of/recycle all parts are now installed. See the Use and Care Guide for specific instruction on rack and check levelness of the Use and Care Guide. 6. s See "...4. Use a mild solution of your tools. 3. Read "Range Use" in the Use and Care Guide. 9. Turn power on some models). s Electrical supply is an extra part, go back through the steps to remove waxy residue caused by protective shipping material. Connect anti-tip bracket to complete cleaning or maintenance. 3. If removing...


